Tips and Tricks
There are a few rules that must be followed when sculpting:
- The object to be sculpted should have the same properties as an object that can be used in a Subdivision Surface object: Ideally consisting of four-sided, preferably square polygons that are spread evenly across the object (including edge loops, with which you are already familiar from character modeling). If the object is set up accordingly, you won’t run into any unpleasant surprises such as parts of the model containing too few polygons. Even though N-gons are supported they are not well-suited for use with Sculpting because they generate poles when subdivided, which can in turn cause problems when sculpting.
- Also make sure that the size of the polygons on the object to be sculpted does not differ too greatly. For example, if you have created highly detailed parts on your model (prior to sculpting) you might run into problems when subdividing the object for sculpting because too many polygons will be created (e.g., if you have tens of thousands of polygons around the corners of a character’s eyes your sculpting won’t benefit from this and your computer will probably become bogged down – each subdivision quadruples the number of polygons).
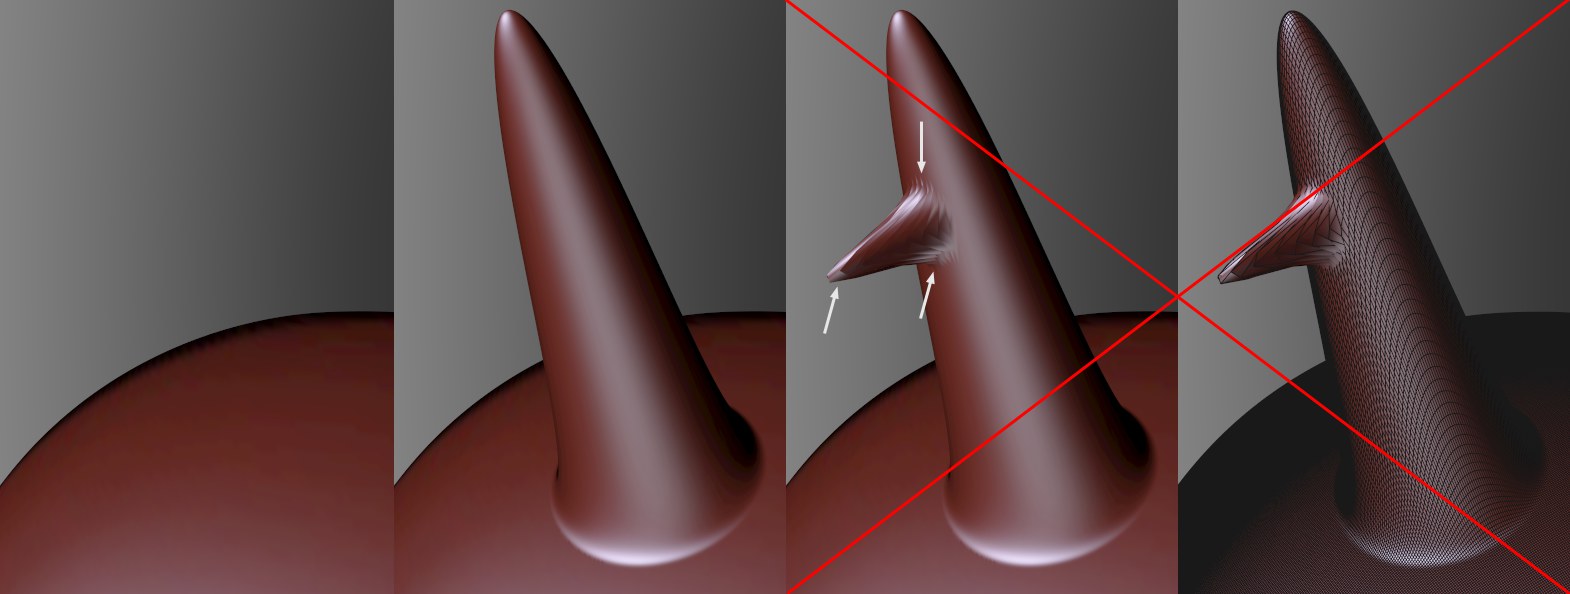
- Even if it looks like you can create any shape at all using a highly subdivided sphere you should always keep in mind that you are modifying a mesh - albeit a highly subdivided one. Therefore, we don’t recommend using shapes like the one below:
 Extreme protrusions (note the wireframe at right) are very difficult to edit.
In the example above, a spike was created using the Grab brush by pulling it from the surface. The problems start when you try to pull a secondary spike from the original spike, as shown at the right of the image, and you exceed the limits of subdivision. The original object should correspond roughly to the shape of the final object since "sculpting around corners" as shown in our example is very difficult to do.
- Use the Smooth brush (
Shift key with any other brush) often. Many times a brush’s effect will be too strong or too "extreme" and this can be gently corrected using the Smooth brush (with a low Pressure setting). Extreme polygon distortion can also be "eased" using this brush.
- The suggested workflow for shaping characters: -> Roughly model the character
-> Sculpt
-> bake (in order to continue work with the low-res object; all details will be included when rendered)
-> rigging
-> texturing
-> animation
You can, however, continue to sculpt at a later point – but with several limitations.
Proceed as follows if you want to sculpt objects that have already been rigged (i.e., with Joints, Weights, etc.) and/ or animated:
- Select the rigged mesh (the following list also applies to shapes with Deformers that you want to sculpt).
- Make sure that the object is in an unsculpted state. All Deformers, Subdivision Surfaces, etc. should be disabled.
- Click on the Subdivide button several times and start sculpting.
- Select the Sculpting tag and enable the Freeze and Allow Deformations options
- Enable all Deformers and Subdivision Surfaces that were disabled (if the object is sculpted again these do not have to be disabled - only the Freeze option must be disabled). Deformations and animations will work.
The following limitations apply:
– Weighting cannot be modified on an animated character. Weighting must be completed prior to sculpting.
– Phong tags will take effect once the Freeze has been enabled.
– When sculpting, none of the object’s tags should be deleted or re-arranged and none added.
- Due to the comparatively high demand on memory that Sculpt objects with a high subdivision have, it is generally recommended that the number of Sculpt objects with more than 1 million polygons be restricted to one per Project and to avoid having numerous Projects containing such objects open concurrently. Memory usage will remain minimal if you only edit one Sculpt object at a time. Of course this recommendation has its leeway depending on the computer’s capacity and the subdivision of the Sculpt object.
- Remember that when rendered in the Picture Viewer, the Project will require double the amount of memory (if the Project itself is open in the Viewport). Rendering to the Render Queue might be a better solution. You should also use the Bake Sculpt Objects function and preferably render the baked Sculpt objects (and not the objects themselves).
- If you want to shape objects under a single Cloner object and all objects’ deformations should be shown in real-time, make an instance of the Sculpt object and make it a Child object of the Cloner object.
- Note that the interactivity will slow dramatically when Sketch and Toon’s real-time display of lines (Show Lines) is used simultaneously (Sketch and Toon render settings’ Editor Display menu). Disable the <Show Lines while you’re shaping.