Material Menu
Creates a Material tag for each selected object. Each of these tags is assigned the selected material. You can also apply materials using Drag & drop. If you drop the material on to an existing Material tag …

… the tag’s previous material is replaced by the new one. However, if you drop the material onto the object’s name, a new Material tag is created for the material.
These commands redraw the thumbnails of the selected materials or all materials.
Most of the time you will not need to use this command because new materials are rendered automatically. However, when you save a scene, the thumbnails are compressed to reduce the scene’s file size. When you load a scene, you may notice artifacts in some of the thumbnails. In such cases, use this command to redraw the thumbnails. You will also need to use this command when importing foreign data formats such as DXF and 3D Studio R4.
To abort the rendering of the thumbnails, press the
Arranges the material list in alphabetical order.
You can also sort materials manually using Drag & drop. Drag the material that you want to reposition and drop it in the new position. The insertion is right-justified. In other words, the material will be placed to the right of the material onto which you drop it. If the target position of the material is outside the visible range of the Material Manager, you can scroll by moving the mouse pointer to the upper or lower edge of the window.
 The layers in the Layer Manager and the Material Manager will correspond.
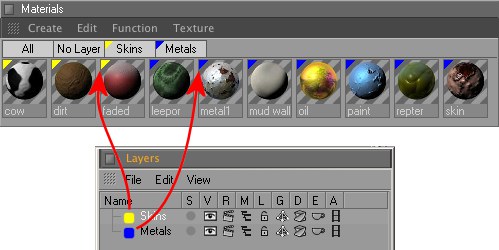
Cinema 4D’s layer system also encompasses materials. If materials are assigned to layers in the Object Manager via the Layer Manager the corresponding layer name will also be displayed in the Material Manager.
Alternatively a new layer can be created in the Material Manager using the Add to New Layer command. All currently selected materials will be assigned to this layer. The layer color will be displayed as a small triangle at the top left.
Cinema 4D’s layer system lets you quickly organize materials for an easy overview. Clicking on the corresponding tab will display all materials assigned to a given layer. Multiple tags can be selected at once.
To move materials simply Drag & drop them onto a different layer: Drag the material(s) onto a different Material tab. Furthermore, the tabs All and No Layer are available. Selecting the All tab will display all materials contained in the scene. Selecting No Layer will display all materials not assigned to a layer. To rename a layer simply double-click its current name and enter a new name.
When copying materials into a new scene, any assigned layers will also be copied.
A material will be assigned to a specific layer.
A new layer will be created to which the material will be assigned.
Removes a material from any layer to which it may be assigned.
What does this function do?
Suppose you have exported a scene from your CAD package complete with various materials. You import the scene into Cinema 4D. You then decide that you want to replace the materials with better quality Cinema 4D materials — that’s exactly what this function does.
First you need a Cinema 4D reference scene that contains all the new materials you want to use in place of the original materials. Note that these new materials must be named exactly the same as the original materials they are to replace.
When you call the function, you will be prompted to select this reference scene. After doing so, you can then choose to replace either all like-named materials or you can opt to replace specific materials only, in which case a dialog will appear, allowing you to choose exactly which materials will be replaced.