Material Manager
![]()
Create Menu
Edit Menu
Texture Menu
View Menu
Selection Menu
Material Menu
Material Properties / Material Editor
Extensions
Material Nodes
Good materials are every bit as important to photorealism as good modeling. Using the Material Manager, you can accurately recreate any type of material.
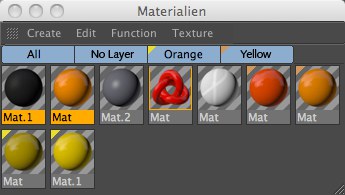
A thumbnail is displayed for each material, which, by default, shows how the material looks when placed on a sphere in front of a striped background.
You can change the size of the thumbnails using the following commands on the Material Manager’s Edit menu: Mini Icons, Small Icons, Medium Icons and Large Icons.
When you select an object in the Object Manager, the thumbnails of materials it uses appear depressed in the Material Manager. If you select an individual Material tag, only the thumbnail of the material
that is used by this tag appears depressed.
To apply a material to an object, drag the material’s thumbnail from the Material Manager and drop it onto the desired object in the Object Manager or viewport. If you drop a material onto a Material tag, this material replaces the previous one.

If instead you drop a material onto an object name or onto an object in the viewport, a new Material tag is created. An object may have multiple Material tags, in which case the textures are layered one on top of the other. The right-most Material tag in the Object Manager is the top layer. Of course the Node Materials also offer numerous possibilities for stcking effects in layers (in doing so, multiple materials do not have to be assigned to the material - this can be done using a single Node Material.
In addition to any materials that are active, you can also select materials. The names of selected materials are displayed in red. The Material Manager’s commands operate on the selected materials only.
To edit a material, double-click its thumbnail. This opens the Material Preview window, which has its own preview picture. You can also edit the selected materials in the Attribute Manager. You can access many of the commands for materials via the context menu. To access this menu, right-click (Windows) or Command + click (Mac OS) a thumbnail. To delete a material, click its thumbnail and press Backspace or Delete.
Even after deleting a material, the mapping data for the Material tag is preserved.
Active materials (drag a selection window or Shift+click (from-to selection or Ctrl+click to add or remove selected items)) can be moved (also to other layers) via drag & drop.
Multiple selection and the Reflectance channel (only Physical material)
Very complex reflectance settings can be defined in the Reflectance channel. Until now (pre-R18) the Reflectance channel’s settings were not displayed if multiple materials were selected, which meant that no common values/settings could be defined.
This now works if the conditions described below are met: when a material is selected, all other materials with the same Reflectance channel structure will be marked with a small rectangle:
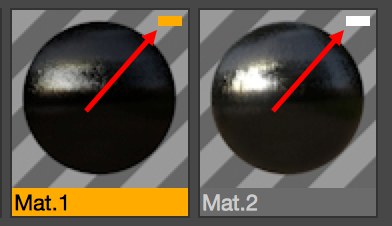
These materials can then be edited simultaneously in this channel when they are all selected (in the
The same number identical type of layers (Beckmann, Oren-Nayer, Lambert (Diffuse), Anisotropic, etc.) must exist in the same order. Then a common editing in the Material Editor or Attribute Manager can take place.
If the sequence or type or count differ, the settings will not be displayed.
If you press the Alt key while dragging and dropping a material and drop the material onto another material, the latter will be replaced by the material dragged onto it. By pressing both Alt and Ctrl keys the latter material will be replaced by a copy of the material dragged onto it.
The same applies to materials dragged from the ![]() Content Browser...
Content Browser...