Tag Properties
Defines globally if Ghosts should be created for Motion Clips of a given object hierarchy. Disable this option if you do not want Ghosts to be shown for any Motion Clips of a given Motion System tag. This will override the same option in the Motion Clips themselves.
Enable this option if you want to display an animation path for the object to which the Motion System tag is assigned.
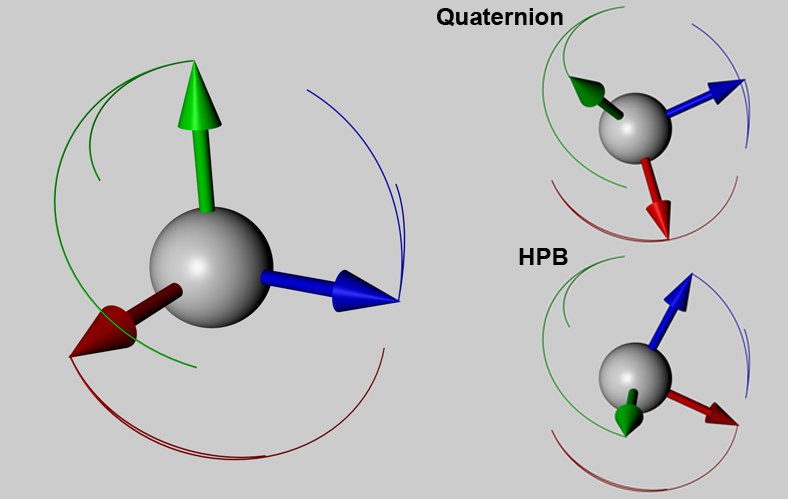 An example of rotation with both mix modes. One Motion Layer is animated from a rotation of 0°, 0°, 0° to 15°, 30°, 45° and mixed with another Motion Layer from 0°, 0°, 0° to 0°, 0°, 0° (this example is the simplest method with which to demonstrate this process).
If this sounds a little complicated to you, don’t despair - this function is of a mathematical nature and indeed quite difficult for a normal user to decipher. Suffice it to say that this parameter controls the mixing and rotation between Motion Layers.
The basic issue is as follows: At some point, Motion Layer 1 will, for example, have a HPB rotation of 10°, 10°, 10°, to which Motion Layer 2 will be mixed with values of 30°, 60° and 90° (both Motion Layers will have a strength of 100%).
There are basically two methods available with which such rotational angles can be mixed:
Each of the three rotational angles will be added individually. For our example above the result would be 40°, 70° and 100°. This method is best suited for animations of a technical nature.
The rotational angle as a whole will be interpolated. Our result in this instance would be 29.6°, 31.7° and 46.6°. This method is primarily suited for character animations. Details regarding Quaternion can be found under Quaternion Rotation.
This mode (which was the only one available prior to Cinema 4D R11.5) determines which mode should be used based on given factors. If all Tracks contain the three HPB angles and all Motion Layers are set to 100%, the Quaternions method will be used. Otherwise the HPB method will be applied.
Hence, if unwanted results occur for your animations you might want to switch to a different mode. Additional information regarding HPB rotation can be found here.
Clicking this button will create a new Animation Layer.
Transfers the resulting animation of all Animation Layers selected (via Shift or Ctrl, not by checking the box) in the list to the "Default Layer" (which is always present by default) and all selected Animation Layers will be removed. If no item in the list is selected when the button is clicked, all Animation Layers on the default layers will be collapsed and removed.
Opens the Timeline in Motion mode to the object to which the tag is assigned. All other objects will be hidden.
Opens a dialog window in which you can rename the selected Animation Layer, i.e., the layer that has a check mark next to its name. This button is only made available if a layer other than "Default Layer" is active.
Deletes the active Animation Layer. This button is only made available if a layer other than "Default Layer" is active.
Duplicates the active Animation Layer. This button is only made available if a layer other than "Default Layer" is active.
Resets the coordinates of the object to which the Motion System tag is assigned to the values defined by the "Default Layer". This is especially useful if you are using an Animation Layer to add detail to an animation. Let’s say you have a Motion Clip that defines a character walking through a room and this Motion Clip loops several times. At some point in the cycle you want to add a new movement (animation), e.g., a turn of the character’s head with the secondary movement of its shoulders and hands. First, create the new pose and place this new animation and the corresponding keyframes on an Animation Layer. Now go to the frame (time) at which the new animation should be faded out. Click on "Set to Zero" to remove any offset to the "Default Layer".
Animation Layers server to:
- Fine-tune existing animations without modifying original animation data (animation layers will be mixed).
- To "store" various selectable animations (for the same parameters). Only a single Animation Layer will be enabled at one time).
This list displays all existing Animation Layers for a particular Motion System tag. The layers will be evaluated from top to bottom. The "Default Layer" will always be located at the bottom of this list. All animations not explicitly assigned to a layer will be recorded on the "Default Layer".
At the far left is the check box with which a given layer can be activated/deactivated. Keyframes will always be generated for the currently active layer. To the right of each check box is the respective layer’s name (with the exception of "Default Layer") and a slider for adjusting the layer’s overall effect. Of course this slider value can also be animated.
To the right of the slider is the Animation Icon. Clicking this icon will disable/enable the Animation Layer.
To the right of the Animation Icon is the Solo switch, which can be activated/deactivated by clicking on it. Clicking on the gray circle will change its appearance to an orange one with a black "s" at its center. If this switch is activated only the animation on this Animation Layer will be calculated according to the "Default Layer" animation and subsequently displayed in the Viewport.
To the right is an icon that can shows whether the Animation Layer is absolute or relative. For more information, see ![]() Add Relative Animation Layer
Add Relative Animation Layer