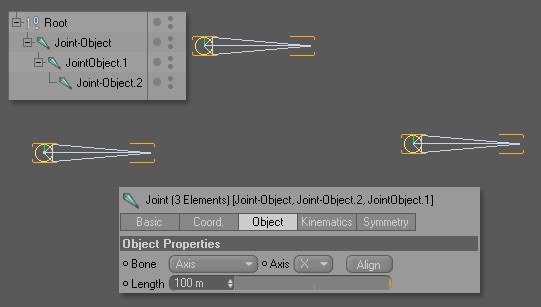
Object Properties
The settings on this tab control how joints and bones are displayed, including how bones are created.
Here you can choose where a bone starts and ends. Choose from these modes:
Switches off the display of bones. Joints are still visible but there are no connections between them. Joints do not deform the mesh in this mode although any weights assigned before switching to Null are preserved.
Draws the bone along a selected axis of the joint object instead of between two joints. As with bone objects, you can manually adjust the bone’s length. The weighting behaves exactly the same as in the To Child mode.
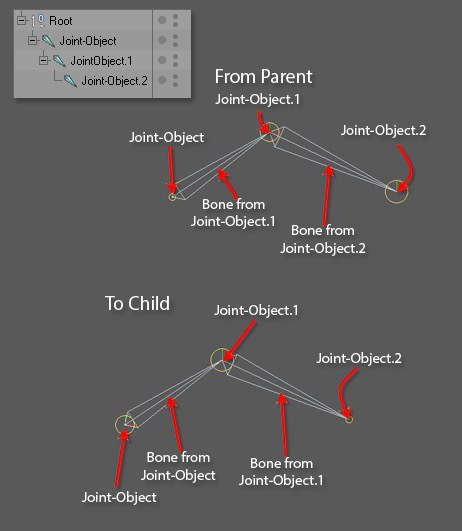
At first, these two modes seem almost identical. However, there is one very important difference: From Parent draws the bone backwards so to speak, from the selected joint's parent to the selected joint. To Child, on the other hand, draws the bone from the selected joint to its child.
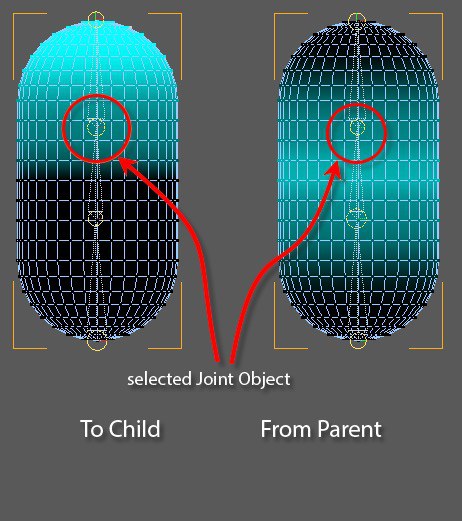
The weighting is also applied in these directions. In the next screenshot, you can see two identical objects, each weighted automatically in one of the two modes. Even though the weighting is different, you get the same result when rotating the selected joints.
However, keep in mind that you can get unexpected results when switching from one mode to the other if weighting has already been applied.
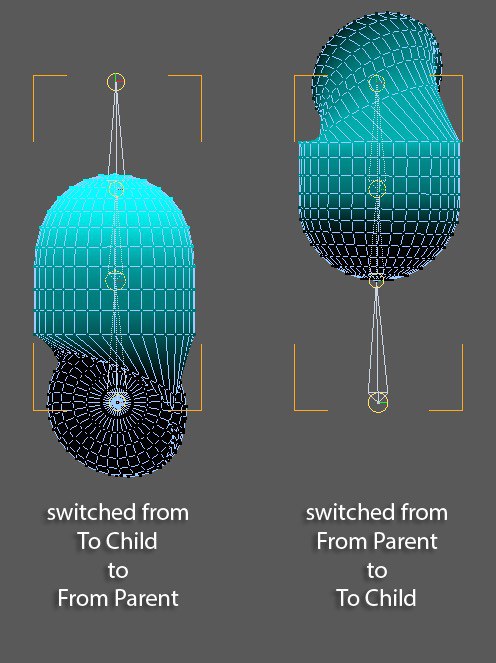
In other words, the two modes are not interchangeable and you should decide which mode to use before applying weighting. To Child is the default mode because it behaves in a very similar way to the bones objects in older versions of Cinema 4D with regards to weighting yet still offers the advantages of a joint-based system.
So why two modes? The reason is flexibility. Does it seem more logical to you to weight the bone before or after the joint? It's your choice. You can even mix several modes within the same rig.
In the From Parent or To Child mode, this defines which joint axis will be lined up with the length of the bone when you click the Align button. In these modes, it usually does not matter whether or not the joint object lines up with the bone because the bone is always drawn between the two joints regardless. But it can be useful to line up the axes when using the joints in an expression.
The Axis parameter works differently when Bone is set to the Axis mode. Here, the Axis controls the direction in which the bone points. Changing the Axis points the bone in a different direction, which in this case also changes the deformation of the mesh.
Lines up the selected Axis along the bone. This button has no effect in the Null mode, which has no bones, nor does it have an effect in the Axis mode, which by definition lines up the bone with the selected joint axis.
This setting also behaves differently depending on which mode is selected for Bone. In the Axis mode, it simply sets the length of the joint object. Nothing else changes. The deformation of the mesh is still the same.
The Length also sets the bone length in the modes From Parent and To Child. In From Parent mode, it sets the bone's length between the selected joint and its parent. In To Child mode, it sets the bone's length between the selected joint and its child.
With the From Parent mode, the selected joint moves to adjust to the new bone length. Joints move in both modes when you change the Length and the deformation is usually affected.
![]() Bone
Bone
Here you'll find all the display options for bones.
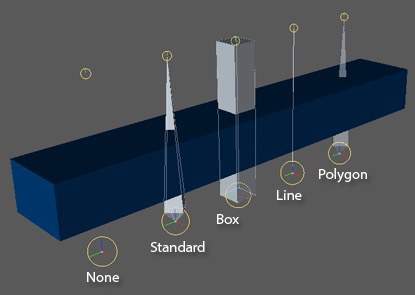
Defines how the bone is displayed. These options are for display purposes only and have no effect on how the mesh is influenced.
Hides the bones.
The bones are displayed as outlines if behind surfaces or as a mix of solid and outlines if the bones are partially hidden. This is the default mode.
Displays the bone as a box shape instead of the usual double pyramid; otherwise, it behaves the same as the Standard mode.
Displays the bone as a simple line.
Displays the bone as a polygon object that can be rendered and textured. The polygon object is usually the familiar double pyramid shape, or it's a box if the bone was already displayed as a box prior to switching to Polygon.
Lets you set the size of the bone. Choose one of two options:
Lets you set the size of the bone using the Size parameter.
Maintains a certain width to height ratio for the bone.
Allows you to change the size of the bone when the Size drop-down list is set to Custom.
![]() Joint
Joint
Here you'll find all the display options for bones.
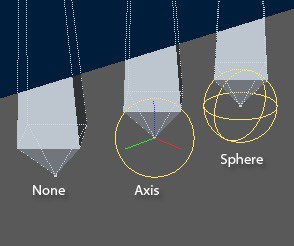
Offers three different options for displaying the joint object. These options are, again, for display purposes only and have no effect on how the mesh is influenced.
Hides the joint completely.
Draws a thin circle around the joint object's origin. The joint's axis system is also displayed. This is the default display mode.
Draws a sphere around the joint object's origin that helps to indicate the joint’s rotation. The joint's axis system is not displayed in this mode.
Lets you choose between two options which control the size of the circle or sphere displayed in the viewport for the selected joint.
Allows you to set a custom size for the joint's circle or sphere using the Size slider.
Links the size of the joint's circle or sphere to the bone’s length automatically.