Object Properties
Muscle objects have two different states, Edit and Animate.
Use this mode to create or edit anchors (to which your muscle is attached), muscle cage geometry and so on. The shape of the muscle will be displayed based on the selected state and the Length parameter.
Use this mode if you need to see the muscle in action. Here, the muscle shape will be based on its current length, so you can easily see how it will behave if you attachedit to animated joints, or if you need to see the dynamics effects. When in this mode, you can fine-tune the shape using the Shape spline, but you won't have access to the geometry of the muscle or its anchors.
This is where you define the shape of the muscle based on its length. There are three modes:
This mode should be the first you set up, since it will define how your muscle looks when it is not deformed or when it is in its relaxed pose. This is the neutral rest pose state.
This mode is used to define the shape of the muscle at its minimum length, or when the muscle is contracted.
This mode is used to define the shape of the muscle at its maximum length, or when the muscle is stretched.
You can assign the relaxed state shape to the other modes by simply holding the
Enable this option if you want to calculate the volume of the muscle automatically for the extended and compressed state, based on the shape set on the Rest state.
This parameter is used to set a precise length for each parameter. For example, if you want the muscle to be stretched at its maximum when it reaches 200 cm, then you can set it up here manually.
Use this command to set the length automatically based on the current length of the muscle. Once you have adjusted your anchors’ positions to fit your character, this should be the first command you run to set the length of the muscle in its relaxed state.
You need to use this command in the Compressed and Extended modes as well, if you want to shape them manually and not use the Auto Volume option.
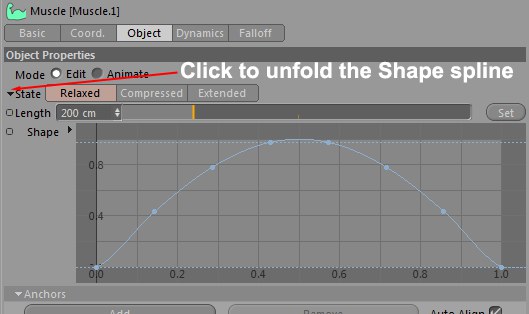 The Shape spline can be accessed by clicking the arrow next to the State parameter.
The Shape spline can be used to shape the profile of the muscle object. This spline can be edited while in Animate mode, which is pretty useful to tweak your overall muscle shape without having to go back to the Edit mode or edit the cage of the muscle object. It can also be animated, which lets you apply tweaks to your muscle to correct its shape all along the animation, or for special effects if you want to drive the spline with an Expression (a muscle twitching, for example).
![]() Anchors
Anchors
Anchors attach points of the muscle cage to a specific object so the muscle can move along with this object. A muscle can have multiple anchors, although it requires at least two (one for each end of the muscle).
Use this command to add an anchor to your muscle. By default, each muscle comes with two anchors (one for each end), but you can add more anchor points if the muscle needs to behave in a non-linear behavior. For example, using three or more anchor points can be used to simulate back muscles, which are anchored over a large area and should follow the curvature of the spine when it bends.
Use this command to remove the last anchor link (the anchor links hierarchy are read from top to bottom). This command will only remove the link but not the objects linked in the Object Manager.
If this option is enabled, the points attached to each anchor of the muscle cage will be automatically oriented based on the position of the muscle anchors. This option is useful to prevent the muscle from losing its volume when rotating its anchors because the points will always align with the muscle orientation.
Drag & drop the objects to which you want your anchors to be constrained. Your anchors will automatically follow the position and rotation of the objects in this field, similar to what the Parent constraint does. In most cases, you will want to use joints but attaching your anchors to Null objects instead will give you more flexibility.
Enable this option to rotate the points of the cage with the object specified in the link field, for each anchor.
Use this command to assign the currently selected cage points to the anchor.
Use this command to restore the point selection to the stored selection for that anchor, and resets the anchor data. Hold the
Use this command to select the points of the cage that have been assigned to the anchor.
Use this command to create a Null object and attach it to the anchor. You might need to manually set a new points selection for this anchor so it knows what part of the muscle cage it needs to influence.
![]() Geometry
Geometry
The muscle geometry is defined by a cage, much like a Subdivision Surfaces object. The cage points define a simple geometry shape that is then interpolated to give the actual muscle shape. This tab controls both the cage points parameters and the precision of the interpolation resulting in the final muscle shape.
Controls the amount of length segments for the muscle cage.
Controls the amount of rotation segments for the muscle cage.
Defines the amount of subdivision the interpolated muscle shape has. This generates the actual geometry of the muscle in the viewport, which can then be used by other generators or deformers, such as the Collision deformer.
![]() Transition
Transition
Use this spline to control the transition between each state, how each state will blend with the others.
![]() Deform
Deform
This section controls how the muscle deformer uses the muscle.
Controls the amount of subdivision used for the deformations. This is similar to what the Subdivision parameter does in the "Geometry" section but can be defined separately for deformations only (in case you want the geometry to be different than its actual deformations - to be used with other Deformers, for example). A higher subdivision value will slow down the muscle deformations, but will give more accurate results if the muscle cage is complex.
This parameter controls the deformation vector when the muscle intersects the mesh of the character. More-or-less how it will push the mesh.
This mode will push and pull the mesh based on a radial deformation around the muscle geometry.
This mode will push the polygons of the mesh in the direction of their Normals.
This mode will push the mesh based on a specific direction, defined by the position of a controller object (see Object, below).
This parameter allows you to set a gap between Muscle object and mesh to deform.
Drag & drop the object you would like to use as Up Vector for the Direction parameter. The muscle will always push the mesh toward that object.