Object Properties
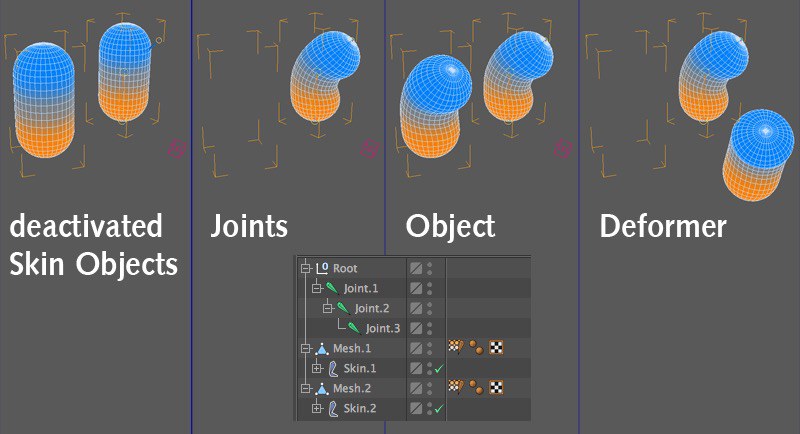
Defines which coordinates are used for deforming the character. Unlike the old bone objects, joints do not have to be placed inside the character.
Uses the character's coordinates. If you move the character away from the joints, then switch on the skin object, the character stays where it, still away from the joints. The deformation itself is not affected. The character still deforms as expected, except that the character is in a different place to the points. One advantage of this mode is that you can animate the character standing next to its virtual skeleton. This makes it easier to animate the character in some cases.
Another advantage is that you can animate multiple characters using a single rig. Suppose you want several dancers to perform the cancan. Starting with just one dancer, copy the dancer's mesh several times, including its Weight tag. Don't copy the joints. Move the dancers apart in the viewport to form a row. Make sure that the skin object can affect all the dancers (group all the mesh together with the skin object inside a null) and set Coord to Object.
Now you can control all the dancers at the same time using one rig. You can change the position, rotation and scale of the individual characters as desired.
Uses the joint's coordinates. This option corresponds to the behavior of the old bones system. When you activate the skin object, the character will jump if necessary to ensure it is in the same position as the points, even if the non-deformed character is in a completely different place to joints.
Uses the skin object's coordinates, but otherwise it is very similar to the Object mode. As with the Object mode, you can control multiple characters using a single rig, except that each character must have its own skin object as a direct child. You can then move the skin objects around in the scene to control the position of each characters.
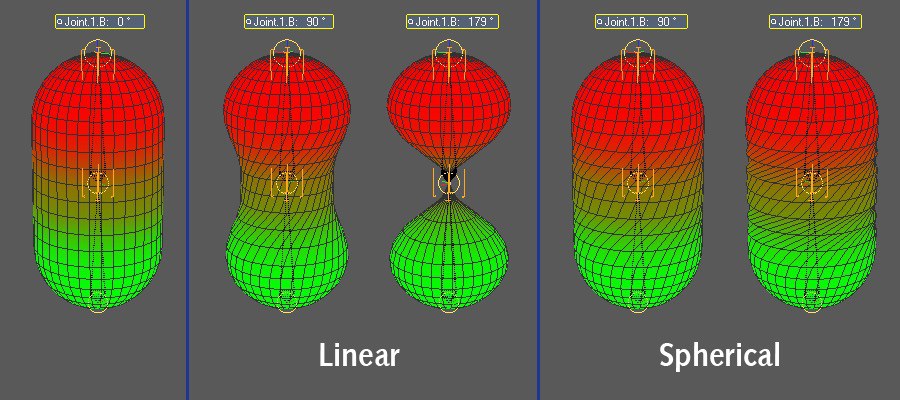
Here you can choose which method is used to deform the mesh.
Deforms the mesh in a similar way to the old bone objects. Linear is the fastest method available, but in some cases it can cause the geometry to shrink in the direction of the joint axis when you rotate the joints through large angles.
Takes slightly longer to calculate than Linear but it can avoid the shrinking problem associated with Linear. The difference between the methods is clear to see when you rotate along the B axis, as shown in the next picture.
Allows you to mix the Linear and Spherical methods together as desired. Keep in mind that you can get a different result when changing the method for a mesh that has already been weighted. Therefore, in general, decide which method you want to use before weighting the character.
There are, however, cases where it can be useful to switch the method for an already weighted character. For example, suppose you've weighted a character with the method set to Spherical. To speed up animation in the viewport, you can switch the mode temporarily to Linear, then switch it back to Spherical before rendering.
This setting lets you select one of two types of Deformer calculations. If, for example, you change the position of a Joint instead of rotating its Parent Object the difference between these two options can be seen. Otherwise the difference will generally not be noticeable.
Select this option if you notice strange deformations occurring on a character that was weighted using Release 10.0. This function is only backwards compatible with Release 10.0.
This option is designed to work with Release 10.5 and reflects the standard procedure other applications use to deal with this situation.
Use this setting to define how a Skin Object should behave if bones are stretched or compressed (squashed) beyond the values defined for the initial state in the Weight tag. This lets you create a squash and stretch effect, as is often done in traditional animation.
If an option other than None is selected, that option will override the squash and stretch settings of individual IK tags. If you want to use different values for individual areas, the IK tag settings must be used.
The following options are available:
The Skin Object will not be squashed or stretched. Select this option if you want to define the squashing and stretching of an IK tag.
Uniform Scale
Bone Scale
Volume Scale

The effect of the various options can be seen in the image above. The Volume Scale setting reflects the effect most commonly used in traditional animation.
Defines how the Linear and Spherical methods are mixed together when Type is set to Blended. A value of 0% corresponds to the Linear method, a value of 100% corresponds to the spherical method.
You can optionally create a vertex map and Drag & drop it into this field. The vertex map will then control how the two methods are mixed together. A vertex with 0% weighting corresponds to the Linear method, a vertex with 100% weighting corresponds to the Spherical method.