Effector
Use this slider to adjust the distance of the clones from the spline: A value of 0% means the clones will not approach the spline; a value of 100% will place the clones directly onto the spline (in so far as no other settings oppose this action).
If you want various splines to blend into one another, make sure the start and end points of the clones and spline lie in very close proximity of each other. Otherwise, an unwanted overlapping of clone movements could result.
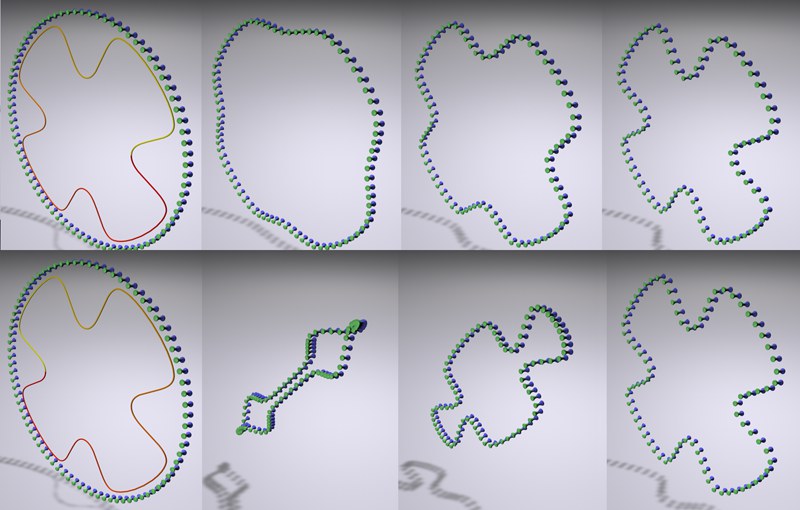 From left to right: Increasing Strength values. In the top row, clones and spline match (start and end points lie very close together); in the bottom row, clones and spline are twisted in opposing directions.
There are three modes from which to choose. They have the following properties:
The clones will be placed with equal intervals onto the spline.
In this mode, the position of each clone is primarily dependent upon the Effector’s falloff setting. Depending on the size of the falloff value, the clones will flow along the length of the spline. This works especially well in conjunction with the Linear falloff type and a maximum falloff value.
If the clones have irregular intervals between them in the X, Y or Z directions before the Effector has taken effect, these irregular intervals can also be retained, proportionally, by the clones arranged on the spline.
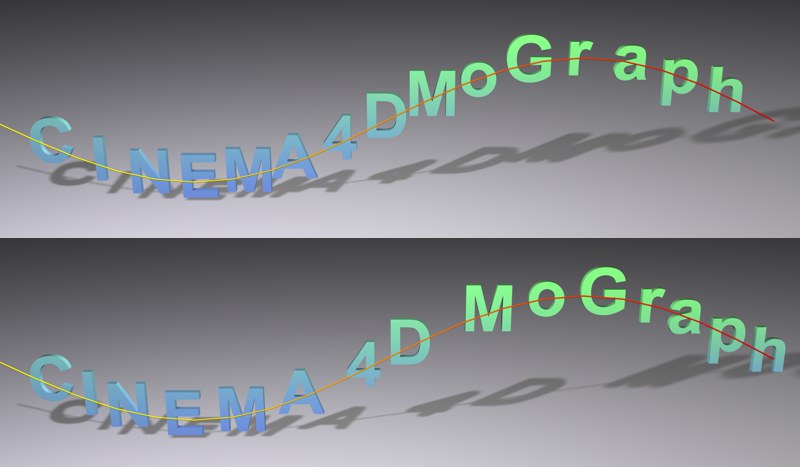 A MoText object with an Effector in the Letters tab. At top: Step mode. At bottom: Relative mode.
This is especially useful when working with text because the relative letter spacing will be maintained (only works with single-line text).
Drag a Spline object or Tracer (see Tracer) from the Object Manager into this field.
Here you can manually define an Up Vector. This will, in principle, prevent Clones from rotating 180° when used in conjunction with certain spline constellations.
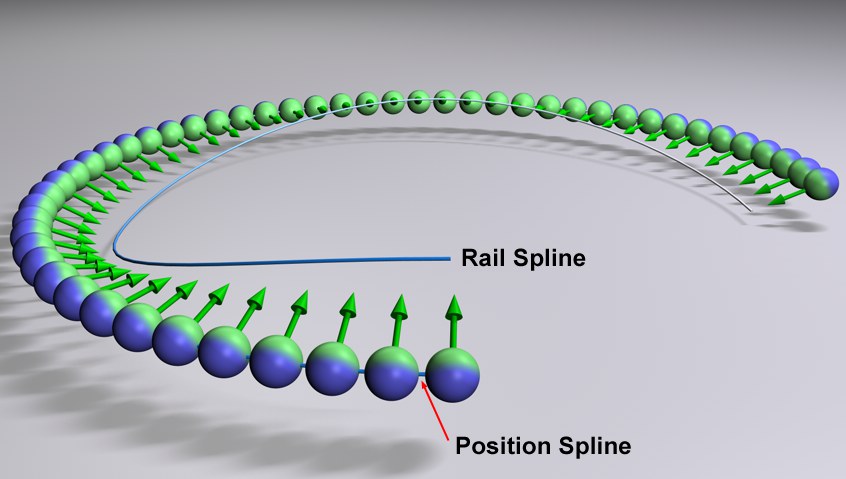
Drag a Rail Spline into this field. If Target Rail is enabled, the Clones will point along their Y axis to a corresponding location along the Rail Spline (otherwise the Clones will orient themselves as accurately as possible). The point to which the Clones will be oriented depends on the position of the Clone along the Spline to which it is aligned. Clones positioned at the beginning or end of the Spline will orient themselves in the direction of that respective end. Clones positioned in-between will orient themselves in accordance with their distance from the end to which they lie closest.
When using Splines with multiple segments, only the first segment will be used.
Use this option to enable or disable the Clones’ rotation around the X axis. They will then only rotate around their Z axis, which can end up preventing the Y axis from pointing in the correct position, as described in the above option. This is why this option only works in conjunction with the Rail Spline.
If Strength is set to 100%, modifying Offset will make sure the clones wander along the spline. Lesser Strength values will produce interesting effects.
This is the most important setting when it comes to letting clones wander along a spline.
Every spline has a starting point and an ending point (these are colored yellow and red on splines made editable in point mode). Use the Start and End settings to define the area of the spline on which the clones should be arranged. If Start is set to 0% and End to 100%, the clones will be arranged along the entire spline.
If raising the Strength setting results in an intersection of clones, i.e., the first clone lies on the end of the spline and the last clone on the start of the spline, it often helps if you simply invert the positions of the Start and End sliders.
If an Offset value not equal to 0% has been selected, this setting determines whether clones that land on a spline’s start or end points should stay there, or appear on the opposite end of the spline.
If splines consisting of several segments are used, these settings define the clones’ behavior on the splines. The following settings are available:
The segments are numbered (internally), starting at 0. The Segment setting can be used to define a single segment to be used.
The clones will be distributed equally across all spline segments, their intervals remaining constant per segment
Clones will be distributed randomly across all spline segments. The random distribution can be varied by modifying the Seed setting.
The Clones will be positioned in equal intervals along the Spline and the intervals along all segments will remain constant regardless of the segment length.
Use the Segment setting to define which spline segment should be used exclusively (Use Index mode only).
Use the Seed setting to randomly vary the dispersion (only in Random mode).