Parameter
You can influence particles based on an object’s motion.
Drag the name of the object whose motion should influence the particles from the Object Manager and drop it into this box.
Inheritance [-∞..+∞%]
Variation [0..100%]
Determines how strongly the object’s change in position affects the movement of the particles. Higher values create a more accurate response, as though the particles are attached to the object. However, as soon as the object stops moving, the particles can move freely once more. You can vary the Inheritance value using the Variation parameter.
Rotation Inheri. [-∞..+∞%]
Variation [0..100%]
Determines how strongly the object’s rotation affects the rotation of the particles. The particles will be rotated about their own axes. You can vary the Rotation Inheri. value using the Variation parameter.
Adds variation to the direction in which the particles move, helping to create a more natural, less uniform effect.
Use Type to choose how the object’s motion will influence the particles.
All particles will be affected in the same way regardless of their positions in 3D space.
A virtual sphere or cylinder is placed at the chosen object’s origin. Only those particles inside the sphere or cylinder are then affected.
The size of the sphere is defined by the Radius value. The axis along which the cylinder is aligned is determined by the Cylinder Axis setting. Set the height of the cylinder using the Cylinder Height parameter.
Use the Distance Gradient or Cylinder gradient to define how the influence of the effect changes within the virtual sphere or cylinder.
Distance Gradient
Cylinder Gradient
Cylinder Height [0..+∞]
Cylinder Axis
When Type is set to Sphere, the Distance Gradient defines the influence of the effect on the particles according to how far away they are from the center of the sphere. The left edge of the gradient represents the center of the sphere, the right edge its surface. The brightness of the gradient acts as a multiplier for the effect.
If Type is set to Cylinder, the Cylinder Gradient controls the influence of the effect along the length of the cylinder. The left edge of the gradient represents the center of the cylinder, the right edge the caps. Thus the settings are mirrored. The brightness of the gradient acts as a multiplier for the effect.
To create a knot, click in an empty area below the gradient and a knot of the color at that position will be added. To change the color of a knot, double-click it and choose the desired color using the system color dialog. To remove a knot, Drag & drop it away from the gradient. The small diamonds on the gradient are bias handles and they pull the interpolation of the color knots from side to side for more control over how the gradient changes.
This gradient will control the influence with respect to the distance of the particles from the Cylinder Axis. Higher (brighter) values will result in a force pushing the particles towards the chosen axis. You can easily create a vortex using this parameter.
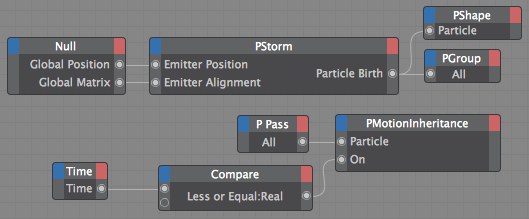 In this example the influence of the PMotionInheritance node is animated over time.
Additional input ports:
A Boole value of True switches the node on; a value of False switches it off.
Since the node’s parameters can be keyframe animated, by default the Cinema 4D time is used internally to ensure that the values are interpolated correctly. However, you can pass your own time value to this port. This should be of the data type Time, which is a Real number in the simplest case. If no value is passed, Cinema 4D’s time is used.
Connect this port to the stream of particles that should be influenced by the object’s motion, such as to the Particle output port of a PPass node.