Object Properties
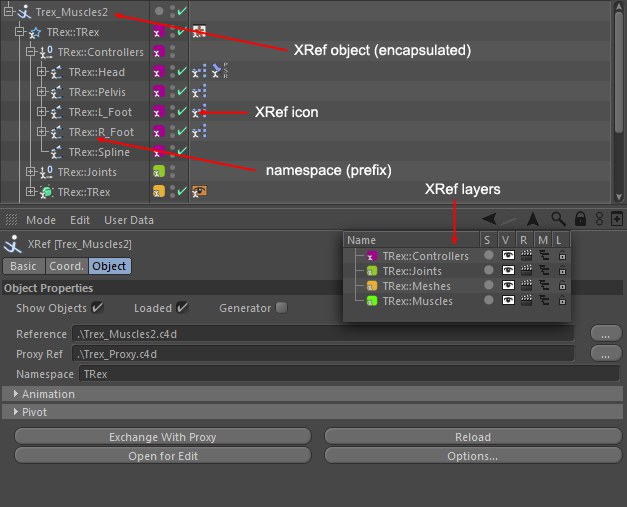 The default icon for each referenced object, has an XRef icon assigned to it. The XRef icon is assigned to objects, tags, materials and layers.
Use this Option to show or hide the hierarchy of objects in the Object Manager, encapsulated in an XRef Object. This option won't affect their visibility in the viewport.
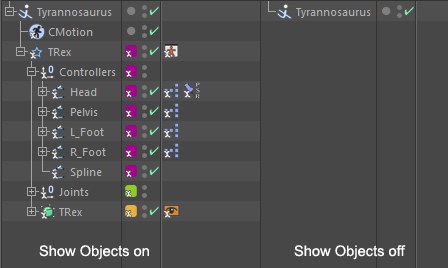
Use this Option to load or unload the objects linked to that XRef object from the scene. This is useful to keep the master scene file size to a minimum, while not losing the changes you made to the referenced objects.
When objects are unloaded, they also disappear from the viewport.
The XRef icon will turn red (also when you create a new, empty XRef object):

XRef objects can now be defined as Generators. No individual objects will then not be imported into the master Project and the XRef object will quasi instance the reference Project (as was done with older XRef projects). This lets you keep the master Project’s file size to a minimum. The disadvantage: Individual objects can no longer be modified, linked to Expressions or animated within the master Project. The XRef object itself can, however, still be animated or deformed.
Enabling the Generator option will make various settings animatable.
Reference, Proxy Ref and all settings in the Animation tab can be animated. This lets you replace referenced Projects or modify the timing.
Caution: Enabling this option will reset the XRef object completely. All modifications made in the master Project will be lost!
Use this option to select the reference scene. Absolute (e.g., c:/Files/hubert.c4d) or relative (e.g., hubert.c4d) paths can be defined. If the latter is defined the reference scene will be searched for according to Asset Path rules (see here). We recommend you save master and reference scenes to the same directory and to the same layer (which, by the way, is done automatically when the Save Project command is executed).
A master scene’s objects or materials can be parted to reference scenes using the
The XRef Object will assume the name of the reference file (as long as the object has not been manually renamed in the Object Manager). For example, if the reference file is named Hajopei.c4d the XRef Object will also be named Hajopei. This lets you quickly see which file is referenced by which object.
Clicking the load button next to the Reference link, you can load a reference scene. Upon selection of the scene, you will be asked if you want to Update (yes) or Replace (no), the referenced scene. The difference here is that if you update the scene, any changes you made to the referenced objects (you moved a referenced object in the master scene, for example) will be kept when reloading the referenced file. If you decide to replace the referenced scene, any changes made to referenced objects in the master scene will be lost, resetting the referenced objects to their initial state.
Similar to the Reference link, use this option to load a scene that you would like to use as proxy for the selected XRef. A proxy scene is usually a scene that is a simplified version of your final reference. It makes handling the master scene easier by giving you the option of using a lower polygon count version of the XRef file, for example. Note that any scene can be used as a proxy. It doesn't even have to be the same scene optimized/simplified, they can be completely different if you wish.
Use this option to add a prefix to the objects contained in the XRef object. All objects within its hierarchy will take that prefix, making it easier to see which XRef an object comes from. Especially useful when you don't want to use encapsulated XRefs. Just type the name you would like to use, and press Enter to validate the changes.
However, note that internal, hidden Selection tags (as with the Extrue object C1 for the caps surfaces, for example) WILL NOT be renamed and the material assigned via the Material tag (Selection) will not be projected correctly.
![]() Animation
Animation
This tab contains numerous animation settings for a (selected) XRef object.
This option enables or disables XRef objects’ animations. This option is a global switch for the selected XRef object to speed up work with the Project or to isolate a single animated XRef object. Note that this option does not switch any procedural animations or Dynamics animations - only those animated using keyframes (i.e, the same behavior as the Animation option in the XRef’s Import menu).
If the neighboring Animation option is enabled, a Frame can be set. Using these options you can enter a specific animation frame number that will serve as the default state (the animation itself will not play!). This can, for example, be used to import the same character into a scene multiple times but in different poses; or you can import a tree that is animated using animated Deformers. Each new XRef object can look slightly different.
Use this setting to temporally offset the animation of a referenced Project. This can also be used to import a single character multiple times. Different Offset values can be used to move the character differently. Note that negative values can also be used to play the animation earlier.
Use this setting to scale an animation temporally, i.e., make it play more slowly or faster. This value serves as a multiplier, e.g., if your animation is 100 frames long and you enter a Scale value of 0.5, the animation will be 50 frames long (twice as fast). A value of 2 will produce an animation 200 frames long and so on. This method can be used to quickly adjust an animation’s timing so no actual keyframes have to be edited.
![]() Pivot
Pivot
This tab contains settings that affect the XRef pivot axis (or put differently: the referenced Project’s world origin). All of the following parameters affect the pivot starting at the Project’s original position, scale and rotation. This lets you, for example, import the same Project multiple times, each time with a different pivot point. This positions the referenced objects differently without actually moving the XRef object itself.
Note that the referenced objects are affected and the pivot/axis of the XRef object itself will maintain its original coordinates in the master Project.
Use this setting to move the position of the XRef pivots (i.e., for individual objects).
Use this setting to scale all objects in the XRef object, as if the XRef object itself were being scaled.
Use this setting to change the XRef pivot’s rotation. This will rotate all referenced objects as a whole.
Exchange with Proxy / Original
Click on this button (which is named either Exchange With Proxy or Exchange With Main, depending on the Project loaded) to swap the referenced Project with the Replacement Project or vice-versa.
Use this option to refresh/reload the referenced and proxy scenes.
If the
Use this option to open the reference scene separately, to edit it directly.
Use this option to open the "Add XRef Options" window for the selected XRef. For more information, see the ![]() Add XRef...
Add XRef...