Options
You can select from Linear, Circle and Along Spline modes.
This option defines whether the values for Position and Rotation apply from one object to the next or from the first object to the last. For example, suppose you have selected three spheres and set the Position Y value to 300. If Per Step is enabled, the first and second spheres will be 300 m apart; the second and third spheres will also be 300 m apart; and the first and third spheres will be 600 m apart.
If the option is disabled, the first and last third spheres will be 300 m apart with the second sphere midway at 150 m.
![]() Position
Position
Here you can define whether and how the selected objects will be spatially arranged. The arrangement will start from the position of the first selected object in the Object Manager. The other selected objects will be moved away from this starting position. The directions refer to the world coordinate system.
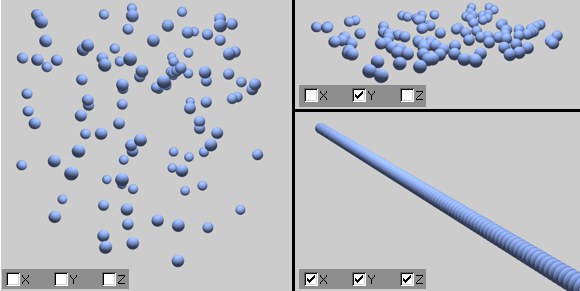 Arranging a wild cluster of Clones using the Arrange function.
Depending on in which directions you want the objects to be moved, enable the X, Y or Z options and enter the movement values for these axes into the Move boxes.
For example, if you want to place all objects in an object group onto a plane, enable the Y option and assign it a value of 0. All objects will then be set to the same height as the first selected object.
![]() Scale
Scale
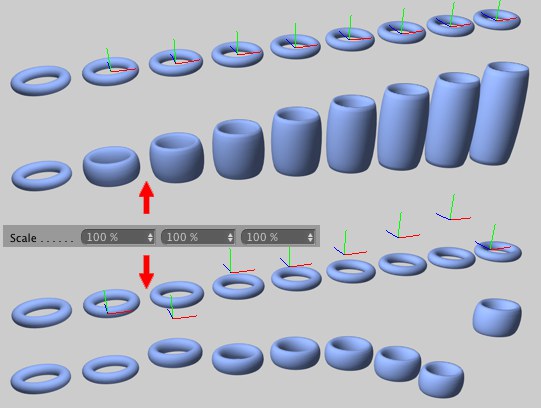 Scaling with the origin at the object center (top) and away from the object center (bottom).
Enable Scale controls if the objects will be scaled.
Each object will be scaled towards or away from its origin. Therefore, ensure that each object’s origin is in the object’s center.The Scaling starts with the first object selected in the Object Manager (this object stays the same size). The other objects will be scaled uniformly according to the Scale value, which either defines the change in scale between each selected object (Per Step enabled) or between the first and last selected objects (Per Step disabled — the value will be interpolated for the objects between the first and last objects).
![]() Rotation
Rotation
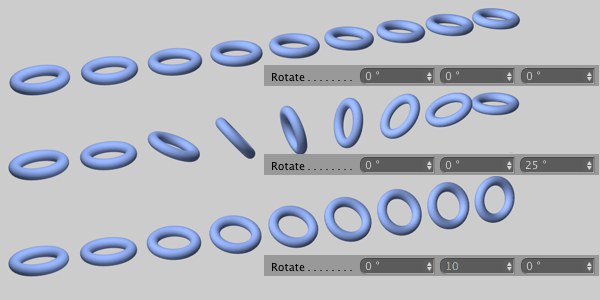 Various Rotate values with Per Step enabled.
If this option is enabled, the rotation angle of the selected objects can be varied. Depending on whether or not Per Step is enabled, the angle will either be increased additively from the first object’s angle on (e.g., 1st object 0°, 2nd object 10°, 3rd object 30°, etc.) or the angle will apply to the last object and the angle values for the intermediate objects will be interpolated.
Objects will rotate around their respective object axes.
The spiral staircase in the example below was created by moving the origin away from the object center.
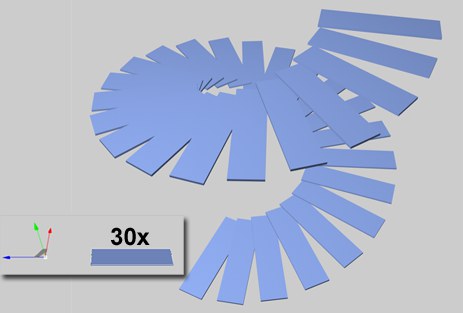 A spiral staircase achieved by moving each object origin away from the object’s center.
Enter X-, Y-, and Z rotation values here.
In this mode the selected objects are arranged along a virtual circle.
This option defines whether the values for Position and Rotation apply from one object to the next or from the first object to the last. For example, suppose you have selected three spheres and set the Position Y value to 300. If Per Step is enabled, the first and second spheres will be 300 m apart; the second and third spheres will also be 300 m apart; and the first and third spheres will be 600 m apart.
If the option is disabled, the first and last third spheres will be 300 m apart with the second sphere midway at 150 m.
![]() Position
Position
The Enable option controls whether the selected objects should be arranged along the virtual circle. The center of the virtual circle is determined by the position of the first selected object. Use the X, Y and Z options to choose which object coordinates should be arranged on the circle.
Defines the radius of the virtual circle.
These values define the start and end angles for the virtual circle. If Start and End are set to 0° and 360° respectively, the objects will be arranged at regular intervals along a full circle; the first and last object will be placed one on top of the other.
You can specify an additional movement for the selected objects on top of the movement due to the circular arrangement and first object.
![]() Scale
Scale
Enable Scale controls if the objects will be scaled.
Has the same function as previously described for the Linear mode.
![]() Rotation
Rotation
If this option is enabled, the rotation angle of the selected objects can be varied. Depending on whether or not Per Step is enabled, the angle will either be increased additively from the first object’s angle on (e.g., 1st object 0°, 2nd object 10°, 3rd object 30°, etc.) or the angle will apply to the last object and the angle values for the intermediate objects will be interpolated.
Enable this option to align the selected objects with their X-axes tangential to the virtual circle.
Enter X-, Y-, and Z rotation values here.
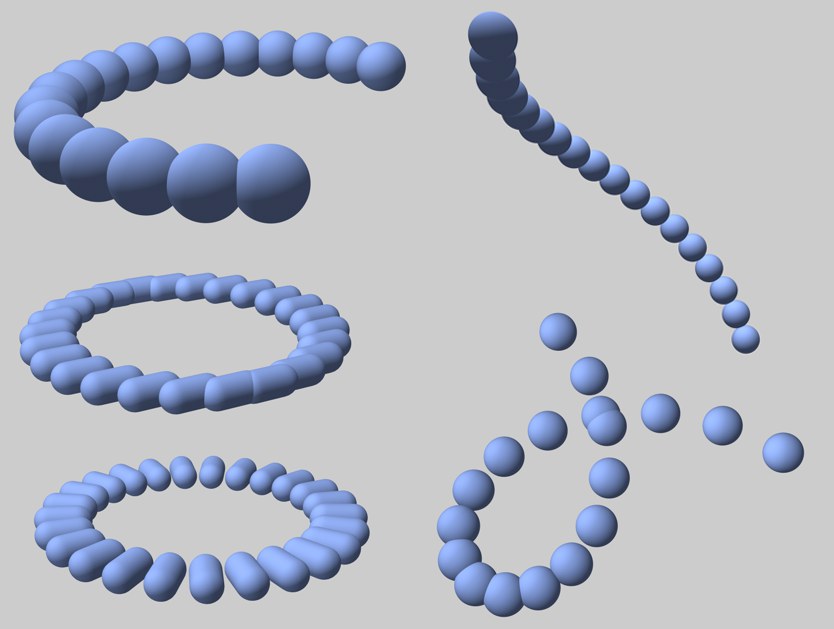 Various arrangements. Going clockwise starting from top-left, these are: Start set to 120°; with Y movement; full circle with X movement; Align Tangential enabled; Align Tangential disabled.
In this mode you can arrange the objects along a spline. You can optionally specify a rail spline.
This option defines whether the values for Position and Rotation apply from one object to the next or from the first object to the last. For example, suppose you have selected three spheres and set the Position Y value to 300. If Per Step is enabled, the first and second spheres will be 300 m apart; the second and third spheres will also be 300 m apart; and the first and third spheres will be 600 m apart.
If the option is disabled, the first and last third spheres will be 300 m apart with the second sphere midway at 150 m.
![]() Position
Position
In this mode you can arrange the objects along a spline. You can optionally specify a rail spline.
Depending on in which directions you want the objects to be moved, enable the X, Y or Z options and enter the movement values for these axes into the Move boxes.
Drag & drop the spline along which the objects should be arranged from the Object Manager into this box. Provided Start Pos and End Pos are set to 0% and 100% respectively, the first selected object will be placed at the start of the spline and the remaining selected objects will be placed at regular intervals along the spline.
These two parameters define the area of the spline along which the objects will be arranged.
![]() Scale
Scale
Enable Scale controls if the objects will be scaled.
Has the same function as previously described for the Linear mode.
![]() Rotation
Rotation
Here you can enable rotation for the objects. The objects will then be arranged along the spline with the axis specified by the Align value tangential to the spline.
You can use a rail spline to control the alignment of the objects. Drag & drop the rail spline from the Object Manager into this box.
The alignment axis is defined by Align.
The Bank is the angle by which each object is rotated about the object axis defined by Align.
You can rotate the objects using the Rotate value. It has the same function as previously described for the Linear mode. However, this rotation will be added to any rotation defined by the optional rail spline.
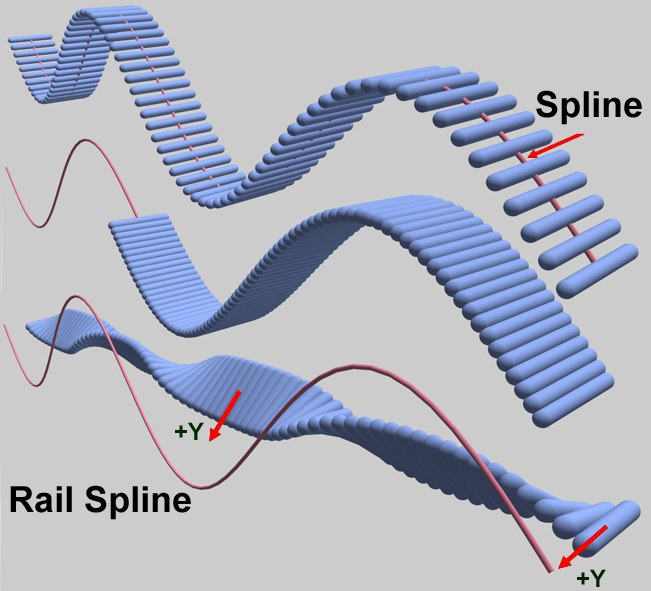 Various arrangements along a spline. Start Pos set to 100% (top) and 50% (center); Rail Spline enabled (bottom).