Options
Use this mode to define how a light source should move when moving across a surface (mouse button pressed).
This is the default mode and will rotate the light source evenly around the cursor. The motion will not be affected by abrupt changes in geometry such as edges or protruding shapes. In this mode the light can be maneuvered to the back side of the object to be lit. This is not possible when in the next mode (Surface).
Similar to a Trackball, only that the light source follows the surface contour much more accurately. This can lead to erratic light positioning when passing over edges or protruding shapes. As soon as the cursor passes over an empty area the light source will come to a stop (contrary to Trackball mode).
When in this mode, the light source will always be positioned exactly perpendicular to the current surface over which the cursor lies, i.e., the light source will shine perpendicularly onto this location and cast the maximum amount of light on that location. This option’s name was taken from Diffusion Shading, which is based on the supposition that light should shine at its brightest at the point at which light and surface meet at a perpendicular (or near) angle.
When in this mode it is possible to define exactly where the Specular light should shine. The light source will be placed in such a manner (taking surface and camera angle into consideration) that the Specular light will be placed beneath the cursor position.
This mode is meant for work with Spot lights. The Spot light will be placed exactly at the cursor’s location.
This ingenious mode lets you exactly position a light source’s cast shadow. Proceed as follows to do so:
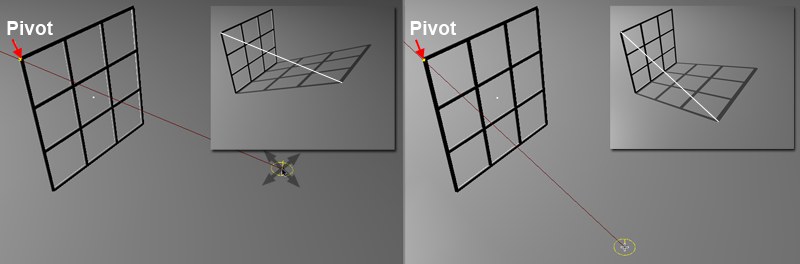 Once the Pivot is set the shadow’s edge can be placed precisely.
- Switch to Pivot mode.
- Click on the Place Pivot button and select a prominent point on the object in the viewport. In the example pictured a corner of the grid was used that will cast shadows.
- If you haven’t done so already, select the light source to cast the shadows in the Object Manager.
- Click and drag the mouse to the location where the shadow should fall. As you will see, the light source rotates correspondingly around the pivot point. Render the scene to get a better impression of how your object is lit.
If a scene contains numerous light sources the light source most relevant to a given surface will be marked by a yellow line when the cursor passes over a surface. Cinema 4D uses the following criteria to determine which light is the most relevant for a given surface:
The smaller the angle of the surface Normals to an imaginary line between a light source and a surface over which the cursor lies, the greater the chance that that light source will be selected.
The light that casts the greatest amount of light on a surface over which the cursor lies will be selected.
 Direct interactive placement of object reflection (Specular Placement mode).
Deactivate this option if you want to use the Lighting Tool to place items other than lights. The only difference when placing items other than lights is that the object to be moved must be manually selected in the Object Manager.
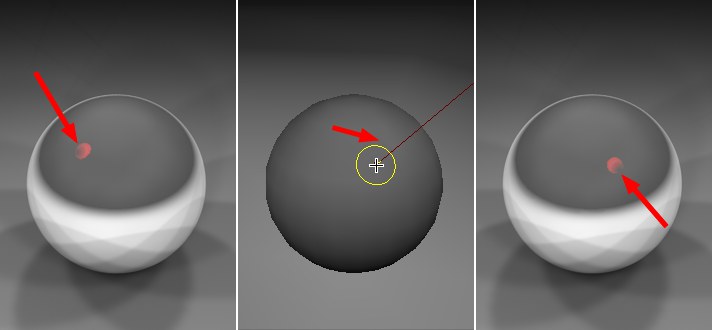
The steps required to create the above image are as follows:
- Select the red sphere in the Object Manager.
- Call up the Lighting Tool (main menu: Tools). Switch to the Specular Placement tool and deactivate the Modify Lights Only option.
- In the editor view, click and drag the reflective sphere to a new position where the reflection is visible.
- Render the image to make sure the reflections appear as they should.
Deactivate this option if you want to hide the yellow and dark red markings that appear between the light source and cursor position.
These three fields represent the pivot point’s coordinates (Pivot mode). Click on the Place Pivot button to set these points interactively. These coordinates can also be edited manually.
Click on this button to interactively set the Pivot point. Subsequently select the pivot point in the editor view. Once placed, the coordinates will be displayed in the Pivot value fields.
To add light, click on an empty area in the editor view. If there is no empty area available, click on this button and subsequently select a point in the scene. A light source will be placed at that point.