Options
In previous versions of Cinema 4D (pre-R18), several special functions were available for this tool, depending on the component mode selected (vertex, edge or polygon). These are no longer dependent on the component mode but from the settings selections made here.
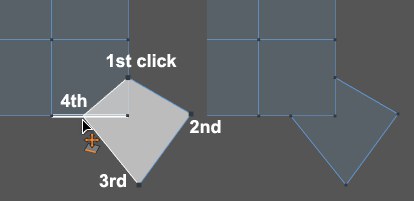
Use this to create polygons as follows:
- Click at all locations at which the polygon should have its corner points (the order in which this is done does not matter). These points can also snap to points, edges or polygons of selected objects.
- The polygon will be created when you click again on either the first point or on the last point created.
As long as the polygon has not been created, a temporary geometry will be displayed as a preview (which can be deleted by pressing theEsc key: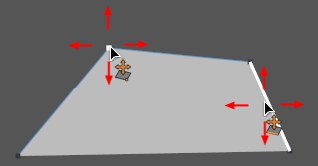
The temporary geometry's points and edges can be moved by clicking and dragging the respective element (the tool's snapping function works here also, i.e., it will snap to existing points and new points can be added to existing edges, which will split the edge).
When doing so, the keyboard shortcuts described above can be used.
You can also click on an outer edge or point, create corner points outside of the polygon and in turn use these as edges/edge points:
If necessary, edges will be split and the outer edges will be used as edges for the newly created polygon.
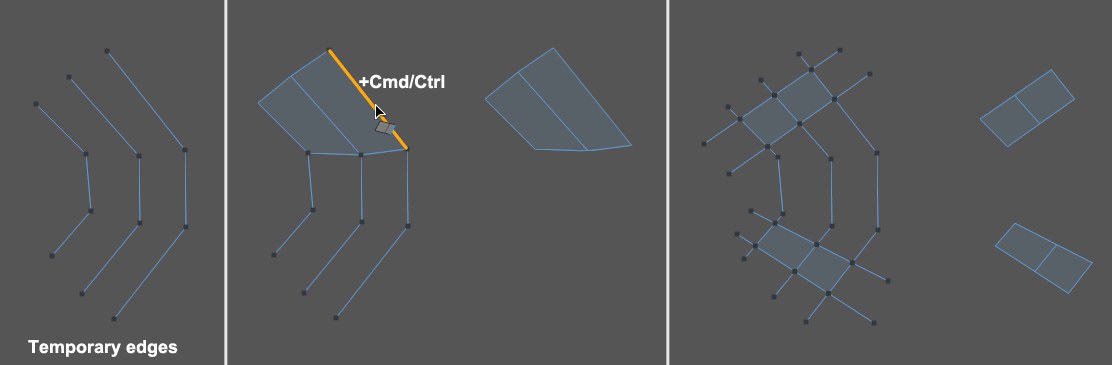 Polygons are created from temporary edges. Unused temporary edges will be deleted.
Temporary edges can be created in Use Edge mode as follows:
- Click on the edge’s start and on its end point.
- Press LMB to set start point and release to set end point.
A polygon will be created if the polygons created create a closed edge line.
Temporary edges can be extruded in combination with the
Edge points can be clicked upon to connect temporary edges. Temporary edges can also be ,connected’ to existing polygons.
Temporary edges as well as their individual points can be clicked upon and moved at any time. When doing so, the keyboard shortcuts described above can be used.
When in this mode, the Polygon Pen works just like a brush. Simply click and drag to paint polygons.
To avoid snapping to hidden points, only enable the Polygon Snap option in the Snap menu.
If the
Note that the Polygon Snap option must be enabled in the Snap menu when painting on another object’s surface. Projection problems can occur in areas between empty space and an object surface.
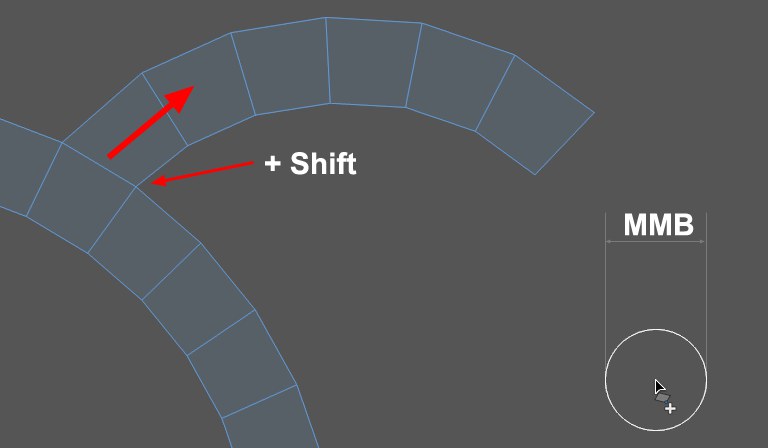
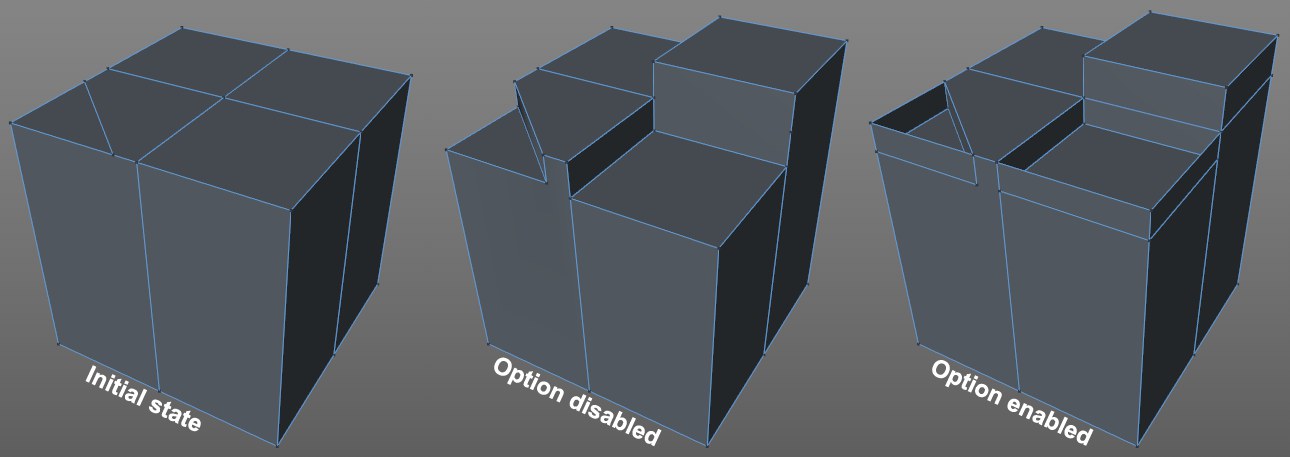
If this option is enabled, a band of four-sided polygons will be created. This works in both modes as follows:
- Use Point mode: click the four points of the first square and then click the two points of the adjoining edge, which will automatically be connected to the previously created polygon.
- Use Edge mode: paint (or click for both edge end points) edges that will be automatically connected to the previously created polygon.
If this option is enabled, a snapping function within the tool (only works with the current object) is activated with which points can be snapped to other points and edges to other edges - whereby the original edge will be rotated accordingly. Points that come to rest at the same location will be melted. If this option is disabled, no elements will be snapped and no points will be melted.
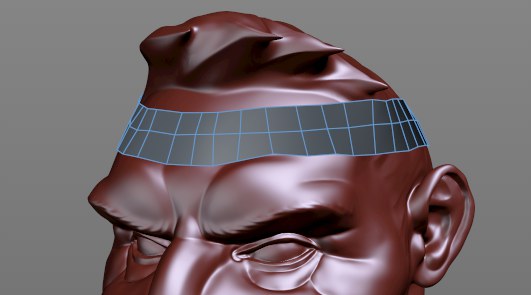 A sweat band created using a band of polygons (polygon snapping) painted onto a Sculpt object, an extruded loop edge with Reproject Result enabled and adjusted to fit.
If this option is enabled during fine-tuning (tweaking), points, edges and polygons will be projected onto the geometry behind it (from the angle of view of the camera). This setting is dependent on the Snap settings.
Create Coplanar Edge On Extrude
For the extrusion of polygons (
Use this setting to define if N-Gons or triangles and quads should be generated when new geometry is created.
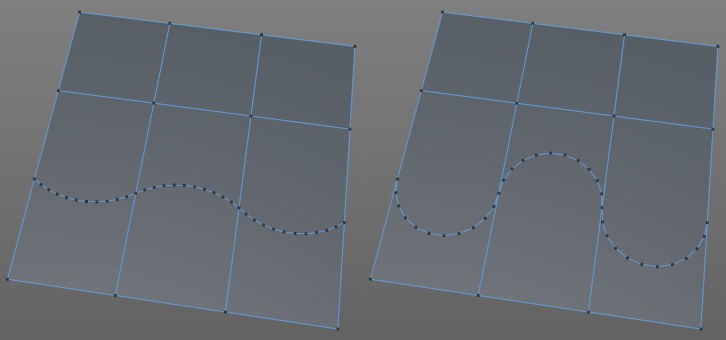 3 curved edges. Left with Create Semi Circle disabled, right enabled.
Hover the cursor over an edge while pressing
Arc Direction Max Angle [0..180°]
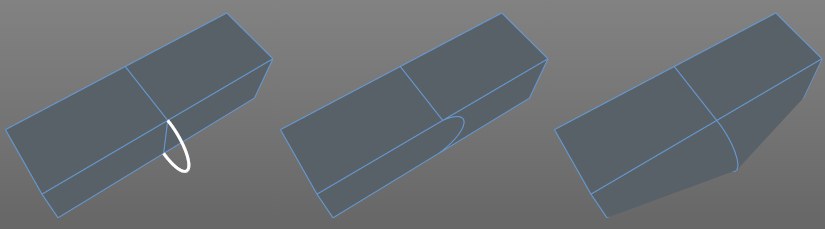 Depending on the angle defined, the arc will lie on the polygon surface or on the middle angle.
This setting also applies to the aforementioned arc function. If the angle between both edge polygons is larger than defined here, the arc can come to rest ON either of the polygon surfaces. If the angle is smaller (or equal), the arc will come to rest exactly at the center angle of both polygon surfaces.
Here you can enter the number of points the arc to be created should have. The finer the subdivision, the rounder the arc will be.
Polygon Brush Radius [0.001..+∞m]
When in Draw Mode Polygon, polygons can be painted like with a brush. The band of polygons that is created will have the edge length defined in this setting. Note that an adjusted radius will be used when existing geometry is supplemented (
When working with very dense meshes it can be difficult to "reach" the desired element, e.g., if an edge lies in front of the polygon you want to affect. In such cases, the tool can be restricted to one of the three elements (points, edges or polygons). The Full mode will include all three elements.