Brush Presets
You can use this manager to access brush presets including any you have created and saved.
Managing the presets (moving, deleting) can be done here as well as in the Content Browser. In the end, however, all presets will be loaded in a library in the Content Browser.
Context Menu
Right-clicking on an element will open a context menu with the following (not yet described) options:
Lets you rename the element.
Opens the Content Browser and displays the corresponding element.
Take a guess at what this does …
File
Creates a new Preset Library. This library can easily be passed onto and imported by other users.
You can add any number of folders to organize your presets. The folder will be added to the selected element.
This command has multiple functions:
-
This command imports Photoshop-compatible brushes in the *.abr format. Note that some compatibilty issues may arise due to the fact that Photoshop contains brush settings that BodyPaint 3D does not offer. This means that the given brush will behave differently in BodyPaint 3D. Imported brushes will be saved to the "(User)/Brushes" BodyPaint 3D preset folder in the Brush Preset Manager or the Content Browser. The name of the corresponding library is bodypaintuser.lib4d and is located in your user directory’s library/browser folder.
If parts of the brush consist of bitmaps, the bitmaps will also be saved (internally). Here is a miniscule selection of available brushes:
Attention: The Photoshop brush properties Dual Brushes and Color Settings (Color Dynamics) are not supported.
This command imports brush presets from BodyPaint 3D Release 2.5 or earlier. These previous vesions did not use the Content Browser to manage brushes.
A dialog window will open when this command is selected. Next, navigate to your old BodyPaint 3D directory, open the prefs folder and load the bodypaint_brushes.b3d file. The presets will then be converted to a Content Browser library. This library can then be found in its default location in the current Cinema 4D / BodyPaint 3D folder (library / browser / bodypaintuser.lib4d).
- Presets from versiona lster than R2.5 (those that were saved as "*.lib4d" files) will, when selected, be copied into your library directory (library/browser) where they will be applied to your scene.
This command is available for selection if you have selected a Brush Preset and made modifications to its parameters. The existing Brush Preset can be overwritten, if desired.
Saves the current brush parameters to a Brush Library. The following dialog window will open:
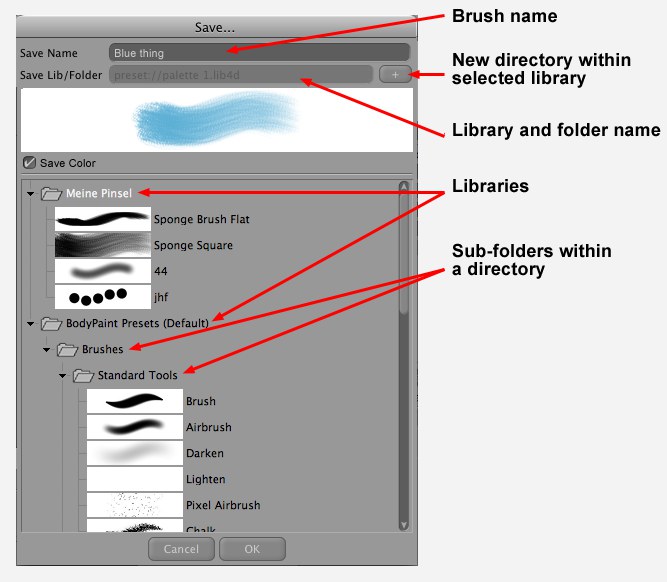
In addition to being able to change the name of each color you can also determine the library and directory in which the color should be saved. Select an element. The + button lets you create a directory for a selected element. Click on OK to save the color (the currently selected color preset can be overwritten).
An identical library organization is pictured here
Exports the selected elements (as "*.lib4d" library). This can be done with individual colors or entire directories. These directories can in turn be imported via the Import BodyPaint Presets command.
Group Menu
If you choose All Presets, all brush presets are displayed. If you choose a different group from the list, only the presets belonging to that group are displayed.
View menu
If this option is enabled, the icons are displayed as a vertical list and their names are specified. The active icon is indicated by a frame.
These options are used to display the icons without a name next to or on top of one another. The active icon will have a red border.
The icons will be displayed in the sizes 24 x 24, 36 x 36 or 48 x 48, respectively.
Choose the size of the icons: small, medium or large.