Table Of Contents
Introduction
A Portal Light is a rectangular Area Light used to assist in indoor Global Illumination. It acts a virtual window, casting direct lighting into a room from the environment outside. Portal lights effectively give you one bounce of 'brute force' Global Illumination for 'free'. If you were to just model a transparent window, you would need up to 4 times the amount of 'brute force' Global Illumination rays to achieve the same noise-free lighting, which of course would have a negative impact on performance. The Portal light blocks and absorbs Global Illumination rays. It works by sampling light color from the RS Environment shader, either from the Default Environment (see Redshift Render Preferences/Globals/Options), from a Redshift Camera Environment or the Custom Environment link of the Portal itself (by asigning RS Environment Materials).
In your scene, make sure that the Z-axis of the portal is directed towards the interior, as the ambient light is emitted only along the positive Z-axis of this light.

Example
The following images show a typical use case.

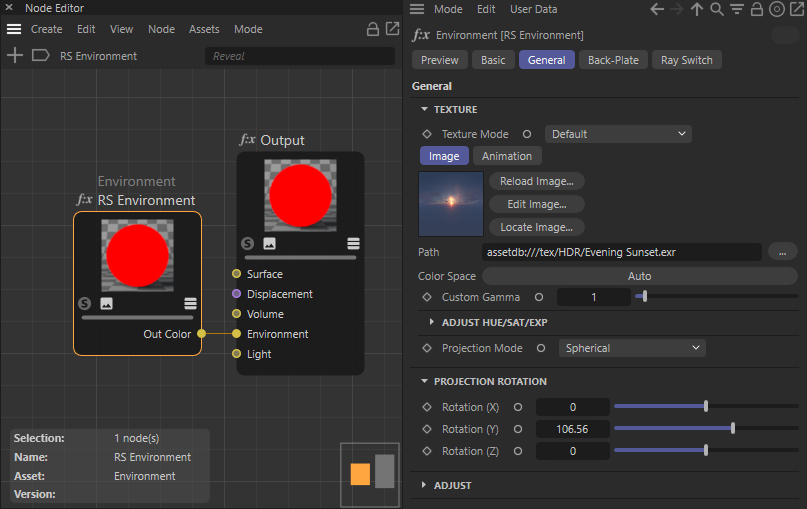
We start by creating a Redshift Environment Material and load a HDR image to its RS Environment node

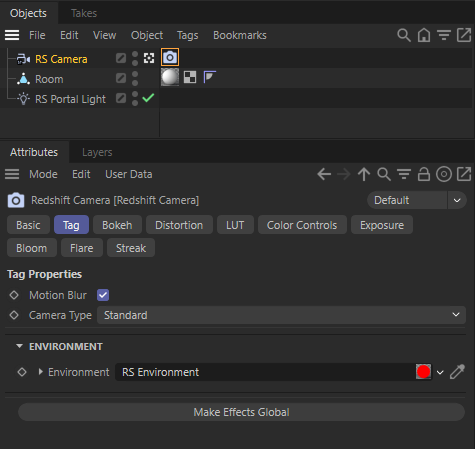
Link that Environment Material to the Environment of a Redshift Camera.
We place the camera in a room and point it at an opening in the wall. The Default Light option is disabled in the Redshift Render Settings dialog (Global/Options). The rendering of the interior appears almost completely black with only a slight red cast from the sunset HDRI used. After we place a Portal light in the opening of the wall, the rendering looks quite different. The room now "sees" much more of the Environment outside and is illuminated more by it. The render time has remained almost unchanged.

The left side shows the rendering without a Portal light, on the right side there is a portal in the open window.
Object
Type
Specifies the light type.
- Point: A point light. Simulates a 'bare bulb' light which emits light in all directions from an infinitesimally small point in space.
- Spot: A spot light. Emits light in a cone-shape.
- Infinite: Simulates a light source which is infinitely far away from the scene. An infinite light has no position, only a direction. Therefore all light rays emitted are parallel and have no decay.
- Area: A light which has a real physical size and shape.
- Dome: Simulates light emitting from a large sphere that always surrounds the entire scene. You can think of this as a sky that illuminates your objects and that can also be mapped with an image, for example. The dome light can thus also be used like a Cinema 4D Sky object.
- Photometric IES: Allows to load an IES Profile files to control the amount and direction of emitted light.
- Portal: A special type of light source that can optimize the calculation of global illumination. Often used in window frames for interior renderings to optimize the rendering of indirect light coming through the windows.
- Physical Sun: Similar to the Infinite light, but specially designed to mimic sunlight, including a color change depending on the angle of incidence of this light source.
Add Graph
Many settings of the Redshift light object can also be set through the material node system. Using this button will create a new Redshift Shader Graph material and connect it to this light.
Light parameters controllable by a light shader include the lights Color settings, Decay, Shadow options and Attenuation.
Edit Graph
If a Shader Graph material has been asigned to the light, you can open the Redshift Shader Graph by using this button and edit the shader directly there.
Add Target Tag
Add Target Tag and Null
You can find these commands in a menu to the right of the Type menu. You can use them to add a Target expression tag to the light. By linking an object to that tag you can aim the z axis of the light to that object. Using the Add Target Tag and Null command creates an additional Null object and uses that as the Target Object with the Target expression tag.
Intensity
Intensity
Specifies a multiplier for the intensity of the light cast by the portal.
Exposure (EV)
Specifies an f-stop value that allows you to intuitively increase/decrease the light's intensity when matching to a plate, or rendering large/tiny scenes without using hugh/miniscule Intensity Multiplier numbers. A value of 0.0 means the intensity does not change.
For example, an Exposure value of 1.0 means the light doubles in intensity and a value by 2.0 means the light quadruples in intensity, etc.
Color
Tint Color
Specifies a color with which to tint the environment samples. Tint Color only affects the color of the light cast from the portal, not the color of the portal itself when seen either directly by the camera or indirectly via reflections or refractions.
Portal Transparency
Specifies a color with which to tint the portal when seen directly through the camera or indirectly via reflections or refractions. A color of (0,0,0) will make the portal completely black, while a color of (1,1,1) will make the portal completely transparent. Colors between (0,0,0) and (1,1,1) will result in a partially transparent, tinted portal.
Custom Environment
Connect a Redshift Environment Material here.
This will override an environment shader that is connected in Redshift Render Settings/Globals/Options.
Shape
Size X
Size Y
These values define the size of the portal.Spread
Enables directionality control for the Portal light, similar to a barn door effect or spot light. The lower the Spread, the more the light is concentrated in the direction of the light normal (along the Z-axis of the portal). A Spread value of 1.0 is the default, physically correct lighting behavior, while a value of 0.0 makes the light a parallel light.
Details Tab
See common descriptions of the Redshift Light object.
Project Tab
See descriptions of Light Linking and Shadow Linking here