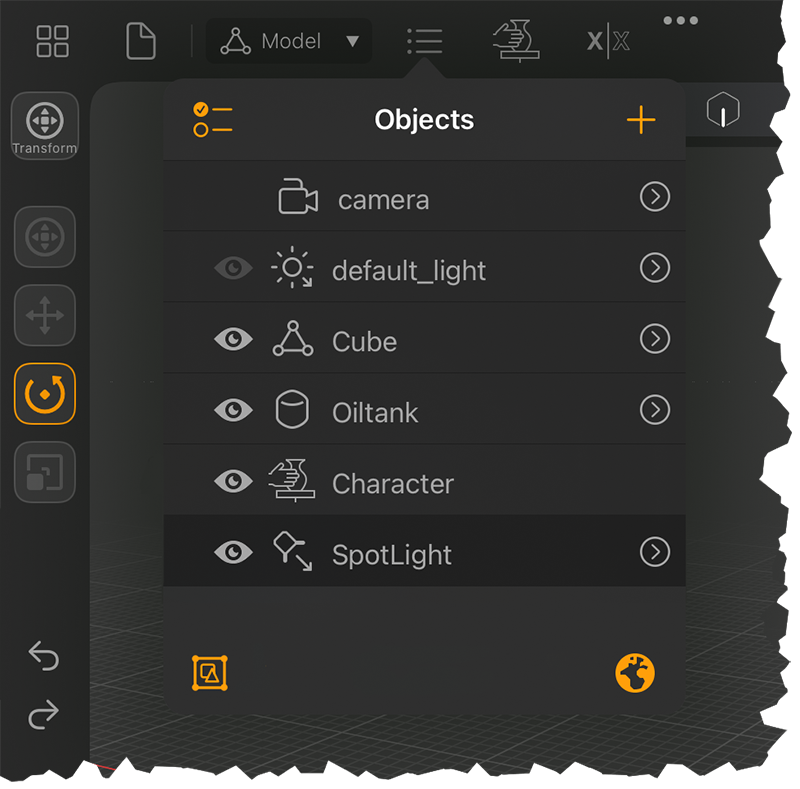
All scene nodes are listed in the Objects menu. Scene nodes can be camera objects, light objects, Null objects, parametric objects, editable meshes or sculptable meshes. The icons in front of the listed elements give feedback about the different object types:
Camera Objects have a stylized camera icon.
Light Objects show the type of lightsource as an icon (Point Light, Directional Light, Spot Light, Area Light, Photometric Light).
Editable Meshes have a triangle icon with highlighted edgepoints.
Sculptable Meshes show a vase on a potter's wheel.
Parametric Objects have an icon representing a typical shape for this kind of object, such as a sphere, a cylinder, a cube or an oiltank shape, as shown in the image on the left.
Interaction with the icons and entries in the Objects menu enables various actions:
+ icon: Allows you to add new nodes into the scene (found in the upper right corner of the Objects List).
Select: Tap an Objects List entry to change the scene selection to this object. Objects can also be selected by tapping on them in the viewport.
Tap the eye symbols to the left of the objects to switch their visibility in the viewport.
Tap the arrow icons to the right of the objects to open the parametric settings of the respective object.
Hierarchical options:
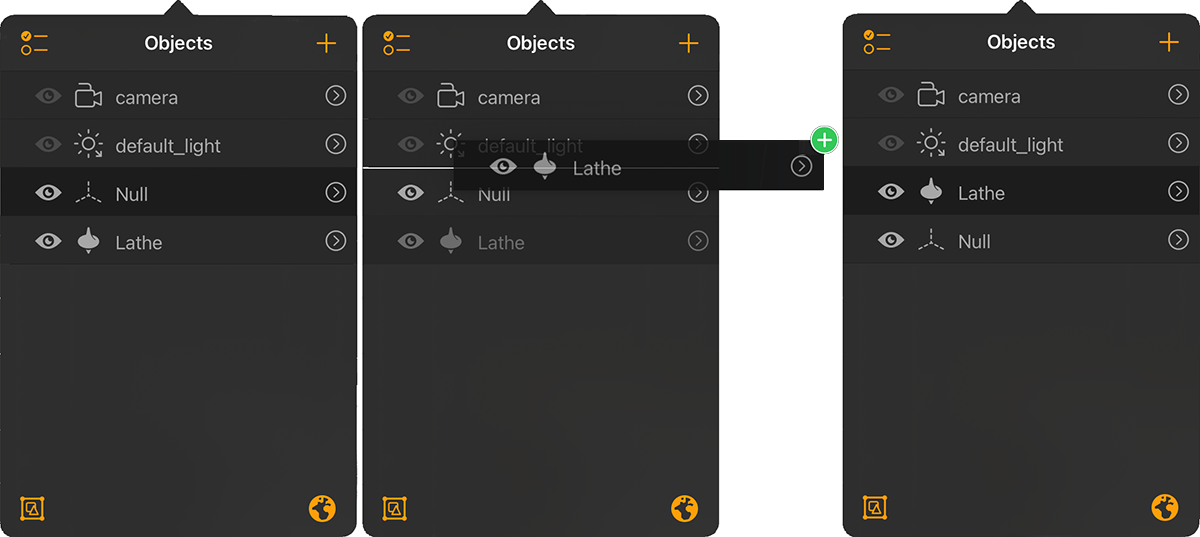
Sorting: You can drag and drop objects directly in the object list to give them an individual order. For example, you can make cameras and lights always appear at the top of the list, even if they were created at a later time. New objects are always created at the end of the list. The following figure shows an example of the sorting process.
In this example, the Lathe object is moved in front of the Null object. Notice the white line between the objects that appears when you drag an object (see middle image). It indicates the new position of the dragged object when you drop it.
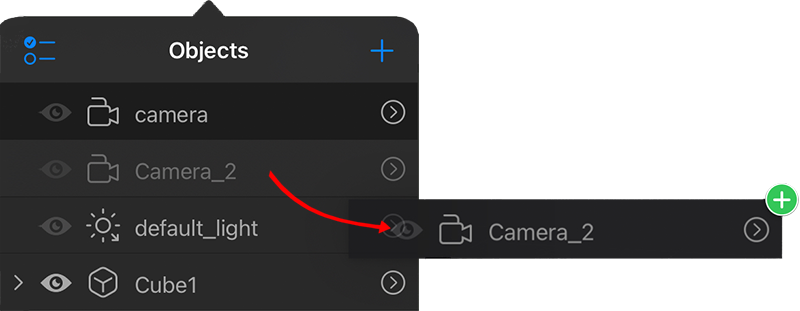
Drag & Drop: There is a special drag & drop functionality for cameras (see next image). This is always very handy when you use multiple camera objects in the project. Simply drag the camera you want to activate from the Objects List directly into the viewport. Alternatively, the settings of a selected camera also offer the Look Through button, through which a camera can be activated for the viewport. You can learn more about this in the section about cameras.
Dragging a camera object from the Objects List to the viewport activates it.
Grouping: Objects can be organized in groups. The advantage lies in the clarity of the scene display in the Objects list and in the possibility of being able to move several objects directly or rotate them around an individual fixed point, for example. A Null Object is often suitable as a parent object of such a group, since it does not contain any geometry. The following image demonstrates the grouping of a Lathe Object as a child under a Null Object.
In this example, a Lathe object is grouped below a Null object. Just drag the Lathe over the Null until a + sign is shown in front of the Null and then drop the Lathe there (see image in the middle). An arrow icon to the left of an objects name indicates that other objects are grouped to it. Tapping on that icon can fold and unfold that object hierarchy (see image on the right).
Specific actions can be found in a context menu for listed objects. Just tap and hold on an entry to open the context menu:
Rename: Tap and hold on an Objects List entry and choose Rename to be able to edit the name of the chosen object.
Duplicate: Tap and hold on an Objects List entry and choose Duplicate to make a copy of the selected object. (This option is only valid for MultiresMesh).
Delete: Tap and hold on an Objects List entry and choose Delete to delete an object from the scene.
Node-specific actions: Some objects have specific actions that actions will be listed here. (e.g: Make Editable on a MultiresMesh or Sculptable Mesh node, or Make Sculptable on an EditableMesh node)
Some actions, such as deleting or connecting multiple objects, requires to select multiple objects first. For this you have to activate the Multi Selection Mode, by clicking on the icon in the top left corner of the Objects menu (see icon at number 1). Clicking on the same icon also deactivates this mode again, if you only like to select a single object at a time. This will display radio buttons in front of the objects, which can be selected by tapping on them (see number 2). After selecting the objects (single selection or multi selction) select an action from the Objects list Toolbar (see number 3). The available commands are explained below.
Objects List Toolbar
These commands are found at the bottom of the Objects List (see number 3). Going through these actions from left to right:
Multi-Mesh: Opens a dialog that allows you to create a new mesh if you need to modify multiple objects of your scene at once. The dialog has the following options:
What: Allows choosing between 'All' objects in the scene or just the 'Visible' ones.
Groups: When the Multi-Mesh is created, it will auto-assign a face group to each originally different mesh.
Layer: All changes will be applied on sculpt layers.
Multi-Mesh is a two step process. It first creates a mesh made out of the lowest subdivision level of every mesh choice (depends on the “What” value). This mesh can the be modified; when happy, the “Multi-Mesh” button can be pressed again to move the changes over to the lowest subdivision level of every mesh, and return them to their original sublevels.
Combine: This allows selected meshes to be combined into a single object. This deletes the original individual objects.
Delete: Removes the selected objects from the scene.
IBLs: Opens the IBL (Image Based Lighting) picker.
Scene object entry
Visibility Toggle(Eye symbol): Each object with a visible representation can have its visibility value toggled from here.
Scene Node Icon: Each scene node type is represented by an icon to allow you to differentiate between them.
Scene Node Name: Shows the name of the node.
Scene Node Parameters(Arrow symbol on the right side): Allows you to tweak parameters of the node.
IBLs
Forger allows you to use "Image Based Lighting" to light their scenes. Doing so will give a more realistic look to scenes.
This should be used preferably whilst painting. Combined with the "Standard" material type since gamma correct materials have a harsher light-to-shade ratio which can be tricky to work with whilst sculpting sometimes.
Please note that this panel does not allow drag & drop since iOS clamps images to 8bit when they are dragged. It's preferable to copy any lat-long images you may have to the apps "Documents/ibls/" subdirectory of the app via Apple's "Files" app.
Forger supports panorama (lat-long) HDR images in common industry formats such as .exr and .hdr.
Selecting an image in this panel will create an "EnvironmentLight" node with the selected image if there isn't one in the scene or change the IBL image of the first "EnvironmentLight" node it finds.
Note:
IBLs can't be accumulated or translated in the scene, only the first one found is used in scenes.