A camera is always needed to be able to define the perspective and view of the objects in the scene. Therefore, a new, still empty scene already contains a default camera.
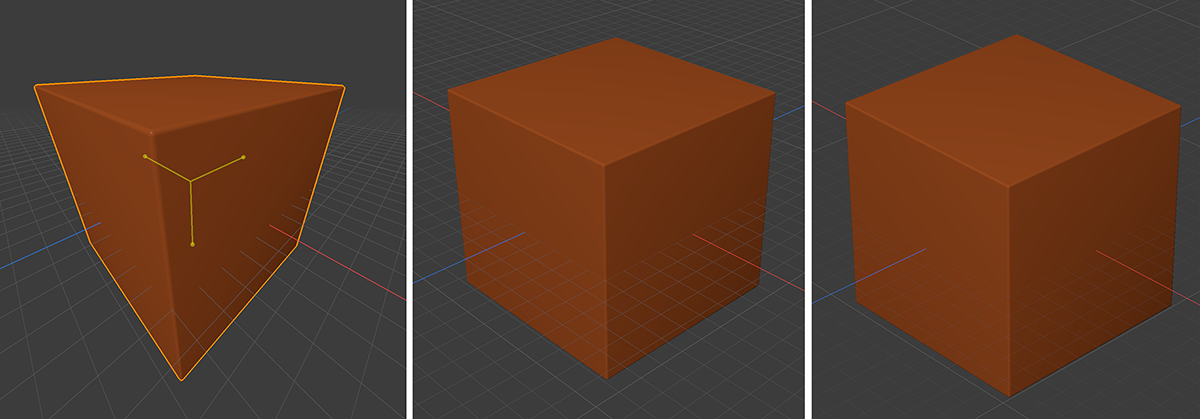
Cameras, however, do not only determine the viewing direction, but also, through their Focal Length, how realistically or optically distorted shapes are displayed. Small Focal Lengths increase the Field of View and can therefore display a larger part of the space at the same time. However, this also increases the likelihood that shapes will be optically distorted, especially if they are closer to the edge of the viewport.
Larger Focal Length values prevent such distortions and result in a technically correct image, but can then only display a small section of space (smaller Field of View). In addition, the Depth of Field can also be set via the camera. Surfaces that lie in front or behind the focal plane can then be displayed more blurred and out of focus. This can additionally increase the realism.
As you can have more than just one camera in your project, this also allows to quickly switch between different perspectives.
Just like mesh objects, cameras also provide Transform settings that can be used to precisely describe the position and direction of a camera in 3D space. However, since the viewing direction of a camera can also be controlled directly in the viewport by gesture control, these numerical values are only required if, for example, technical views are to be defined.
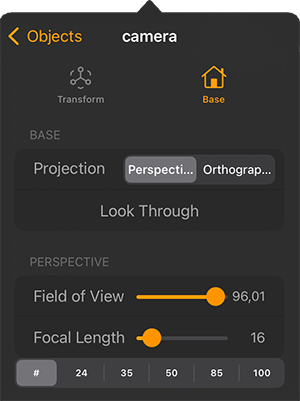
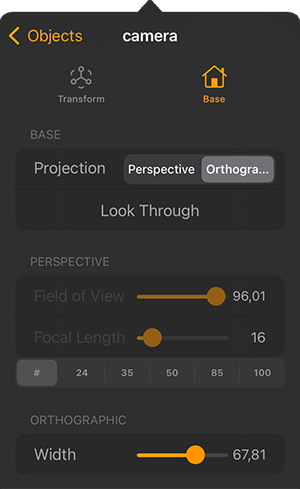
Base Settings
Here you can choose the type of Projection and activate the camera, in case you have more than just one camera object in your scene.
Projection: Choose between Perspective and Orthographic. Perspective simulates a normal film or still camera, providing a Focal Length and a Field of View value to adjust the camera's angle of view. Orthographic enables a more technical perspective that minimizes perspective distortion of shapes.
Look Through: Tap here to active this camera. The viewport will show what this camera sees. This is only needed whenever you have several cameras in the Objects List and want to switch between them. Alternatively, you can drag the entry of this camera directly from the Objects List into the viewport to activate the camera. You can find out more about using the Objects Listhere.
Field of View: In Projection Perspective, this value indicates in angular degrees how wide the camera's field of view is. The larger the angle, the greater the risk of optical distortion. The values of Focal Length and Field of View are automatically linked. If one of these values is changed, the other adjusts accordingly.
Focal Length: This setting is also found on camera lenses and indirectly determines how large the camera's field of view is. A small Focal Length value results in a large Field of View angle and increases the risk of optical distortion of the displayed shapes. Focal Length values corresponding to natural vision are around 50.
Presets: Below the Focal Length you can find several standard settings for it. Just tap on one of the preset values to use it.
Demonstrating the effect of different Focal Length values. From left to right the values 10, 50 and 100 have been used.
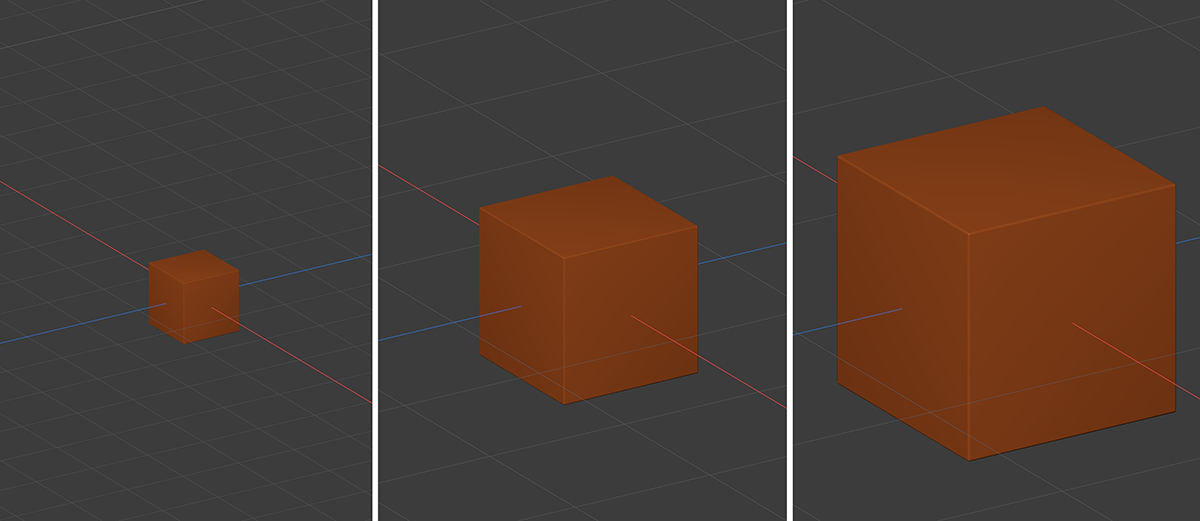
Width: This value is only accessible with Projection Orthographic and sets the optcal size of the objects in the viewport (see also next image). The effect is the same as using the pinch gesture to adjust the zoom directly in the viewport.
Demonstrating the effect of different Width values in Projection Orthographic mode. Note that the representation of the cube shape remains identical, only its size in the viewport changes.
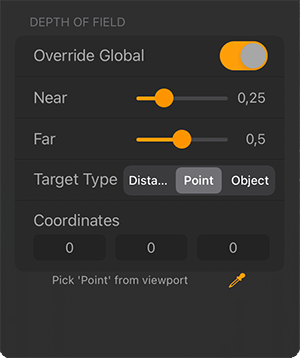
Depth of Field
These settings can be used to override the global Depth of Field settings, that are available in the Display FX Settings described here. This can be especially handy if you are using multiple cameras in the project and therefore all cameras need customized Depth of Field settings. In general, this effect ensures that you can focus specifically on a certain position, and surfaces that are closer to or further away from the camera can be displayed out of focus. In any case, to display this effect, the calculation of Display FX and Depth of Field must be activated in the Display settings. There you can also find additional effects, such as Ambient Occlusion or Bloom to customize the display quality of your scene in the viewport.
Override Global: Activate this option to configure the Depth of Field options directly at the camera instead of the global Display Settings.
Near/Far: These values control the intensity of blur at close range of the camera (Near) and behind the distance given by the Target Type setting (Far). For example, blurring should only occur in the rear area. reduce the Near value to zero. The area between the camera and the chosen focus distance then remains completely sharp.
Target Type: You have three modes here to be able to define the position of the sharpness in space:
Distance: In this mode, you control the focus by specifying a Focus Distance that is applied from the camera's position in the direction of the camera's view.
Point: Here you specify an absolute coordinate in space to focus on. Since this position is independent of the position of the camera, the focal plane always remains at the same position, even if the camera is moved.
Object: In this mode, you can specify an object from your scene on whose axis system (position) you want to focus. The advantage here is that this focus is maintained even if this object or even if the camera is moved. In addition, it is also possible to focus on the position of a Null object that does not appear as geometry in the viewport.
Focus Distance: At this distance, the camera is focused with Target Type Distance. Elements at this distance from the camera always remain sharply visible. You can also use the Distance Picker, to set this distance just by tapping into the viewport.
Coordinates: With Target Type Point you enter the position here, that should be in focus. You can also use the Point Picker to tap into the viewport to use that coordinate.
Object: Activate the Object Picker to tap on an object in the viewport that should be used here. The focus will be set to the objects axis system, as long as Target Type Object is active.
Navigation
The active camera can be moved directly in the viewport with gestures (see also Gestures and Apple Pencil):
Tap and hold one finger on the viewport over an empty area and move the finger to rotate the view and orbit around the objects. The camera will be prevented from rotation around its Z axis (the viewing direction). To be able to rotate completely freely, Free Orbit Style must be switched on in the Navigation Preferences. Then rotations around the view axis are also possible. Having an object selected, your're able to keep that object in the center of the rotation at all times.
Holding the Camera Modifier button on the left while tapping and holding one finger on a surface in the viewport, you can move the finger to move the view. Without the Camera Modifier, moving a finger over a surface normally uses the chosen tool on that surface (such as a selection tool or a sculpting brush).
Holding and moving a two-finger-tap in the empty viewport space will move the view.
Pinching over any part of the viewport will zoom in or zoom out. Having Center Navigation On Pinch active in the Navigation Preferences will use the spot between the pinching fingers as a reference point for the zoom. Without that option, the center of the viewport is used as a reference point.
The speeds of all navigation actions can be set individually in the Navigation Preferences.
Use Legacy Navigation Style: You can find this option in the Navigation Preferences. When enabled, zooming and orbiting are processed only relative to the center of the viewport, even if an object is selected.