Overview and Color Management
|
|
|
|
ACES workflow |
Linear sRGB workflow |

Color Management is a term used to describe the conversion and control of color from one place to another, it is an inherently complex subject but the ultimate goal is to unify the process of color handling throughout a project and across devices. To an artist it might be more simply thought of as the system used to consistently deliver the colors and look that you want out of your work, this makes it one of the most important things to understand when setting up a scene.
Color conversion is a very complex and delicate subject, you must be careful when moving from one color space to another so that the original look and quality of an asset isn’t lost in the process. It’s here where a color management system like OpenColorIO (OCIO) and a color workflow like the Academy Color Encoding System (ACES) comes into play. The CG industry has seen increased standardization over the years to the benefit of artists everywhere, in effect, ACES distills the work of hundreds of color scientists and filmmakers into a very manageable and artist friendly color workflow.
The good news is you don’t have to be a color scientist to make great use of a color management system. For many it starts with being more aware of where our images are coming from and where they’re going to go. Developing a better understanding of color spaces and what can be lost when we convert from one space to another represents a large portion of the learning curve. OCIO with ACES make this conversion process more apparent and deliberate which helps make color management feel more user controlled and flexible. Fortunately, when you learn the ACES workflow in one program that knowledge applies to any other compatible program since the standardization ensures that OCIO and ACES consistently reproduce the same output across applications.
With regard to Redshift, color management occurs in three key areas: texture import, the rendering space, and final output. Prior to the implementation of OCIO all rendering in Redshift was done entirely in scene-linear Rec.709 - sRGB color space and many artists utilized the "linear workflow" as part of their method for color management. When using ACES the workflow changes slightly but the general concept of color space consideration and linearizing your source assets before rendering remains largely the same. The impacts of color management in these areas and further detail on color management and its concepts is discussed in greater detail in the sections below.
ACES vs Linear sRGB
The introduction of ACES as the default Redshift rendering color space brings with it many potential improvements compared to the old default rendering setup in scene-linear Rec.709-sRGB with an un-tonemapped preview.
ACES has a much wider color gamut than sRGB making it capable of representing more colors and more accurately portraying scenes. Due to this increased dynamic range both highlights and shadows have more detail, with a smoother more filmic response and the ability to better handle extreme lighting and color saturation. Due to ACES default tonemapping colors in ACES desaturate as they become brighter in a similar way that we see with our eyes. In general, working with ACES provides an easier path to creating more predictable and photo-realistic images in less time and effort. On top of that, ACES aims to simplify working with formats from many different sources and color spaces with an easy to follow workflow from start to finish of a production pipeline.
Before, when using scene-linear Rec.709-sRGB with a linear workflow, there was no distinction between linear color data ( a linearized diffuse color map) and linear non-color data (normal / roughness maps) but ACES is a color-aware workflow that needs to understand the differences between the two or the result will be incorrect, this is primarily handled by designating the appropriate color space of the source assets as discussed here.
If you would like to render using the old color management method match your render settings to use the Render Space "scene-linear Rec.709-sRGB" and the "un-tone-mapped" view transform as pictured below.
|
Visual Comparison
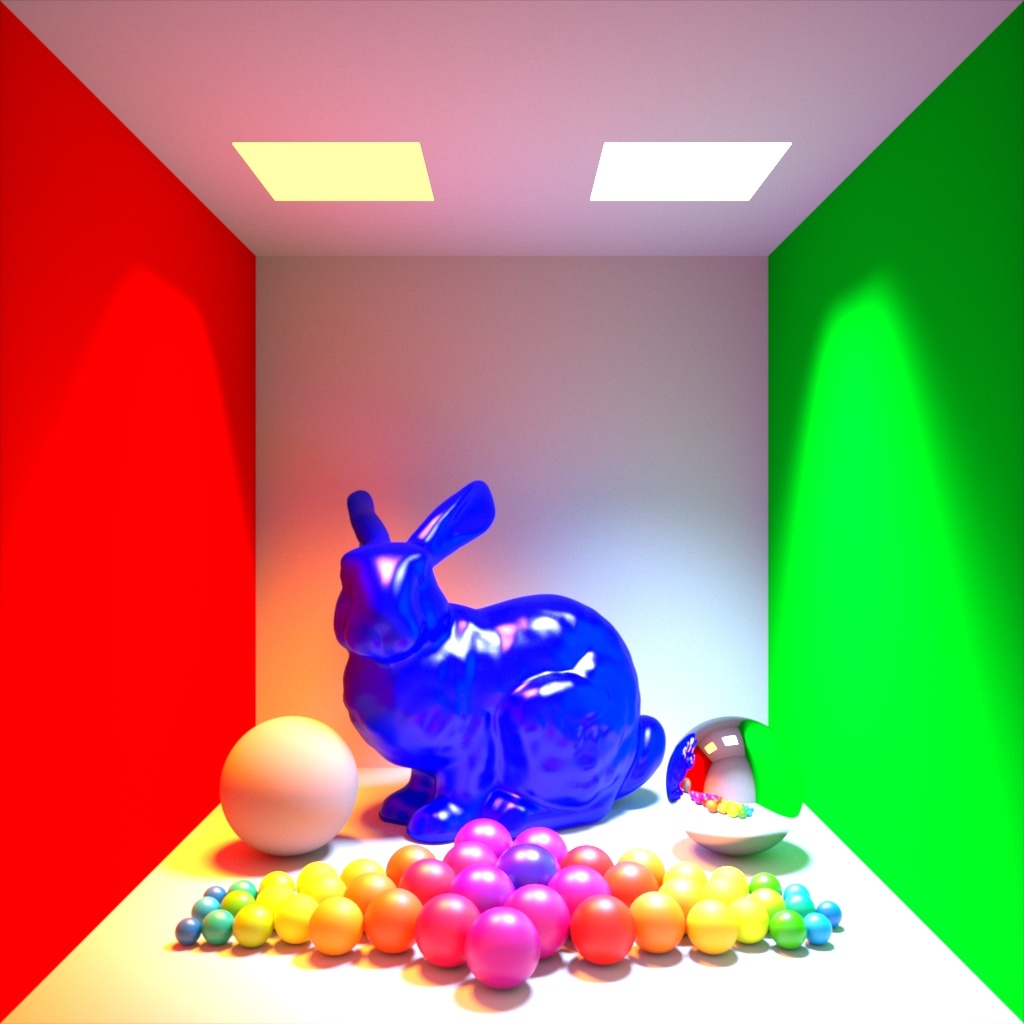
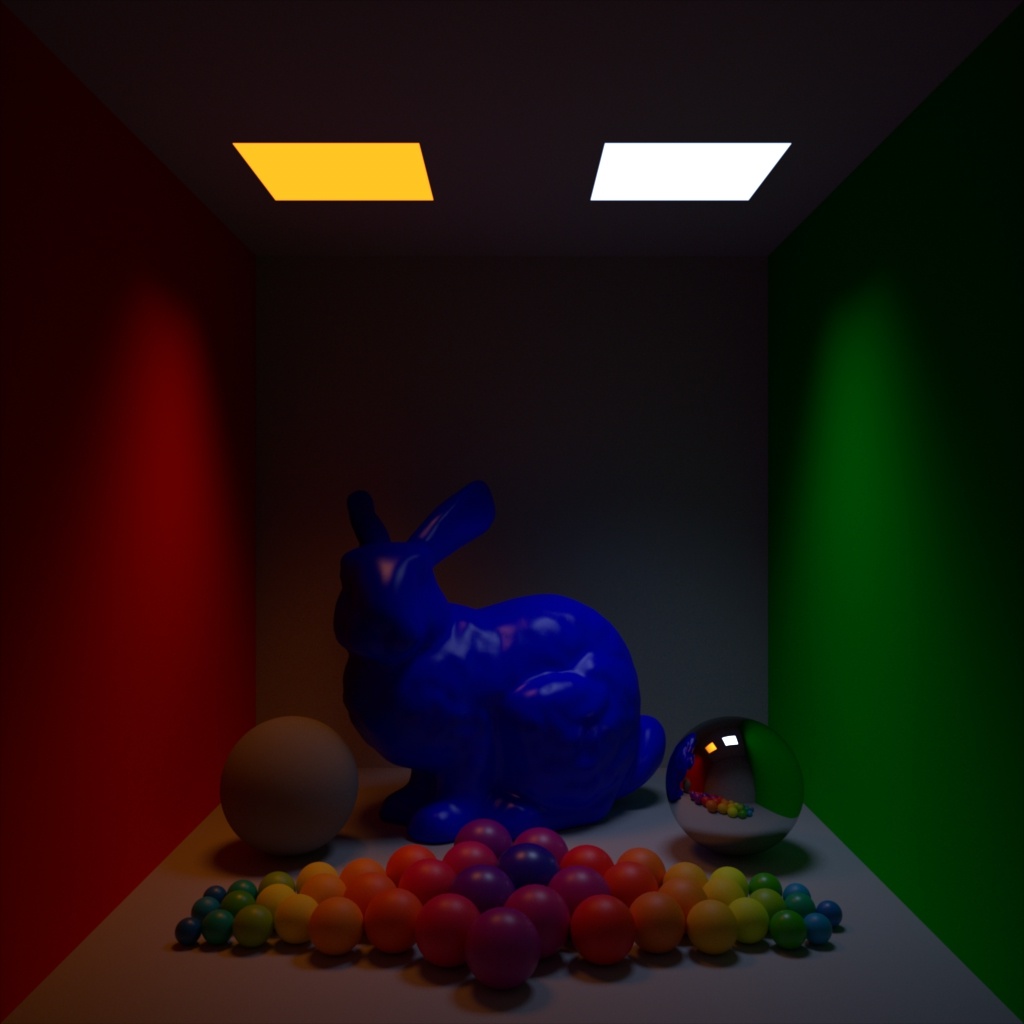
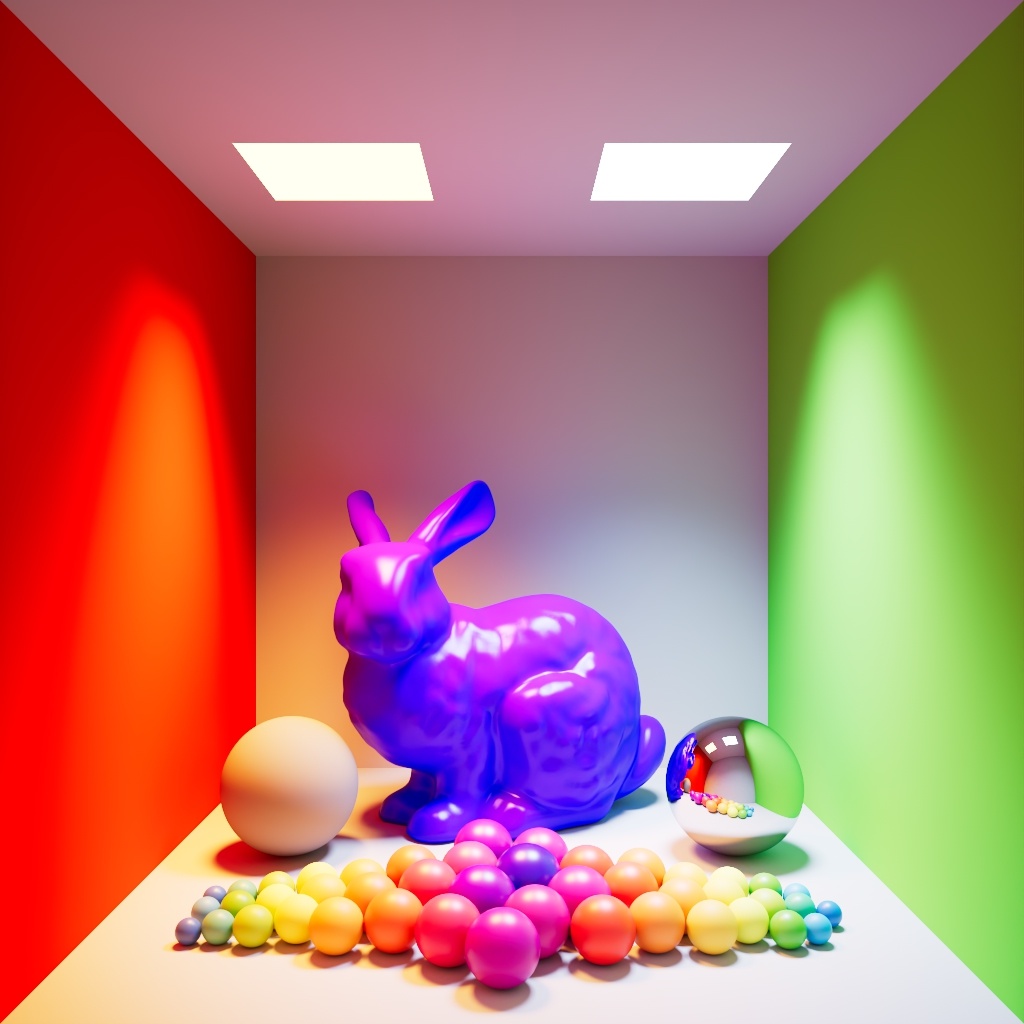
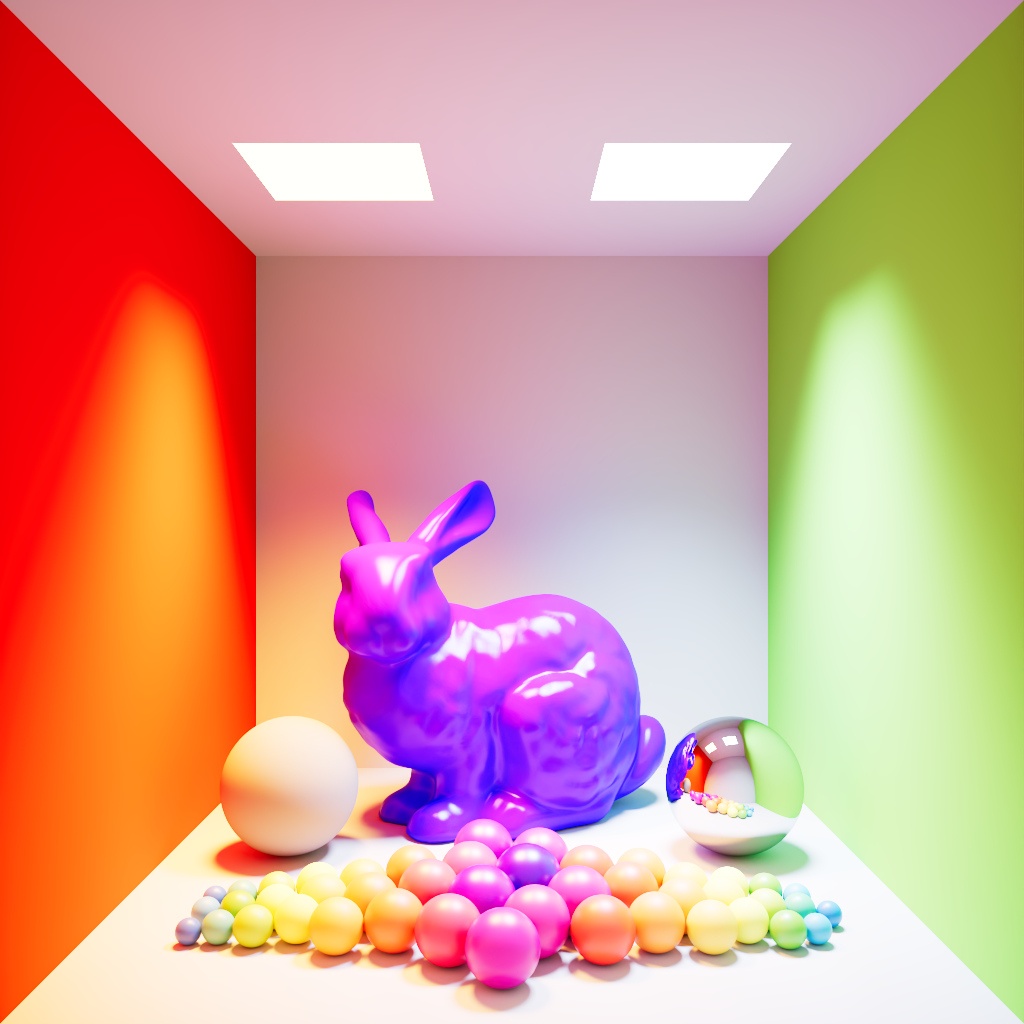
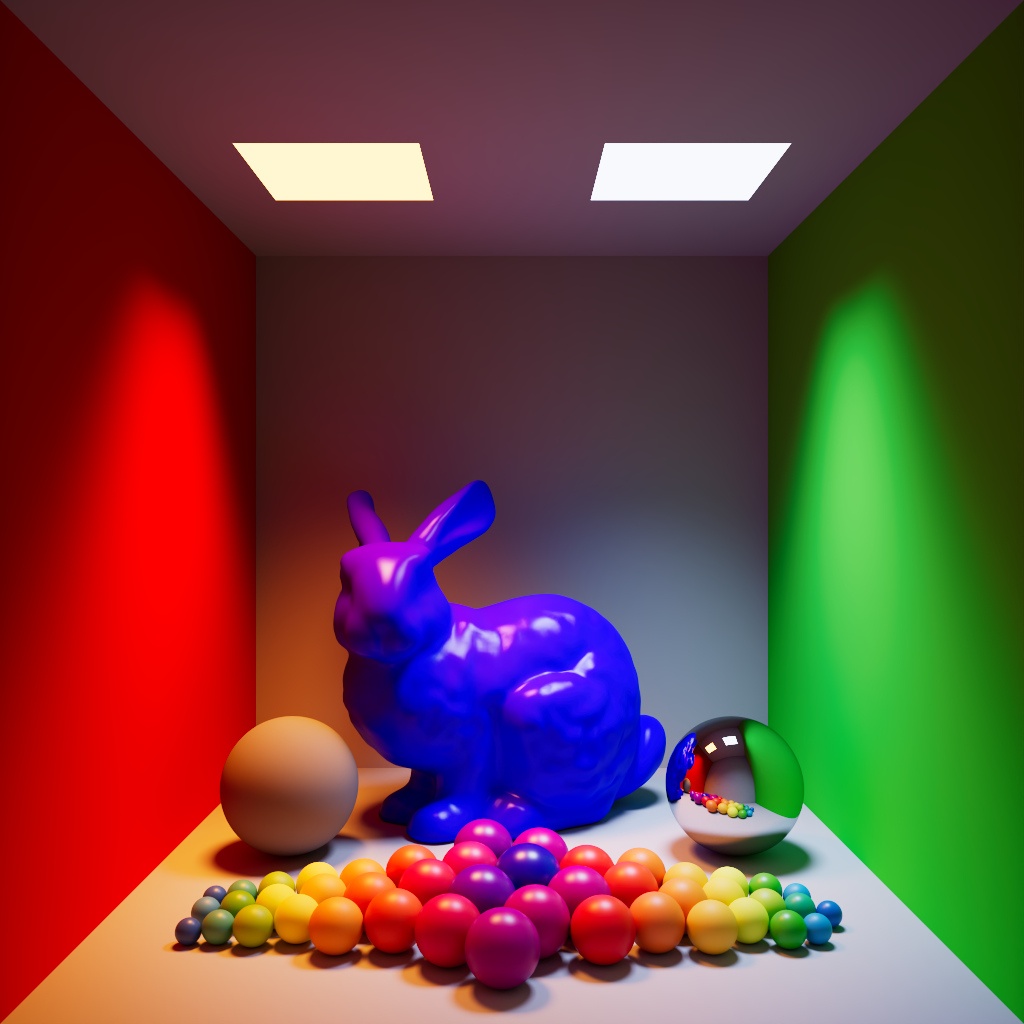
Below are some comparison images of a simple demo scene of various colored objects and two lights, the left light has a color temperature of 2000k and the right 13000k. The demo scene highlights several key things when comparing the new ACES versus the linear sRGB methods, with each set of comparison images the only thing that was changed was the intensity of the lights, all color values remain the same throughout.
This example scene is not intended to serve as a demonstration of why one method is better than the other, but as a very general example of some of the simple benefits of how ACES can manage challenging lighting situations and how it might aid your workflow by giving you the ability to push things farther before visually breaking.
|
|
|
|
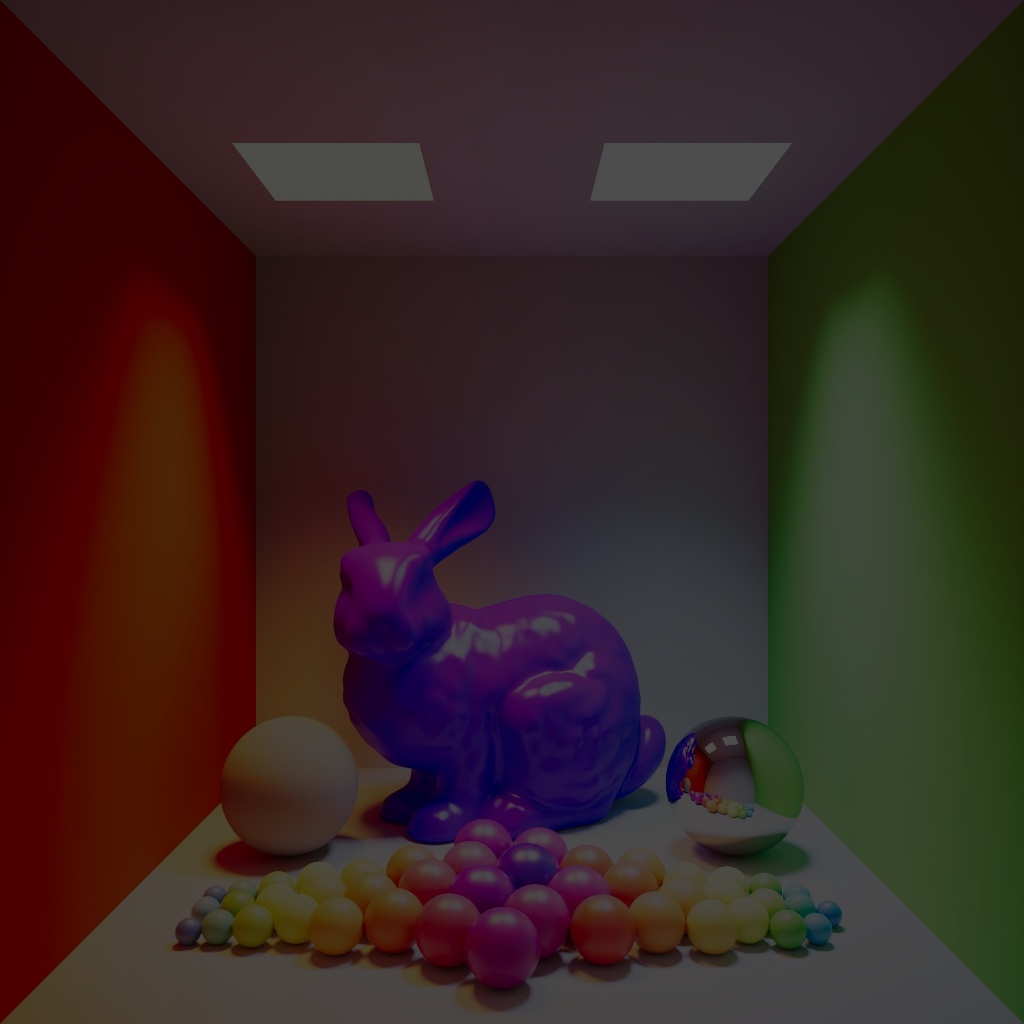
Default ACEScg with ACES SDR-video tonemapping |
Scene-Linear Rec.709-sRGB with Un-tone-mapped view |


From the start the ACES render looks more photographic and generally more realistic despite the uncanny scene. The lighting behaves more naturally in ACES, the bright lights hit the wall and the hottest parts of that light desaturate and roll off nicely back into the color of each wall. The old method begins to clip right away, the lights hit a maximum red and green value and just stay there completely blown out without any desaturation. This can also be seen on the top of the bunny model as well, in ACES the blue shader still manages to maintains its shape under the warm light whereas the linear sRGB method essentially clips to blue and most of the detail is lost, particularly in the ear and face.
In general you might notice that the linear sRGB render looks brighter and by comparison feel that the ACES render looks dull in some respects. This is expected behavior with ACES as it attempts to maintain a more filmic look and in that regard things don't blow out in camera the way that we have become accustomed to when using the older linear sRGB method. For example, there are many objects in the real world that we consider having a white color but if we took a picture of them we wouldn't expect the resulting color value to be 1.0 - pure white. Instead, when under sufficient lighting, we expect those white objects to result in a lighter shade of grey relative to the other colors in the scene, it is only when things are over-exposed or bright sources of light are visible that a clipped output of pure white might be expected. ACES effectively works within that same level of expectation and so a scene-linear value of at least 16 is needed to result in a pure white (1.0) output value when tonemapped through an sRGB output.
|
|
|
|
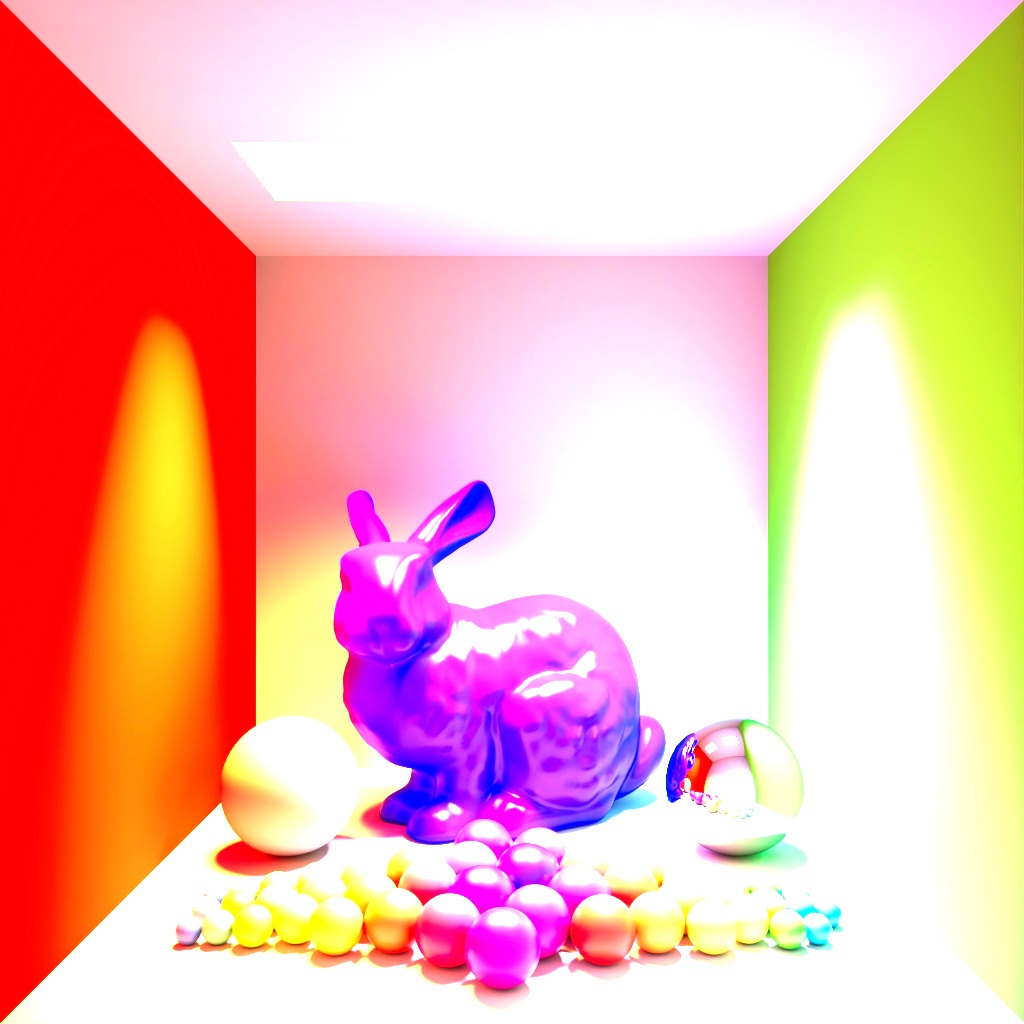
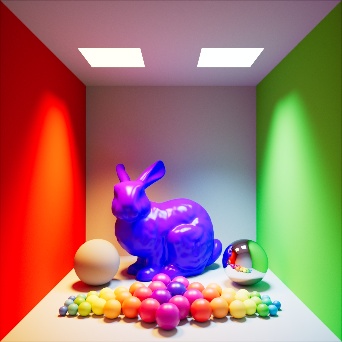
Default ACEScg Exposure +2 |
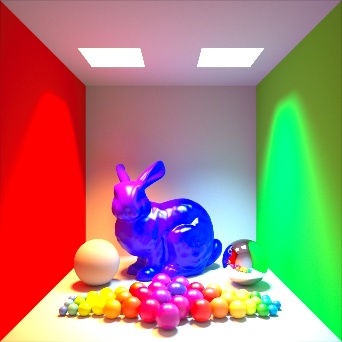
Scene-Linear Rec.709-sRGB Exposure+2 |

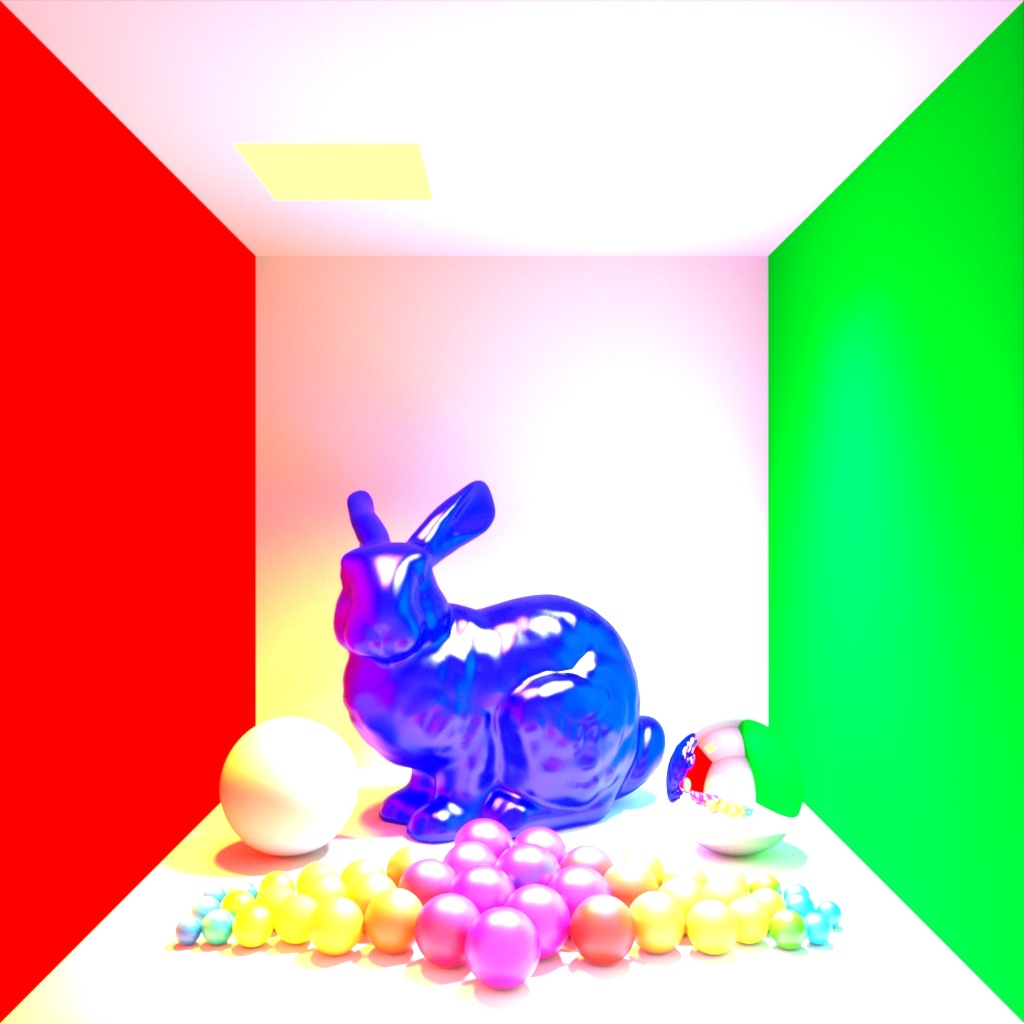
In these examples we compare how an ACES workflow responds to increased exposure versus the linear sRGB method by increasing the light's exposure by 2. The ACES scene is holding together much better, despite clearly being over-exposed most surfaces retain a nice lighting falloff and the objects still have much more shape compared to linear sRGB which is quickly approaching an almost flat shaded look in spots. The ACES scene is much brighter now but most surfaces still aren't clipping to white and allow for more apparent detail in the regions of shadow.
|
|
|
|
Default ACEScg Exposure -6 |
Scene-Linear Rec.709-sRGB Exposure -6 |
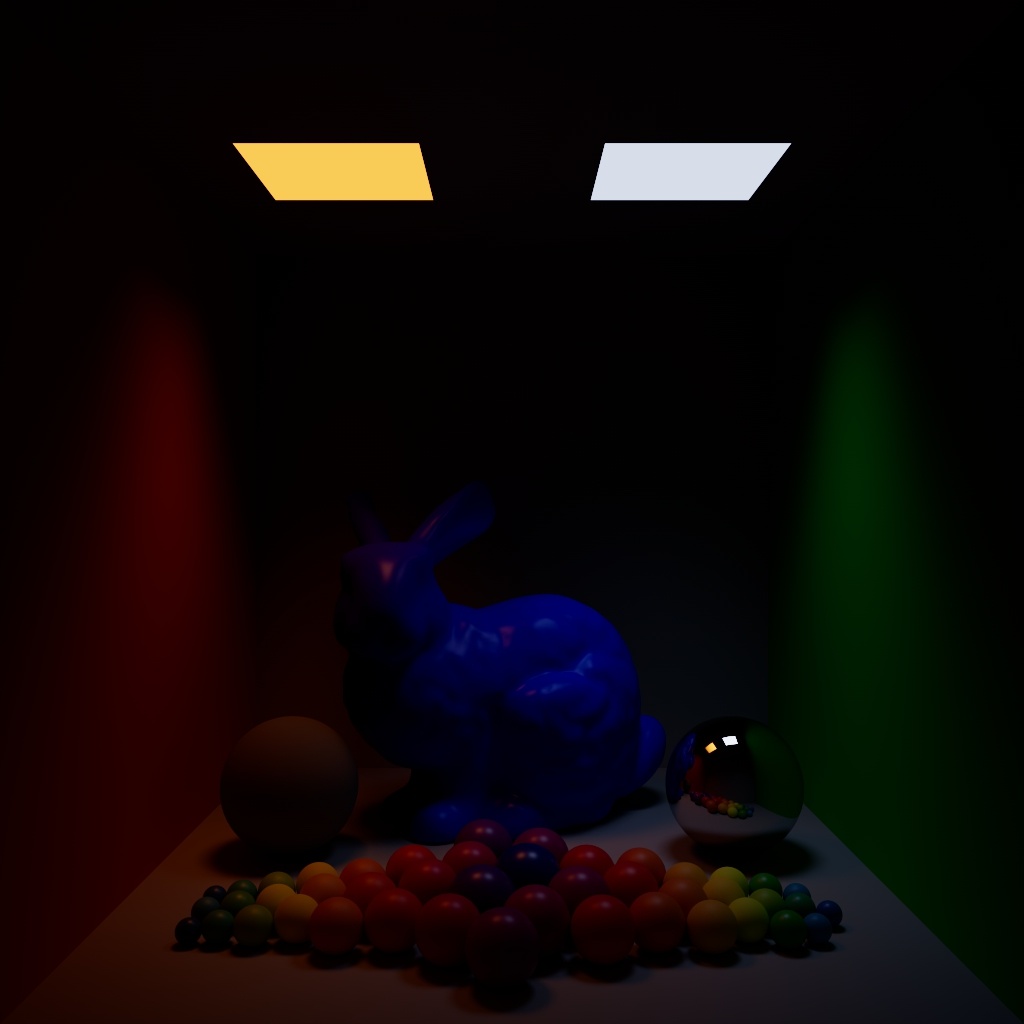
Going the other direction, when we decrease the exposure drastically by 6 the ACES scene gets darker compared to linear sRGB, this is partially due to the fact that the ACES sRGB output tonemapping curve is darker overall with the increased contrast of the more filmic look of ACES.
If you would like to experiment with this scene yourself you can import this alembic camera and these Redshift proxies into your DCC of choice, override with your own shaders, add your own lights and objects, and see how these two rendering methods differ first hand.
You'll want to enable GI, disable any default lights in your scene, and set your render resolution to a square aspect ratio - the example images are 1024x1024.
OpenColorIO
OpenColorIO is an open source color management standard that allows users to manage their color throughout all stages of the production pipeline in a predictable and consistent way. Native OCIO support in Redshift leverages the use of the industry standard ACES color encoding system as the new default rendering color space in the form of ACEScg.
While OCIO allows for an ACES workflow it is not restricted to it, anyone can create their own color spaces and color transformation tools by creating their own custom OCIO config file. Even the older linear workflow for CG rendering can still be used while using OCIO.
Color spaces
A color space refers to a specific gamut of colors with a specific gamma curve. Gamut defines the total set of colors that are able to be represented within a given color space and gamma defines the relationship between the numerical value of a color and its perceived light intensity.
Gamut
The color gamut can be thought of as the container that determines the limit on all the colors that you have at your disposal. If you have a smaller gamut you have fewer colors to work with which means that your color choices will naturally be more limited and the final quality of your work could even suffer. Conversely a wider gamut will give you more flexibility, including the ability to more easily convert down to a smaller color space without sacrificing on quality.
Gamma
A color space’s gamma comes in two forms, linear and non-linear.
Linear refers to a color space where the numerical value of a color and the perceived light intensity scales proportionally with each other. Linear color spaces are preferable for working and rendering spaces because the resulting values are more easily calculated and predictable.
A non-linear gamma curve refers to a color space where the value of a color and the perceived light intensity does not scale proportionally.
As a display format a linear image is generally not considered visually appealing because human sight is non-linear, so we tend to expect a non-linear lighting response when determining if something looks "photo-realistic” since we are more sensitive to value changes in darker colors than lighter colors.
Color spaces and the human eye
Consider that the human eye also has a limit on the wavelengths of light that we can see, we can’t see infrared light for example, with this understanding we can reasonably say the human eye also has its own color space.
In 1931 the Commission Internationale de l'eclairage (International Commission on Illumiation or CIE) defined the basis that we still create our color spaces on to this day with the CIE 1931 RGB color space. CIE 1931 defines the outward bounds of human vision from 400nm to 700nm wavelengths of light, the outward bounds form an arc shape commonly referred to as a horeshoe diagram because of its shape. The colors inside this horeshoe shape represent all the colors that the human eye can see, when compared with the triangular diagram of a digital color space we start to get a better understanding of what amount of this visible color range a color space is actually capable of handling.
|
|
|
Color space comparison |
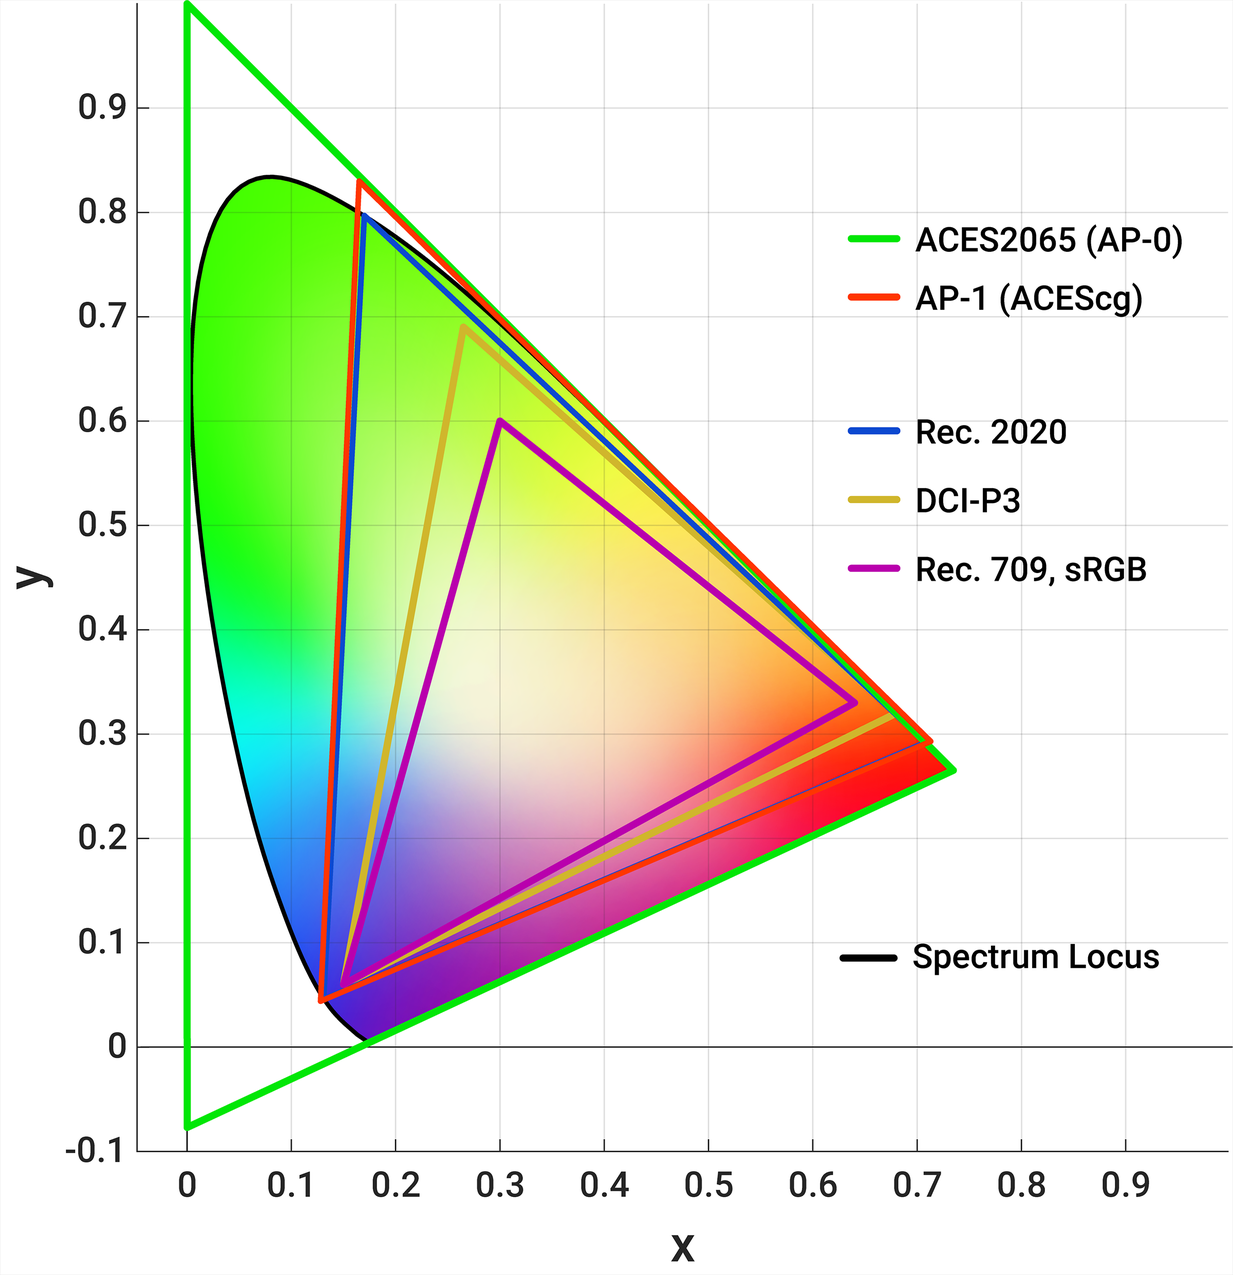
In the image above you can see the horseshoe diagram from CIE 1931 RGB with its black outline known as the spectrum locus or spectral locus. Around and inside the horeshoe are a number of different colored triangles that represent some of the most common color spaces.
From a practicality standpoint, the most important takeaway is that some color spaces are capable of handling more colors than others and in general, the larger the color space you work and render in the easier it is to convert down into a smaller color space later. This is a key aspect of why ACES uses such wide color spaces like the green and red triangles of ACES2065 and ACEScg respectively, they allow for an enormous amount of range and flexibility while still remaining compatible with smaller color spaces like Rec. 709, sRGB since they fully encompass their smaller gamut.
sRGB - Rec. 709 color spaces
Most artists will be familiar with the sRGB color space, this has been one of the most common color spaces for some time now as it is the default color space for many digital art programs like Adobe Photoshop and the internet in general.
There are three main color spaces to discuss here: sRGB color space, Rec. 709 color space, and scene-linear Rec. 709-sRGB. All three color spaces share the same gamut (the purple triangle in the image above) but it is their gamma curves that are different which makes them distinct. sRGB and Rec. 709 have a different non-linear gamma curve while scene-linear Rec.709-sRGB (sometimes shortened to linear sRGB) has a linear gamma curve.
Linear sRGB is the color space used for the CG rendering method commonly referred to as “linear workflow.” Rendering in a linear color space improves results over rendering in a non-linear color but the color space is still heavily limited by the narrow sRGB gamut.
ACES Concepts
The ACES workflow for CG in Redshift is designed to be relatively simple and artist friendly in practice despite the complex underlying color science that serves as its foundation: import and convert all assets to the same color space (ACEScg for Redshift), work in that unified color space, and when finished export everything to the format needed for the next stage in production. Working in ACES with Redshift already has many inherent benefits if your process stops at the render, it's easy to output tone mapped ACES SDR (standard dynamic range) sRGB images, but those benefits extend even further if you intend to apply further processing and effects afterwards in color grading and compositing. An ACES workflow in compositing continues much like it does in CG, importing and converting all assets to ACES, work in ACES, and exporting to the next format.
In order to facilitate moving through each stage of the workflow it is important to understand some of the key concepts that make up the ACES workflow and an ACES OCIO configuration file.
| Color Management Terms | Description |
|---|---|
| Linear |
Refers to a color space where the numerical value of a color and the actual perceived light intensity scales proportionally with each other. Linear color spaces are preferable for working spaces because the resulting values are more easily calculated and predictable; however as a display format a linear image is generally not considered visually appealing because human sight is non-linear so people tend to expect that type of look when determining if something looks "photo-realistic."
|
| Non-Linear |
Refers to a color space where the numerical value of a color and the actual perceived light intensity does not scale proportionally. Human vision is non-linear, we are more sensitive to value changes in darker colors than lighter colors.
|
| Gamma |
Defines the relationship between the numerical value of a color and its perceived light intensity.
|
| Gamut |
A gamut is the total set of all colors that are capable of being represented within a given color space.
|
| Color Space |
Refers to a specific gamut of colors with a specific gamma curve.
|
| Scene-Linear / Scene-Referred |
This refers to the result computed by Redshift as raw linear data before any further kind of processing is done to the image. In situations outside of CG, this would refer to the direct result of the camera sensor recording light values as they are before processing.
|
| Display-Referred |
This refers to the converted output of scene-linear data into non-linear data in order to be properly displayed on a monitor in a specific color space.
|
ACES Config Components
| OCIO Config |
This is the .ocio file that contains all of the relevant OCIO / ACES components needed for your OCIO color management workflow. It houses all your IDTs, ODTs and everything you need to get from the start to the end of your project within an ACES workflow. The same OCIO config should be used for all parts of the production pipeline when working with ACES, if you start your project in Redshift with one OCIO config the same one should be used when compositing with ACES in order to ensure consistency throughout the project. It's entirely possible to use different OCIO config files but care should be taken when doing so. This file is most commonly seen named config.ocio |
|
|
|
| ACES Color Space | Description |
|---|---|
| ACES2065-1 |
The foundation of ACES, a linear color space with the widest gamut of all ACES color spaces, capable of encompassing all the colors of human vision. ACES2065-1 is used for archival or transfer purposes rather than a working color space.
|
| ACEScg |
A linear color space used in CG and effects composting, default used by Redshift for rendering. Wide gamut.
|
| ACEScc / ACEScct |
Non-linear color spaces used for color correction. ACES cct has a different gamma curve in the form of a "toe" in the dark portion of the image compared to ACES cc. The resulting effect is footage that is more similar to grading in log. |
|
|
|
| ACES Transforms | Description |
| IDT - Input Device Transform |
These transforms are used to take the color data of a specified source and convert it into a specified color space. In Redshift this is most commonly used when converting textures used in shaders and lights to the rendering color space.
|
| RRT - Reference Rendering Transform |
The RRT converts raw scene-linear data into linear HDR display-referred data in preparation to be used with an ODT. This is a step that is performed automatically in the background whenever an ODT is used and is necessary to convert from the raw linear output into a color space suitable for conversion into the final display space for monitors.
|
| ODT - Output Display Transform |
These transforms are used to convert the high dynamic range RRT result into data that can be properly viewed on your display.
|
Common OCIO color spaces and their purpose
|
OCIO v2 Naming (Redshift default config) |
OCIO v1 Naming (ACES 1.2 config) |
Purpose |
|---|---|---|
| sRGB | Utility - sRGB - Texture |
To be used on Input with LDR (low dynamic range) sRGB color images like JPEG and PNG.
|
| Scene-Linear Rec.709-sRGB |
Utility - Linear - sRGB
|
To be used on Input with HDR (high dynamic range) color images like dome light / area light textures and other linear HDR color images.
|
| ACEScg | ACES - ACEScg |
To be used on Input for pre-converted ACEScg textures.
|
| Raw | Utility - Raw |
To be used on Input with non-color (data) images like bump, normals, roughness, displacement etc.
|
| Invert ACES 1.0 SDR-video | Output - sRGB |
Can be used on Input to more easily match branding colors. This is known as using an inverted LUT as it involves using a transform normally reserved for Output as an Input. This is not recommended to be used with textures in a physically correct shader as things like pure white will be mapped unrealistically bright. |
|
Camera Specific Color Spaces
|
Input - *Camera* - *Color Space* |
To be used on Input with the matching camera specific color space. |
ACES Workflow
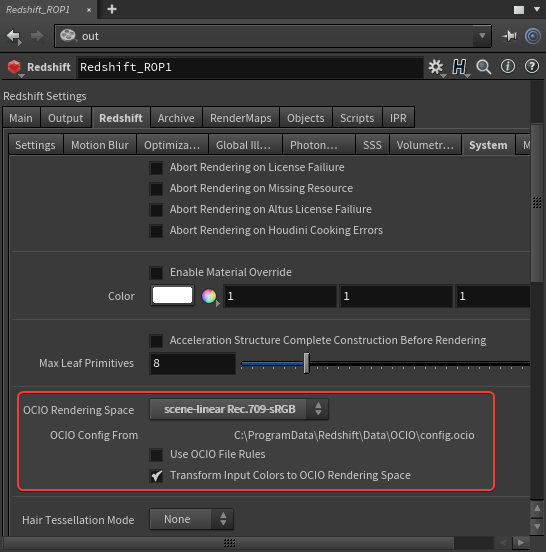
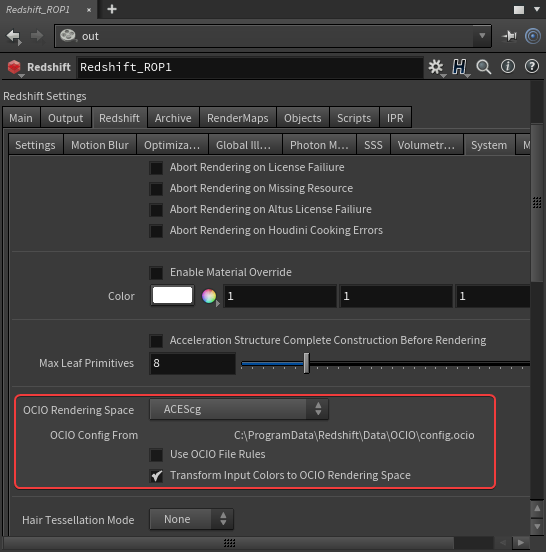
Step 1: Redshift Color Management Setup
Before working in ACES an OpenColorIO configuration file must be set in the Color Management section of the Redshift Globals render settings. By default Redshift is set up to use the OCIO file path established by your computer's environment variable, if no OCIO environment variable is established then Redshift will default to the custom OCIO ACES configuration that Redshift ships with. This custom Redshift ACES config is pared down and it contains commonly used input and render color spaces (including ACEScg), as well as some output display transforms. Once an OCIO configuration file is properly specified a rendering color space can be chosen, ACEScg by default.
An environment variable is a dynamically-named value that is established at the system level. In practice an environment variable is queried by programs for a custom value specific to that system.
For OCIO this comes in the form of an environment variable called $OCIO which corresponds to the file path of your system's OCIO config. In practice this tells your OCIO relevant software where on your system it should be pulling your OCIO config from and makes it easy to use the same config file across all of your software and through the various stages of production without manually setting up each piece of software. Click below to learn how to set up an environment variable for your system.
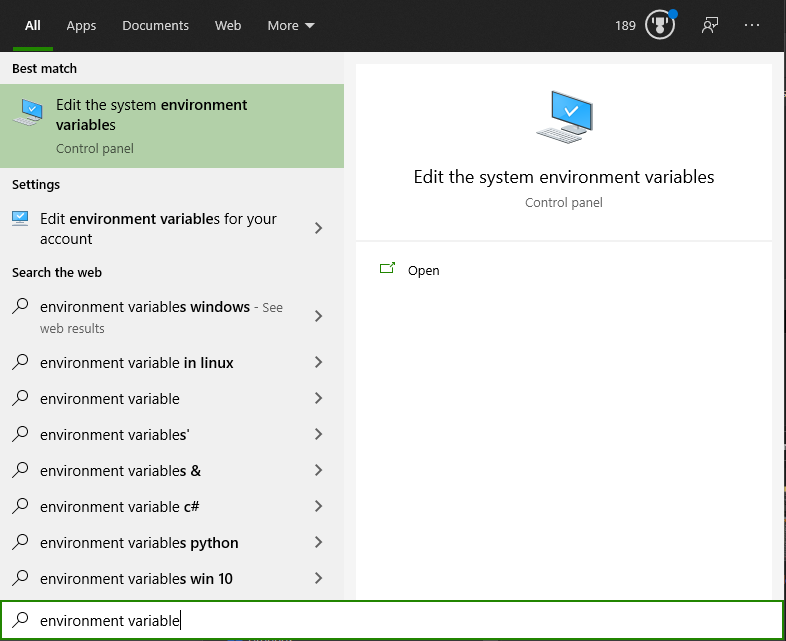
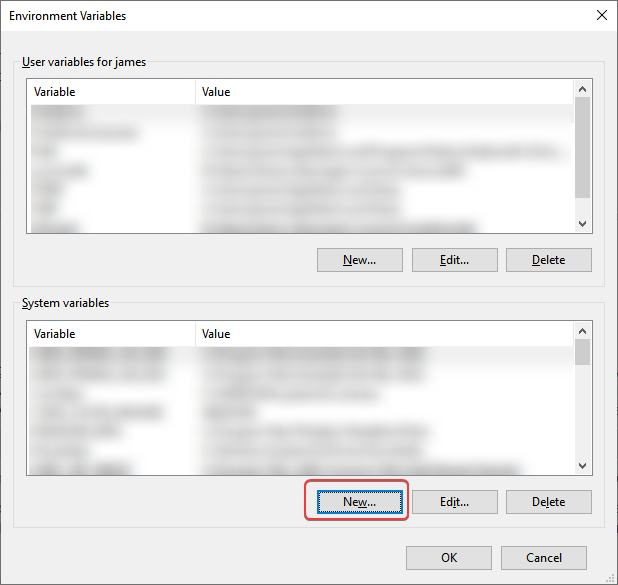
Start by typing "environment variable" into your start menu and click on "Edit the system environment variables."
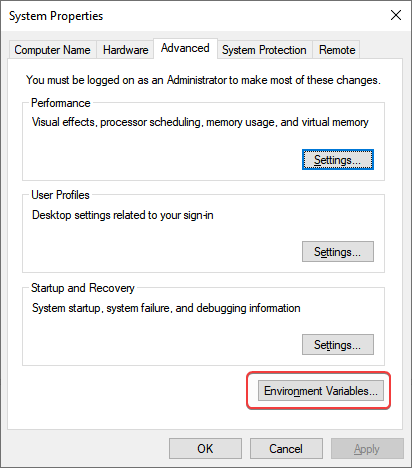
Then click on the "Environment Variables..." button in the System Properties window.
From there create a "New" system variable:
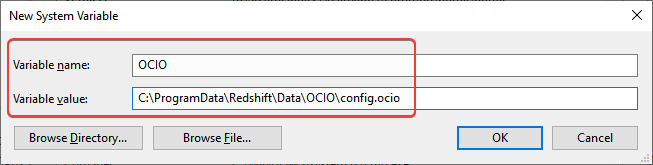
Use the following settings
- Variable name: OCIO
- Variable value: Copy the full file path to your OCIO config file here
- The example image below is set to use the custom OCIO config that ships with Redshift.
- C:\Program Files\Maxon Redshift 20XX\Data\OCIO\config.ocio
After the rendering color space is specified you must select a display transform that matches the display you are working on to properly preview the renders. If you are using an sRGB monitor then you would use the default sRGB display transform. In addition a View transform can be selected to tone map the render to your liking, by default Redshift uses the ACES 1.0 SDR-video view transform which has some nice filmic tone mapping.
Redshift ships preconfigured for the most common ACES workflow but if yours is not setup try using the following settings:
If you would like to render using the old color management method match your render settings to use the Render Space "scene-linear Rec.709-sRGB" and the "un-tone-mapped" view transform as pictured below.
|
Custom OCIO Config
If you would like to use your own custom OCIO config instead it's as simple as changing the OCIO configuration path in the Redshift Color Management settings to your own config file.
The OCIO config that comes with Redshift is lightweight, if you have the need for more IDTs and ODTs you can download the latest ACES config file released here, save it somewhere on your hard drive and then set its location as the OCIO config path in Redshift or set its path in your own environment variable.
Step 2: Convert Assets to ACEScg
|
|
|
|
| Redshift Texture Color Space parameter | Redshift Texture Color Space menu expanded | Redshift Dome Light Color Space parameter |
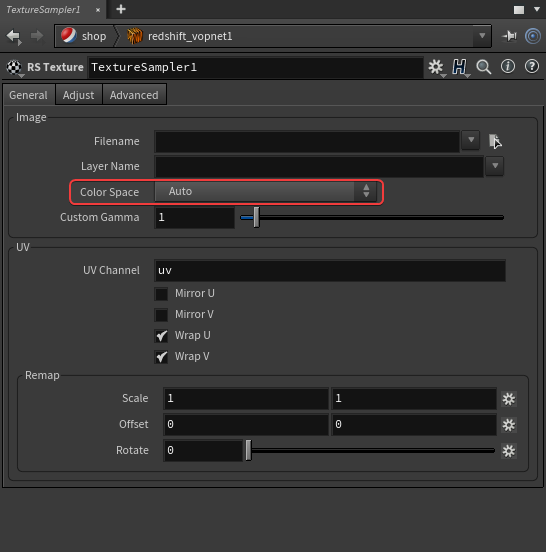
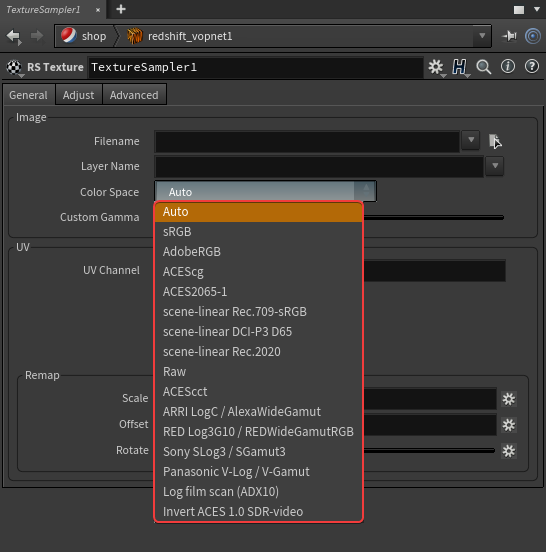
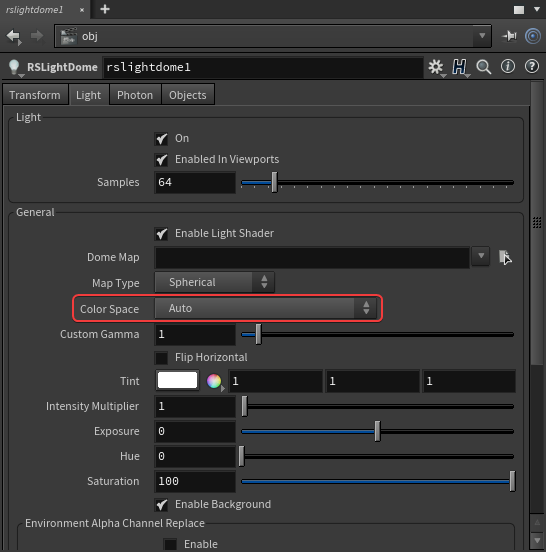
In order for colors to display as expected all source assets must first be converted into the same linear rendering color space, ACEScg by default. This is accomplished by setting the color space correctly for each asset using the color space drop-down menus pictured in the pictures above. These color space parameters serve as a built-in Input Display Transform (IDT) when viewed through the lens of an ACES workflow, the same general mentality as working with ACES renders in composite as described on this page.
Redshift automatically converts native color swatches like diffuse colors, ramp colors, and the Redshift physical sky into the linear rendering color space. Redshift is set up by default to automatically convert any textures used with materials, lights, and dome lights into the rendering color space but there is a chance that it will get this automatic conversion wrong. It's important to make sure that the color space is set correctly for each asset which is why it can be overridden manually by following these general tips:
- If your asset is for color data
- Examples: diffuse / albedo color, specular/reflection color, dome light texture/backplate
- If you already know what the correct color space is set it to that
- If it's a JPG / PNG / BMP etc set it to sRGB
- If it's an EXR / HDR etc set it to scene-linear Rec.709-sRGB or other appropriate scene-linear color space
- If your asset is for non-color data
- Examples: normal, roughness, metalness, displacement etc.
- If you already know what the correct color space is set it to that
- Otherwise set it to Raw
|
|
|
|
Correct Color Spaces |
Incorrect Color Spaces |
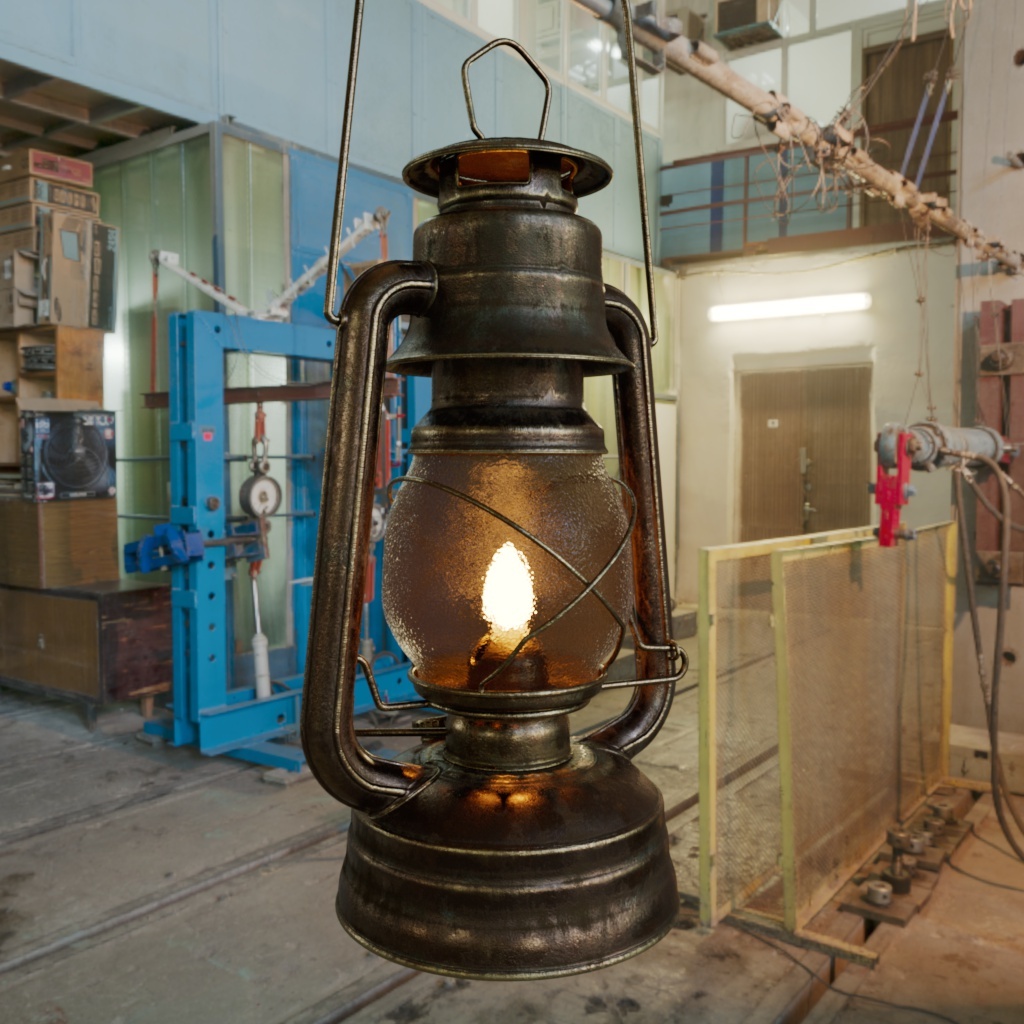
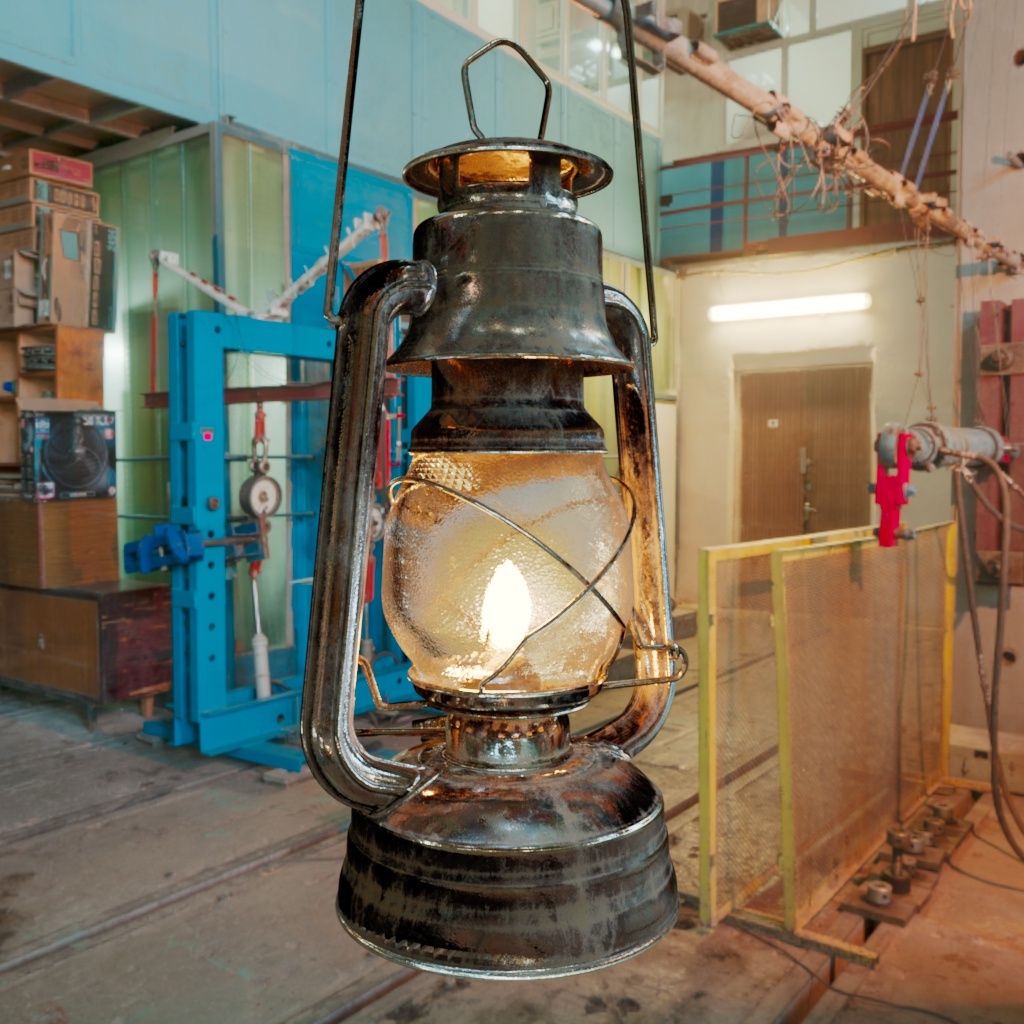
In the example images above the only difference in scene setup is that the color spaces were set up correctly versus incorrectly. The diffuse color texture was set to raw instead of sRGB and all non-color textures were set to " sRGB" instead of the correct color space " Raw." Setting the color spaces correctly is required in order for renders to look right, in general incorrect color spaces for non-color textures negatively impacts the final result more so than incorrect color spaces for color textures. For example, the result of the normal map in the incorrect example looks fully broken, resulting in jagged unnatural reflections that fall far from achieving the correct result on the glass and in the bottom left of the lantern. Incorrect color spaces for color data like diffuse color and HDRI dome light backplate are more subjective, while still technically incorrect they don't visually break as drastically. For example, notice that the HDRI in the background becomes too saturated when incorrectly set to color space " raw" instead of " scene-linear Rec.709-sRGB," this is because it is being incorrectly transformed into the too wide gamut of ACES2065 vs the proper sRGB gamut that the HDRI was originally captured in.
You can download the model, textures and HDRI with the links below to easily recreate the demo scene pictured above. Model and texture credit to Rajil Jose Macatangay at PolyHaven.com
HDRI credit to Oliksiy Yakovlyev at PolyHaven.com
Step 3: Rendering with ACES
Rendering with ACES is automatic when your scene is set up for OCIO ACES Color Management. If you intend to continue with compositing and editing of your ACES Redshift renders then you probably want to retain the ability to fully utilize the strengths of the ACES workflow in your compositor of choice in which case you would want to render out unclamped linear 16bit OpenEXRs. If that extra range is not necessary you can render out as JPG, PNG or other LDR (low dynamic range) file formats with the ACES View tone mapping baked in which will result in highlights being clamped to 1.0, limiting how far you can push edits in post as demonstrated with the comparison below.
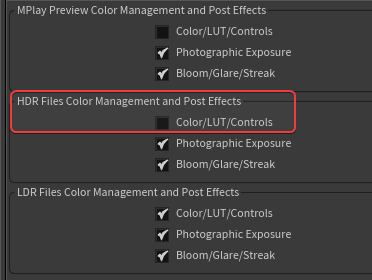
To render out unclamped linear OpenEXRs in Houdini make sure that "Color / Lut / Controls" are disabled for HDR file types as seen in the image below.
|
|
|
Post Effects settings for unclamped OpenEXR and other HDR file formats |
Unclamped vs Clamped Output
|
|
|
|
Linear ACEScg OpenEXR with Output sRGB ODT - unclamped & unedited |
Non-Linear sRGB JPG with Baked in ACES SDR View - clamped & unedited |

At first without any editing both images look identical, as they should, but once you start editing the image the limitations of the clamped SDR JPG becomes readily apparent.
|
|
|
|
Linear ACEScg OpenEXR with Output sRGB ODT - unclamped & Gain +2 |
Non-Linear sRGB JPG with Baked in ACES SDR View - clamped & Gain +2 |
By increasing the gain the clamped JPG with the baked in view transform severely clips throughout the image while the unclamped image handles the over exposure very well as it is still benefiting from the flexibility and increased range of the linear EXR within the ACES workflow. This lack of range is exacerbated even worse if we take this image and go down with the gain adjustment.
|
|
|
|
Linear ACEScg OpenEXR with Output sRGB ODT - unclamped & Gain 0.3 |
Non-Linear sRGB JPG with Baked in ACES SDR View - clamped & Gain 0.3 |
When we reduce the gain from the default 1.0 to 0.3 the difference is stark, since the JPG version already had all of its highlights clipped to 1 everything is forced to reduce in brightness in a very uniform way. This is despite the fact that in the actual scene the Redshift lights are much brighter than the walls that they are casting on, so the clamped image looks more like you are adjusting the opacity of a black solid layer on top of the image rather than adjusting the brightness of the scene itself as in the results of the unclamped EXR example. The raw value of the visible lights in the unclamped linear EXR go as high as 30 (compared to the clamped JPG's 1) so when the gain is reduced the picture darkens in a more predictable and realistic manner due to this much higher dynamic range.
|
|
|
|
Linear ACEScg OpenEXR with Output sRGB ODT - unclamped & Gain 0.02 |
Non-Linear sRGB JPG with Baked in ACES SDR View - clamped & Gain 0.02 |


We can take that to an even further extreme to demonstrate just how much more flexibility and range rendering out an unclamped EXR gets you with a gain value of 0.02. The clamped non-linear JPG is essentially completely gone at this point, and depending on your monitor calibration / viewing situation you may not even be able to see anything at all, but the unclamped linear EXR still looks great. It's certainly now a very dim and underexposed scene but it still looks appropriate and correct if this is the sort of look you're going for and it is easily achievable.
Color Management Parameters
|
|
OpenColorIO Configuration
This sets the path to the OpenColorIO config file. By default Redshift ships with and uses its own predefined configuration but a custom OCIO config be set here as well.
Render Color Space
This is the linear color space that Redshift renders in, ACEScg by default which allows Redshift to make full use of its wider rendering color gamut.
Display Space
This is the Output Display Transform that should be set to a color space that is supported by the display that you are working on, for most people this will be sRGB.
View Transform
This determines how the image is displayed on screen and works in conjunction with the Display transform. By default this can be set to an ACES SDR tone-mapped result, un-tone-mapped, a logarithmic color space (ACEScct) or the raw linear result which is unaffected by the Display transform.
|
|
|
|
|
|
View: ACES 1.0 SDR-Video |
Un-tone-mapped |
Log |
Raw |


Use OpenColorIO File Rules
When enabled this will use any file rules established within the currently used OCIO config file. OCIO file rules are used to automatically set the correct color space for assets that fall within established parameters.
Examples:
- If a file is a jpg / png and has the words "albedo" or "diffuse" in the file name use the sRGB color space
- If a file is a jpg / png and has the words "roughness" or "normal" in the file name then use the Raw color space.
Transform Input Color to OCIO Rendering Space
When enabled this will automatically transform colors selected in the Houdini color picker to the OCIO rendering space.
OCIO Issues
If you encounter issues with OCIO color spaces please take a look at the official Redshift Support pages.