Matte Shadow Catcher
THIS SHADER IS DEPRECATED!! PLEASE USE THE REDSHIFT MATTE OBJECT PROPERTIES MATTE INSTEAD!
Introduction
This shader is used for integrating CG models into a scene that contains a photographic background which already contains pre-baked lighting and is generally used in conjunction with a Camera Map shader. It allows you to capture shadows from CG-lit models, as well as Ambient Occlusion, essentially to remove light from the a pre-baked scene. These shadows can be tuned in the shader, or output to the alpha channel for compositing. The shader also allows the capture of additional CG illumination, both direct and indirect (GI).
Note that this shader does not receive indirect lighting from the Environment shaders as they are not permitted to illuminate Matte Shadow surfaces.
General
Background Is Environment
When this option is enabled, the 'Background Color' parameter is ignored and the color from the global environment shader or dome light is used instead.
Background Color
This is background color that contains pre-baked lighting.
Background Alpha
This specifies the alpha value for the visible background.
Emissive Color
This is added to the final color to make the surface glow. The default color black means no emission.
Emissive Scale
This lets you control the intensity of the emissive color.
Illumination
Diffuse
Catch Diffuse
This enables the capture of diffuse illumination from direct and indirect (GI) lighting.
In order to receive illumination from CG lights, the 'Matte Shadow Illuminator' option needs to be checked for the light. This setting can be enabled under the Ray Contribution section of your lights.
Only Redshift Physical Lights and Redshift IES lights can be Matte Shadow Illuminators.
Color
This is the diffuse tint color applied to direct and indirect lighting.
Weight
This allows you to scale the diffuse lighting amount received.
Shadows
Catch Shadows
This enables the capture of shadows from CG-lit models.
Shadow Color
This is the base color of the shadows. The darker the shadow, the more of this color is applied. For example, if the cast shadow is solid black, then it is effectively replaced with this color.
Shadow Alpha
This is the alpha color of the shadows. For instance if your background alpha is set to 0 and your shadow alpha is set to 1 then you will be able to differentiate between the two in the alpha channel. Alternatively with background alpha set to 0 and shadow alpha set to 0 you could still catch shadows but your shadows would not affect the alpha.
Ambient Color
This is an ambient 'light' color that is added to the shadows, generally used in place of real GI.
Factor in Light Angle
Normally, as the angle between a light and surface decreases, the shadows will appear weaker. Disabling this option makes the shadows strength consistent, regardless of light angle to the surface.
Saturation
This is useful for removing color from shadows that have come from colored CG lights.
Transparency
This controls the transparency of the shadow.
Reflections
Catch Reflection
This enables the capture of reflections in the scene, both from objects and specular CG lights.
Color
This controls the tint of specular/glossy reflections and traditional specular "highlights". Setting this to black means light will not be reflected and thus disables the effect..
Alpha
This allows you to control the alpha value of the refrlections.
Weight
This allows you to scale the reflections received. Zero means "no reflection". One means "maximum reflection".
BRDF
Allows you to choose the technique for simulating physically correct rough reflections. Beckmann is generally considered the standard for a good range of materials, but GGX has a wide specular tail, which is good for chrome materials.
- Ashikhmin-Shirley (legacy)
- Beckmann (Cook-Torrance)
- GGX
- Ashikhmin-Shirley
The legacy BRDF option uses a non-linear looking glossiness fall-off and exists to maintain compatibility with 1.0 materials.
Glossiness
High glossiness means sharp or 'specular' reflections. Lower numbers will make the reflections blurrier and 'rougher', with 0.0 yielding an almost diffuse look.
Samples
Blurry reflections (when "Glossiness" is less than 1.0) will need multiple samples to get a clean "grain-free" result. Higher numbers will reduce any potential grain issues but will take longer to render and vice-versa.
Attenuation
Enable
This enables a fogging attenuation effect on the reflections. The fall-off for the effect is controlled by the parameter below.
Distance
This controls the exponential extinction of the reflection. A value of 0 means no extinction and disables the effect. Larger values yield a more gradual extinction effect.
Ambient Occlusion
Enable
This enables the ambient occlusion effect.
Samples
This controls the number of rays shot. The more samples there are, the smoother the result. Using 32 to 64 samples produces generally good results.
Max Distance
This controls the maximum distance of each ray. The larger the distance, the more likely the ray will hit something and contribute to the overall occlusion effect. Setting a length of 0.0 will use the maximum ray distance of the scene.
Shadow Color
This is the color tint when completely occluded.
Matte Shadow Catcher Example
Here is a simple scene that demonstrates the Matte Shadow Catcher shader, with its 'Background Color' connected to a Camera Map shader. It is 'lit' by a single Dome Light that has a back-plate that is the same image as the Camera Map. Note that illumination from the Dome Light does not affect the Matte Shadow plane.
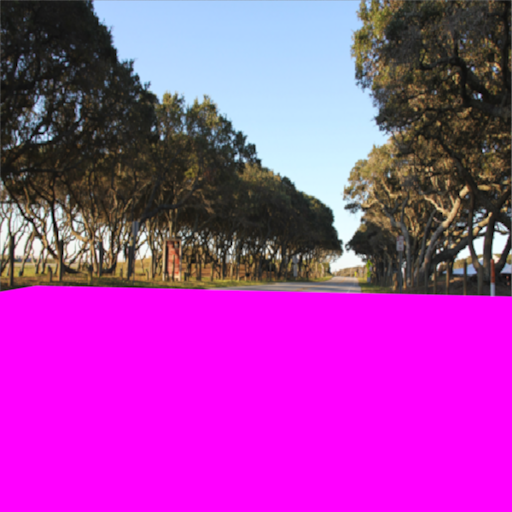
Here you can see the environment back-plate image (courtesy of Jeff Patton), with a modeled magenta plane in the scene where the road should be.
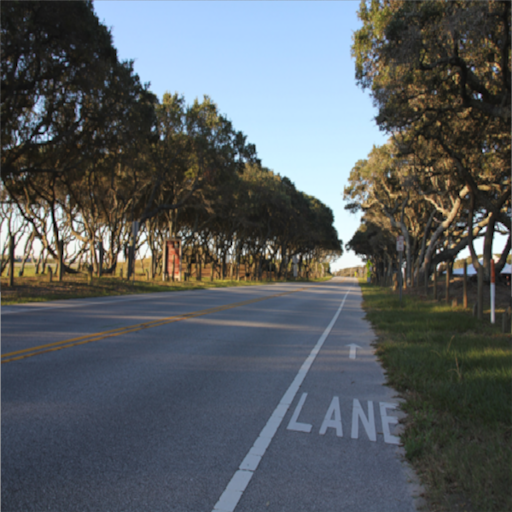
Now with the Matte Shadow Catcher and Camera Map applied to the plane (with its image being the same one as the back-plate). It looks kind of lonely out there…
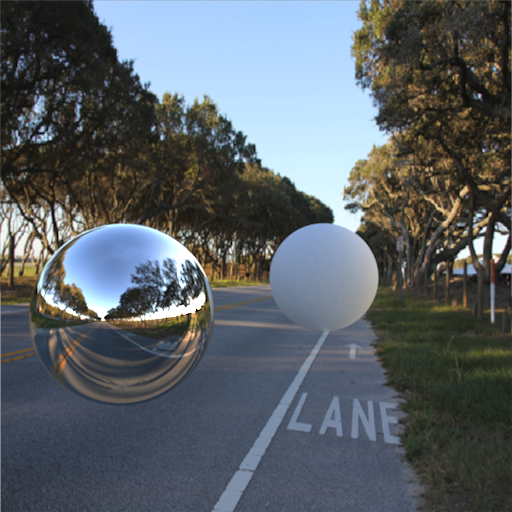
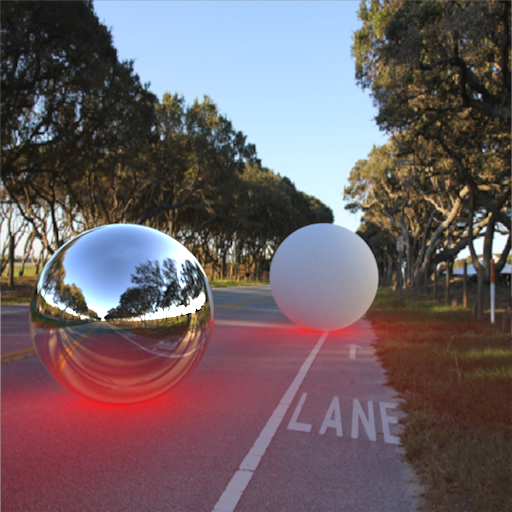
Now we create a fully reflective sphere, hovering just above the Matte Shadow plane. The Environment map uses a back-plate for eye rays and a spherical 'longitude-latitude' map for reflections/refractions/GI. The reflective sphere is reflecting the environment map. We also have a fully diffuse 'white' sphere placed further away. Only the spheres are able to receive illumination (the Dome Light) and GI. At this point 'Catch Shadows' has not been enabled – the spheres look like they are not part of the scene.

After enabling 'Catch Shadows', the spheres look they are part of the scene, since they now cast shadows on the plane below them. Note that the shadows are soft – this is due to the distribution of the light in the Dome Light environment image (the same one you can see reflected in the nearest sphere).The matte shadow material is now using the default settings here, except ambient is set to 0,0,0.
This example demonstrates the effect of applying a base 'Shadow Color' (red in this case). Now the shadows are clearly visible.
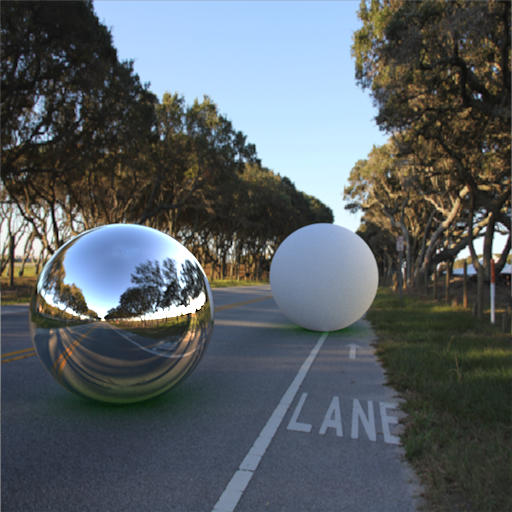
This example demonstrates the effect when AO is enabled, with a green AO 'Shadow Color' to make it more obvious. AO is probably not necessarily useful in this scene, due to the softness of the shadows already cast by the Dome Light.
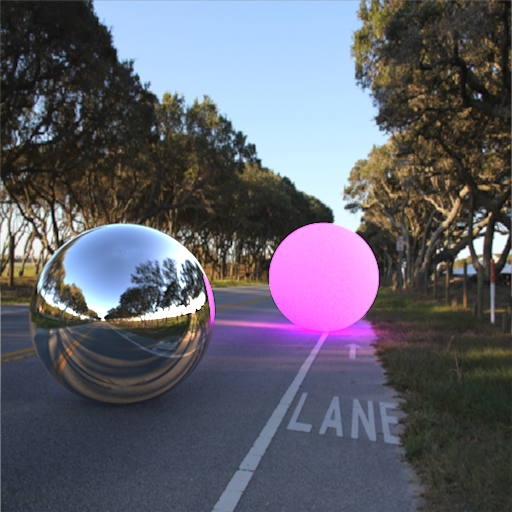
Now we enable 'Catch Diffuse' on the Matte Shadow shader, using the 'Background Color' as the diffuse tint, with the diffuse weight dialed down. Since we have no Matte Shadow 'illuminator' lights in the scene, only indirect diffuse light will be received. To demonstrate this, we make the second sphere emissive. See how it now illuminates the ground?
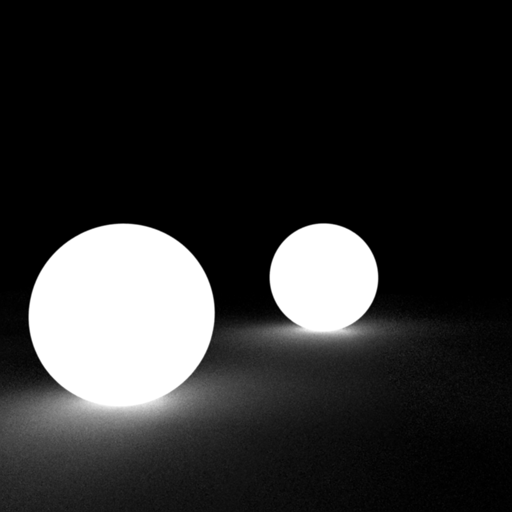
The following image shows you the alpha channel of the resultant render. With the 'Background Color' alpha set to 0 and the 'Shadow Color' alpha set to 1, the alpha channel solely contains shadow intensities on the ground.