The Light > Background sub-palette controls the set up and adjustments for a panoramic background.
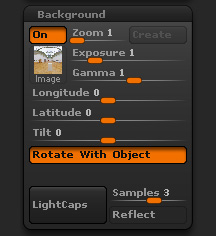
Light > Background sub-palette
On
The On button enables or disables display of the background image. This option is only available if a background image has been loaded.
Zoom
The Zoom slider lets you zoom within the background image. It is only possible to zoom in; you cannot zoom out.
Create
The Create button will create a new background using the current Document Back color. The new background will be shown in the Image thumbnail.
Image thumbnail
When clicking the Image thumbnail, you can choose which background image to apply from the Texture palette. If the desired image has not already been loaded, click the Import button at the bottom left of the popup window to browse for the image file you wish to use.
Exposure
The Exposure slider lets you define the exposure value of the image. This is useful when working with 32-BIT images like HDRI since they contain multiple exposure ranges.
Gamma
The Gamma slider lets you change the gamma value of the loaded background texture. This affects the darker regions of the image without affecting the brighter regions, allowing you to make shadows darker or to bring out details that are hidden by shadows.
Longitude and Latitude
The Longitude and Latitude sliders let you rotate the background image on the horizontal and vertical axes. This makes it possible to find the best point of view for integrating your model with the image.
Tilt
The Tilt slider performs a rotation of the background image around the depth axis. Combined with the Longitude and Latitude sliders, this option makes it possible for you to rotate your background in any manner, across all axes.
Rotate With Object
Rotate With Object synchronizes your mesh orientation with the background. The result is that whenever do a camera rotation, the background will follow. This function is enabled by default.
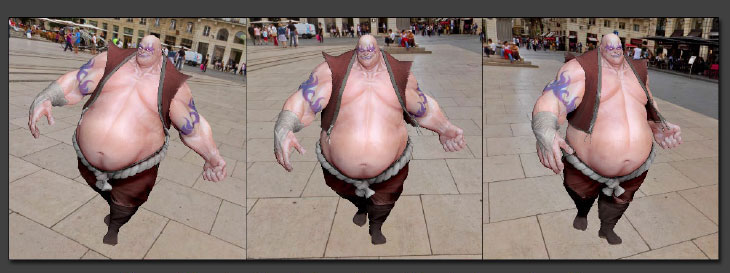
Three different views with matching background positions
When recording a movie, making a Turntable or creating a History animation, the background image will match your camera movements.
Note: only rotation is synchronized; for panning and zooming the background will remain static.
LightCaps
The LightCaps function lets you create a LightCap (Light Capture) based on the shading information within the background image. Once this has been done the LightCap image can be accessed and applied using the Light palette.
LightCap creation is based on two settings: the Samples slider and Reflect mode.
Samples
The Samples slider defines the number of lights which will be created for the LightCap :
- 0 creates 1 lights
- 1 creates 2 lights
- 2 creates 4 lights
- 3 creates 8 lights
- 4 creates 16 lights
- 5 creates 32 lights
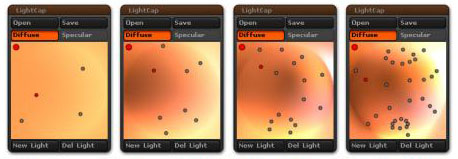
From let to right, a LightCap created with a Sample of 2, 3, 4 and 5. More samples produce a more accurate LightCap
The more lights that are created, the more closely your LightCap will match the image’s lighting and color information. However, this also means that if you wish to modify the LightCap information you will need to adjust the values of more lights.
Reflect
When Reflect is enabled, specular information will be calculated from the image and created as part of the LightCap. This specular data will then be added to each light. This option is useful when you want to use a reflective material on your model.
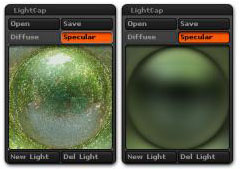
Left: Specular created with the Reflect mode on. Right: with the Reflect mode off