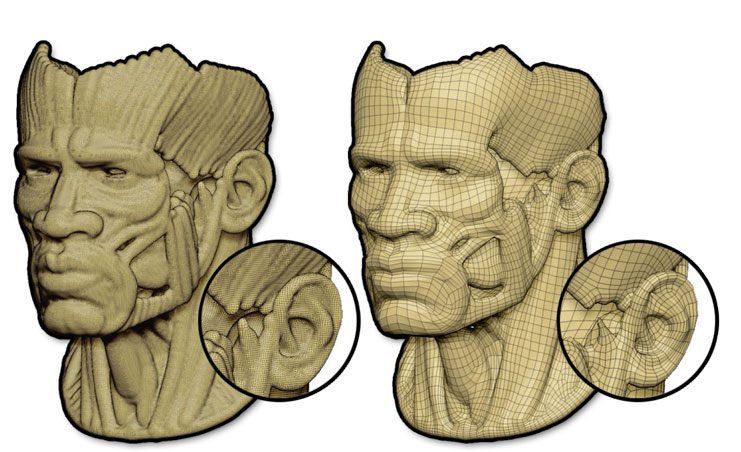
On the left, the original Unified Skin generated from a ZSketch, on the right, the ZRemesher retopology with the default setting applied: It’s just a one button automatic retopology!
ZRemesher will recreate a new polygonal structure for your model, with a controlled flow of polygons and a global polycount value. In just a few seconds you can convert a 200,000 polygon DynaMesh to a 10,000 poly retopologized model with a natural flow of polygons. From there you can project all the fine details from your original sculpture, easily generate UV’s with UV Master, and ultimately create your Vector, Displacement, Normal and Diffuse maps.
The fully automatic solution will give very good results for most of your needs but there will be times when you want more control. For that reason, ZRemesher can control local polygon directions by drawing control curves on your original model to drive its polygon flow and edge loops.
ZRemesher can be found in the Tool > Geometry sub-palette. It requires a PolyMesh3D object such as an imported mesh, DynaMesh or ZSphere adaptive skin. If you wish to use it on a parametric primitive you will need to first use the Make PolyMesh 3D feature. If your model is a ZSphere or a ZSketch in preview mode, you must first create an adaptive or unified skin before you can use ZRemesher.
Here is a quick overview of what ZRemesher offers:
- True one-button retopology. Click the ZRemesher button without changing the settings for an automatic optimal retopology.
- The topology generated by default by ZRemesher offers a flow of polygons that is much closer to what a human eye would reproduce.
- ZRemesher’s speed has been tested so as to be as optimized as possible. It is able to produce low polygon models from even high polygon sources in a fraction of the time required by other retopology tools.
- ZRemesher offers more than one option to compute symmetrical meshes, giving the user high level control.
- ZRemesher offers considerable polygon density control that can be used to reduce polygon counts or even increase counts if you wish. All through PolyPainting.
- The Freeze Border option can keep the exact polygon structure openings in your mesh while performing retopology on everything else. This means that you can use ZRemesher on multi-part models where it’s important for their edges to still line up.