When using the BPR renderer, separate passes are automatically available. You can find them in the Render > BPR RenderPass sub-palette.
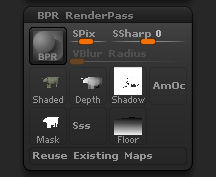
Render> BPR RenderPass sub-palette
To save a particular pass, click on its icon. You will then get a Save As dialog and can save the file to disk in a variety of image formats. For some passes, such as Shadow and Ambient Occlusion, you must turn on the option in the Render > Render Properties sub-palette prior to carrying out the render. In the example above, both AmOc (Ambient Occlusion) and Sss (Sub-surface Scattering) are not available as these options were not turned on.
Using Render Passes
Having separate render passes means that you have more control over the final image, though you do need to use a dedicated image editing program such as Photoshop® to put the passes together, a process called compositing.