Integrated AOVs
Table Of Contents
Introduction
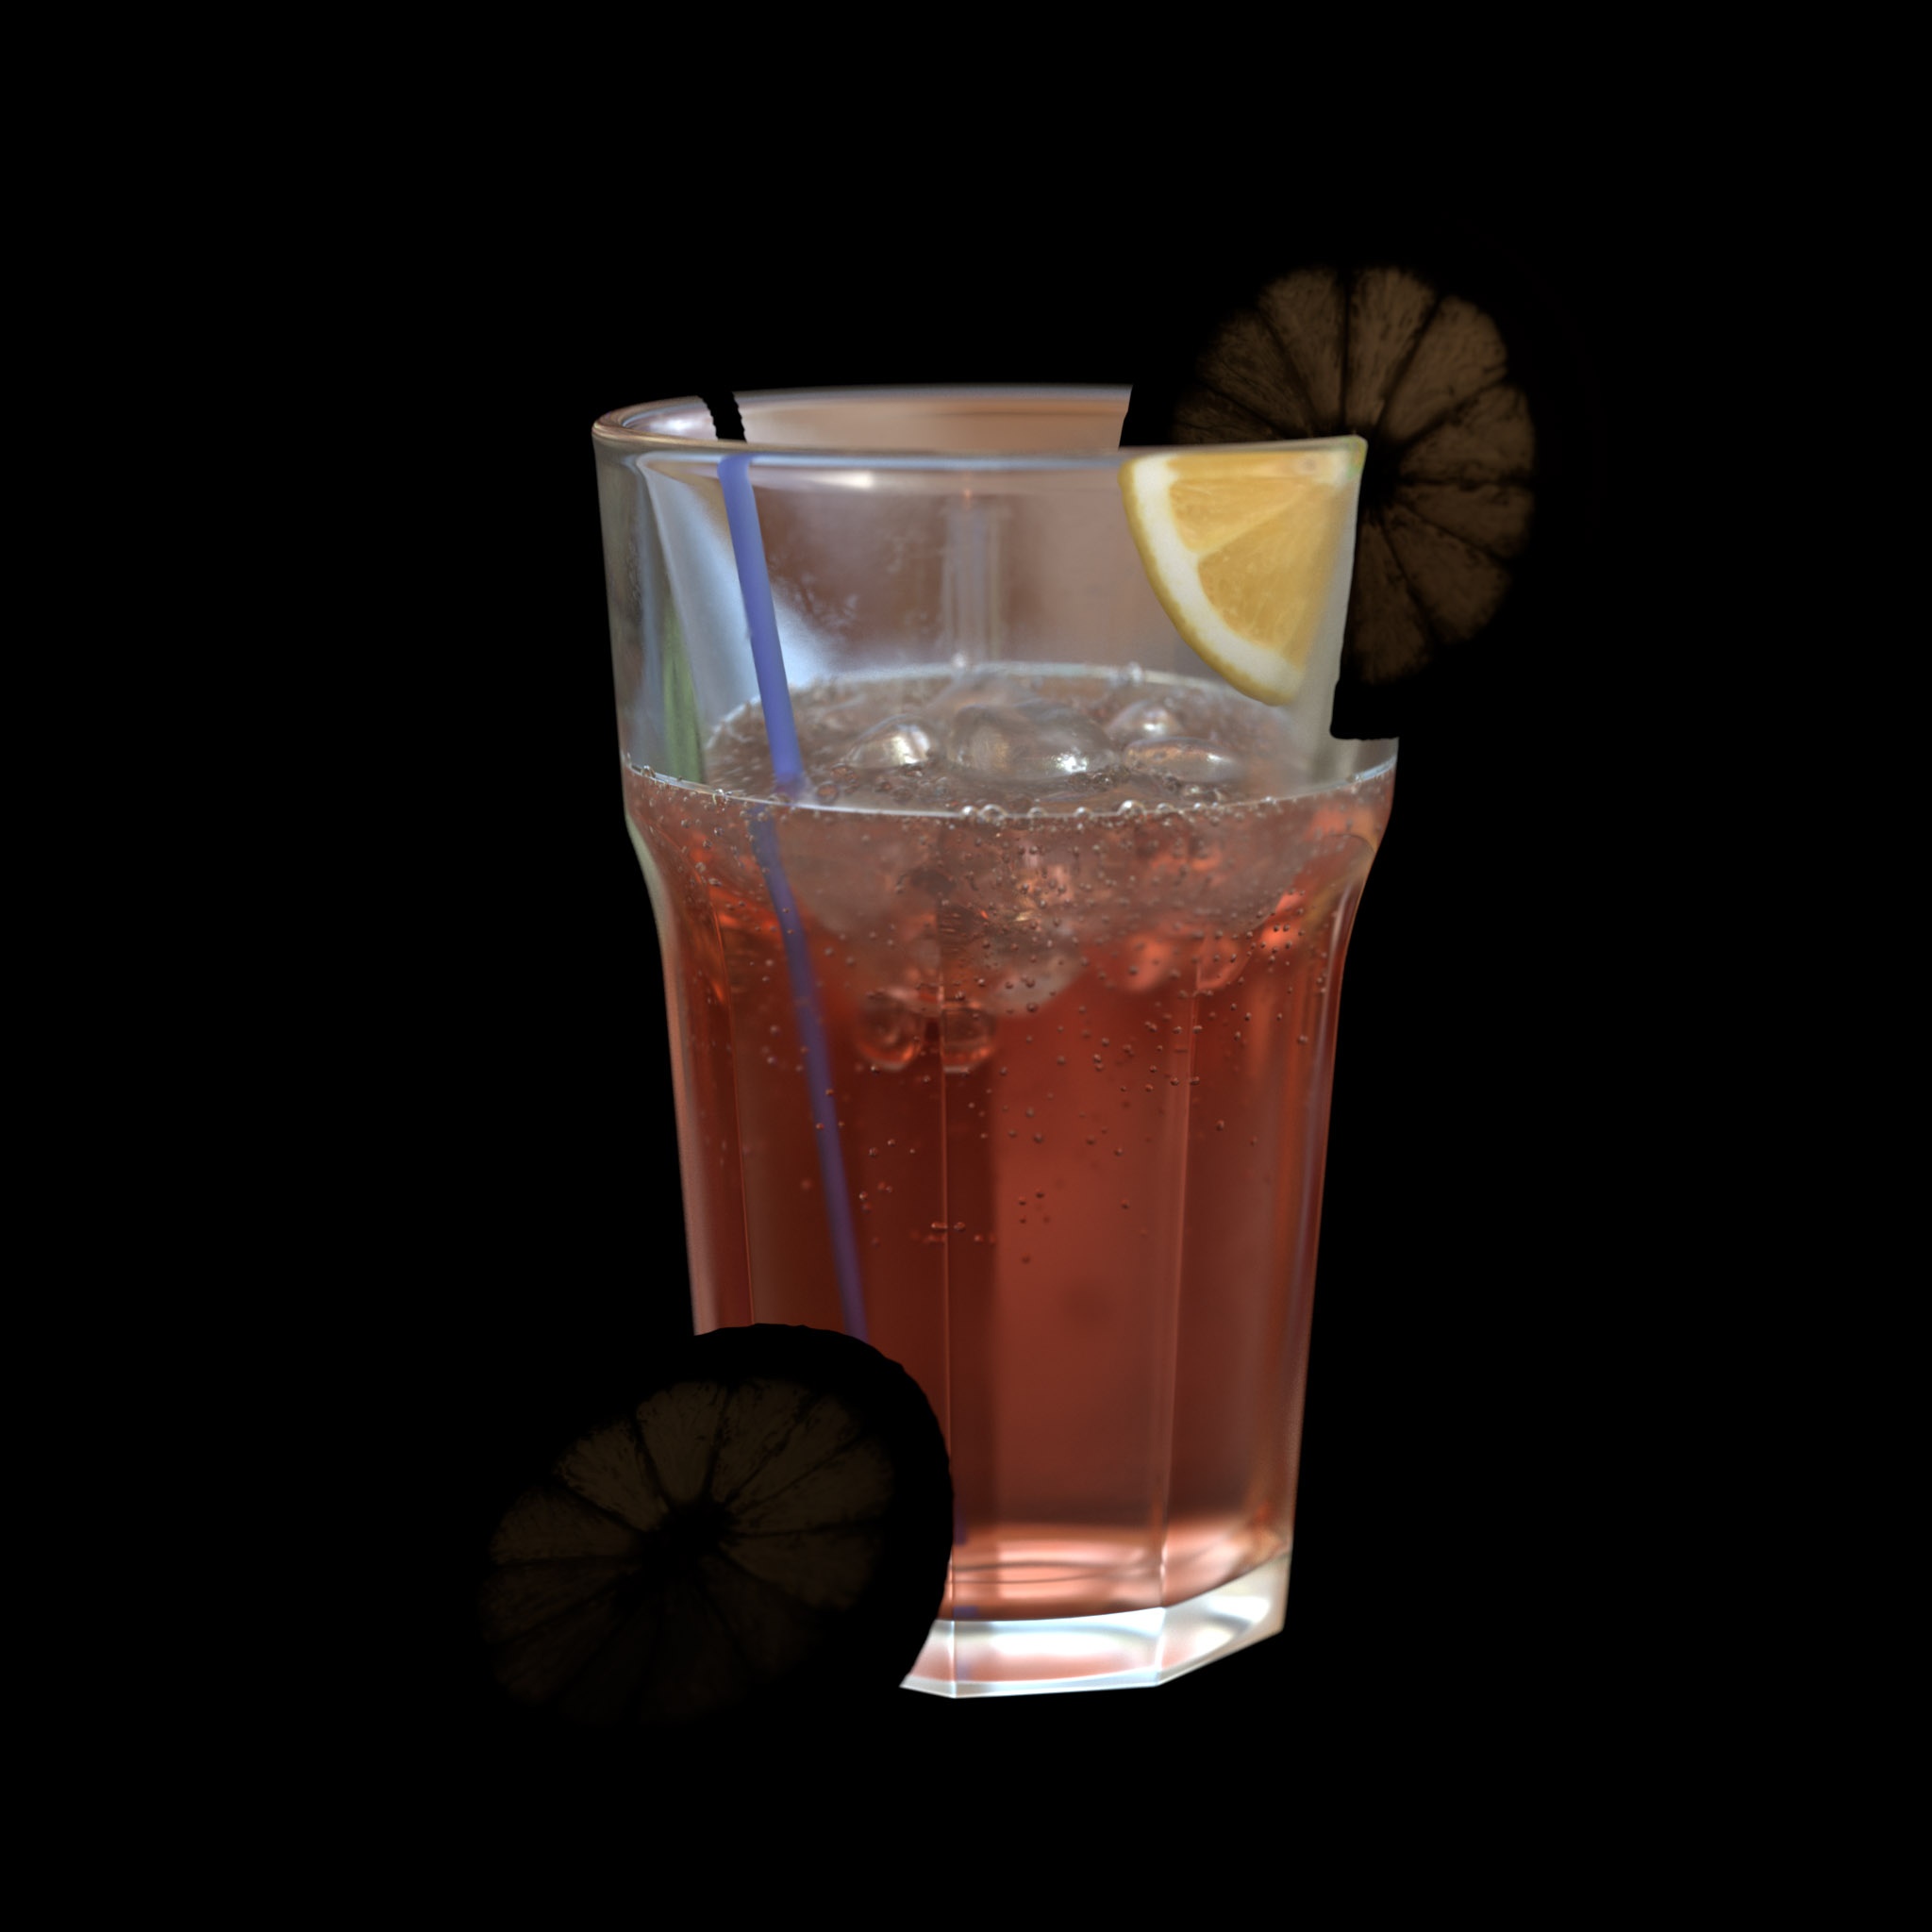
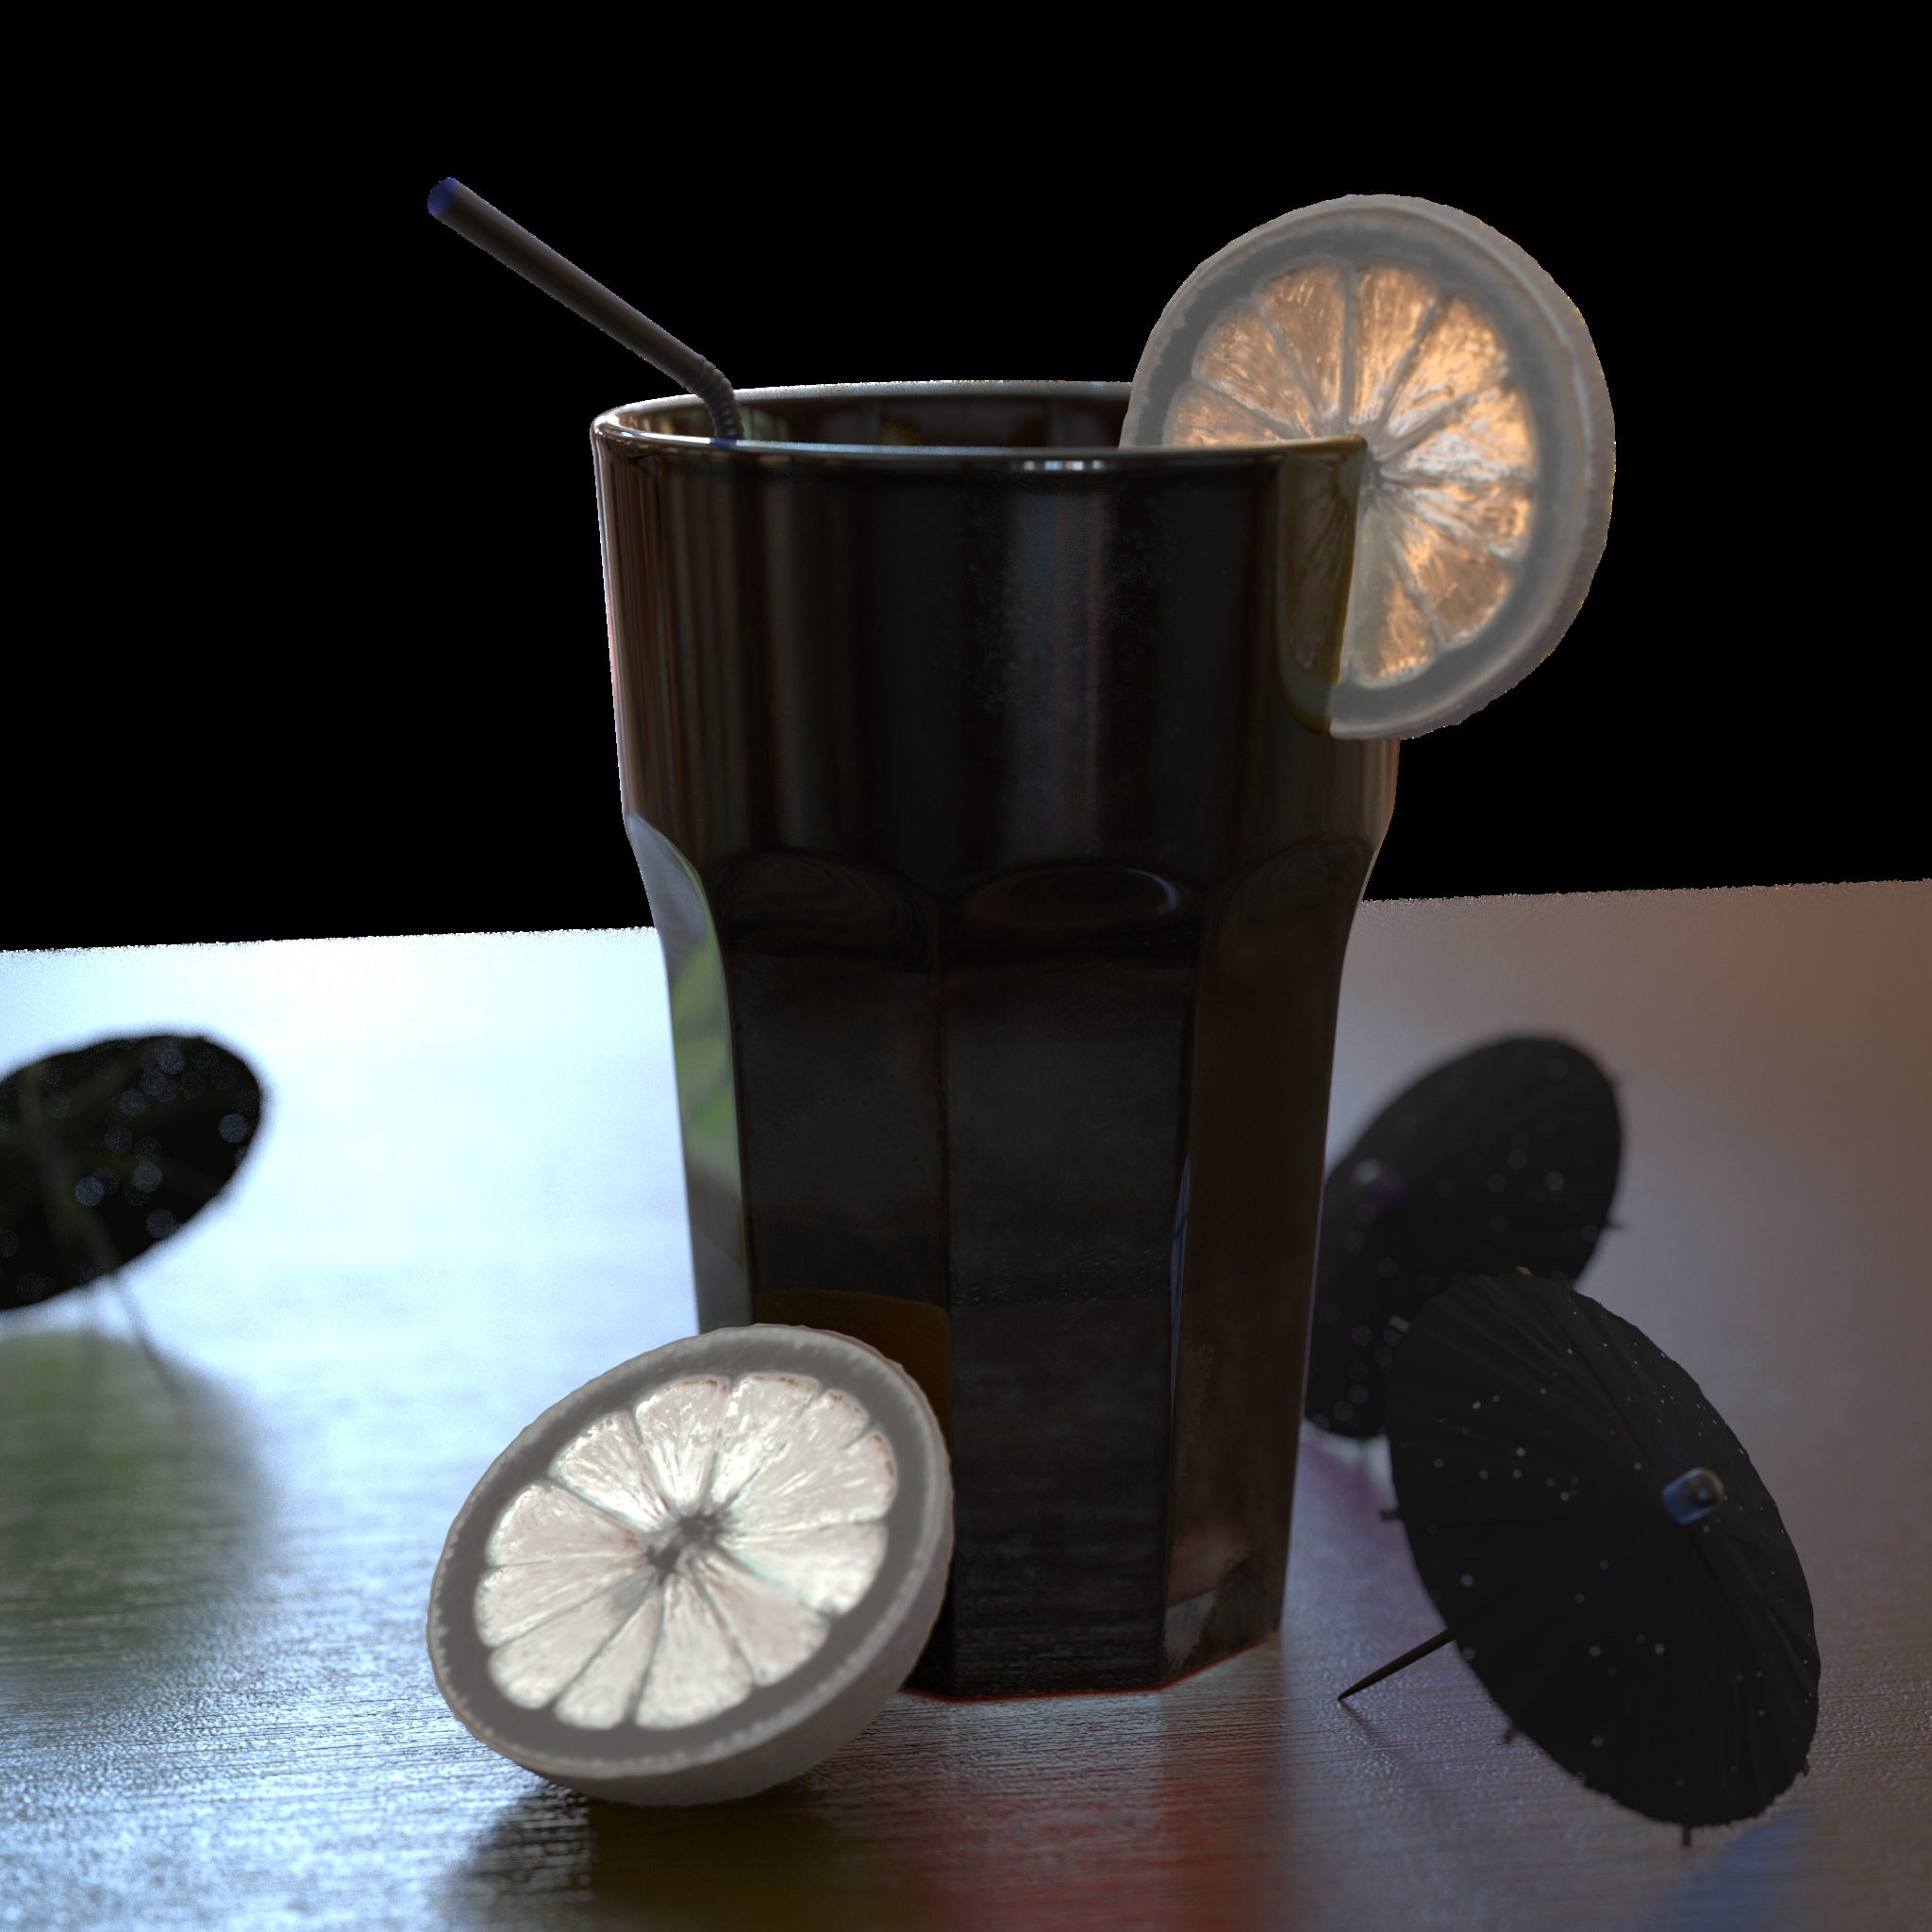
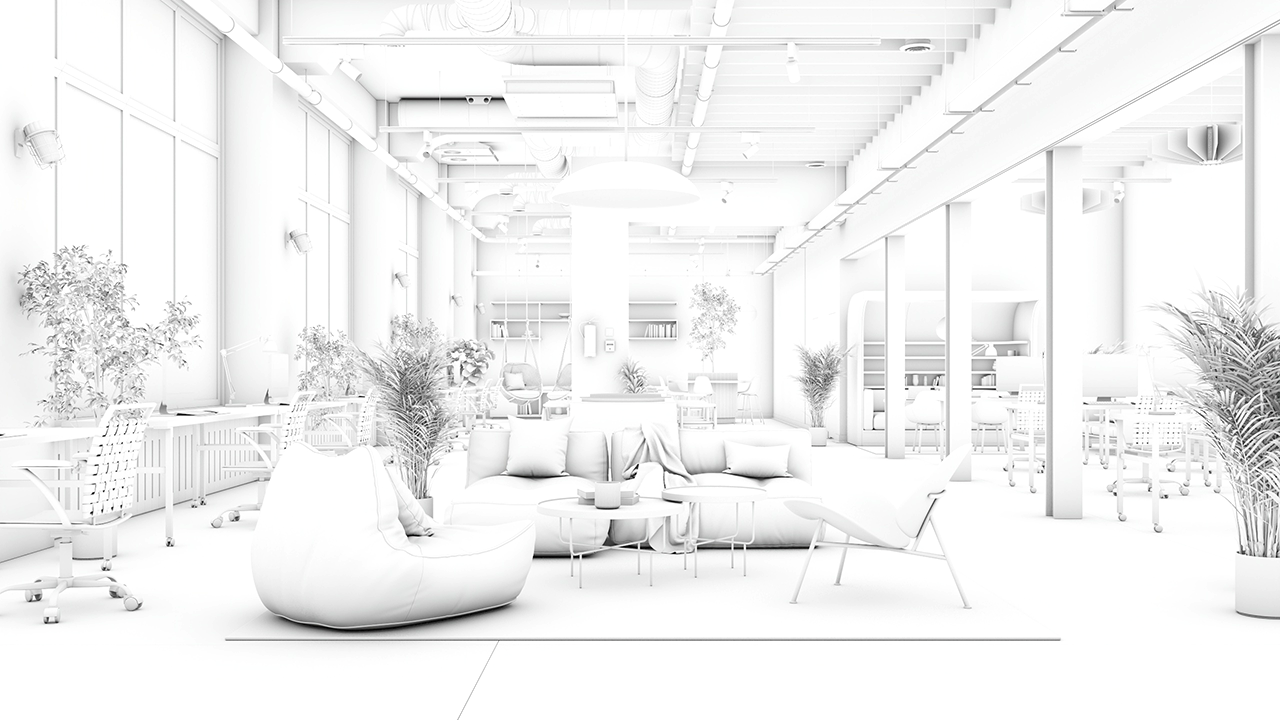
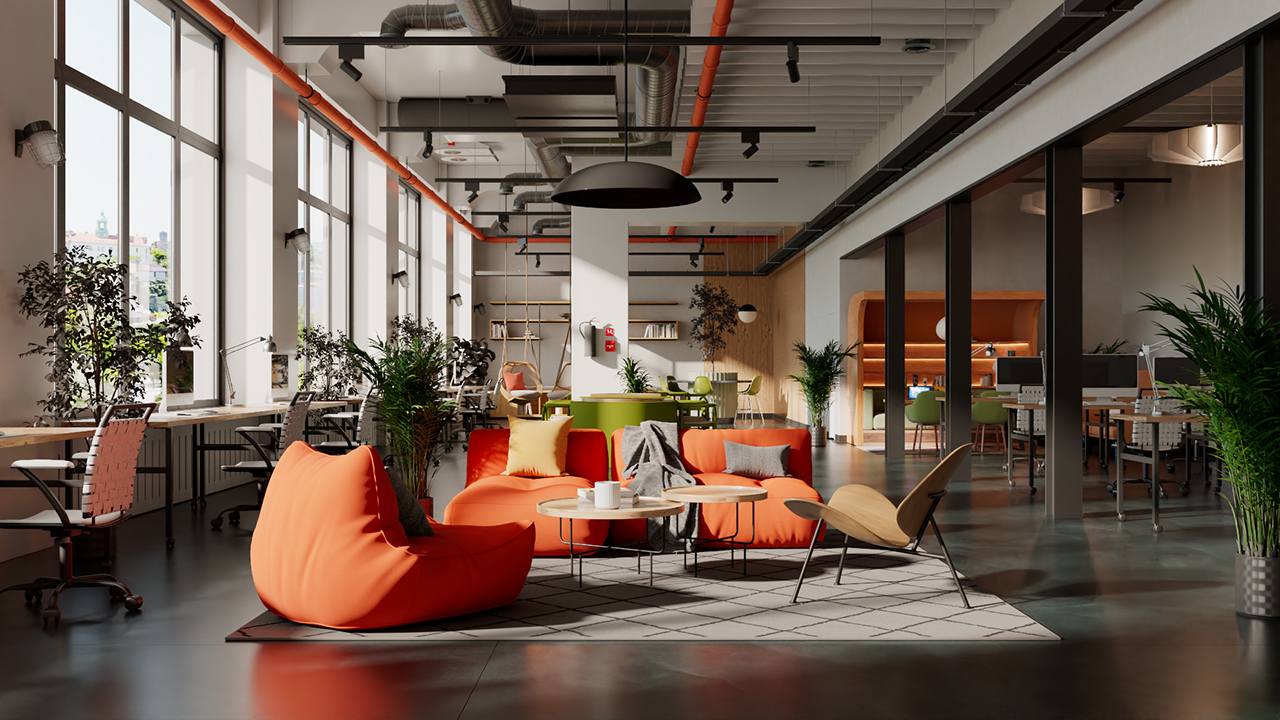
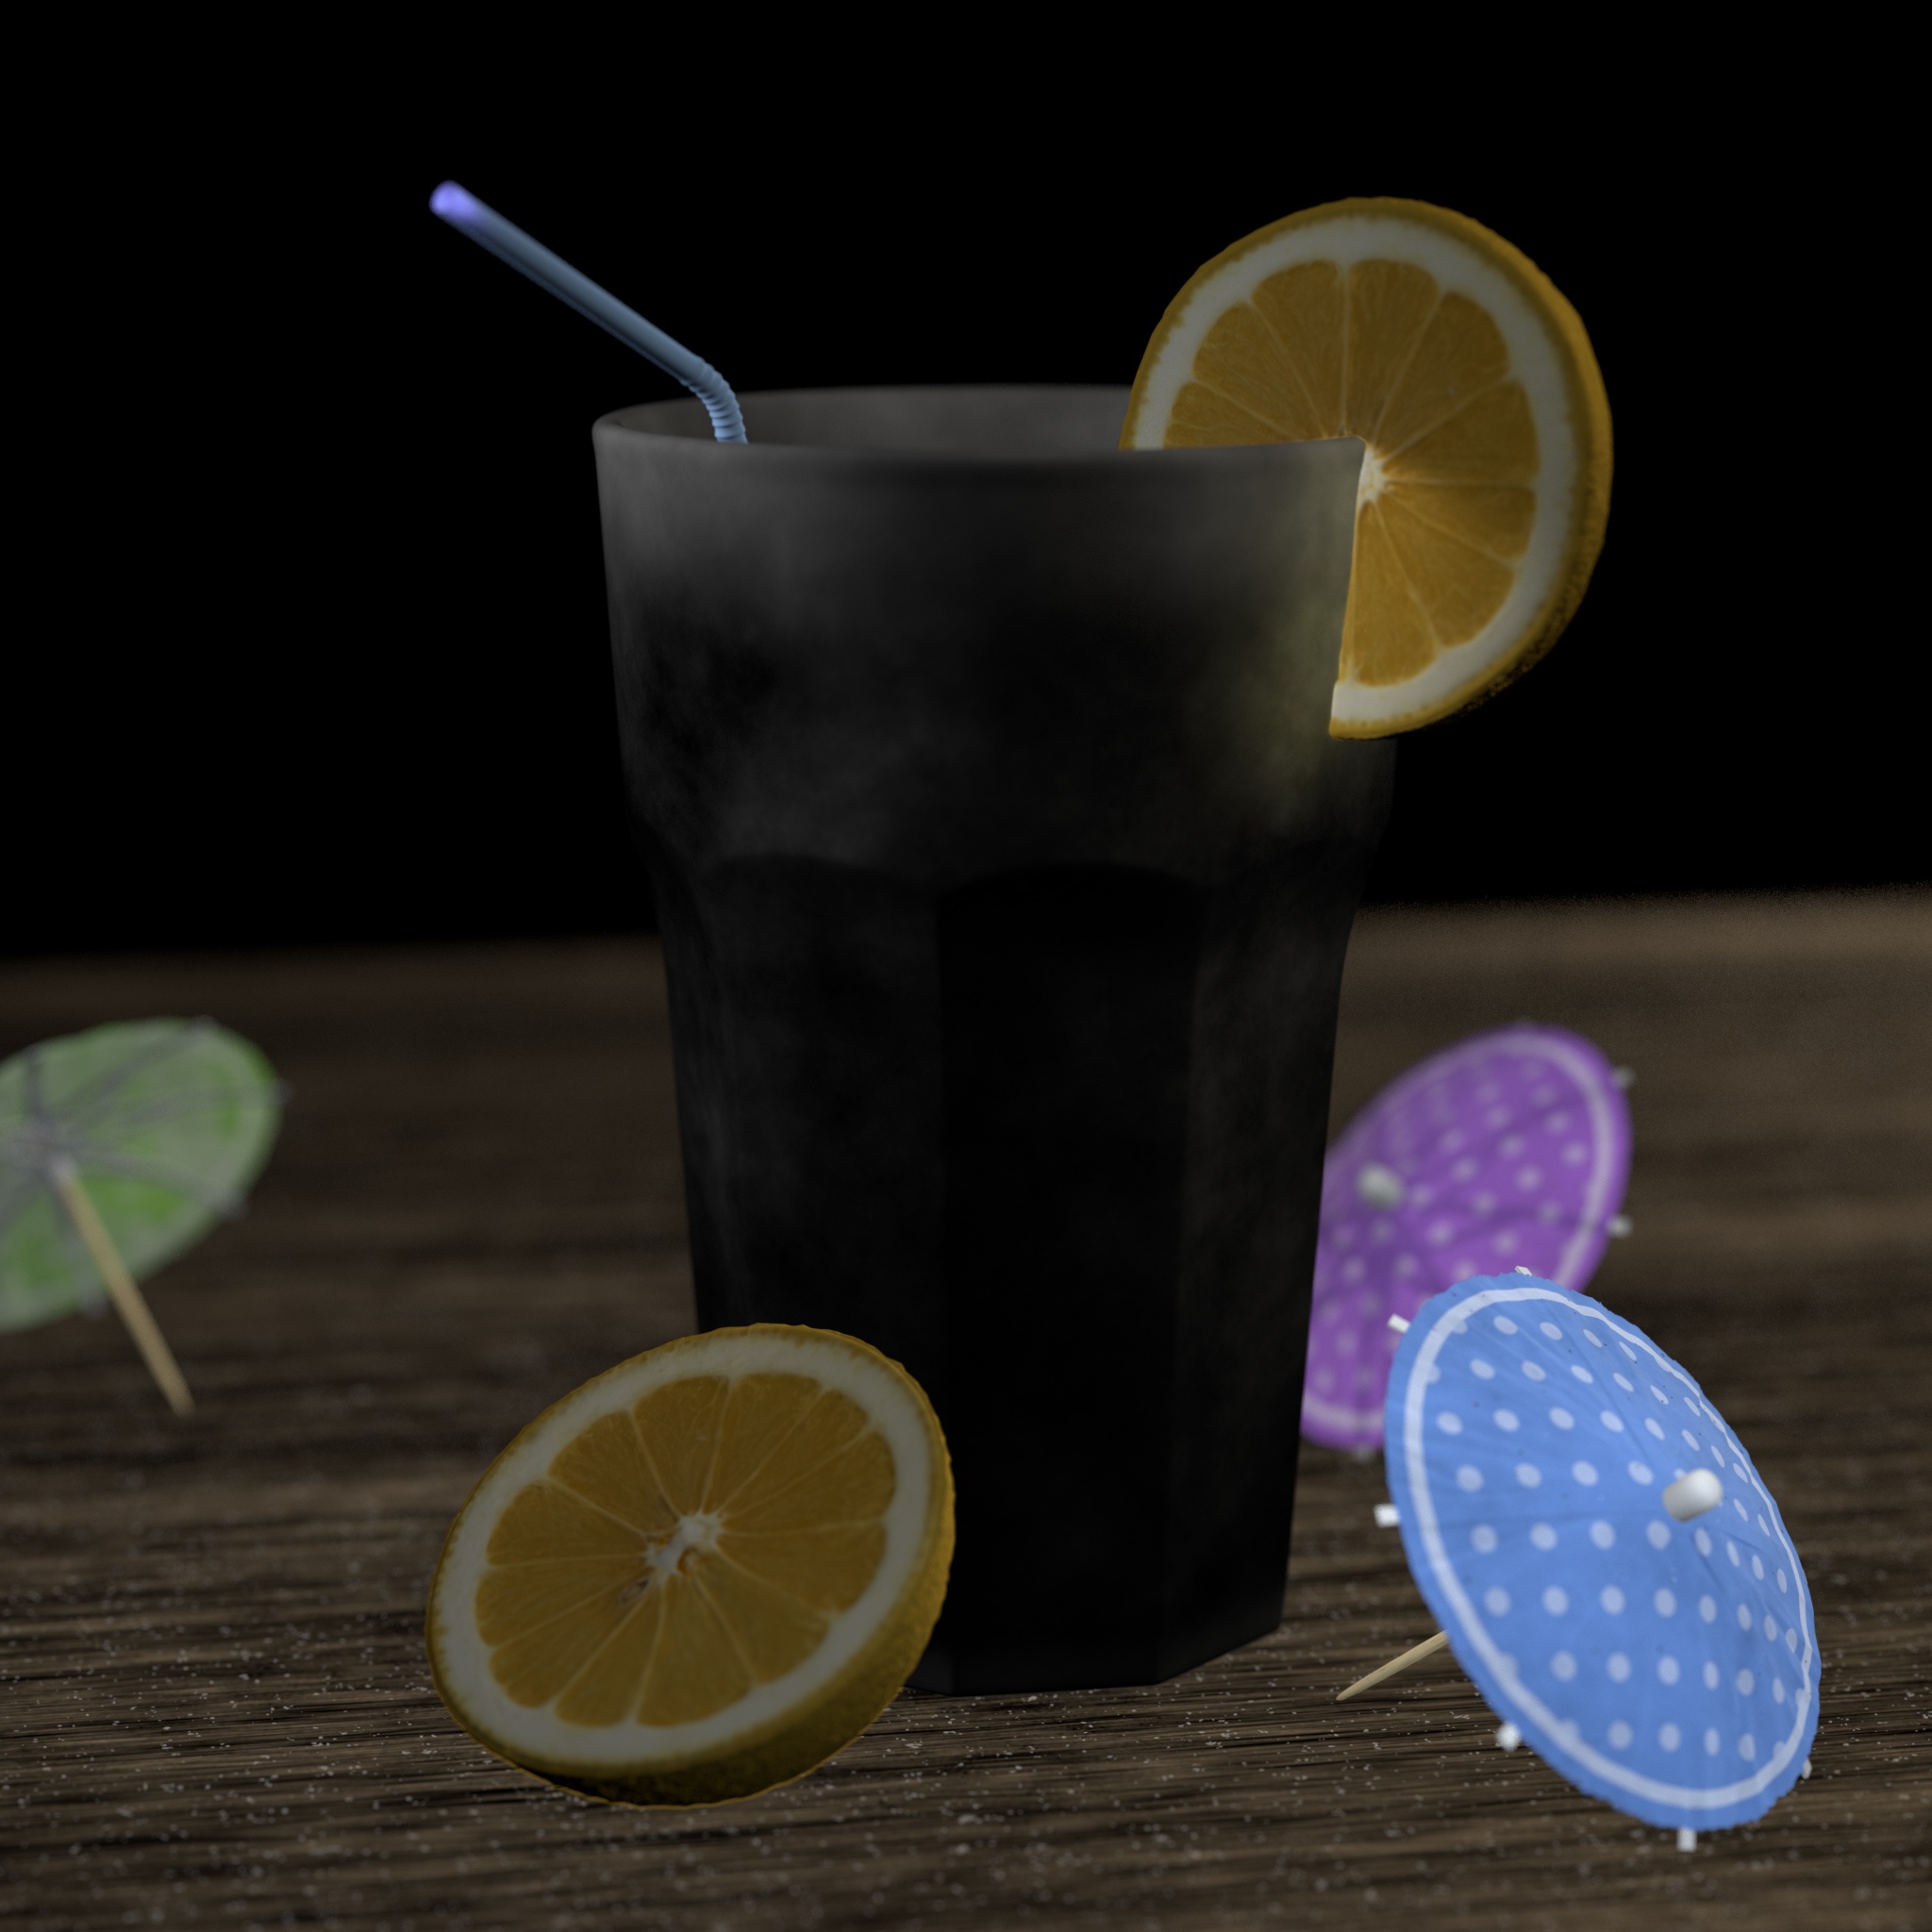
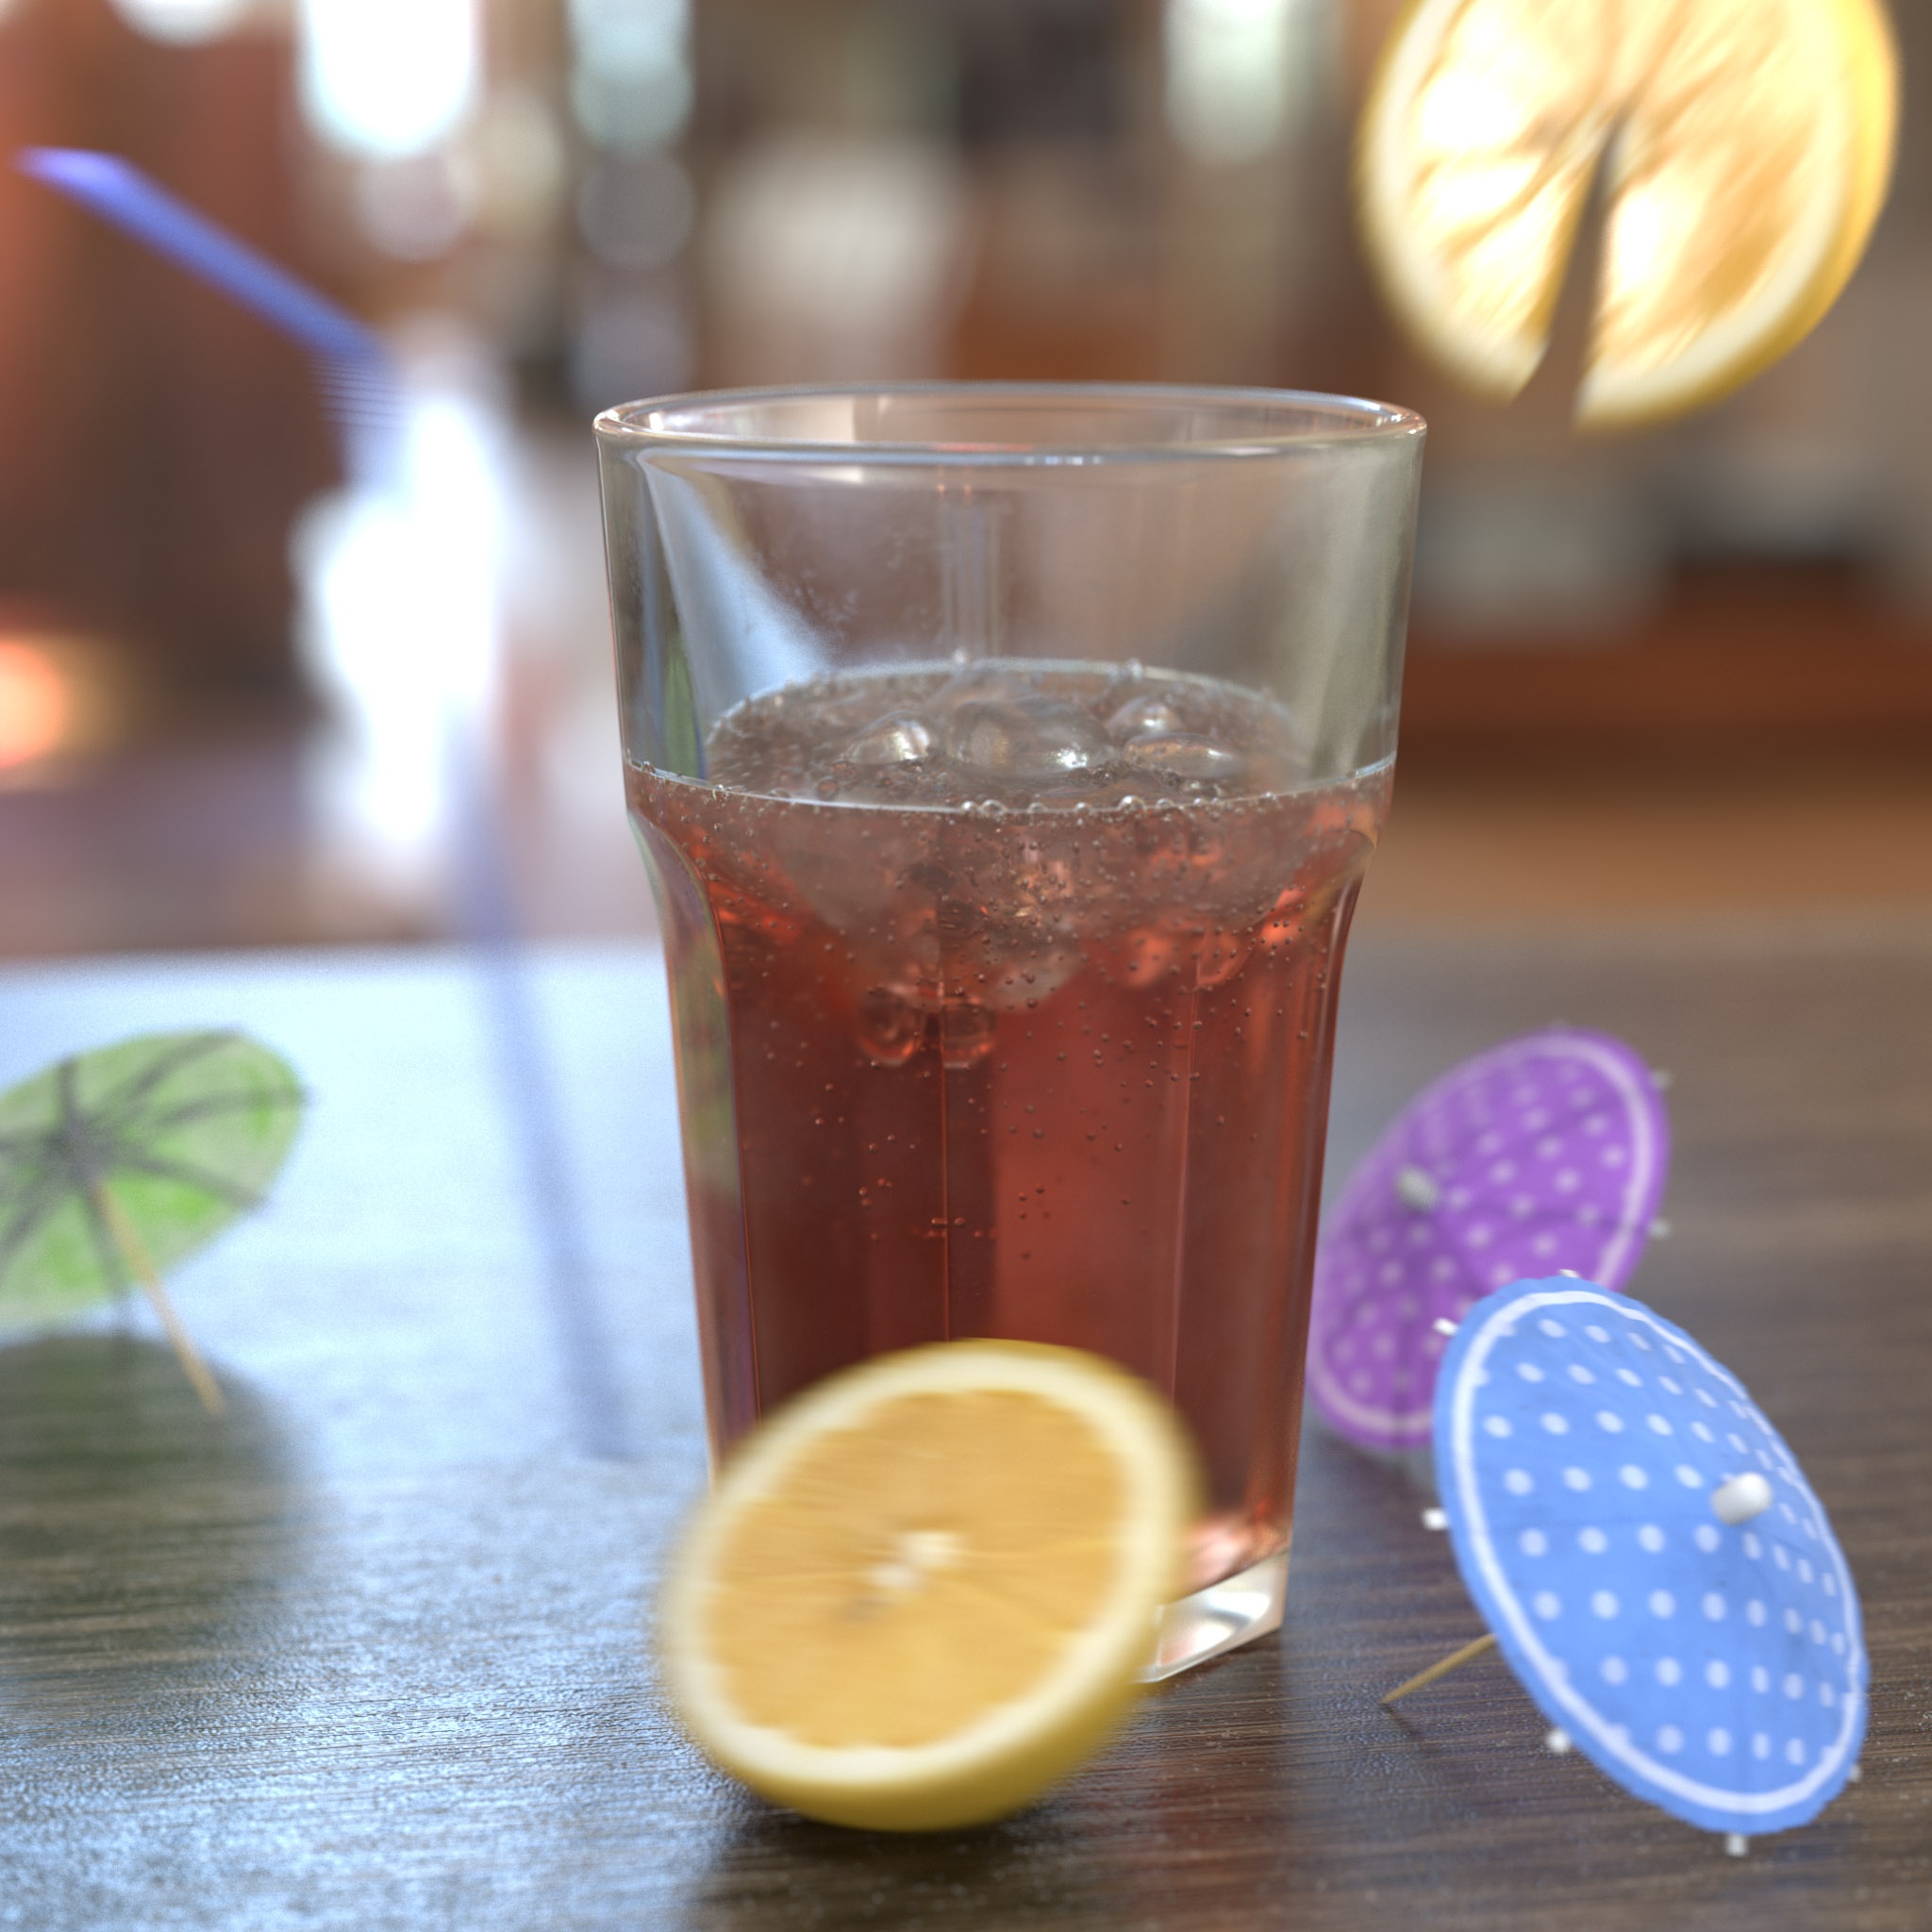
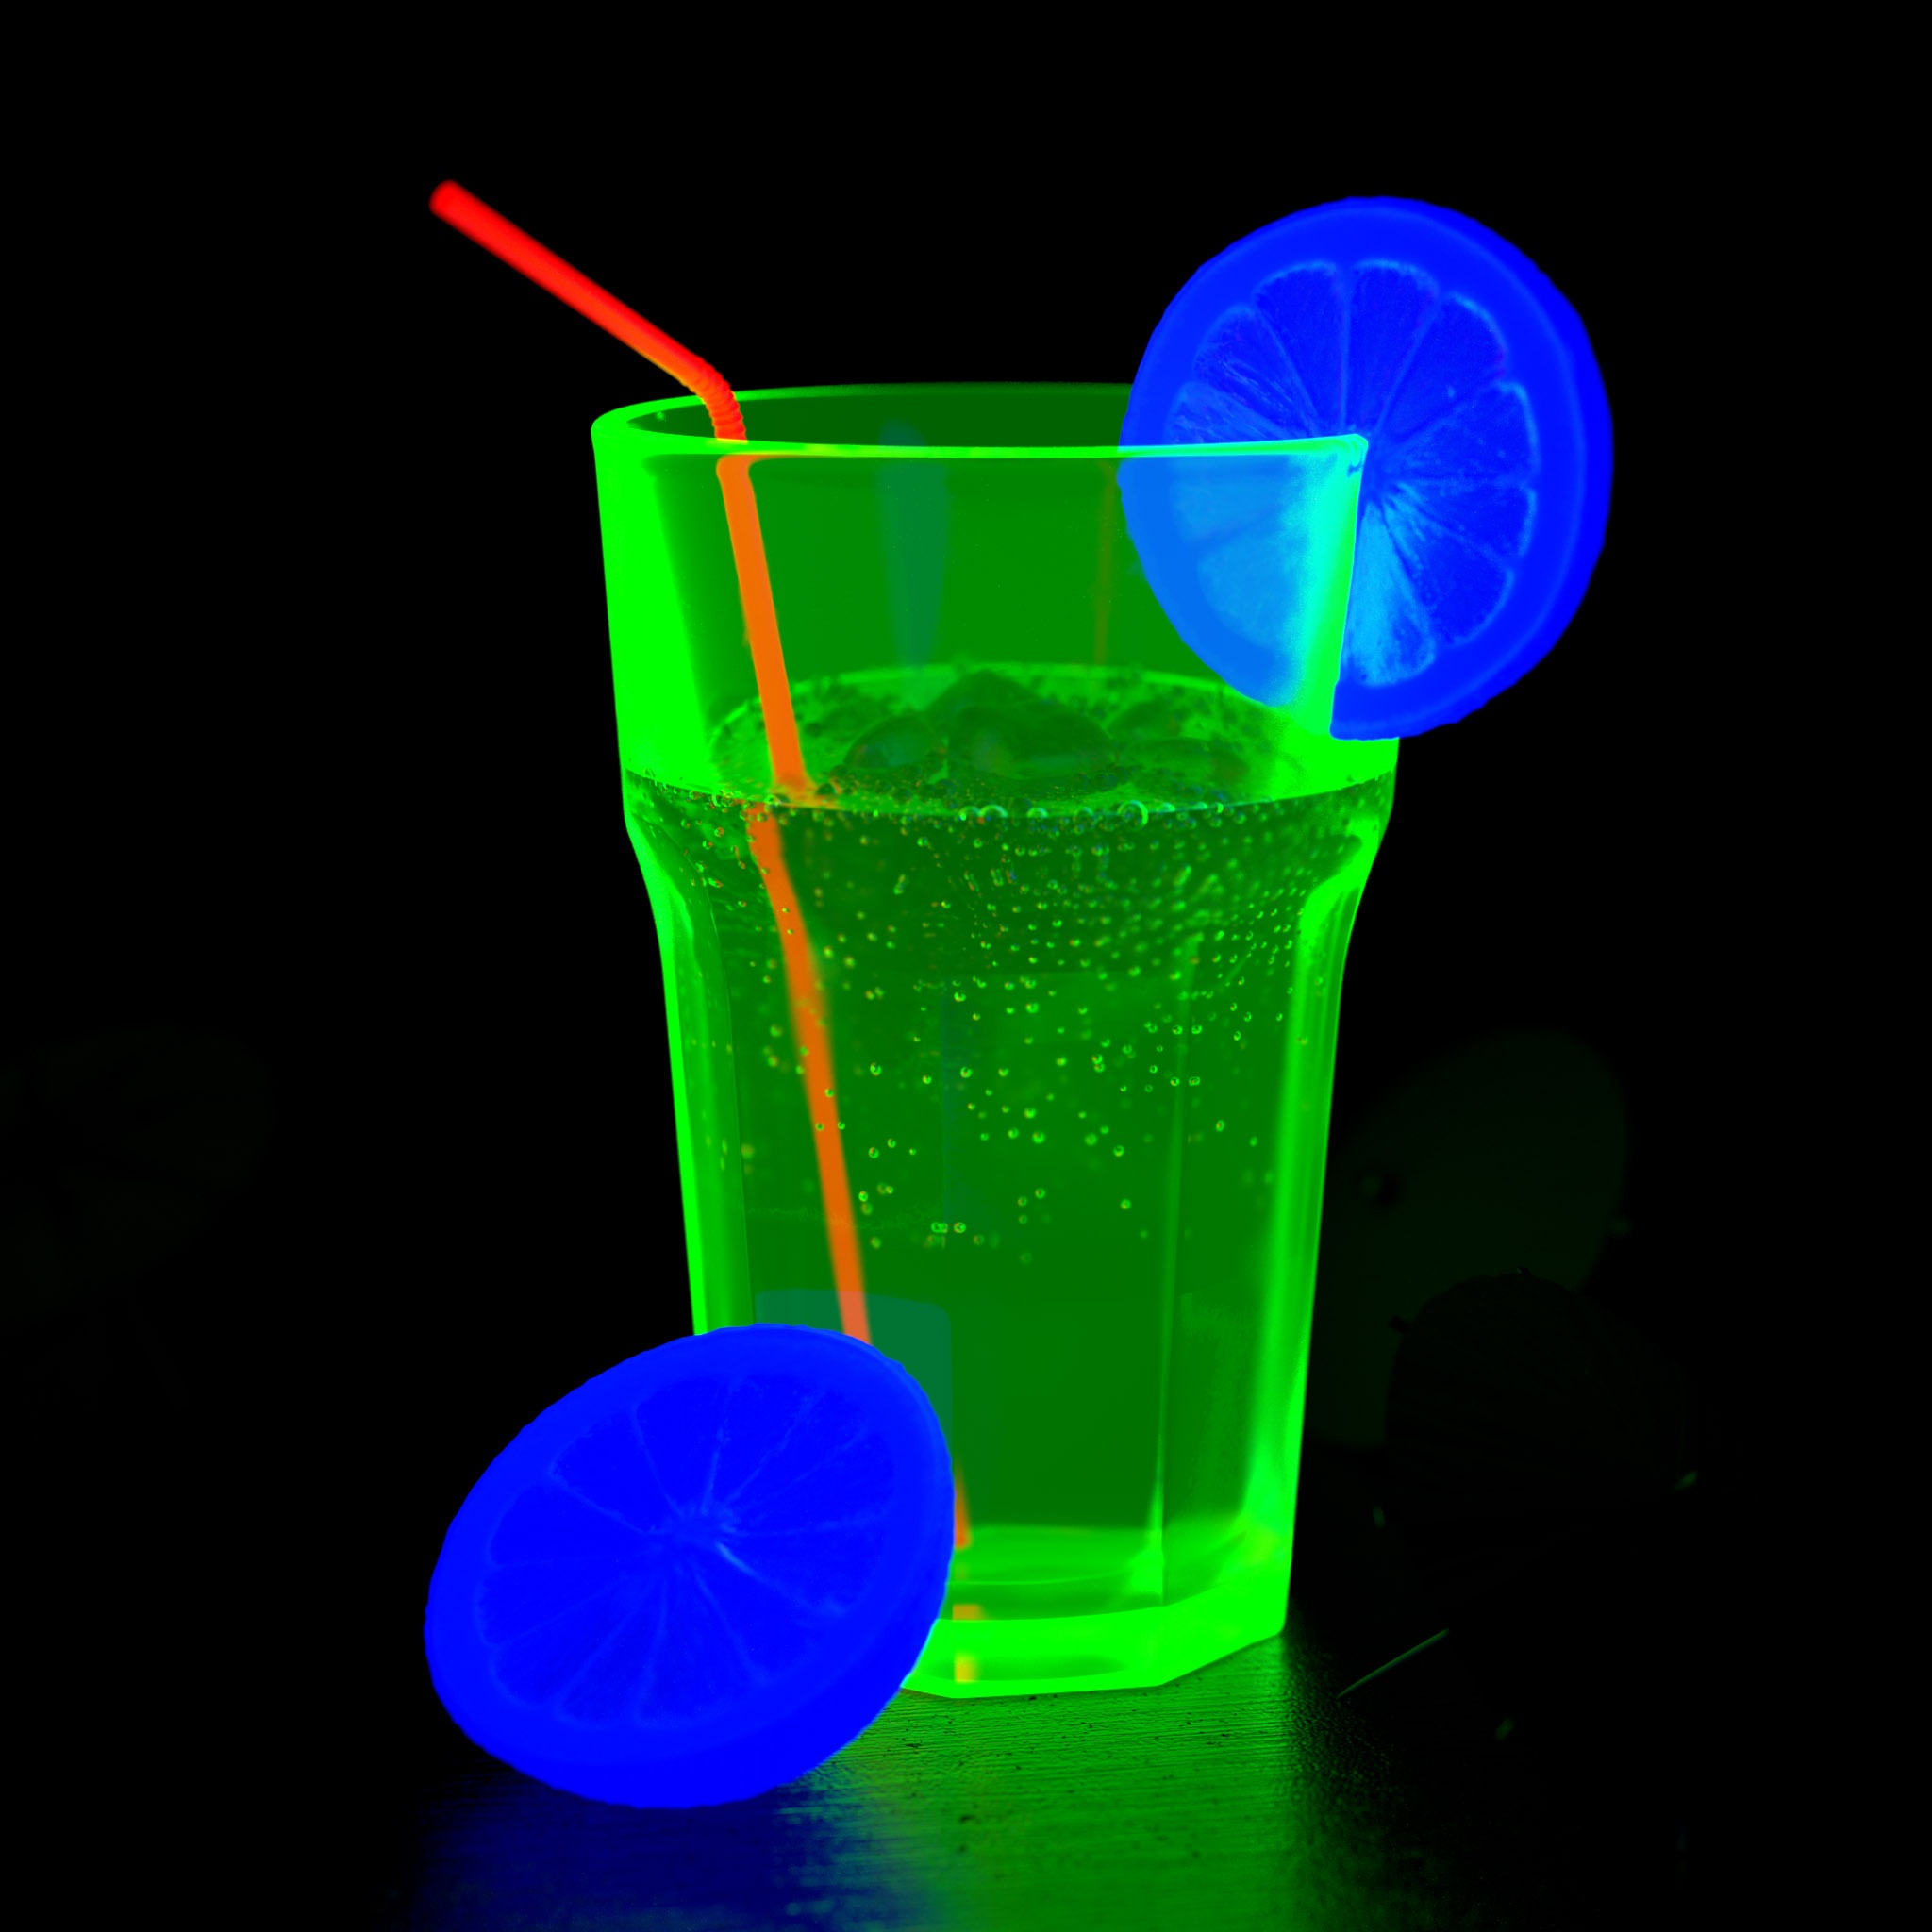
Redshift has a number of integrated AOVs that require little to no additional setup to get started. We'll demonstrate the use of these integrated AOVs using the example scene below which includes most common shading elements (diffuse, translucency, reflections, refractions, bump mapping, normal mapping, SSS), several different light sources, environment lighting, global illumination, and caustics.
Where the scene does not already contain the shading elements needed to cover particular AOVs (emission, volume rendering, motion vectors) small changes will be made in order to demonstrate these AOVs.
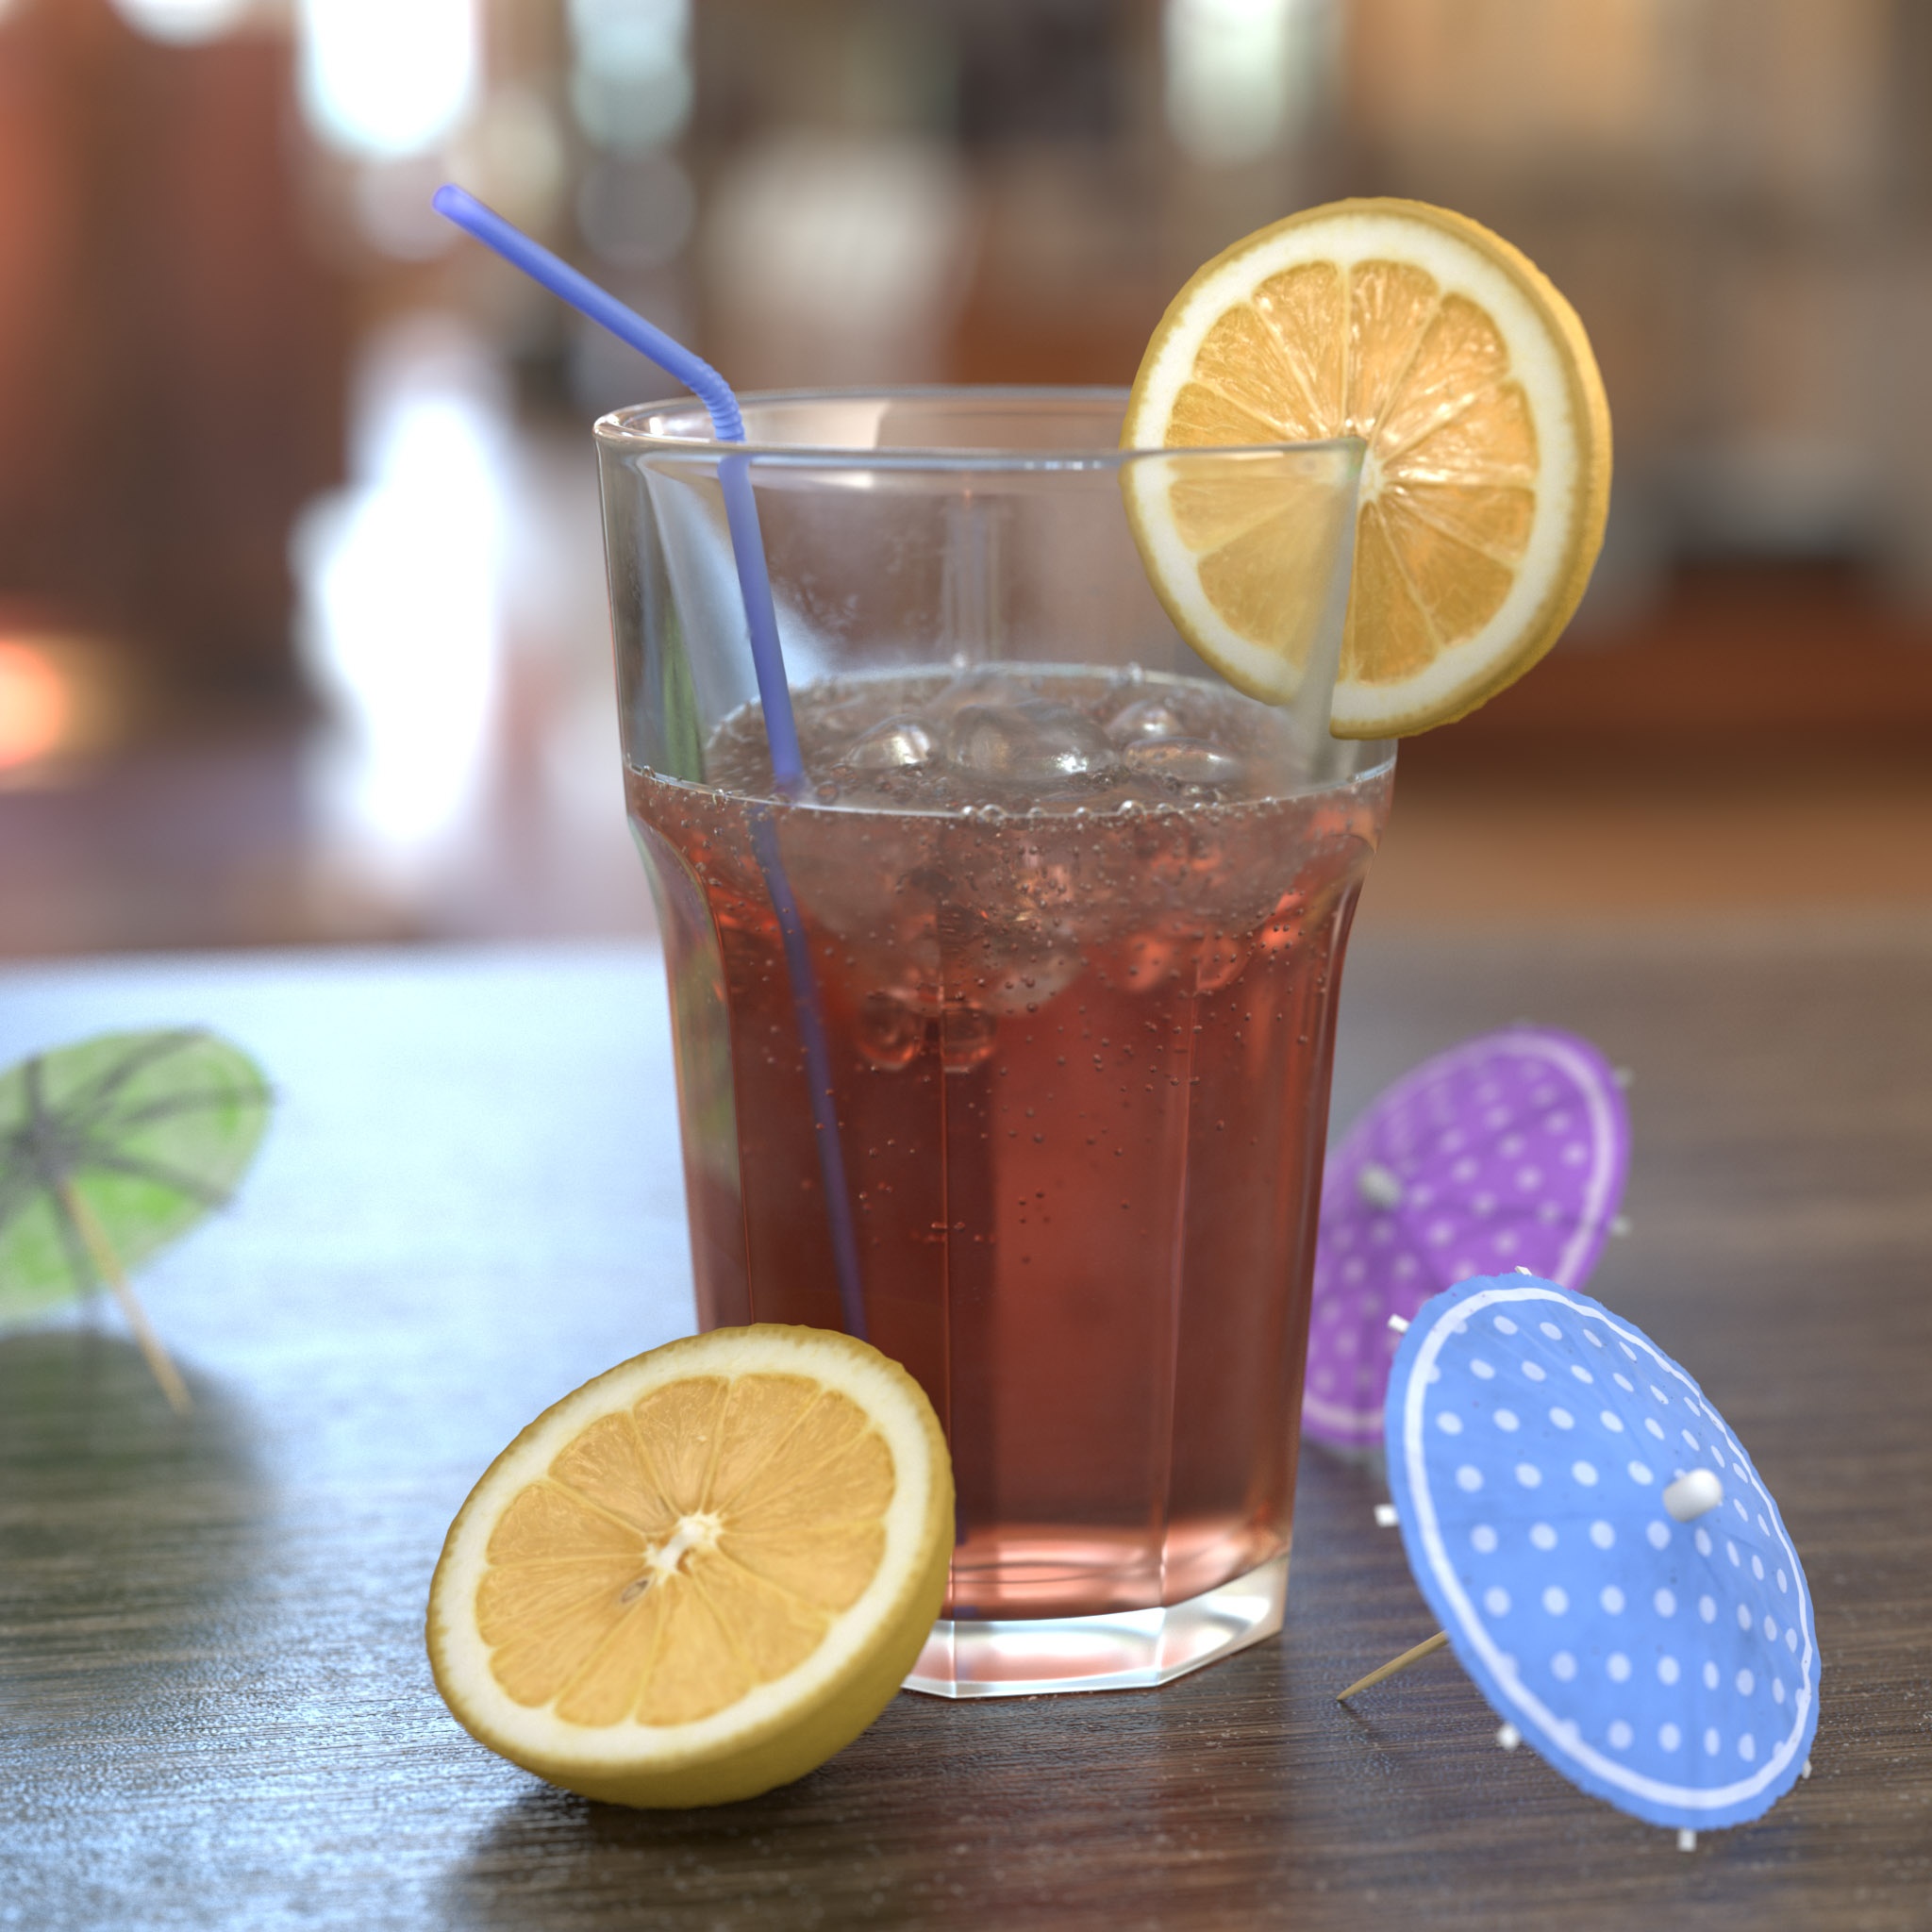
AOV example scene
AOV Workflow
There are essentially two different methods of working with AOVs in Redshift. A more simple method that makes use of fewer AOVs and a more complex method that requires several more AOVs but allows for greater control over individual shading elements. The more complex but more flexible method of working with AOVs involves additional "raw" type AOVs that isolate shading elements down even further, like separating the color component of a material from the lighting contribution in the scene. By comparison you might consider the more simple method the "standard" or "non-raw" workflow.
Both methods are capable of recreating the primary beauty render so it's only a matter of choosing what works best for you and your project. We will cover both methods below but the raw AOV's are covered separately to reduce confusion.
Standard Shading Elements
Diffuse Lighting
Diffuse Lighting AOV
The Diffuse Lighting AOV contains the diffuse and translucency lighting component of the material's final shaded result. Typically, diffuse lighting reaching a material is multiplied by the material's diffuse color. The Diffuse Lighting AOV returns this multiplied result.
If this multiplication is not desired, you can use the Diffuse Lighting Raw AOV, instead, which returns the non-multiplied diffuse lighting.
The Diffuse Lighting is tinted by each object's material diffuse color. The Diffuse Lighting Raw looks almost black and white because it contains only the light color and intensity information without the multiplication with each material's diffuse color.
The Diffuse Lighting AOV already includes a renders Translucency component. If you need to isolate the Translucency component from the Diffuse Lighting AOV please see the raw AOV workflow here
Lighting from emissive materials is visible only in the Global Illumination AOV. For more information, please see here.
Matted objects do not work with the Diffuse Lighting AOV. Shadows that are normally visible in the Diffuse Lighting AOV will not be present for a matted object and you will need to color correct and multiply the background with the shadows/inverted shadows for the matted object.
How to use:
Add the Diffuse Lighting AOV to the primary AOV composite.
Reflections
Reflections AOV
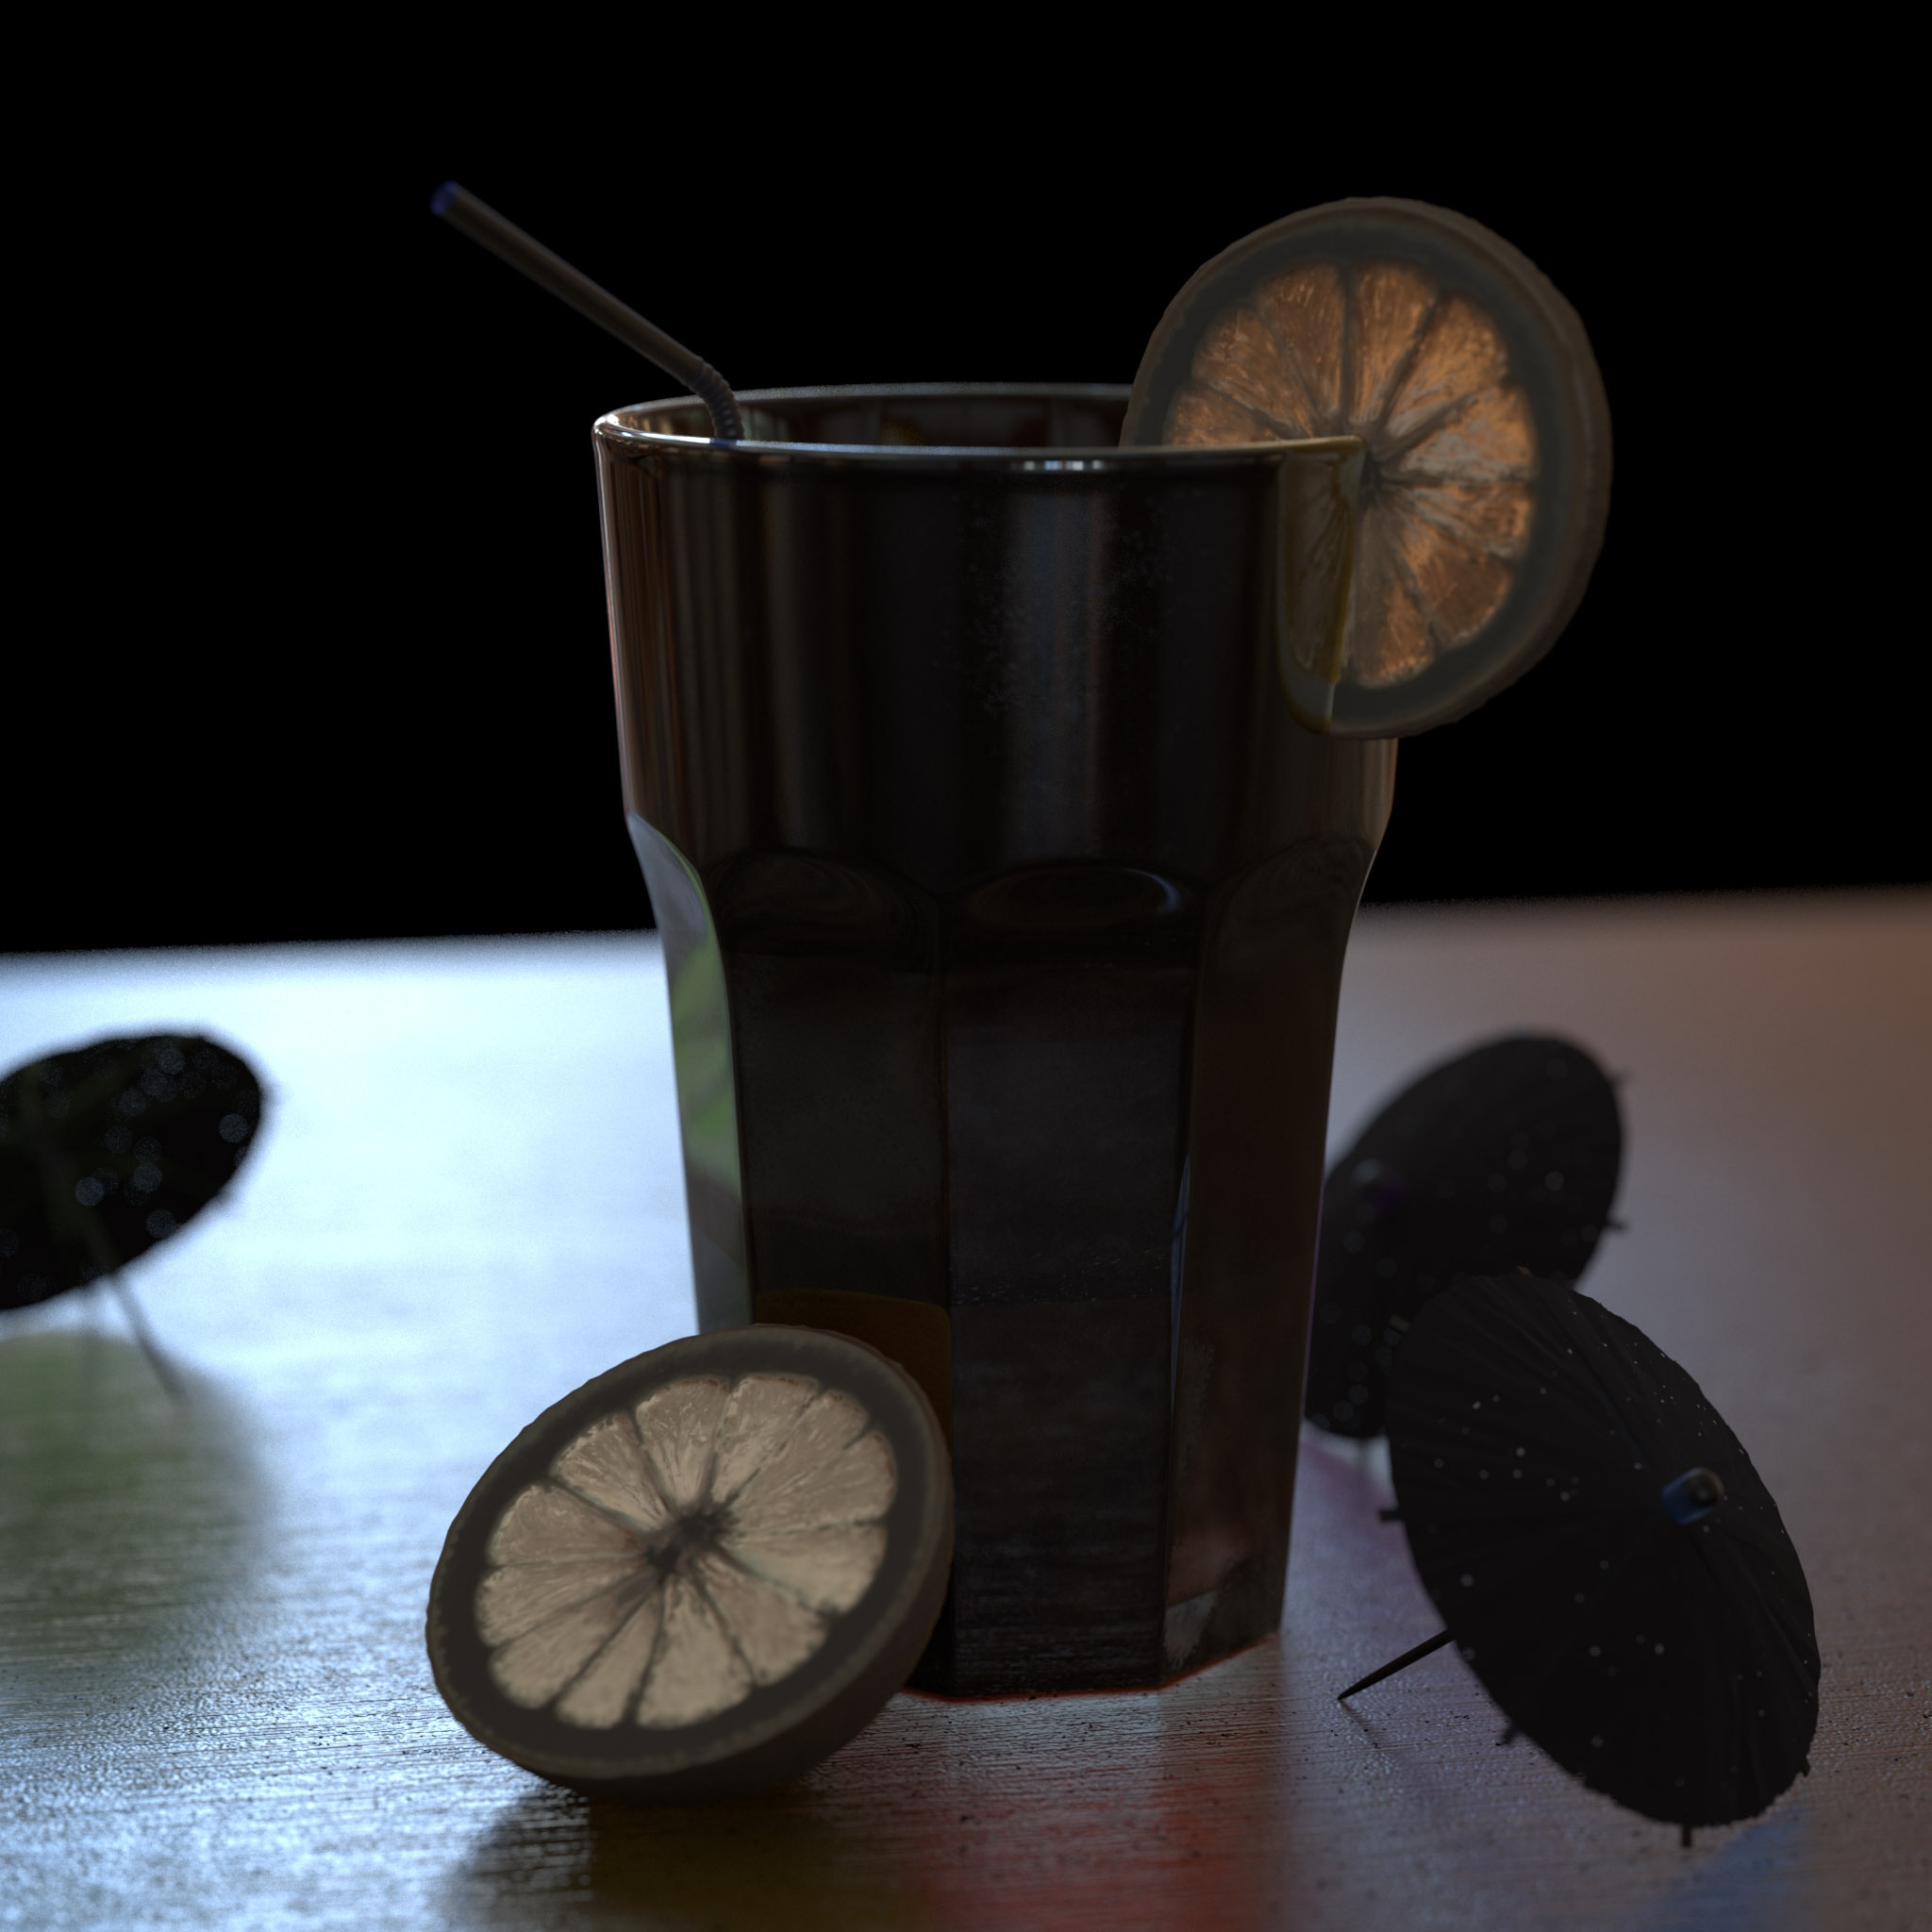
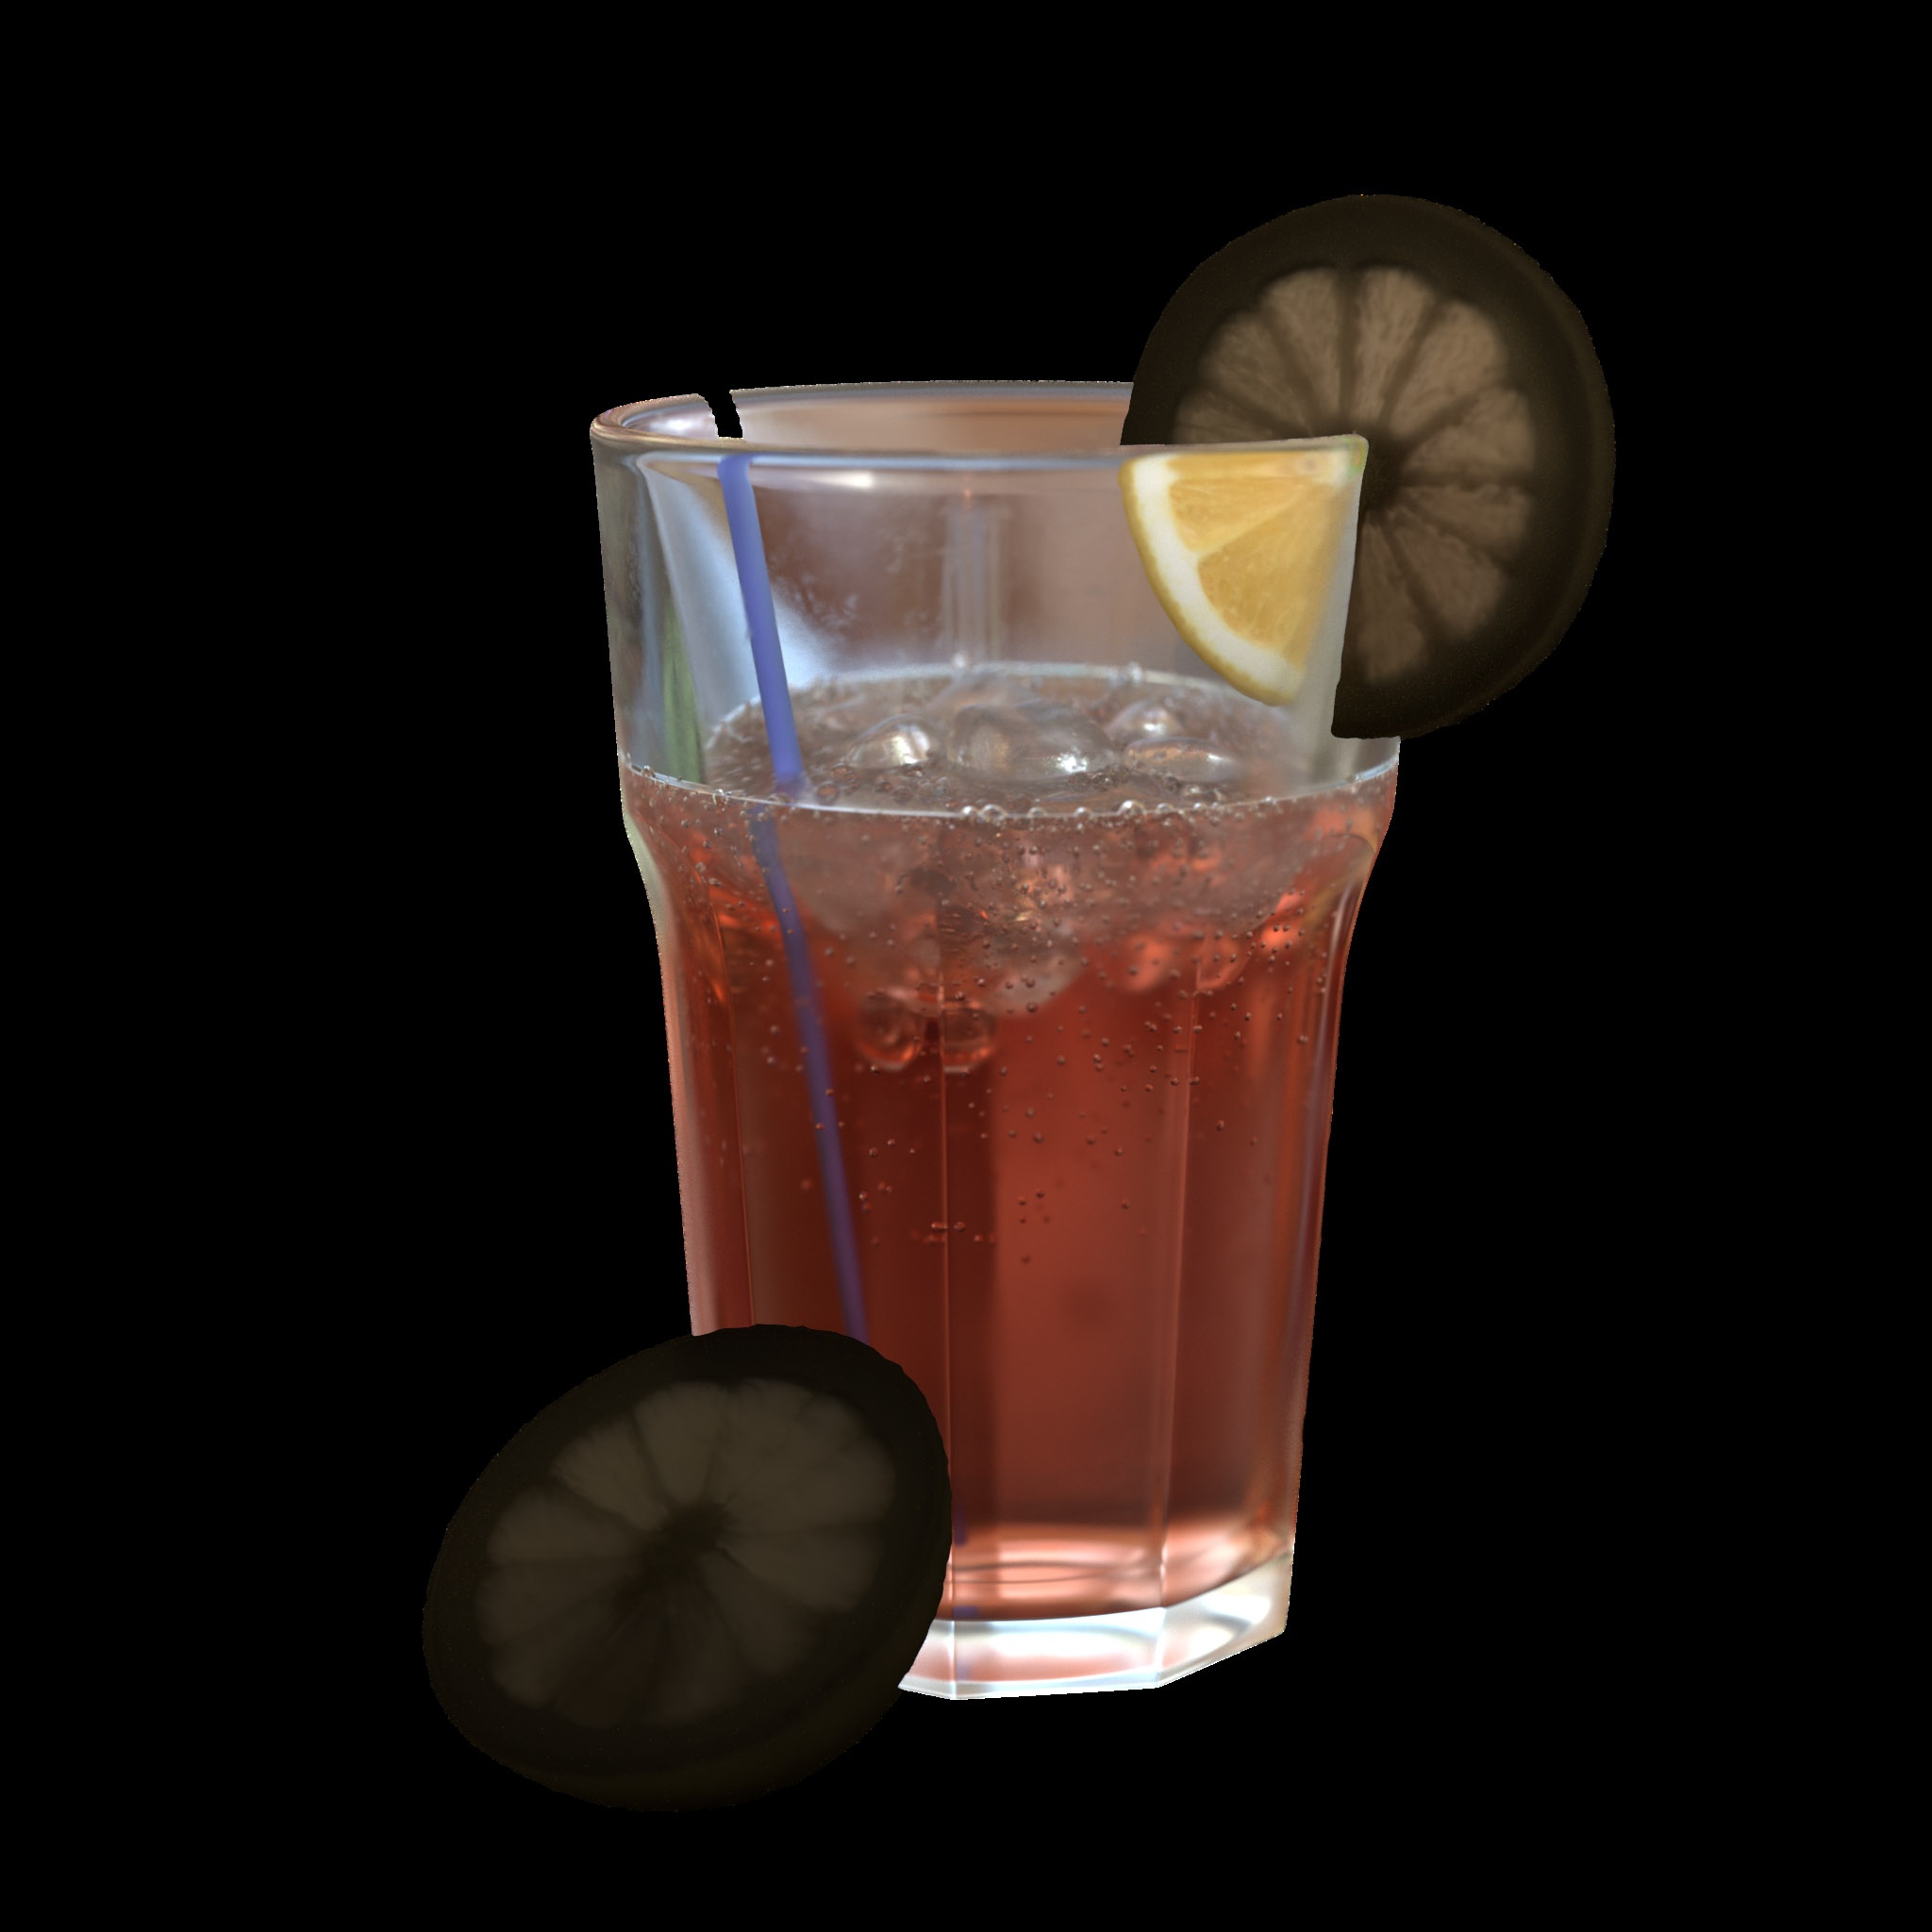
The reflections AOV contains the reflection component of the final shaded result. Please note that the reflections do not contain the reflections of lights (also known as specular reflections): these are contained in the specular AOV. The example scene is lit by an environment shader so environment reflection shows prominently on the table here in the reflection AOV.
How to use:
Add the Reflections AOV to the primary AOV composite.
Specular Lighting
Specular Lighting AOV
The specular lighting AOV contains only the specular lighting component of the final shaded result. Please note that by 'specular lighting' we mean the reflections of lights only. This is demonstrated in the picture above. The example scene is lit by an environment shader which does not act as a light so the environment reflection shows up in the reflection AOV rather than the specular AOV.
How to use:
Add the Specular Lighting AOV to the primary AOV composite.
Refractions
Refractions AOV
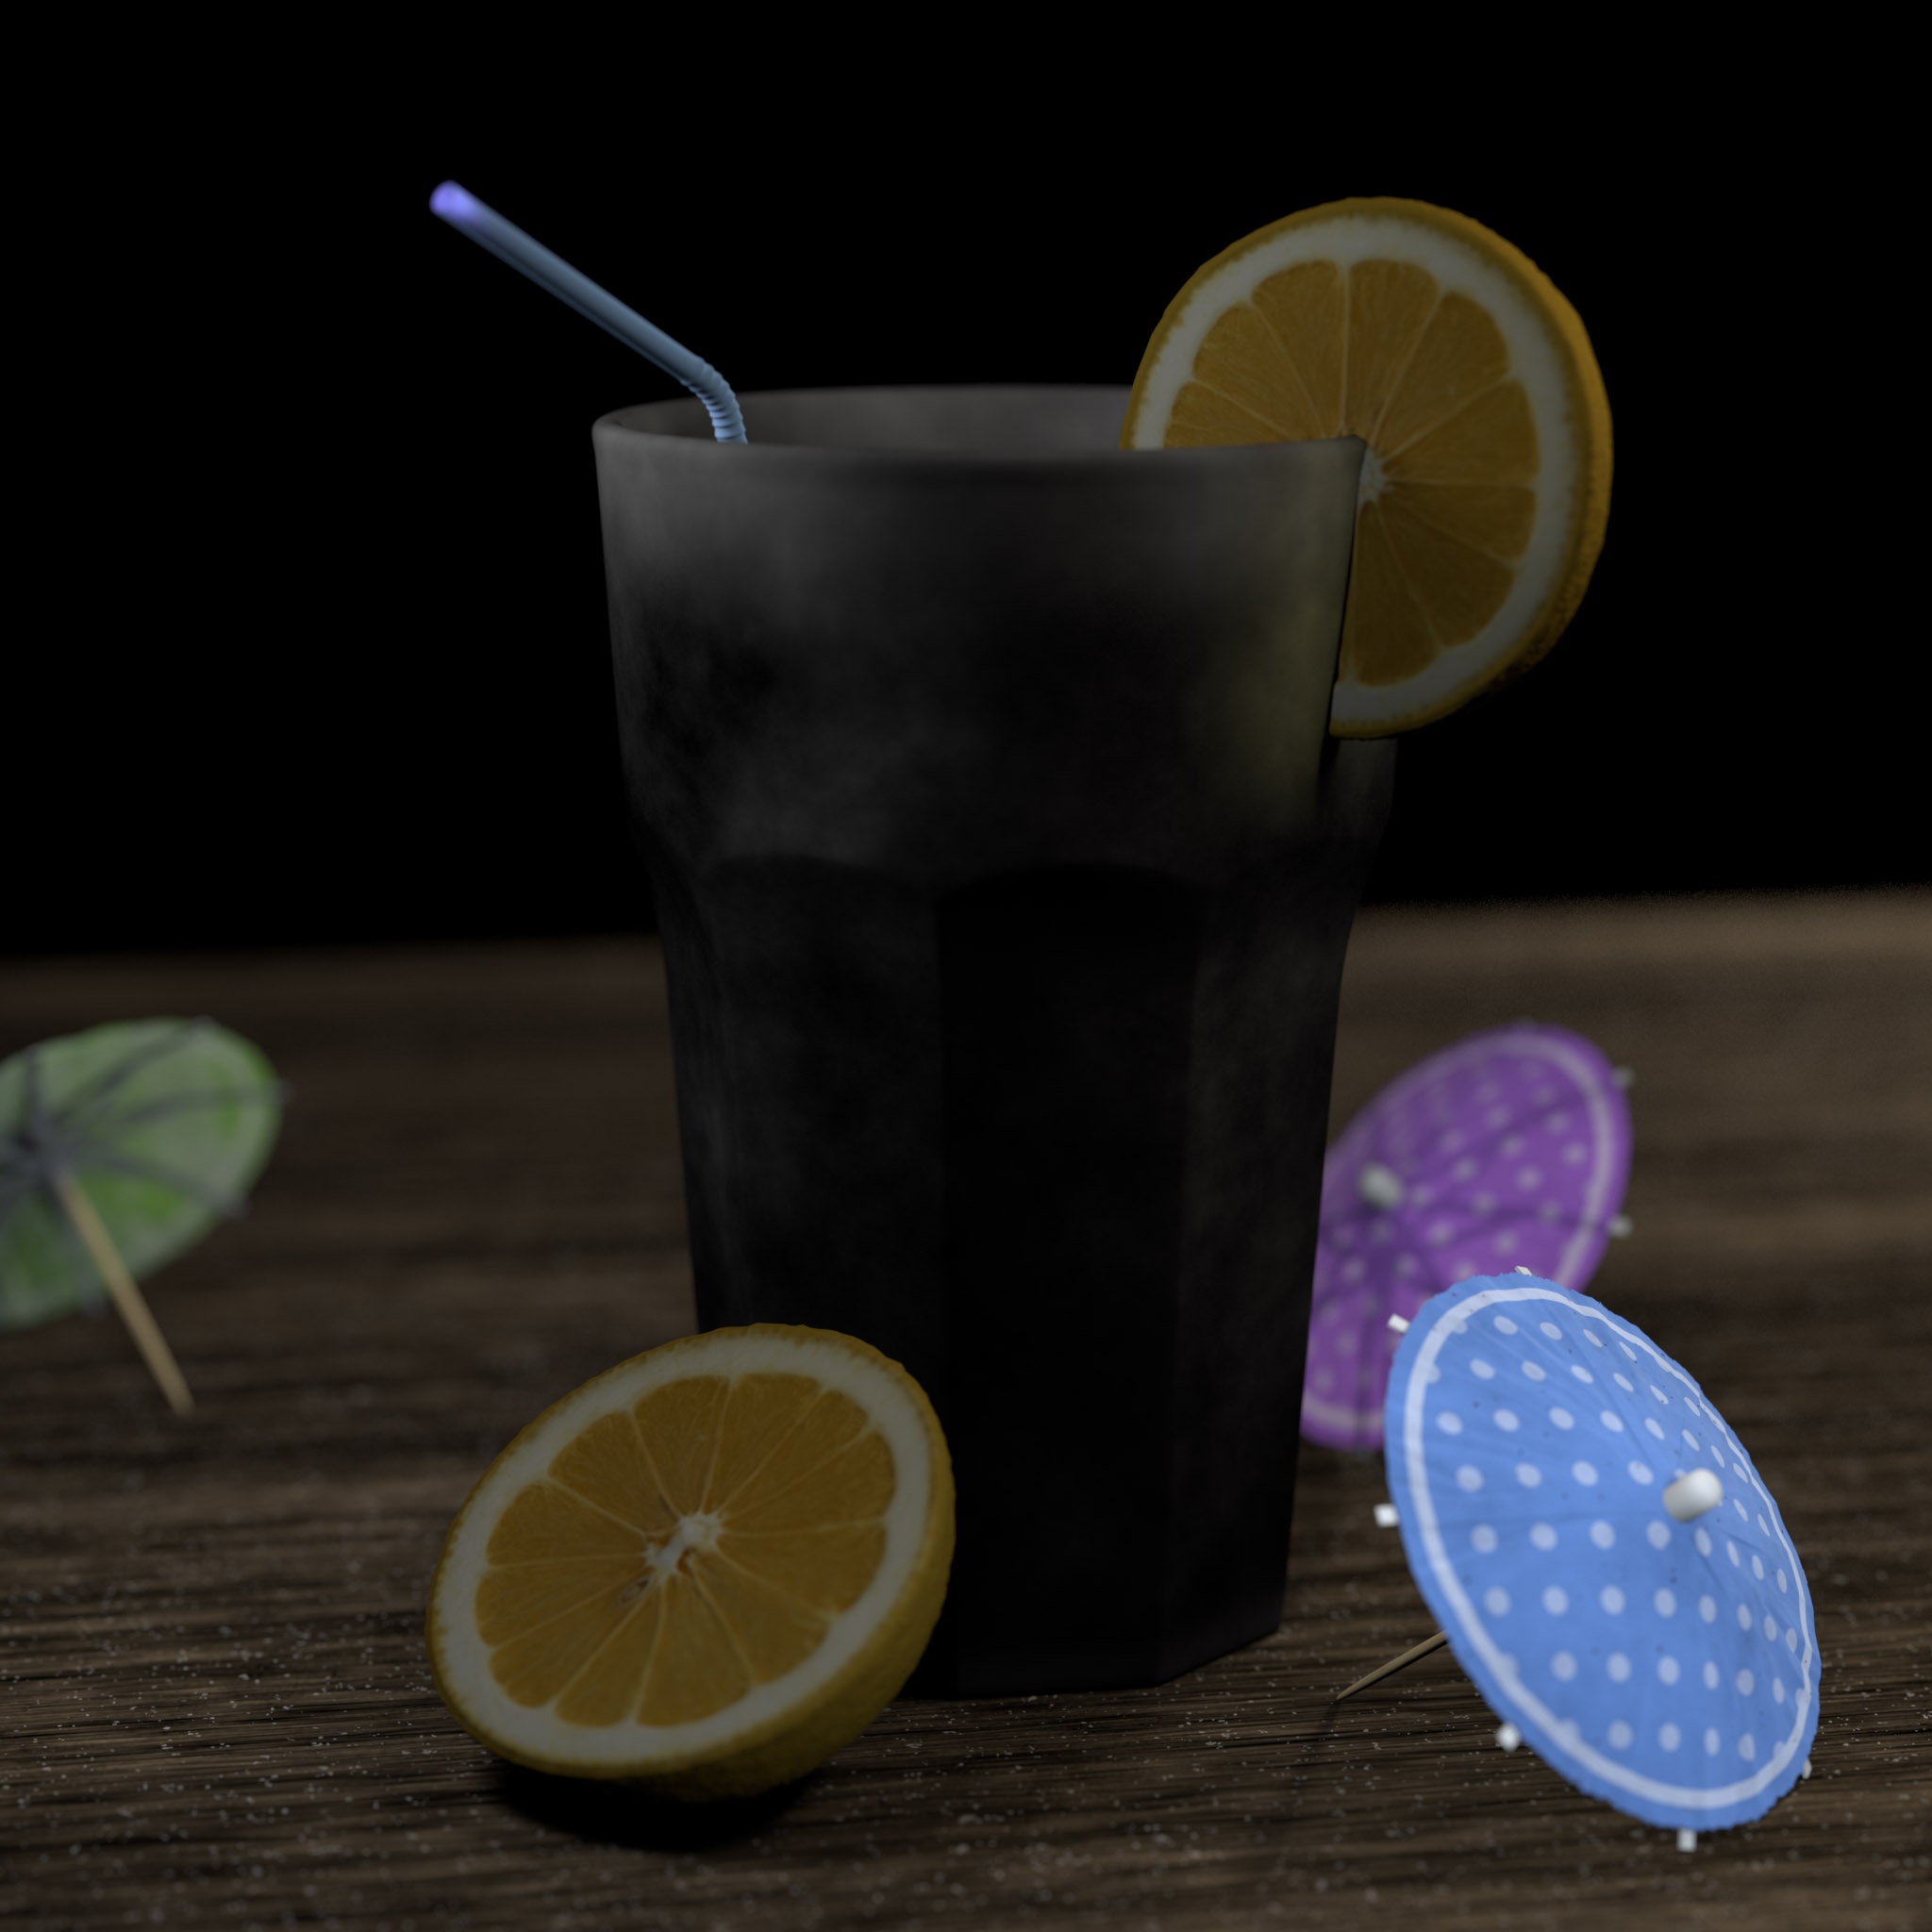
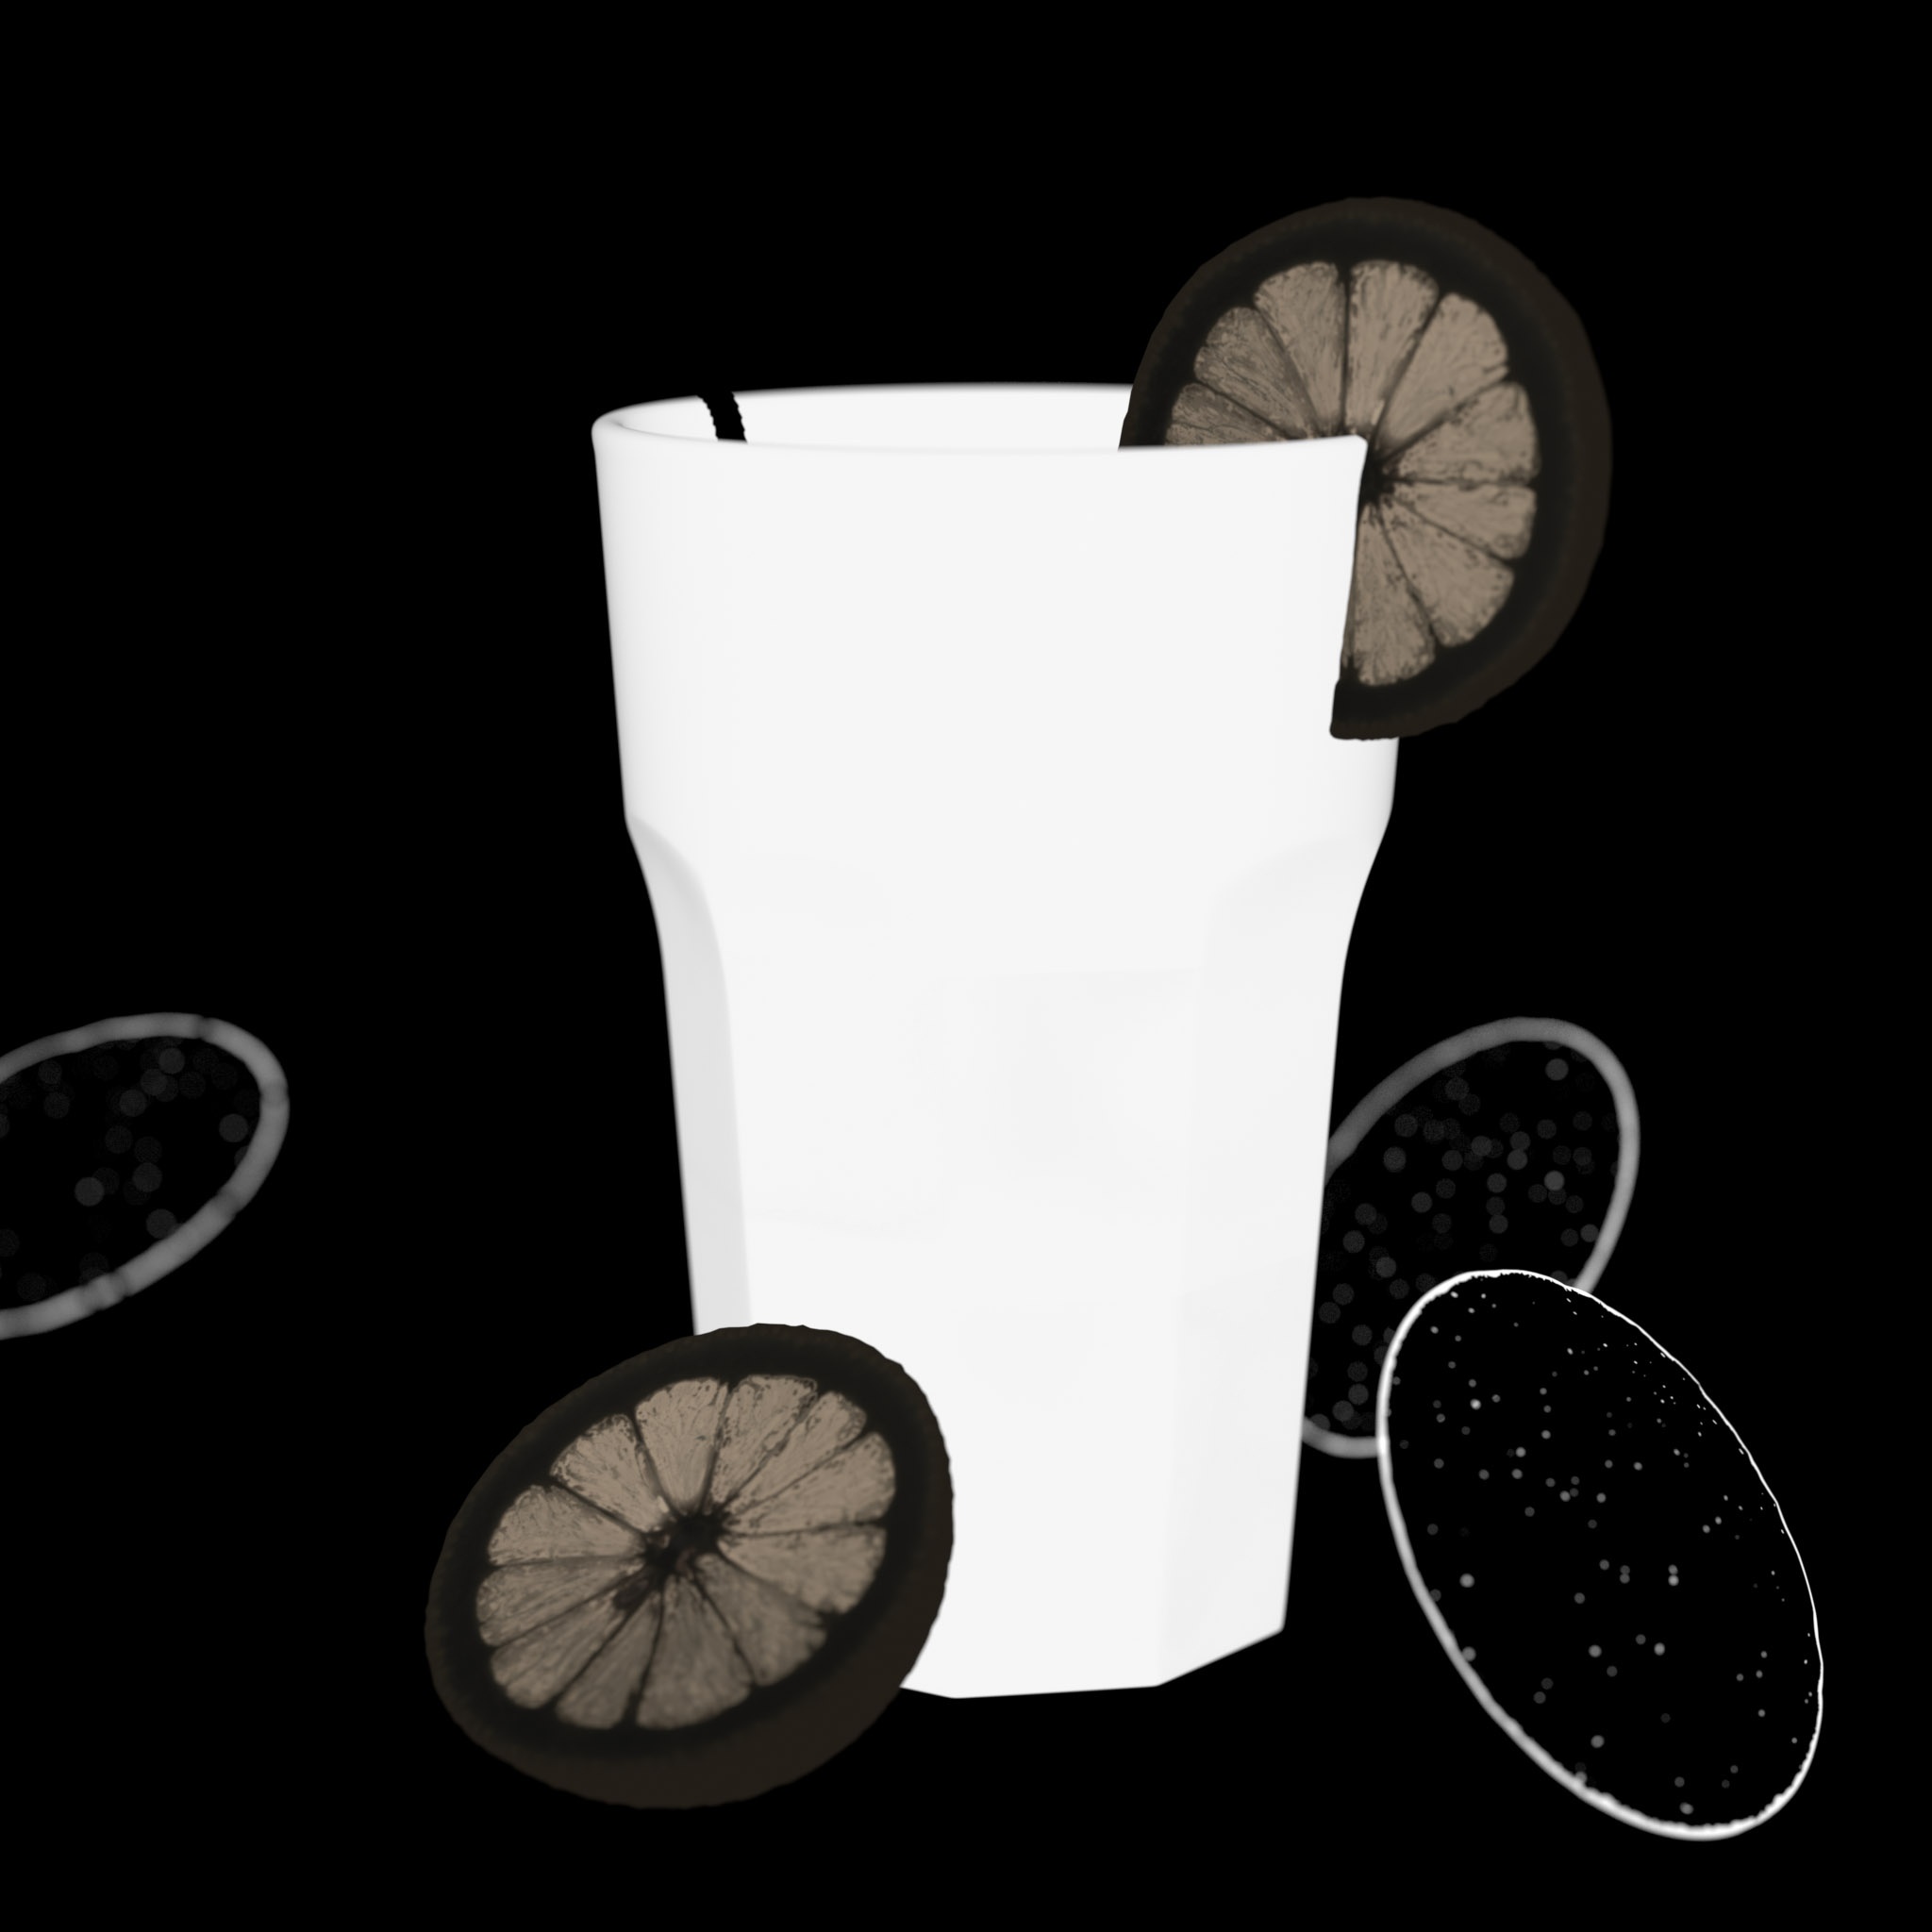
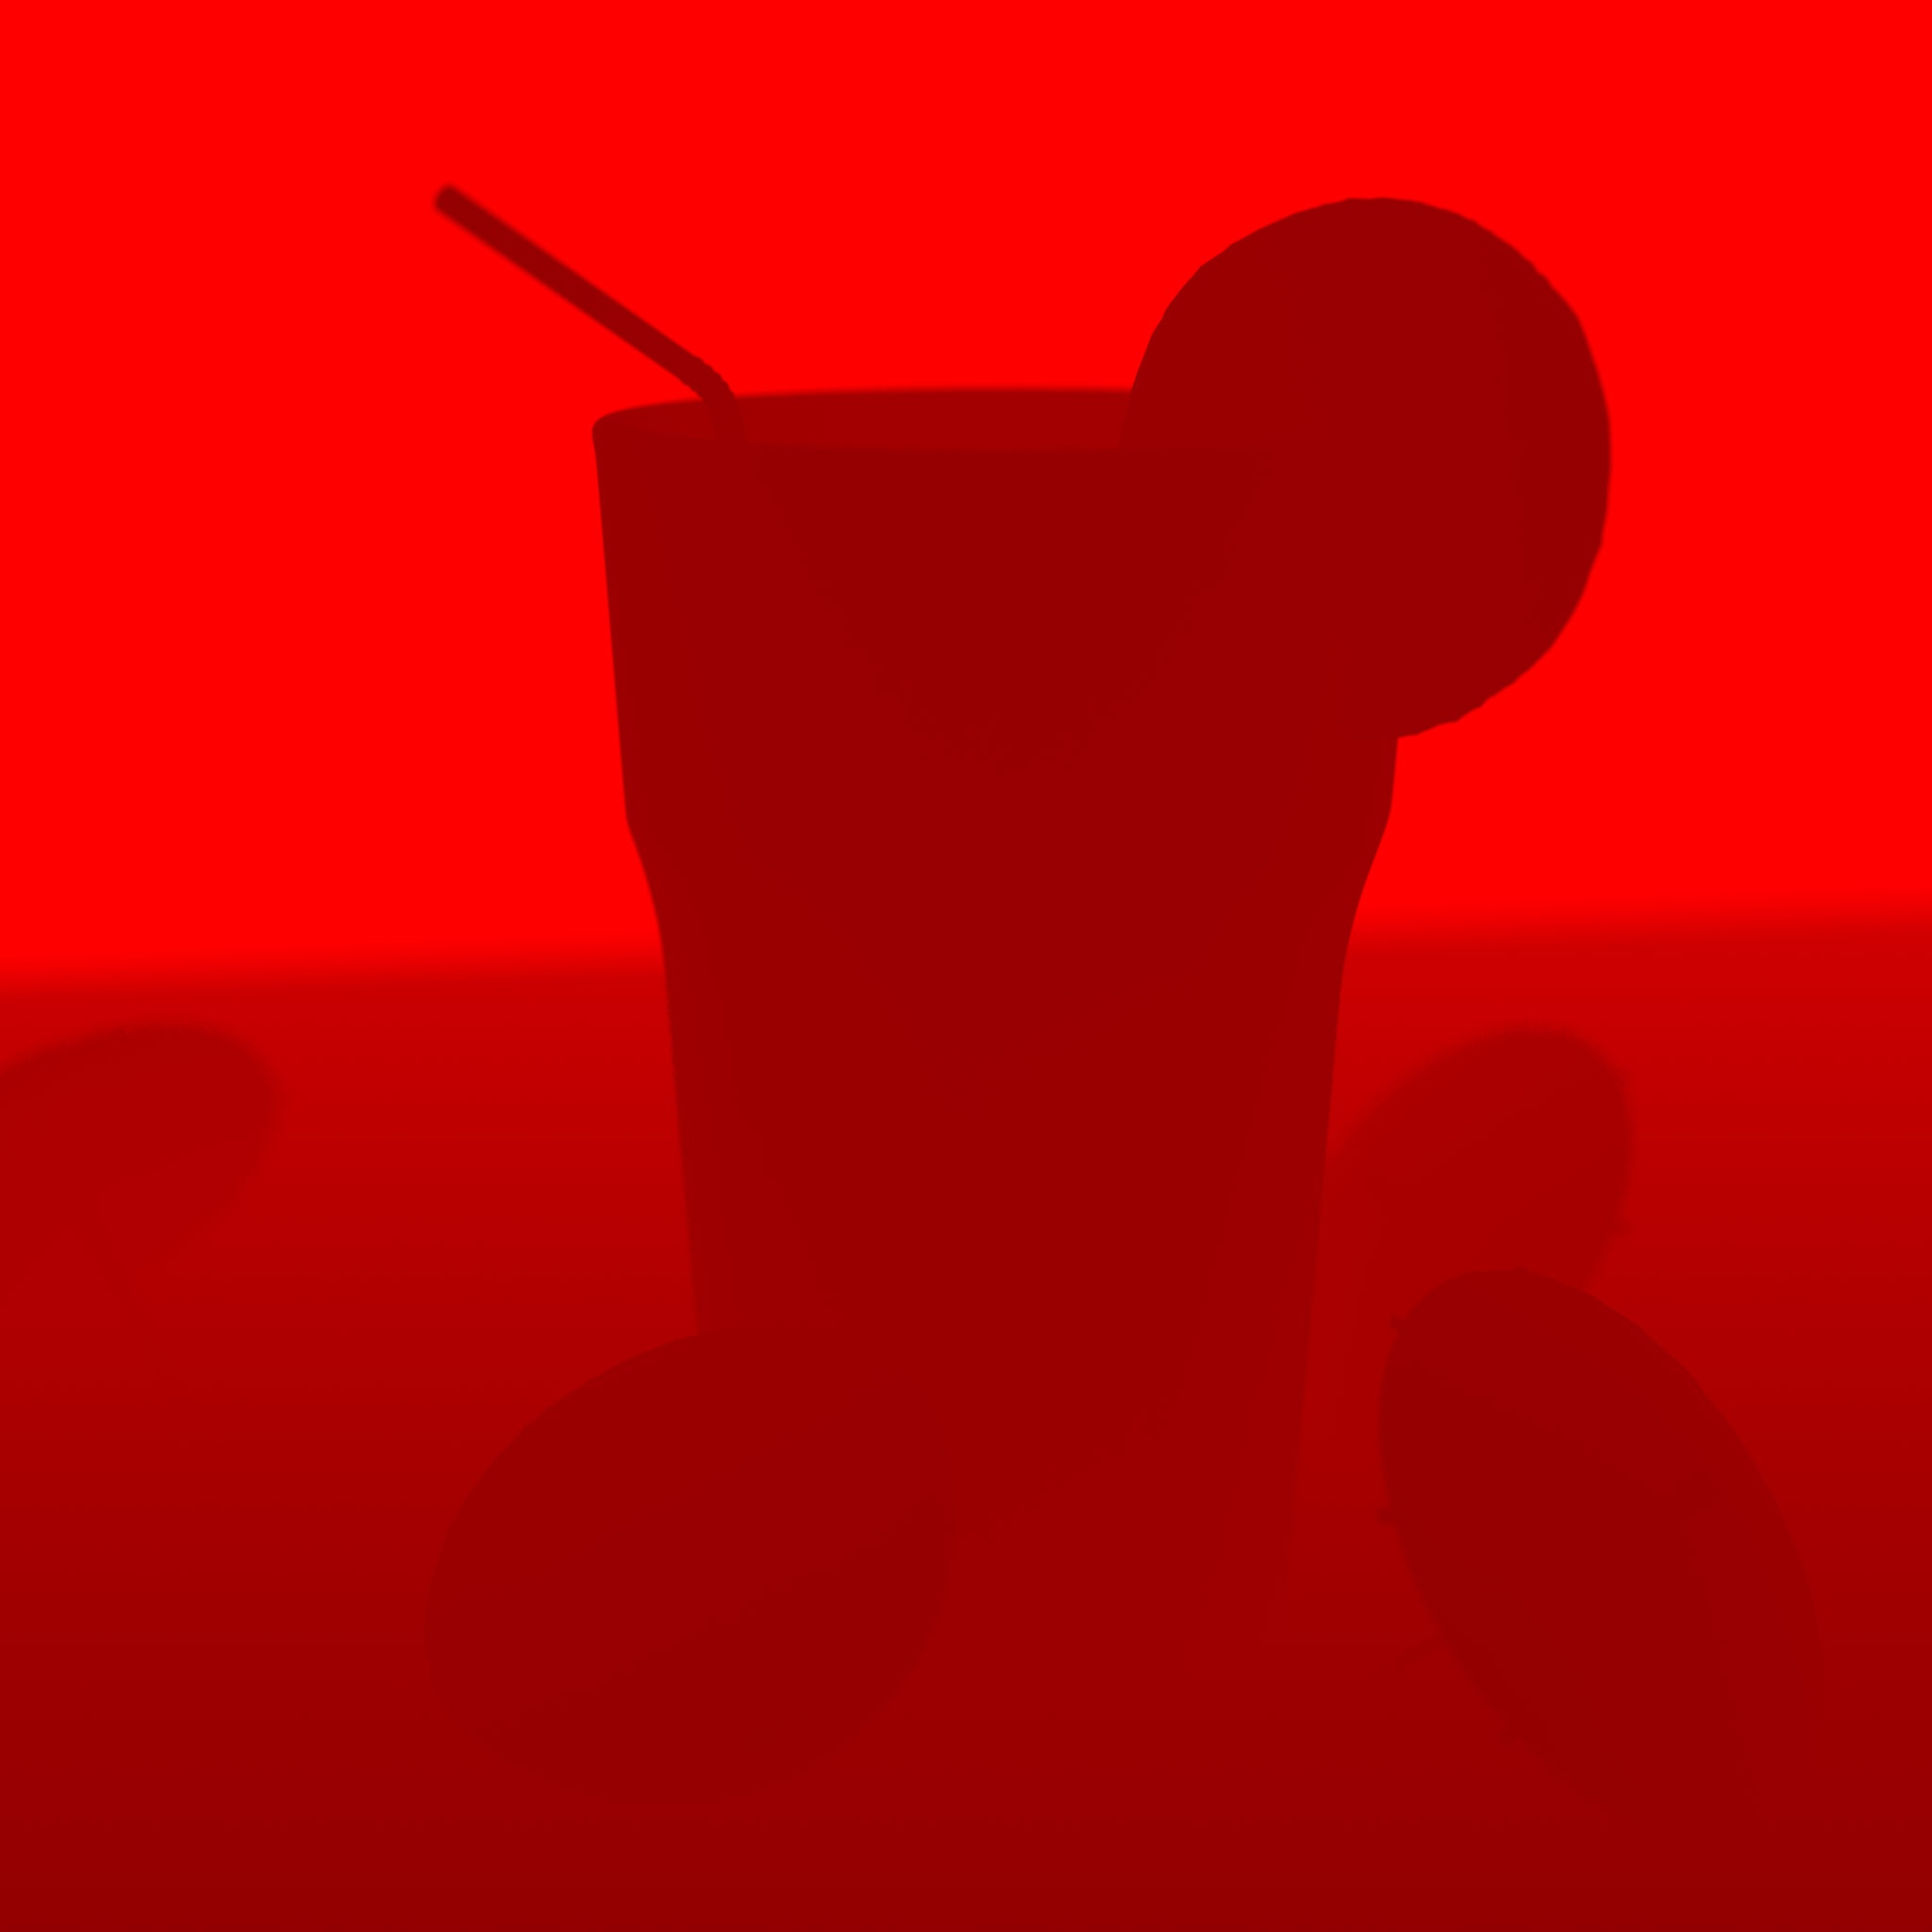
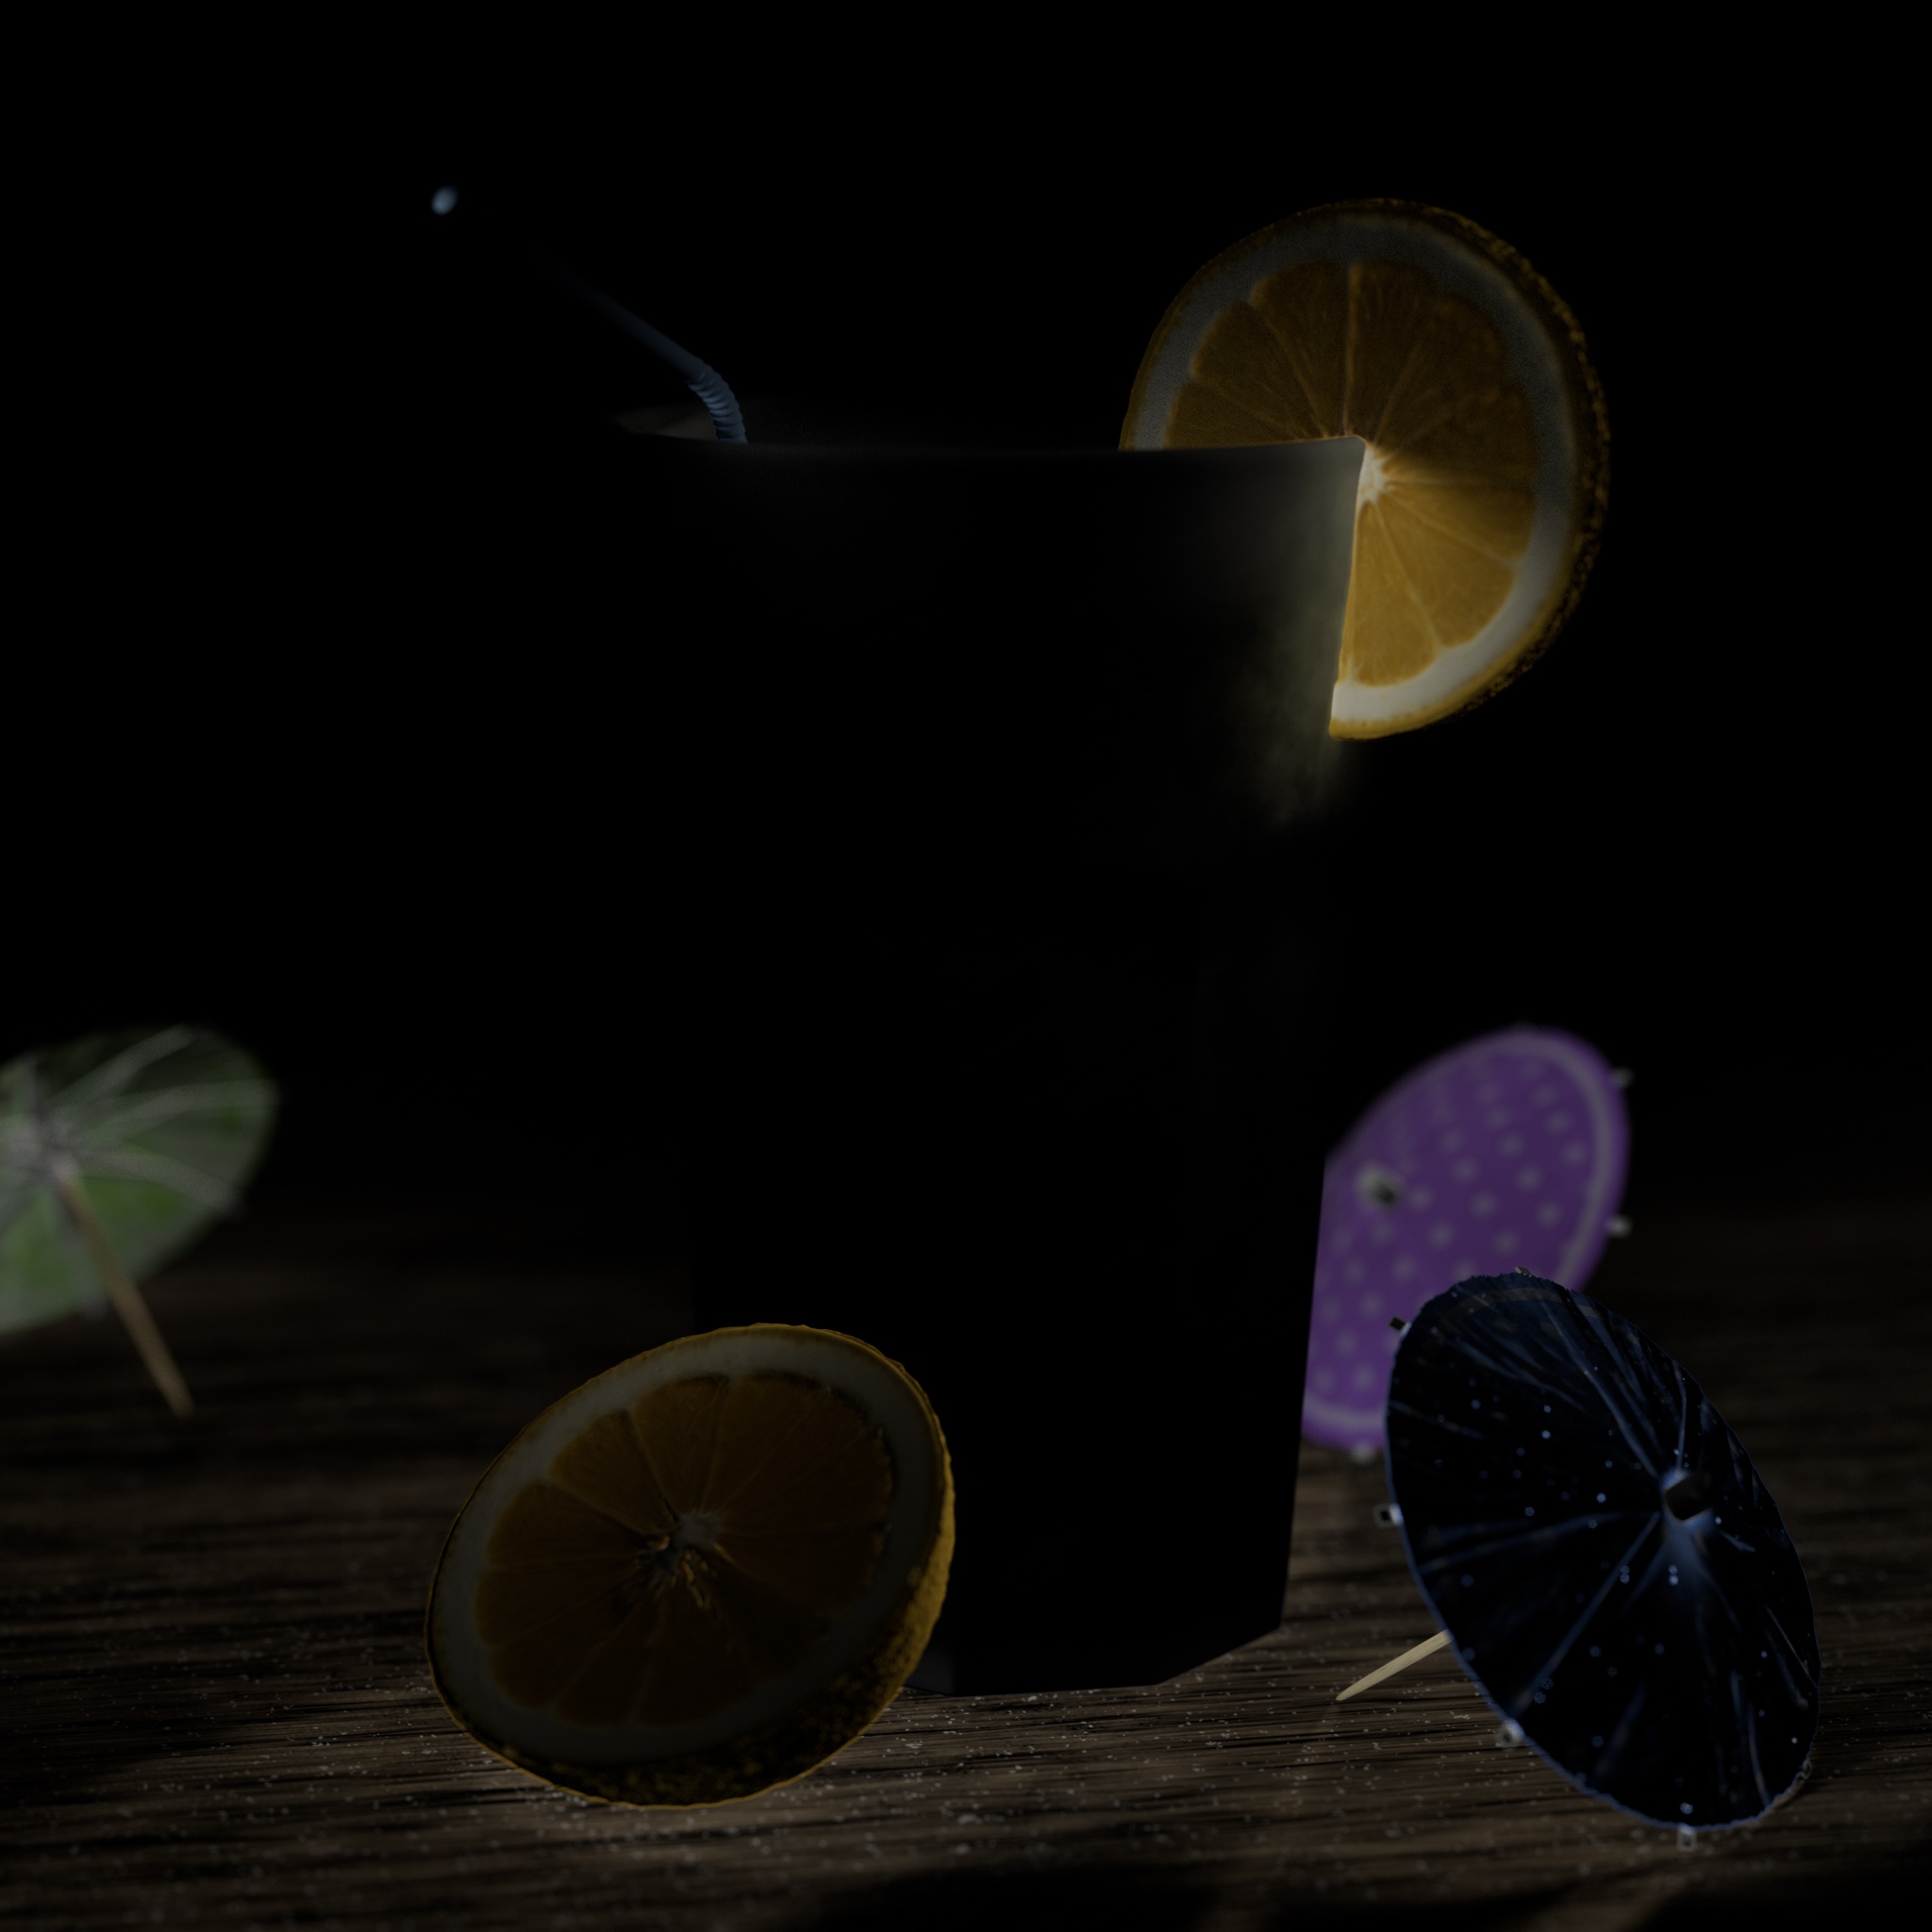
The refractions AOV contains the refraction component of the final shaded result. In the example scene pictured above you can see how the refractive drinking glass dominates this AOV since any ray that passes through the drinking glass is considered a refraction ray at that point.
How to use:
Add the Refractions AOV to the primary AOV composite.
Subsurface Scatter
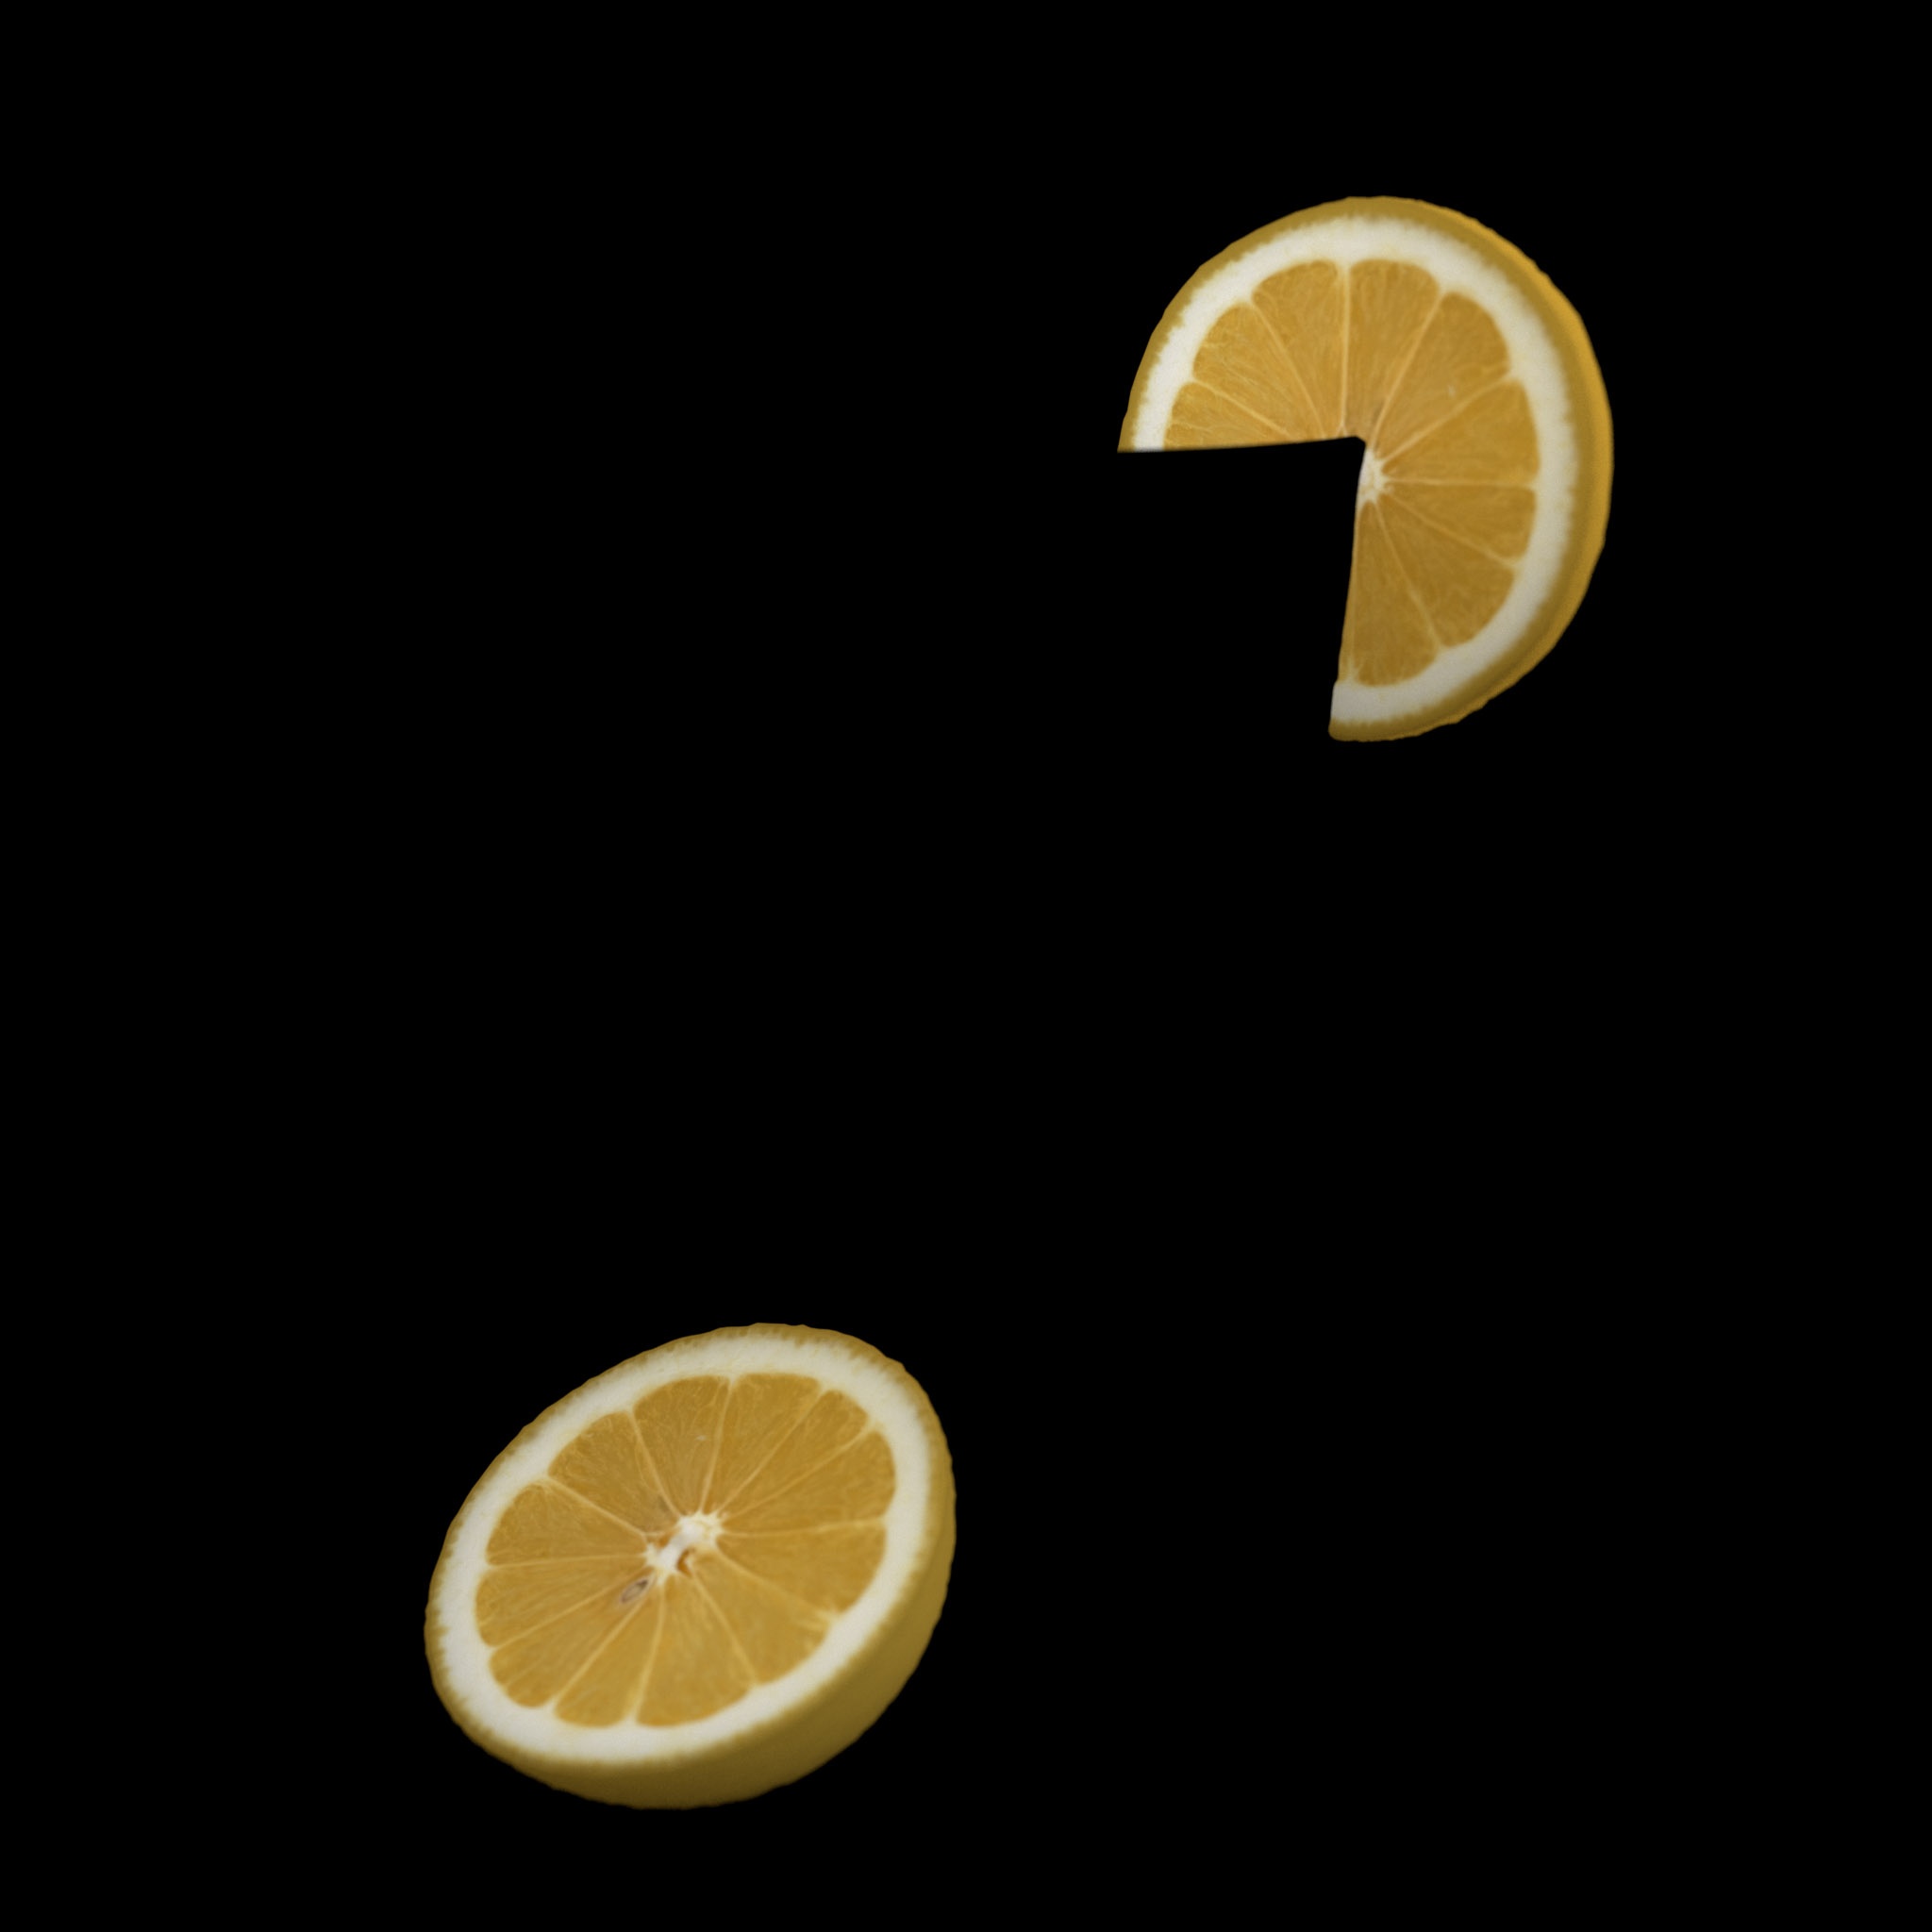
Subsurface Scatter AOV
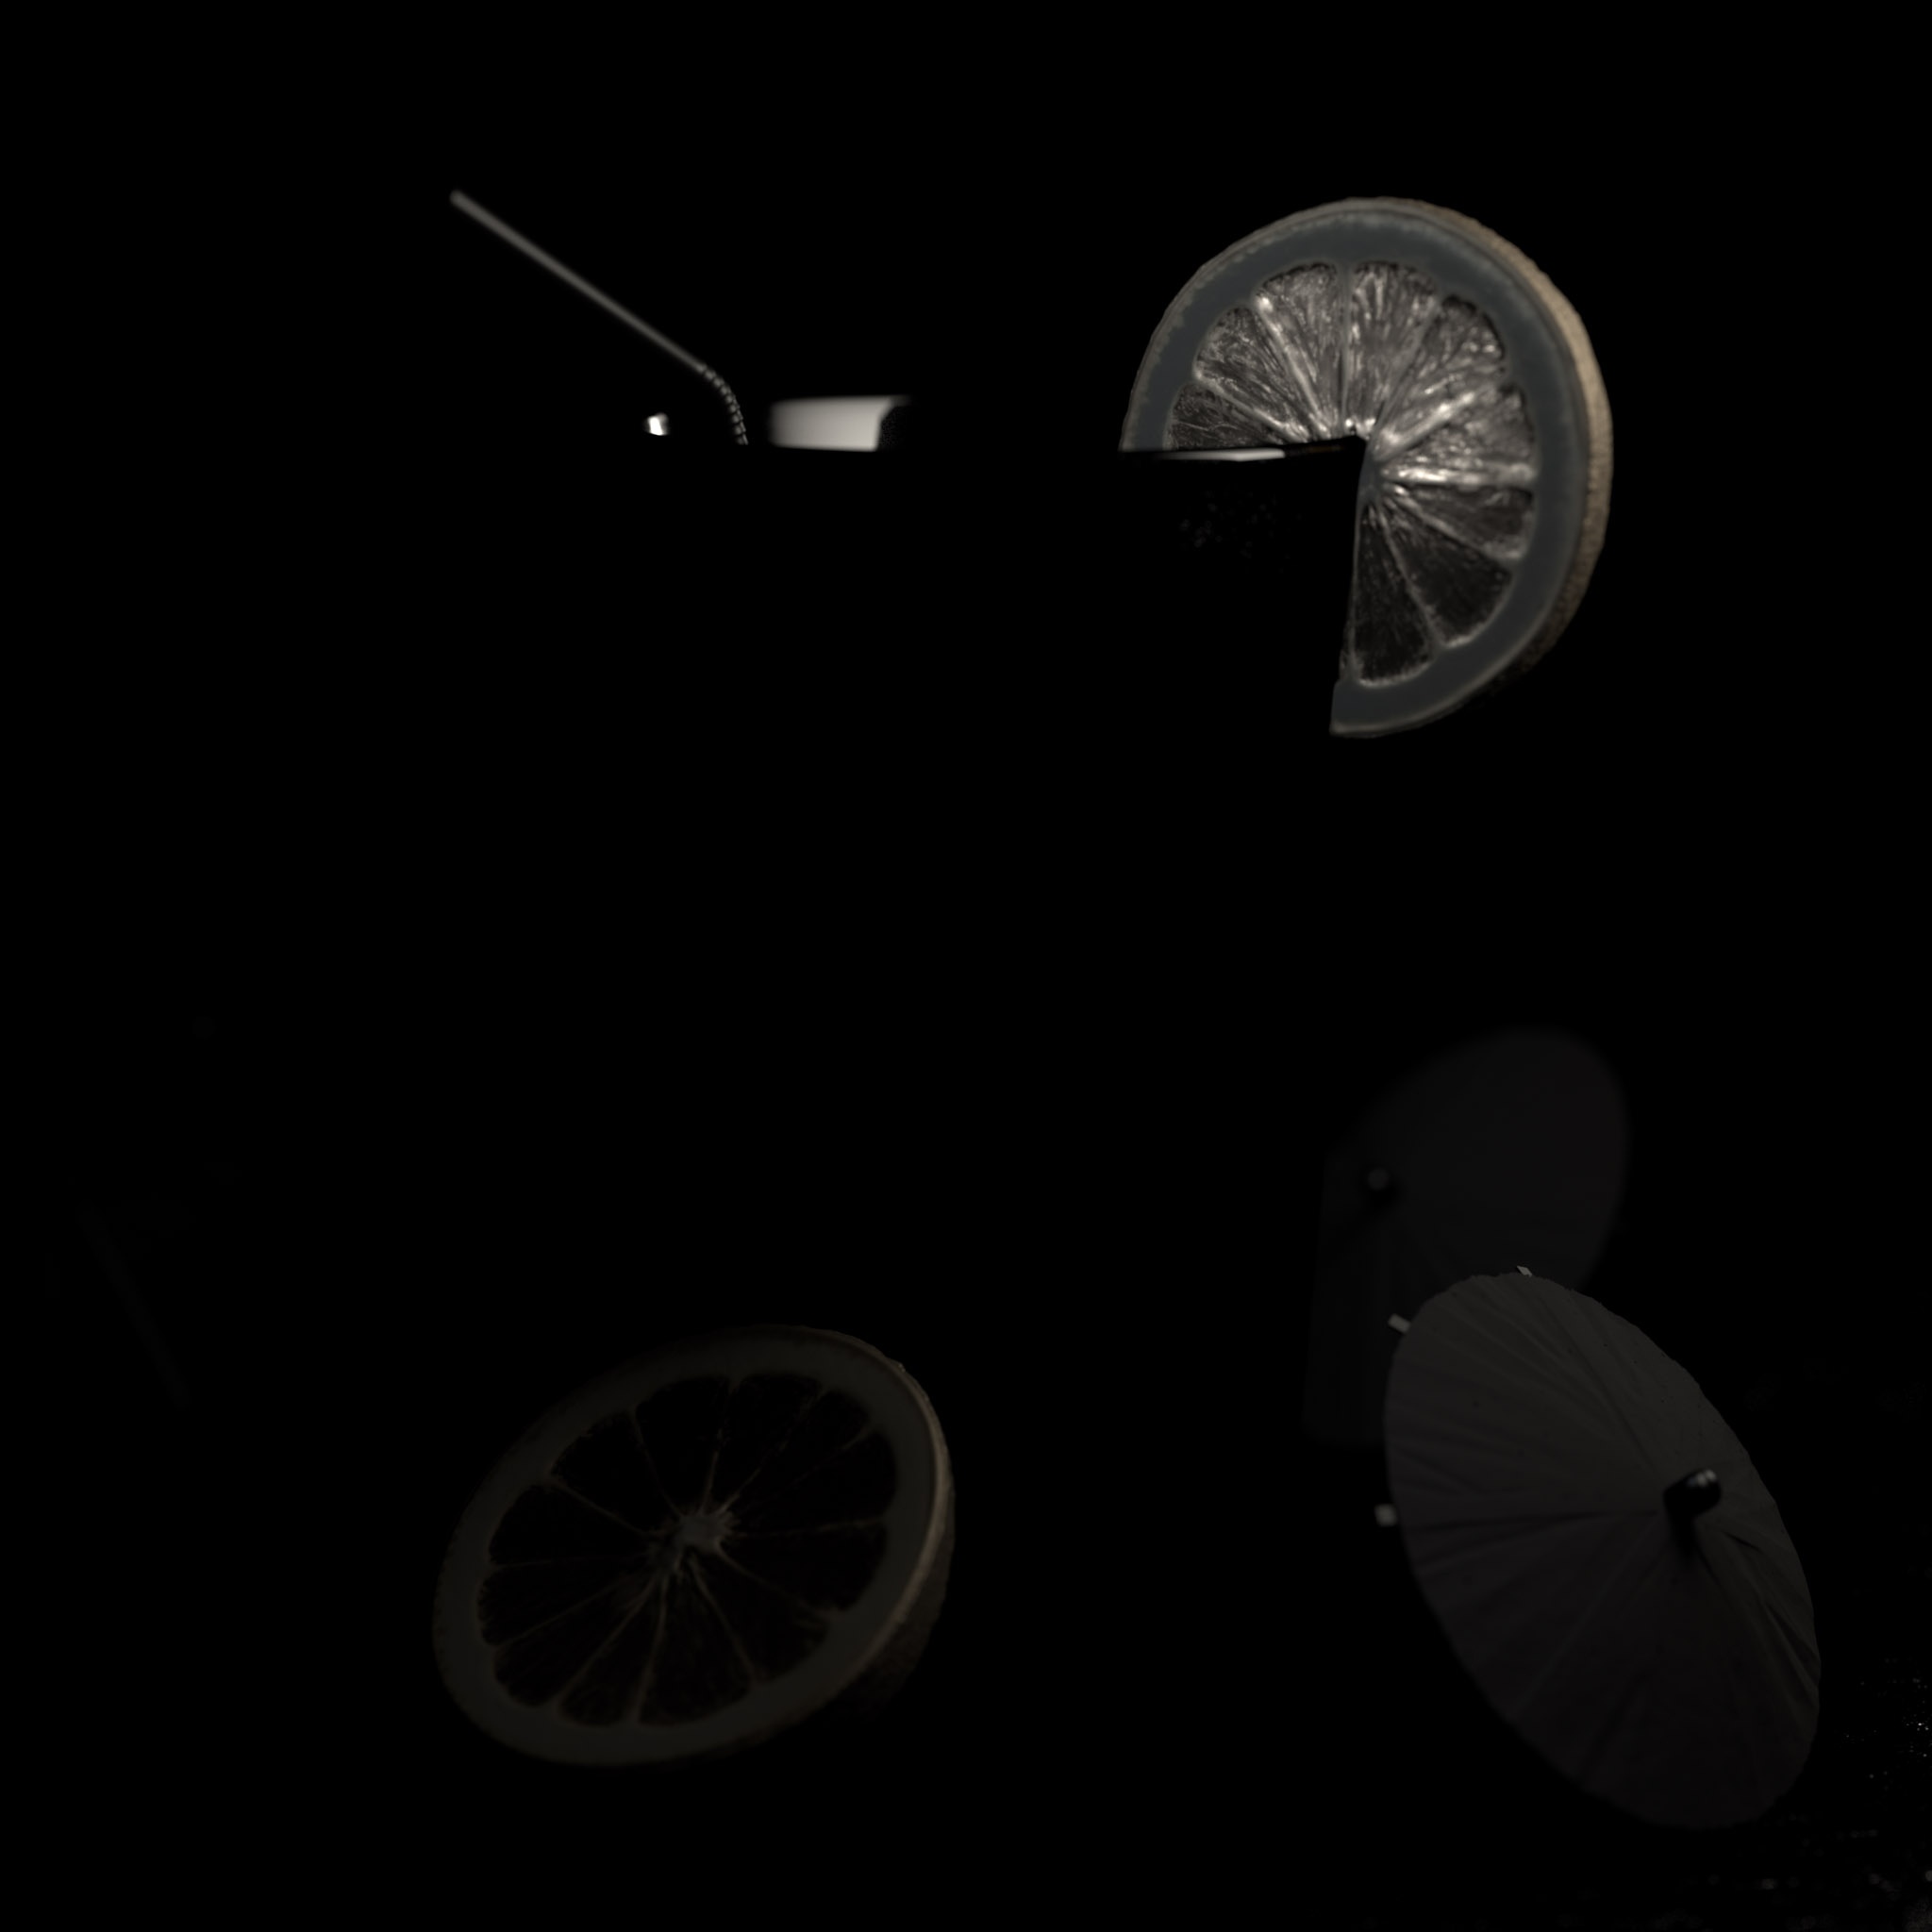
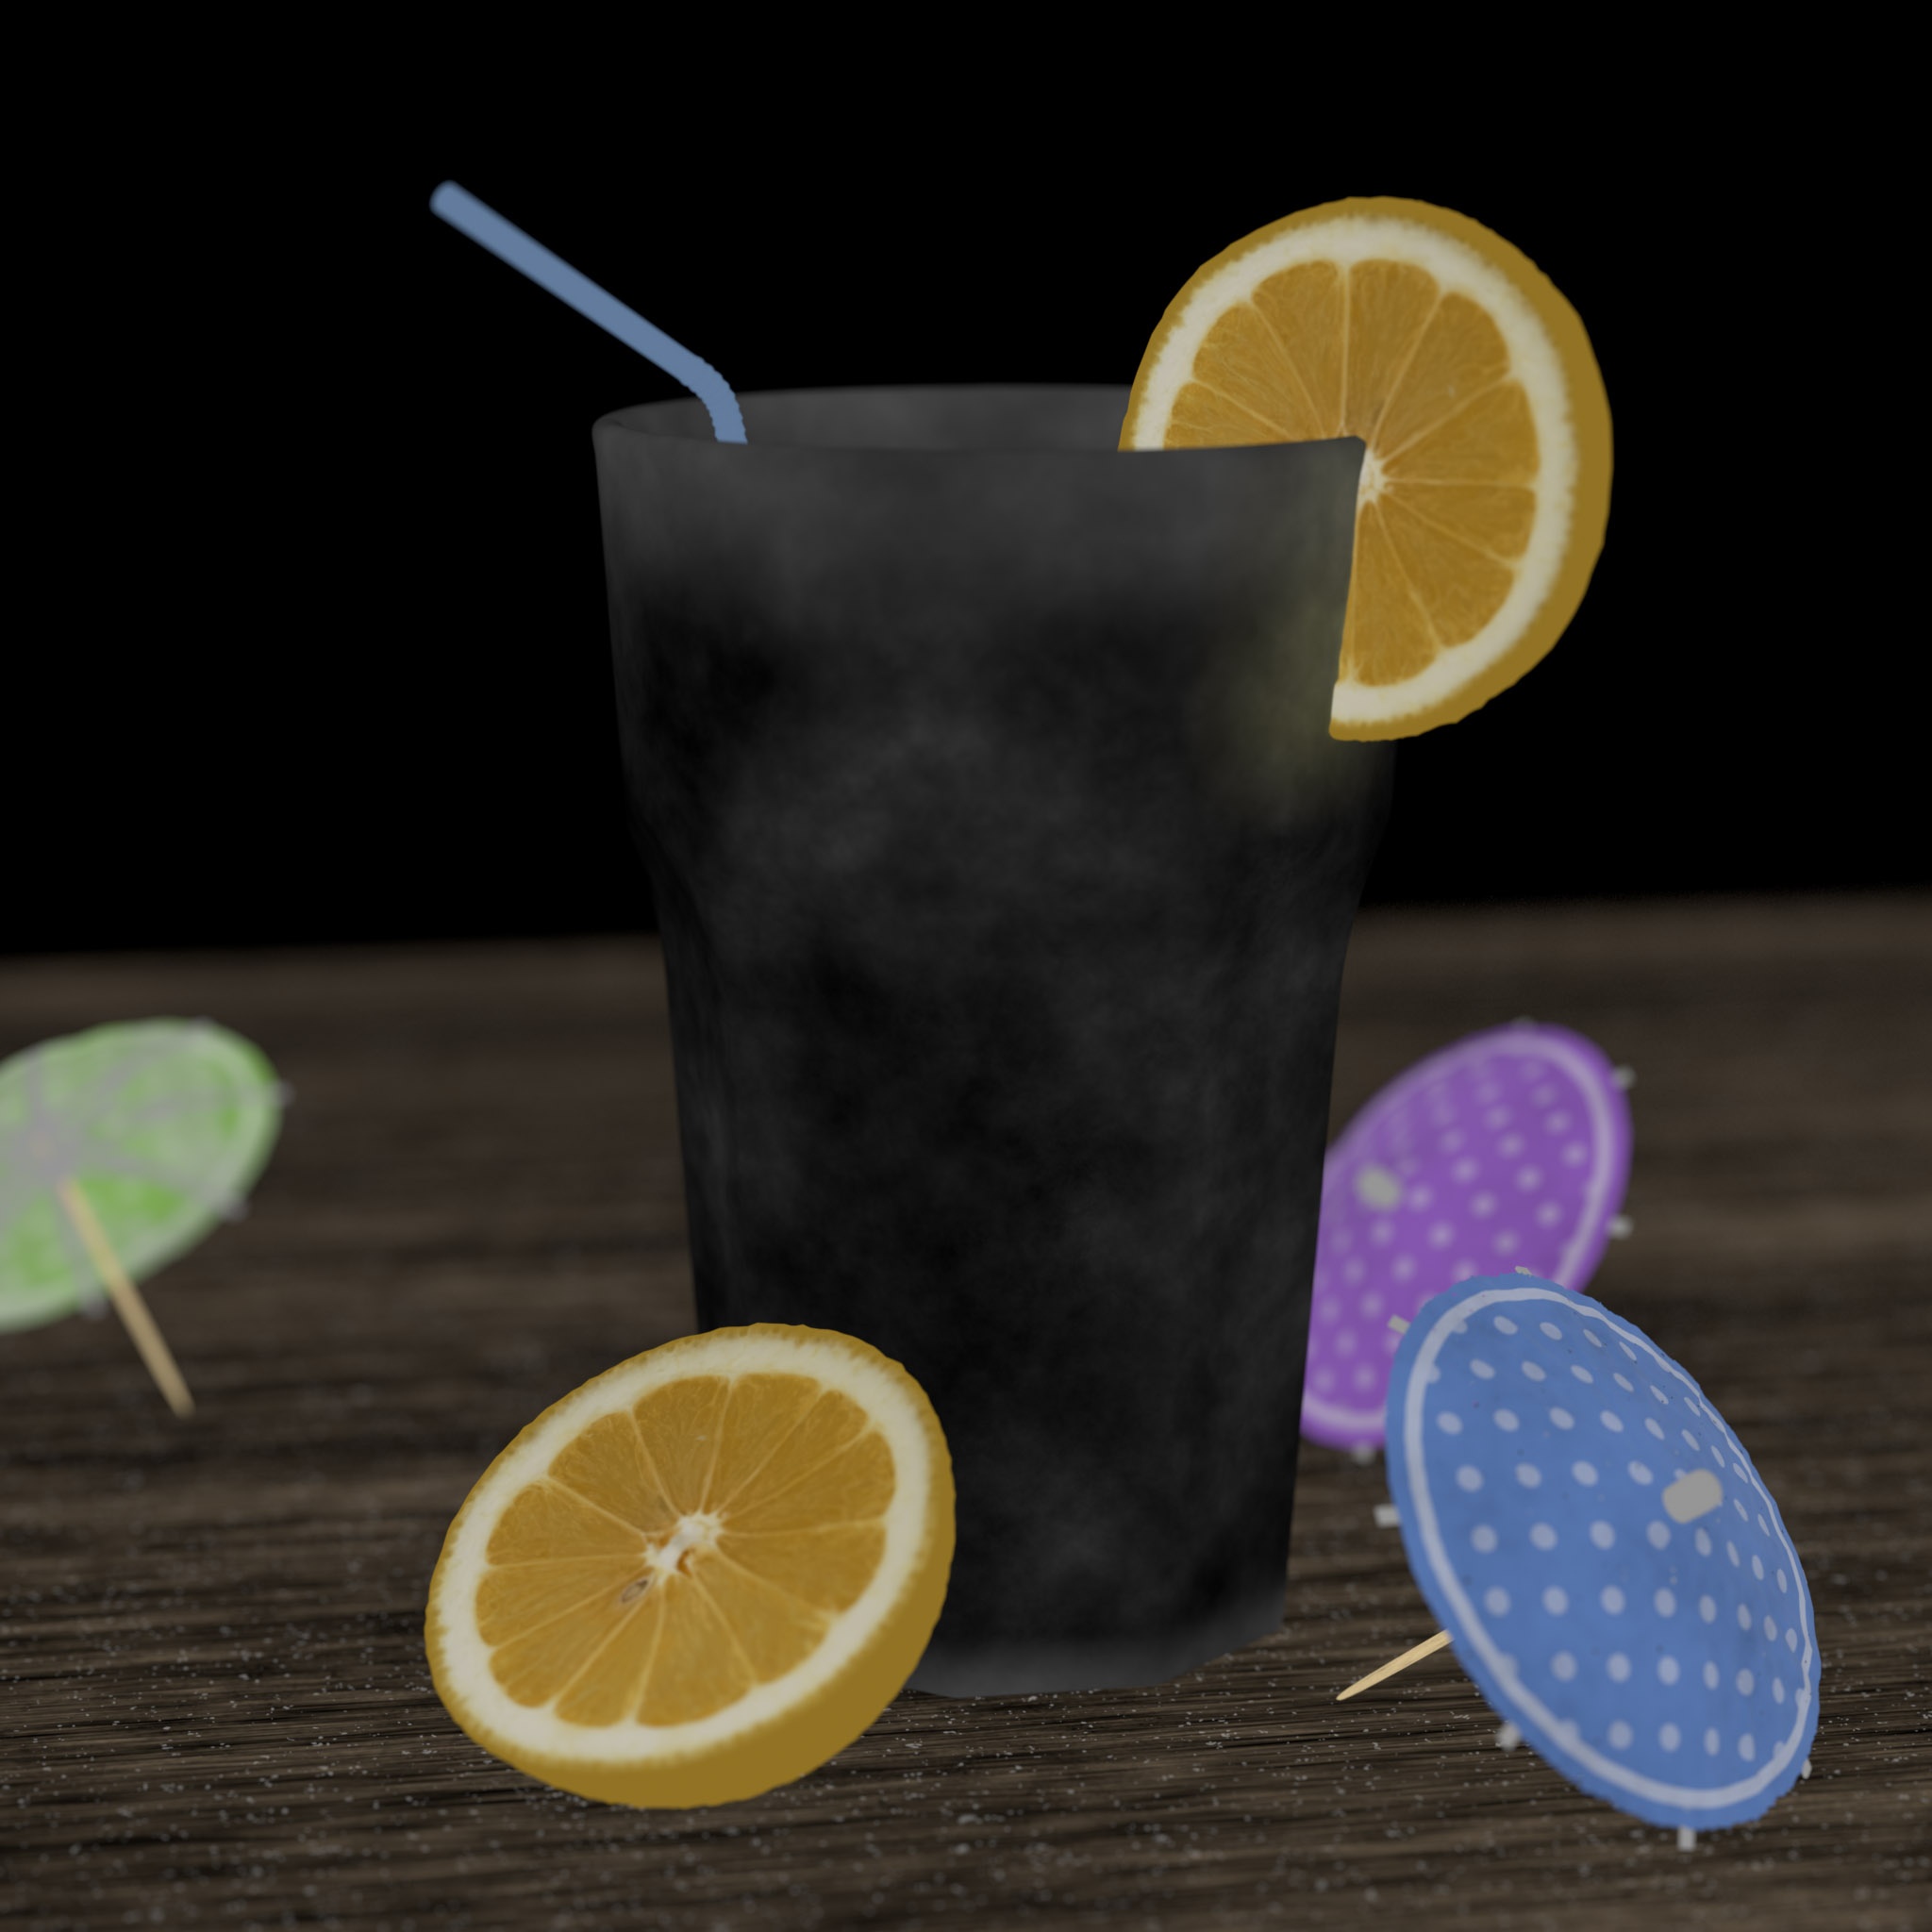
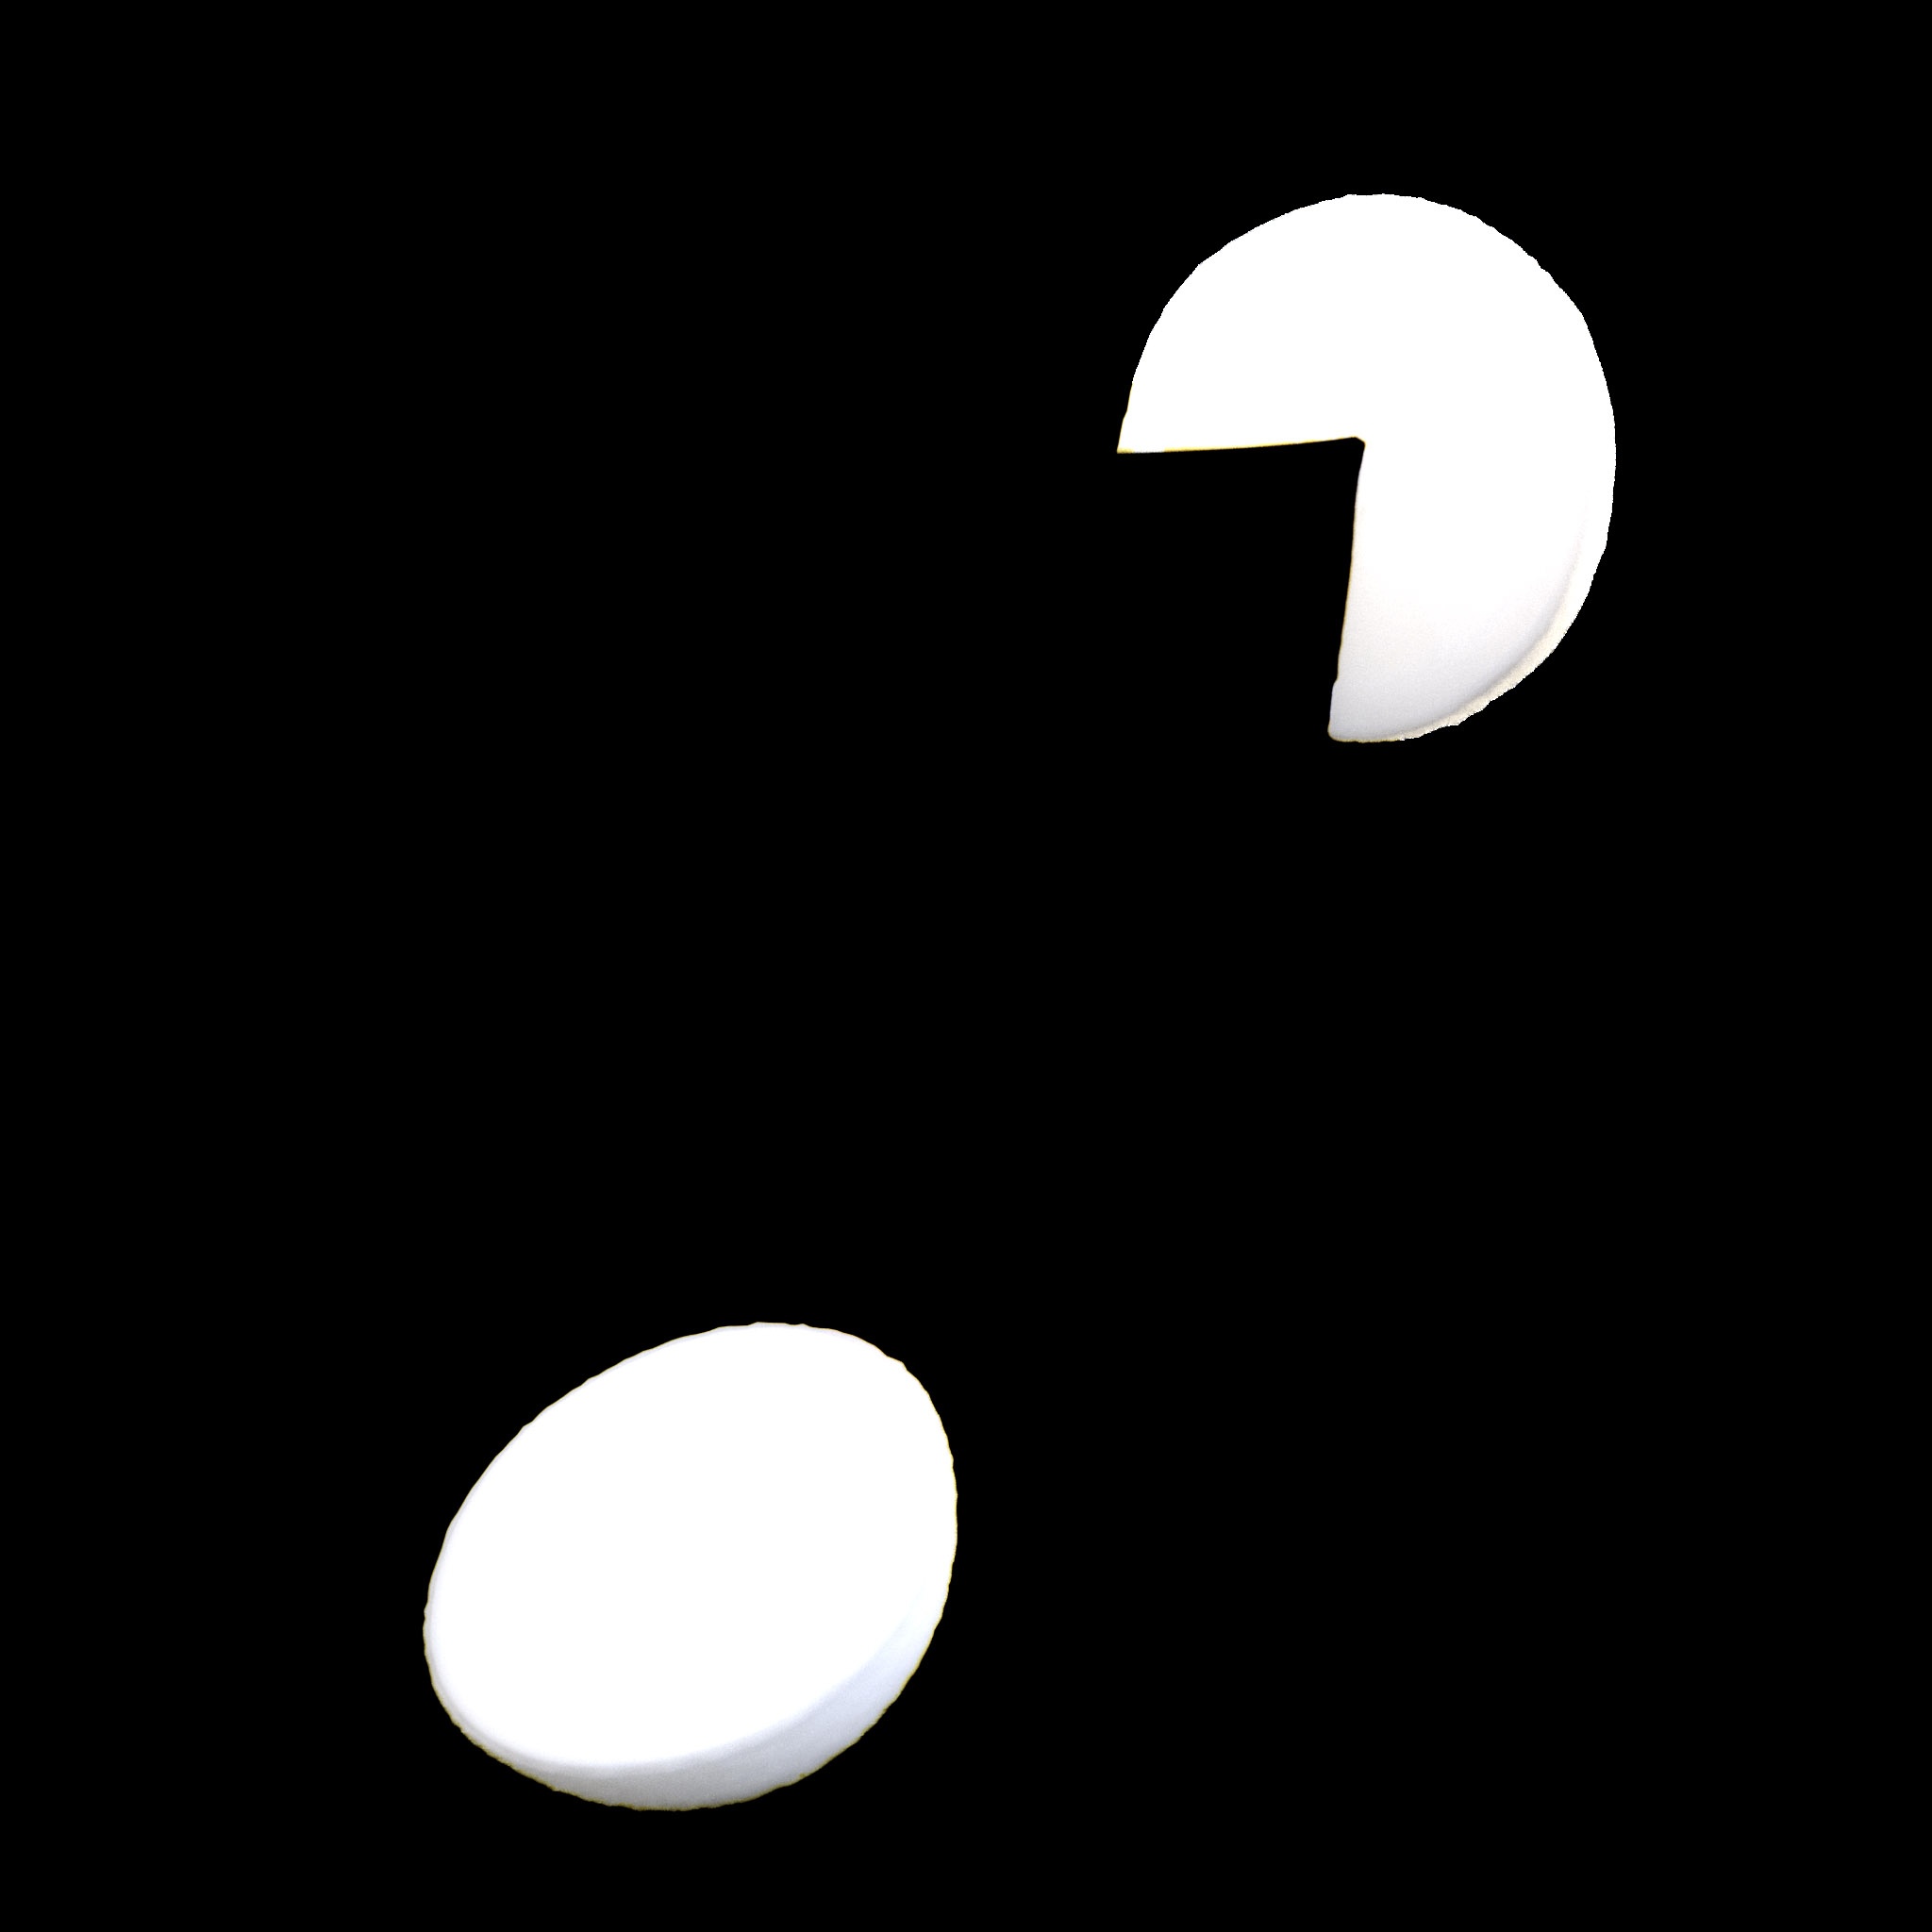
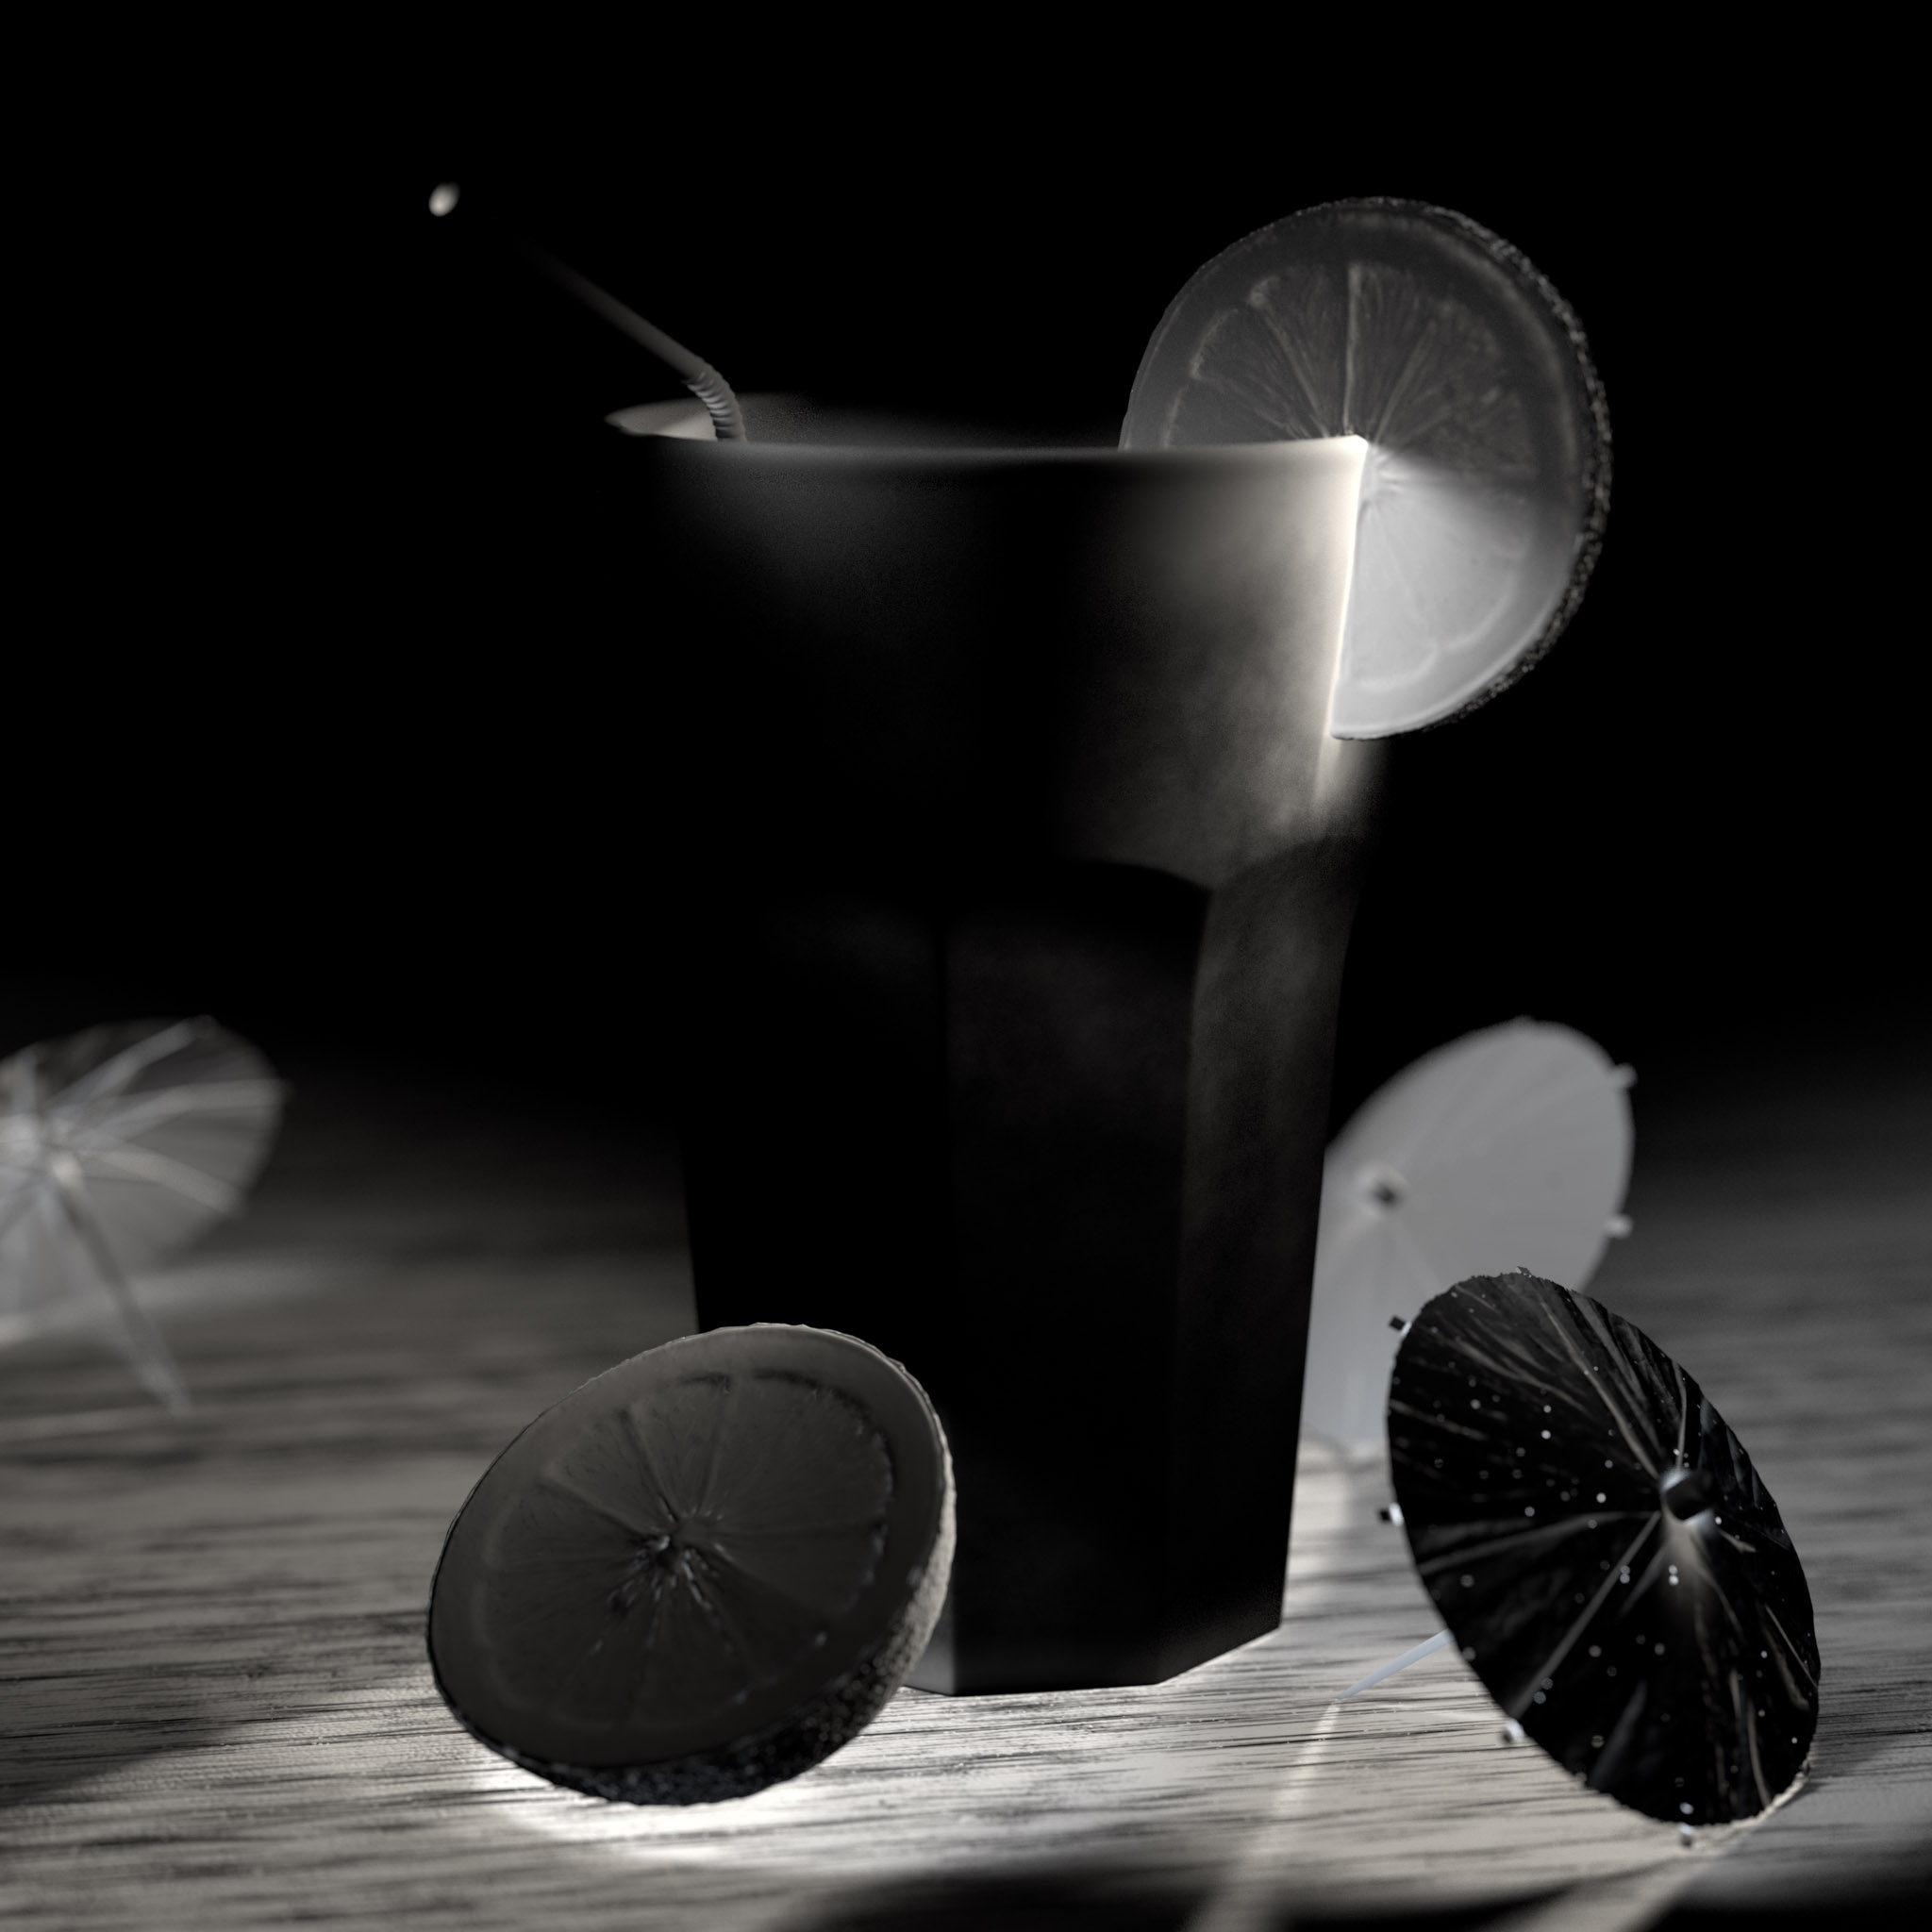
The Subsurface Scatter AOV contains the subsurface scattering component of the final shaded result. In this scene only the lemons have any subsurface scattering element to their shaders and that is displayed here.
How to use:
Add the Subsurface Scatter AOV to the primary AOV composite.
Caustics
|
|
|
| Caustics AOV | Caustics AOV Exposure +4 |
The caustics AOV contains the caustics lighting component of the material's final shaded result. In the example scene pictured above the caustic contribution is relatively low so an additional image is provided of the same Caustics AOV but with a boost to exposure by +4 so that you can see it more easily.
How to use:
Add the Caustics AOV to the primary AOV composite.
Emission
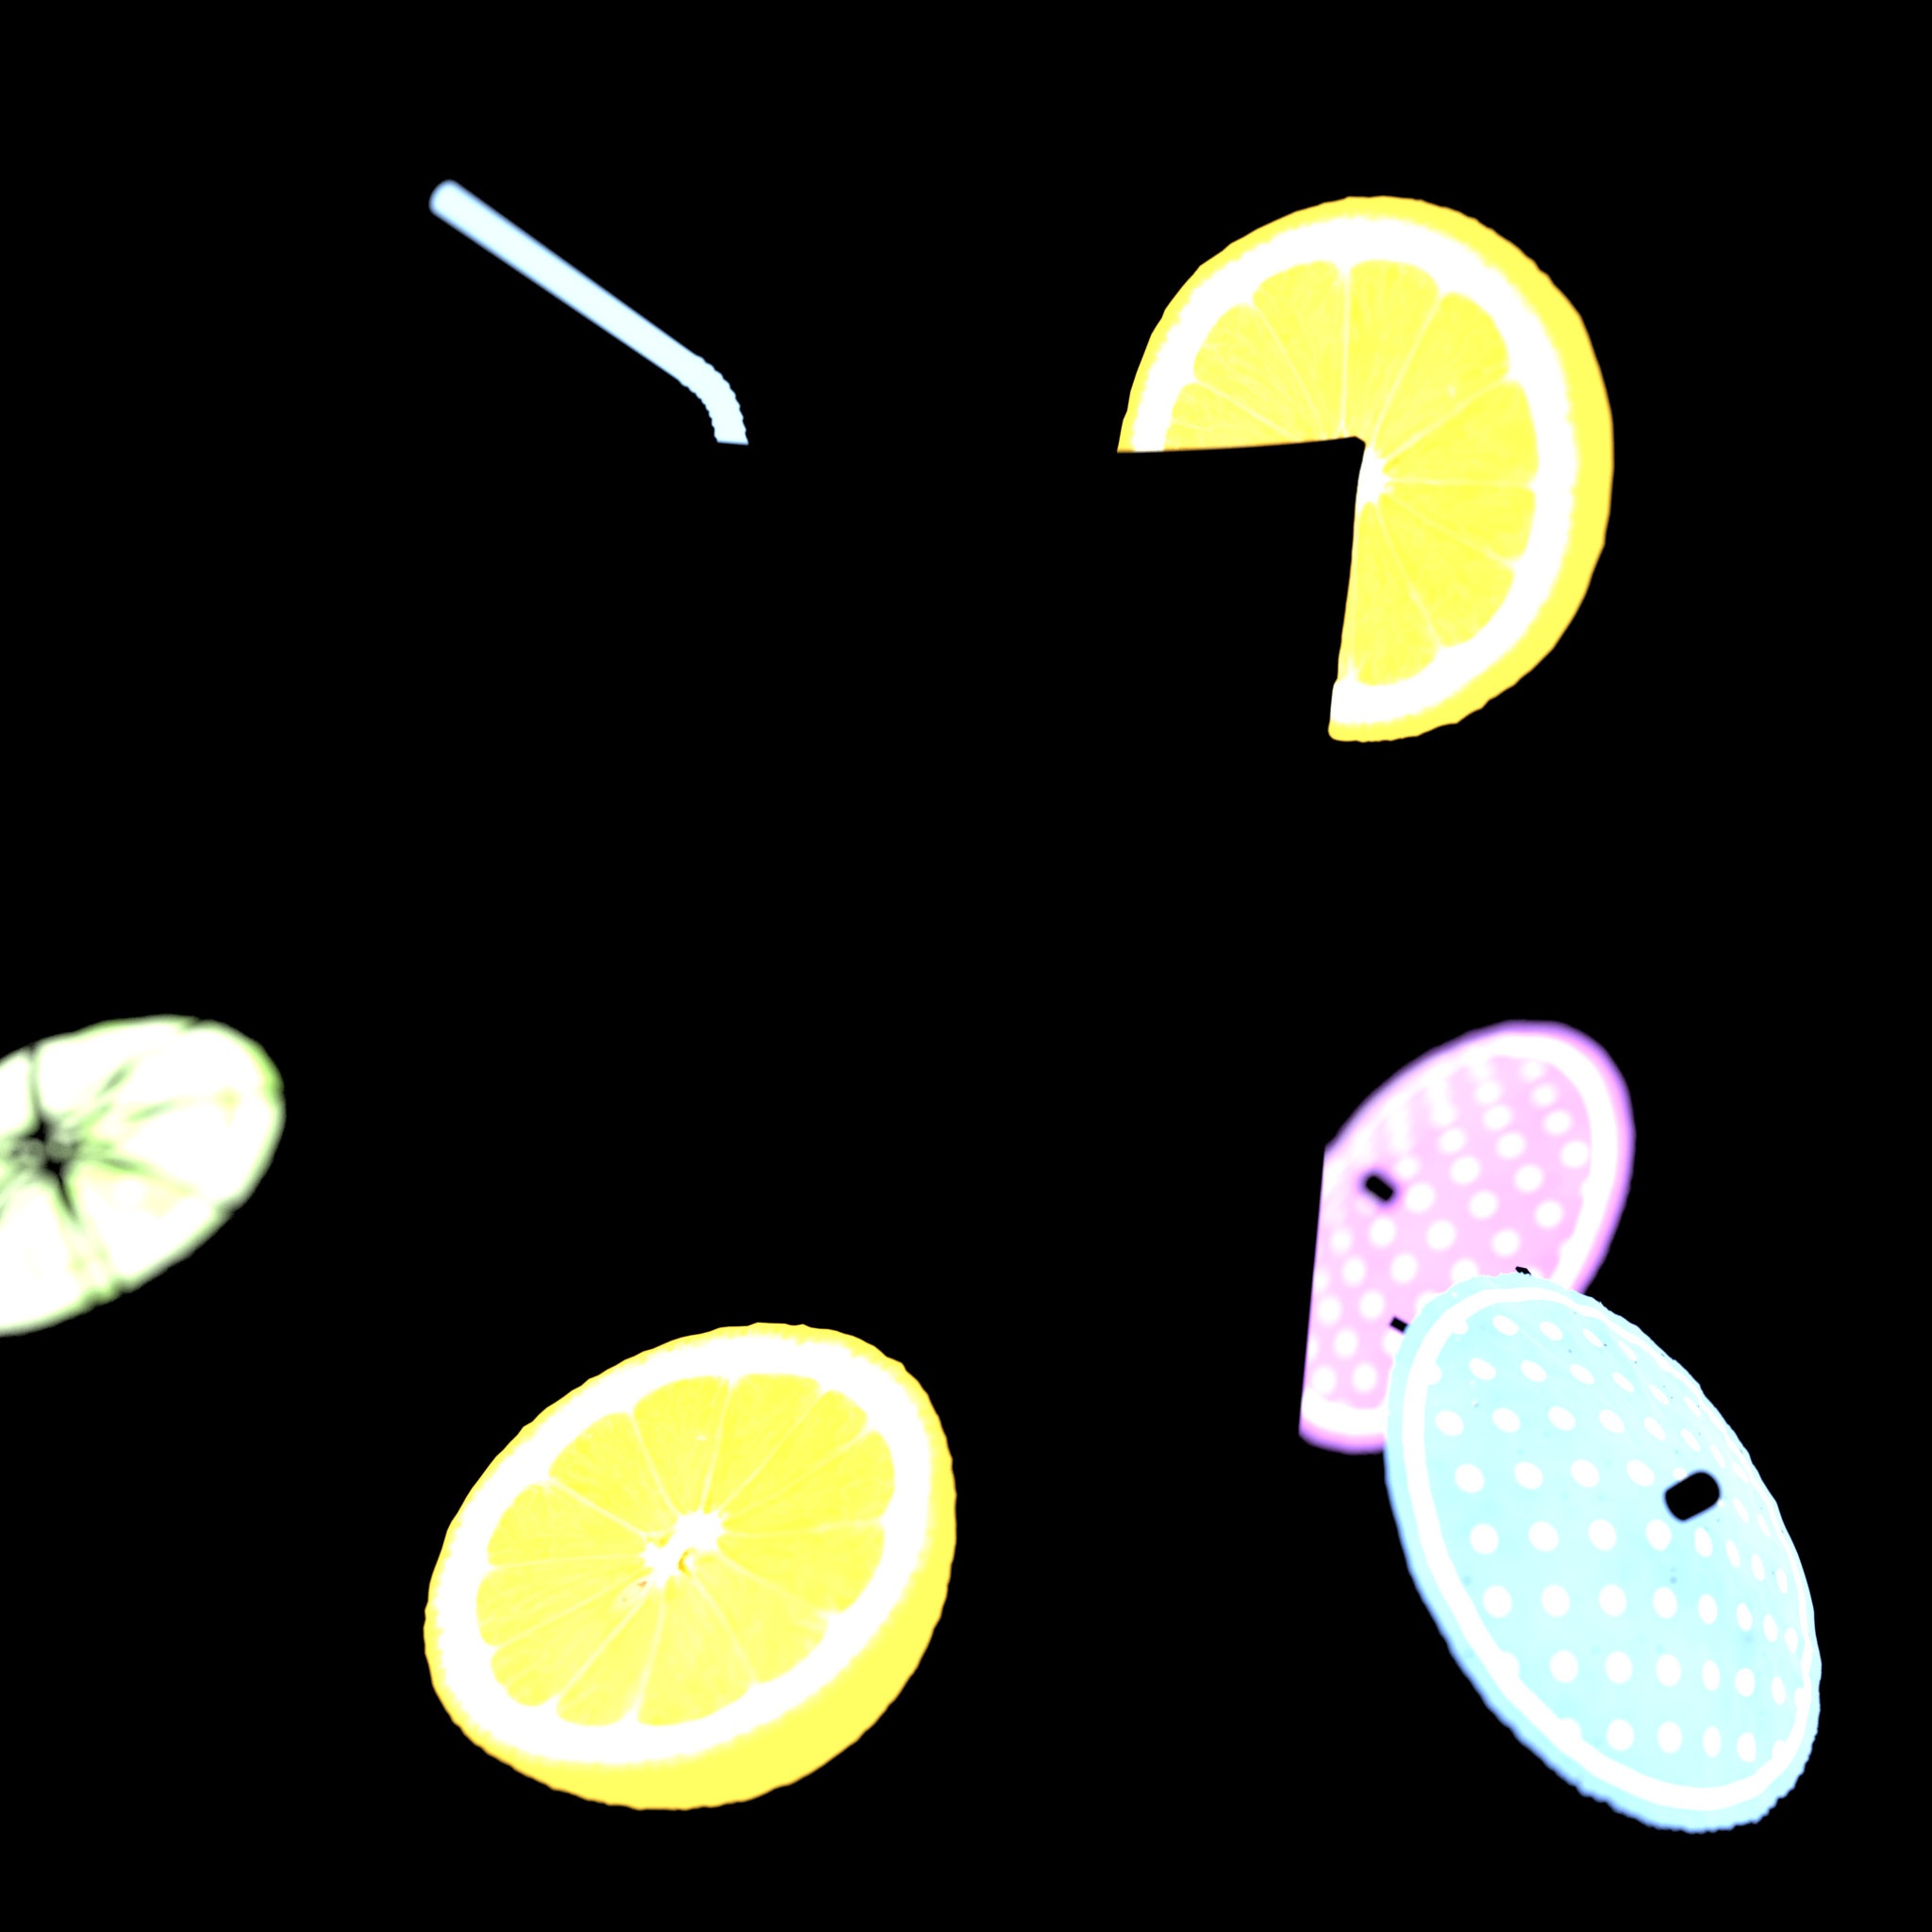
Emission AOV
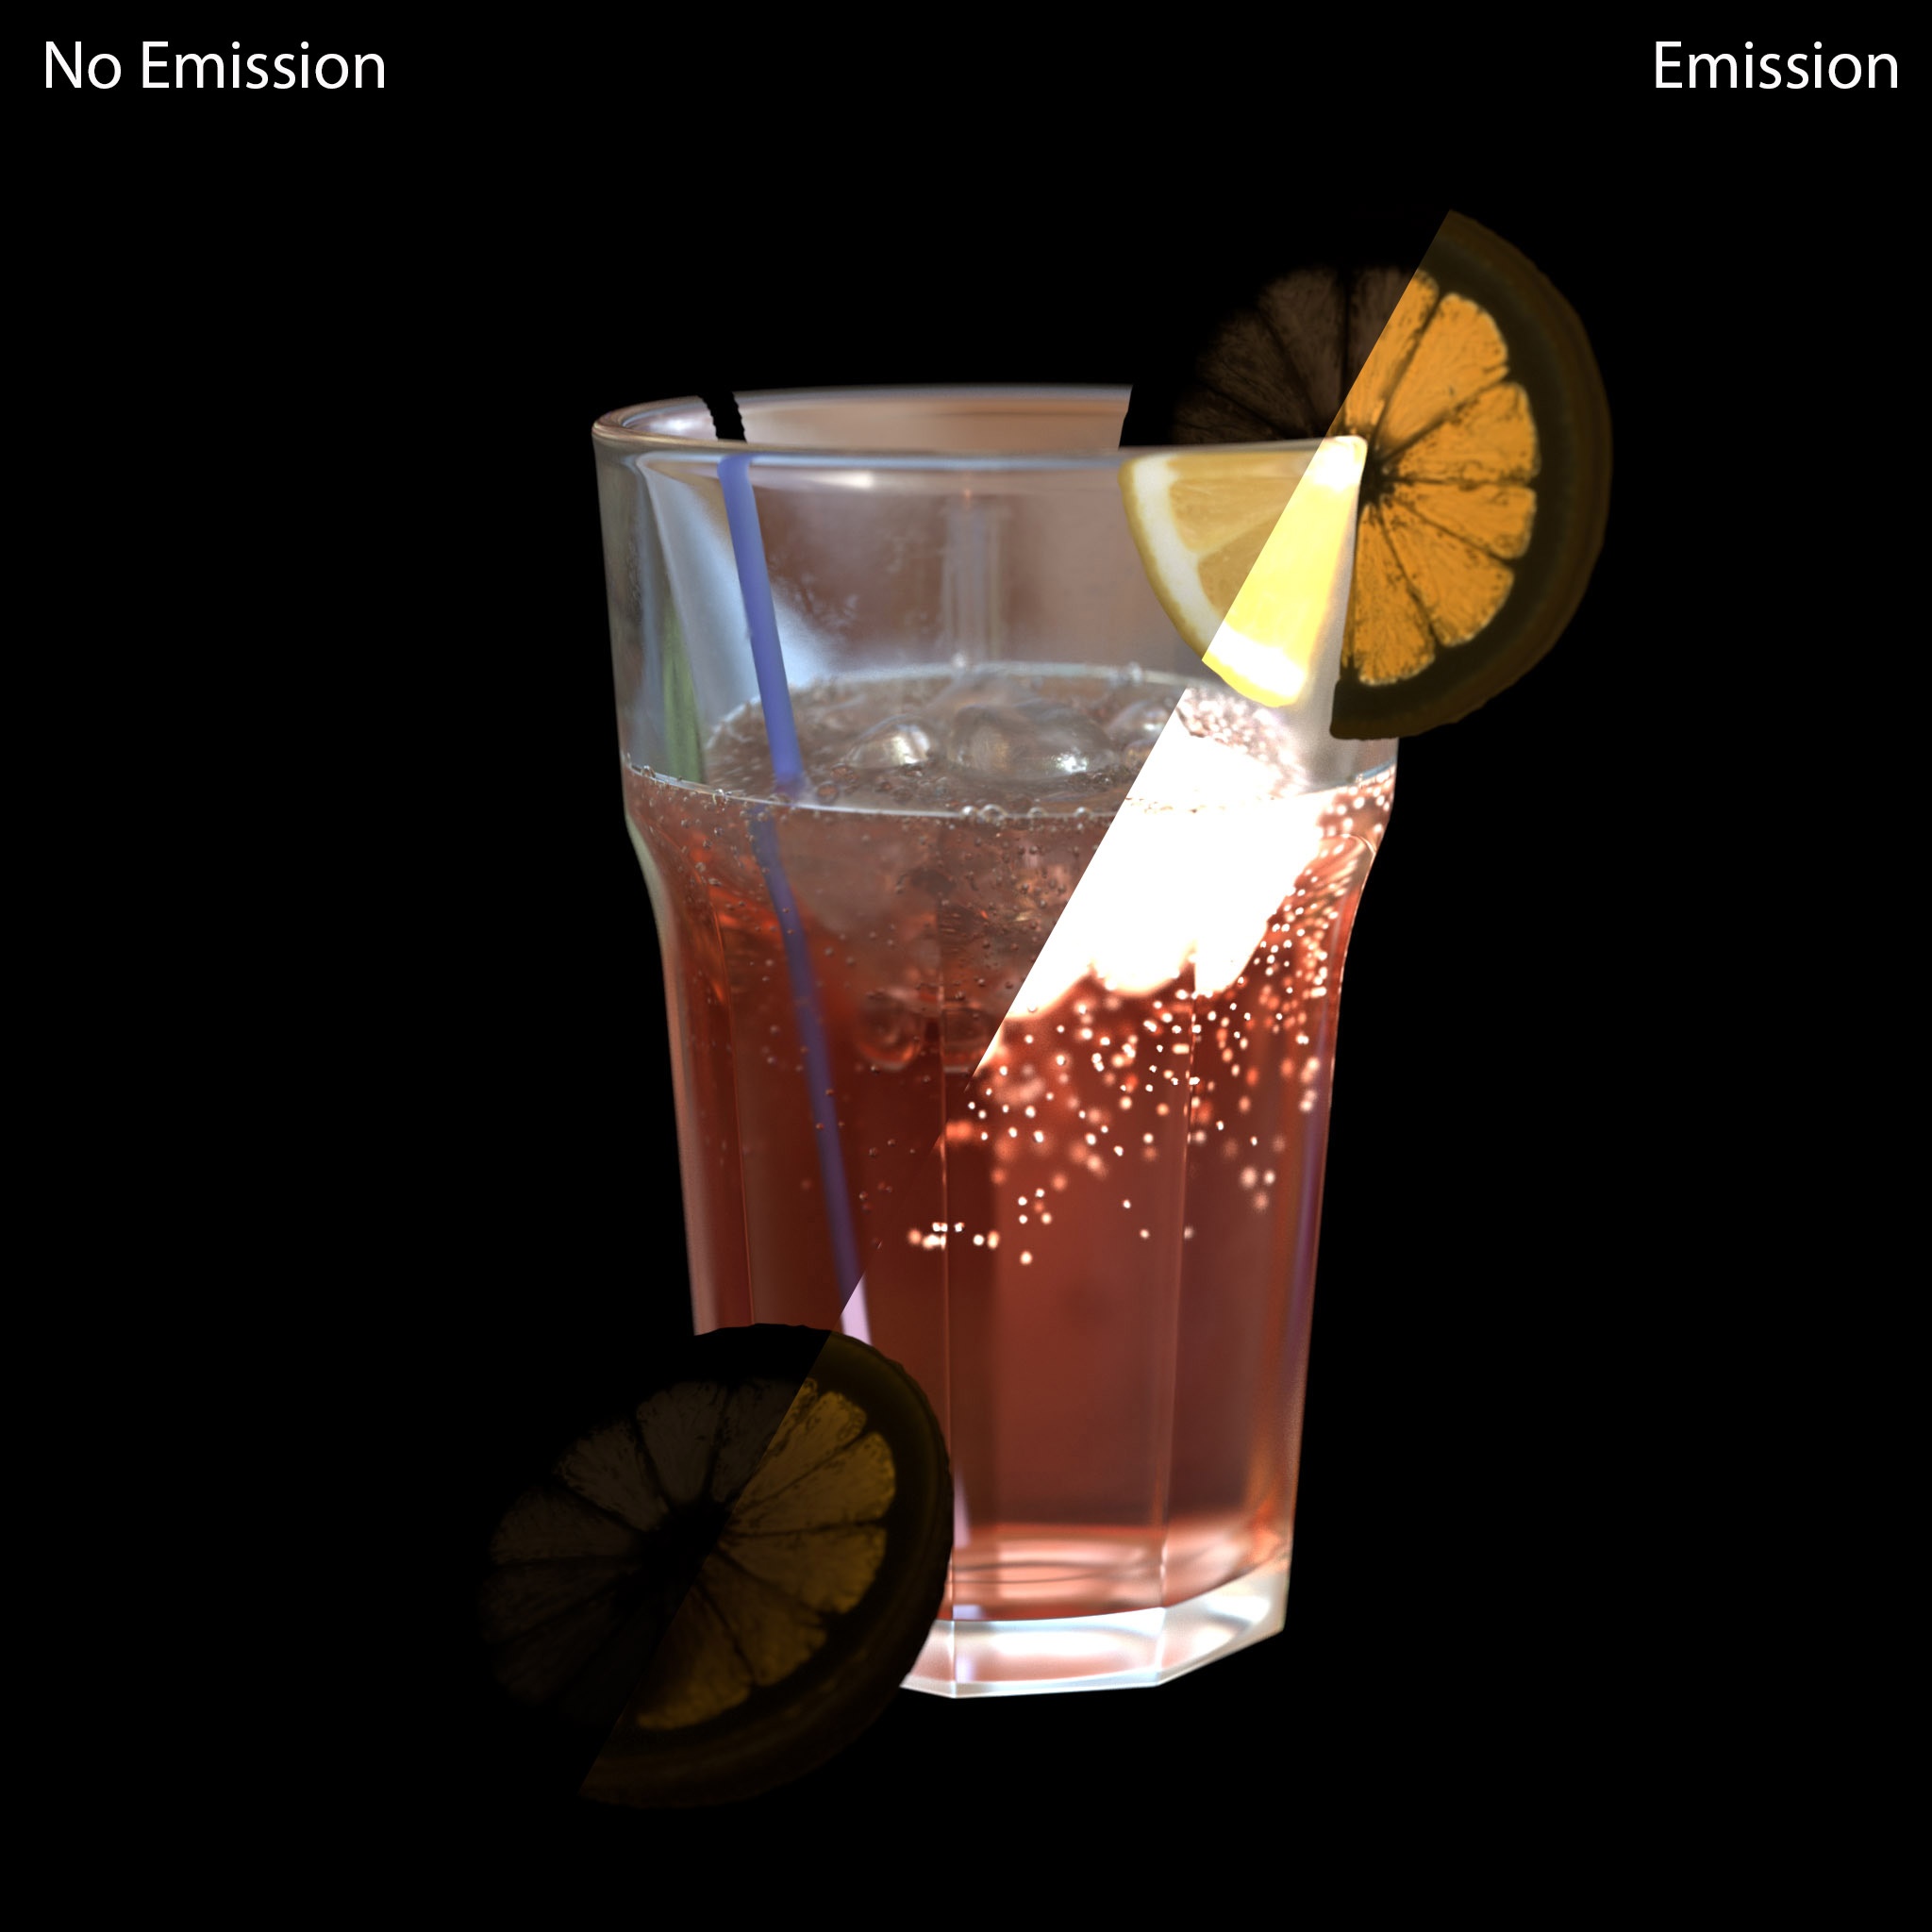
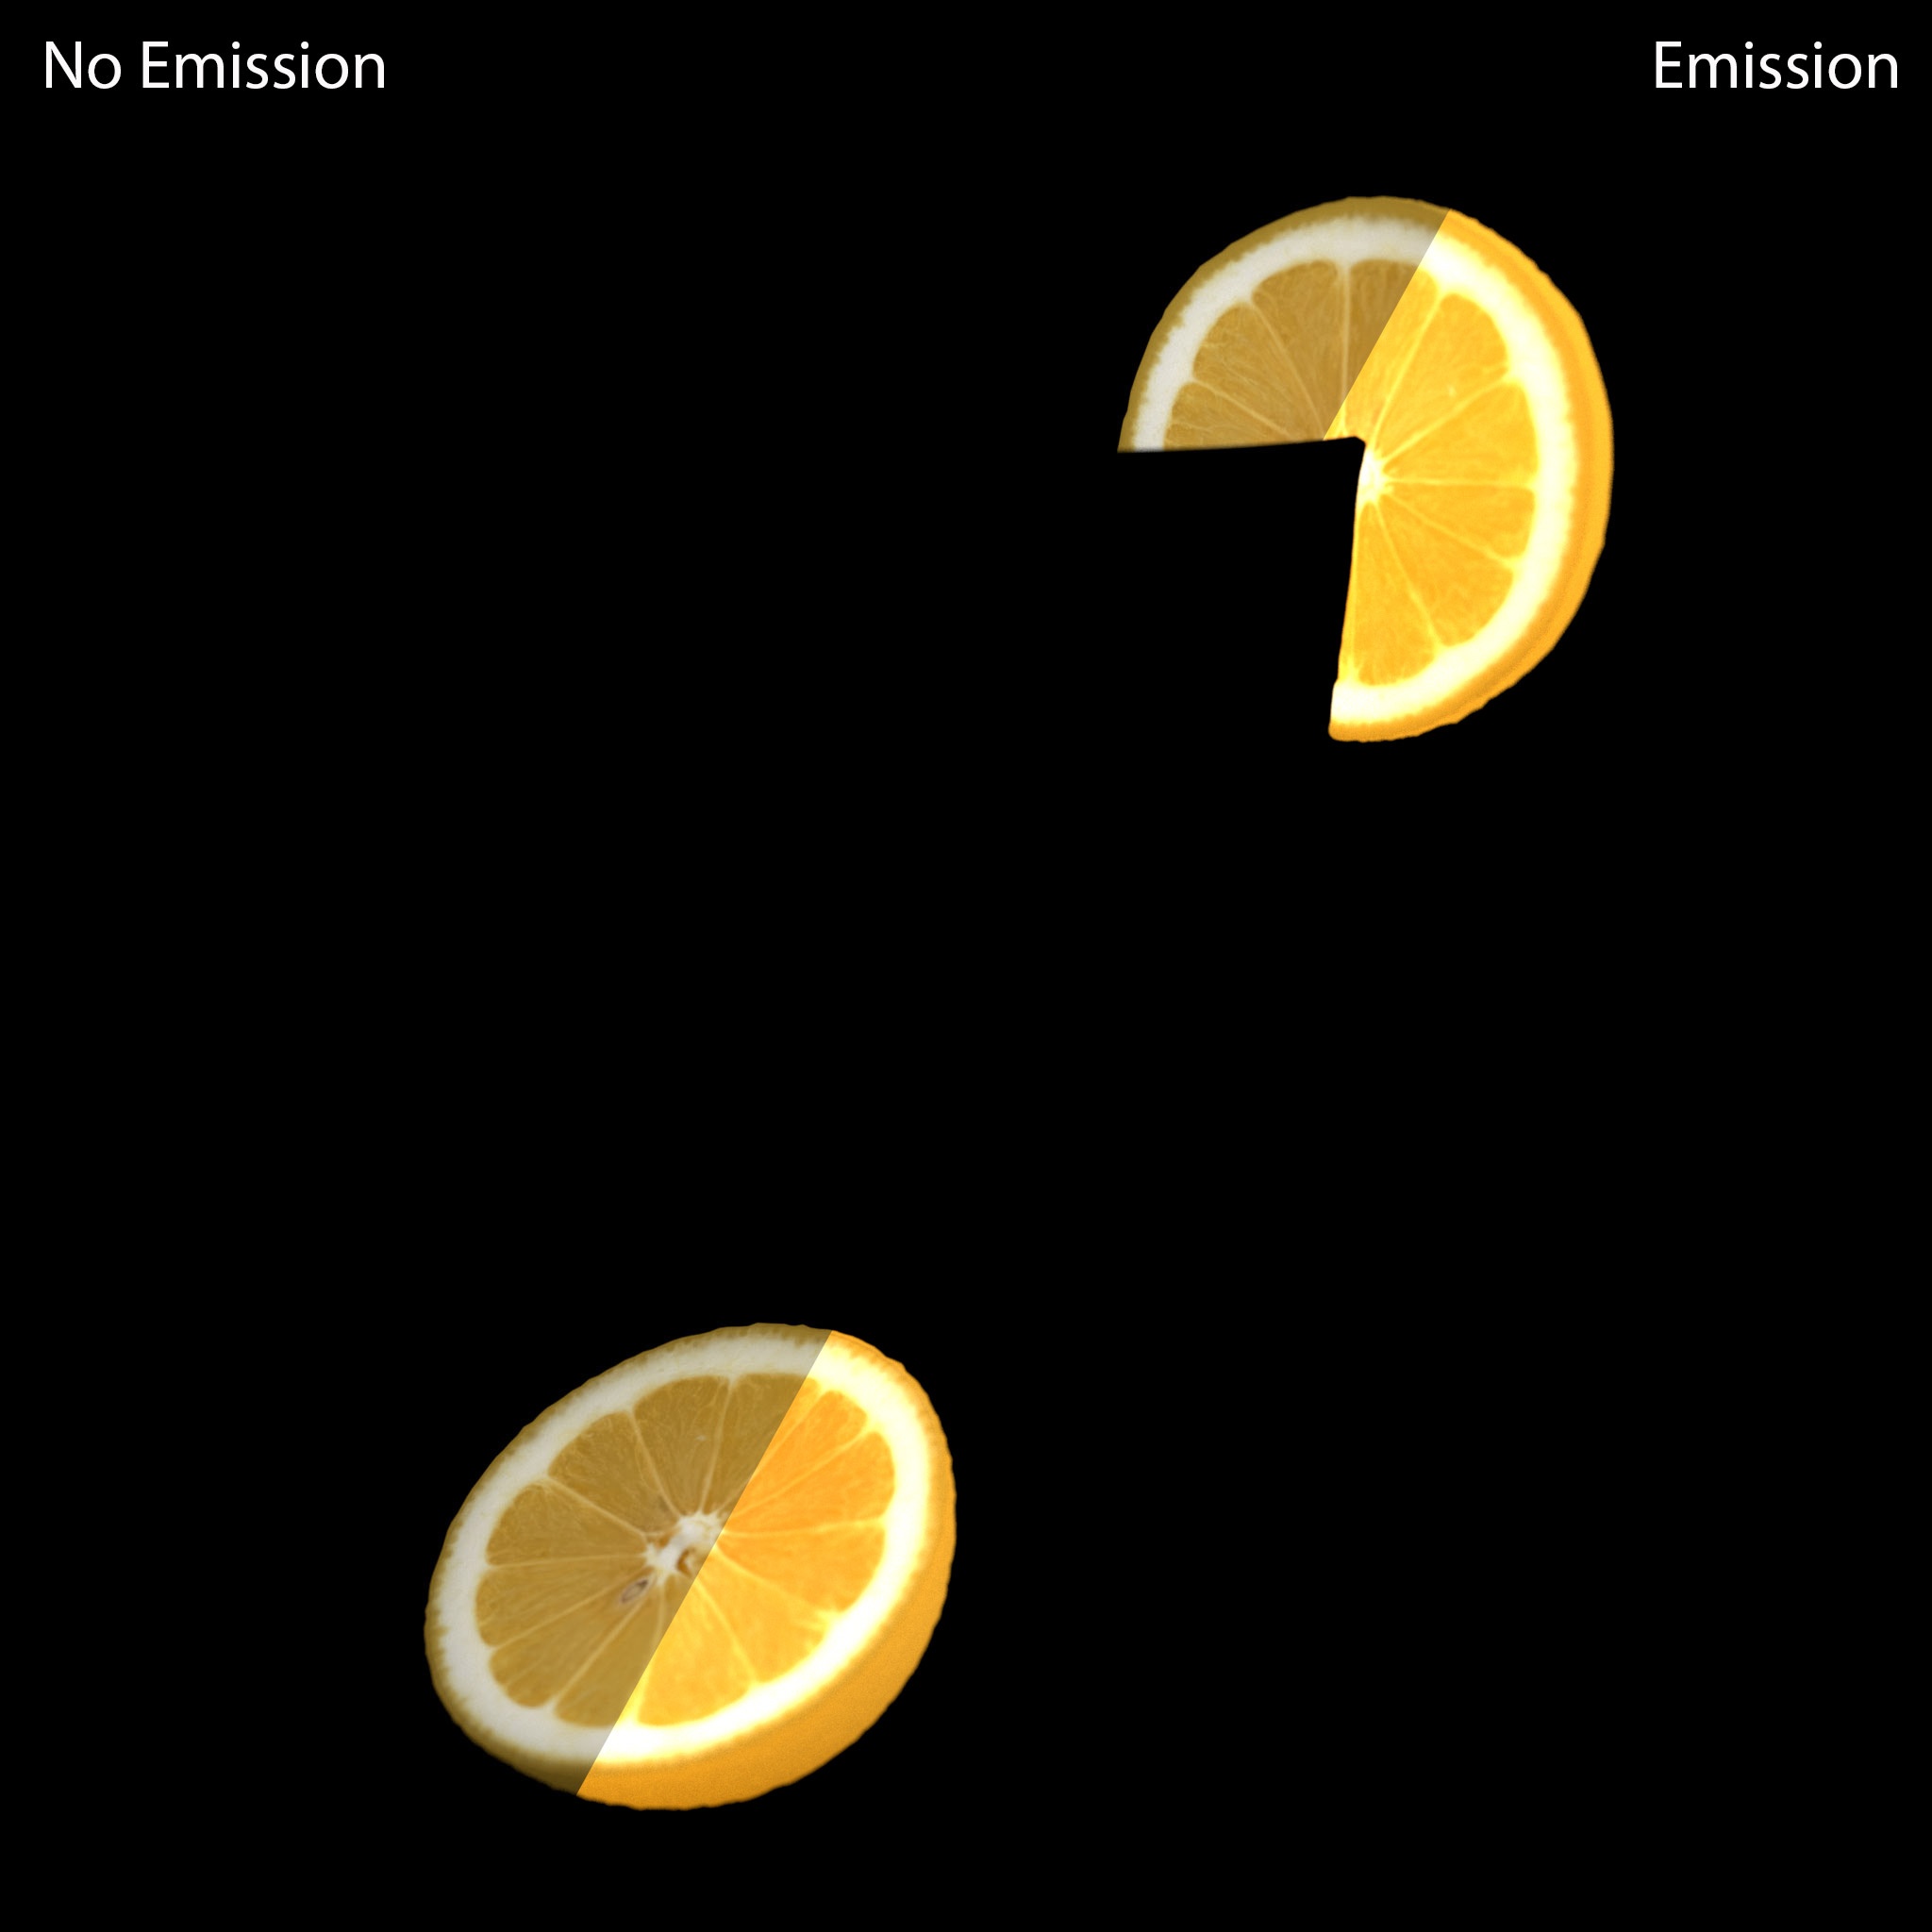
To demonstrate the Emission AOV the example scene has been modified to include emissive elements. Every material in the scene except the drinking glass, liquid, and table have had their diffuse color linked to the emission port with their emission weight set to 2.
The Emission AOV only contains the flat emissive color component of each shader with no lighting information. As far as scene lighting goes, emission only affects the global illumination lighting component of your scene and it is there where you will find any lighting changes based on emission.
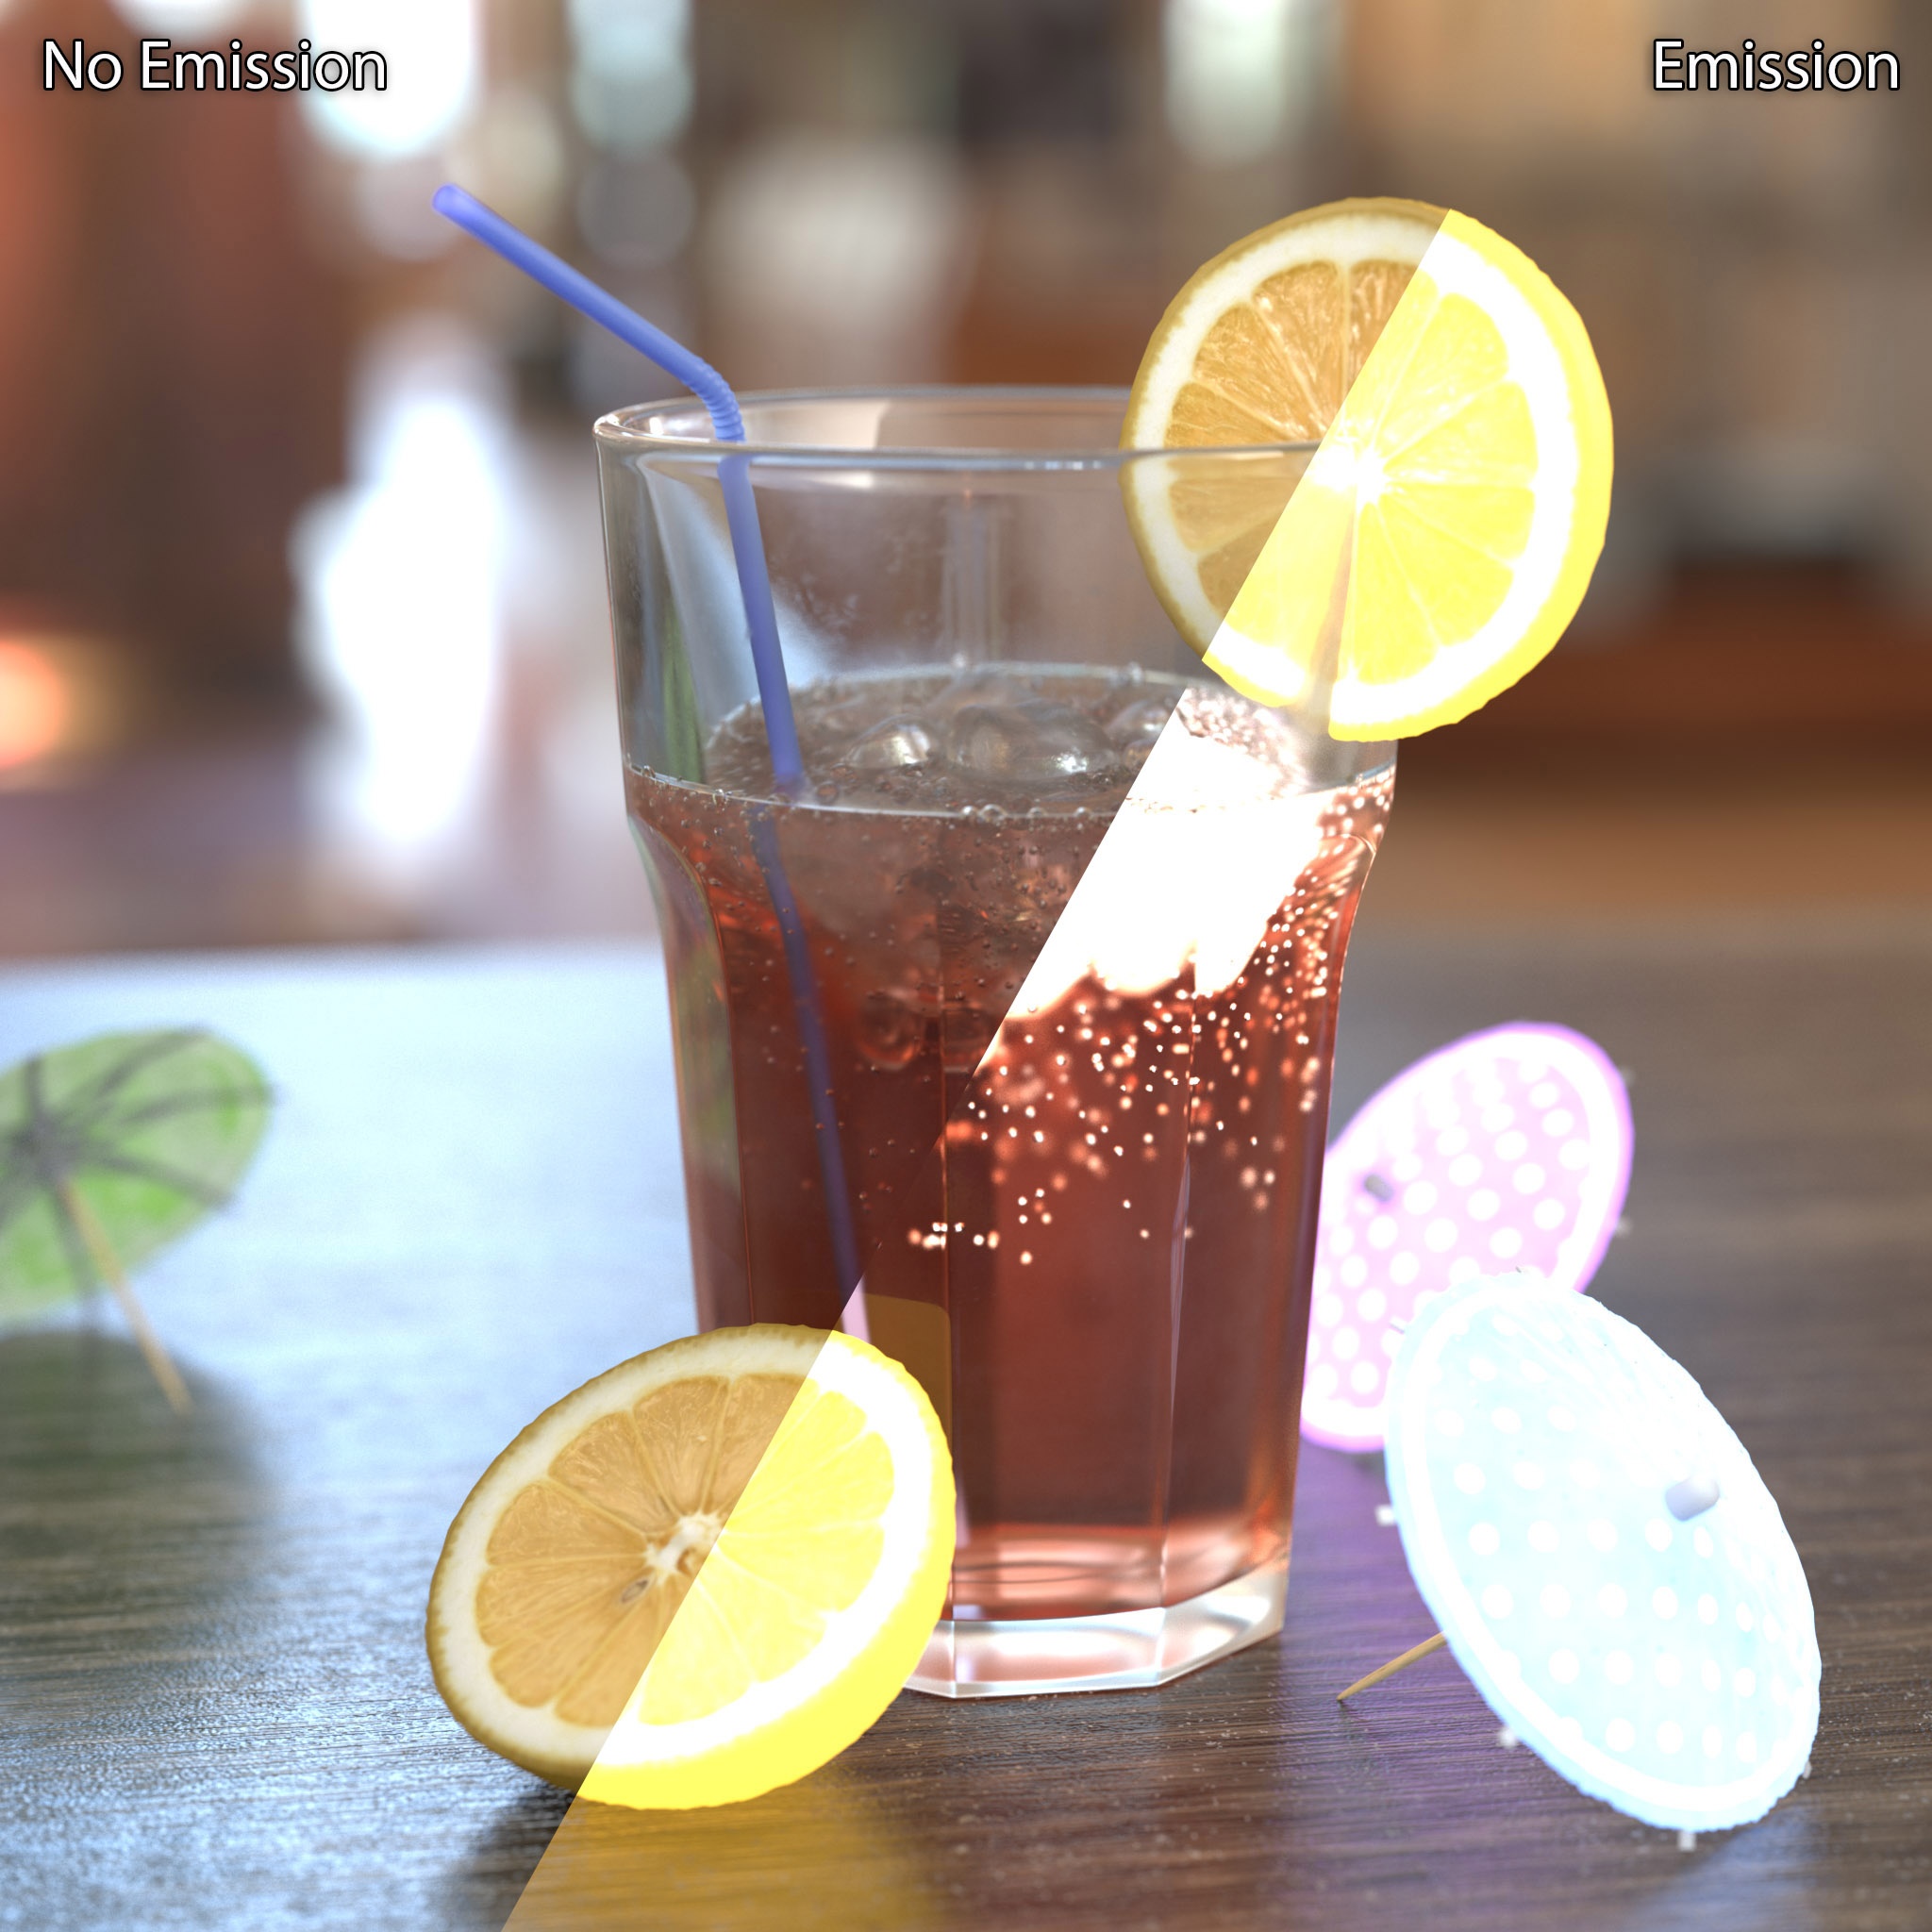
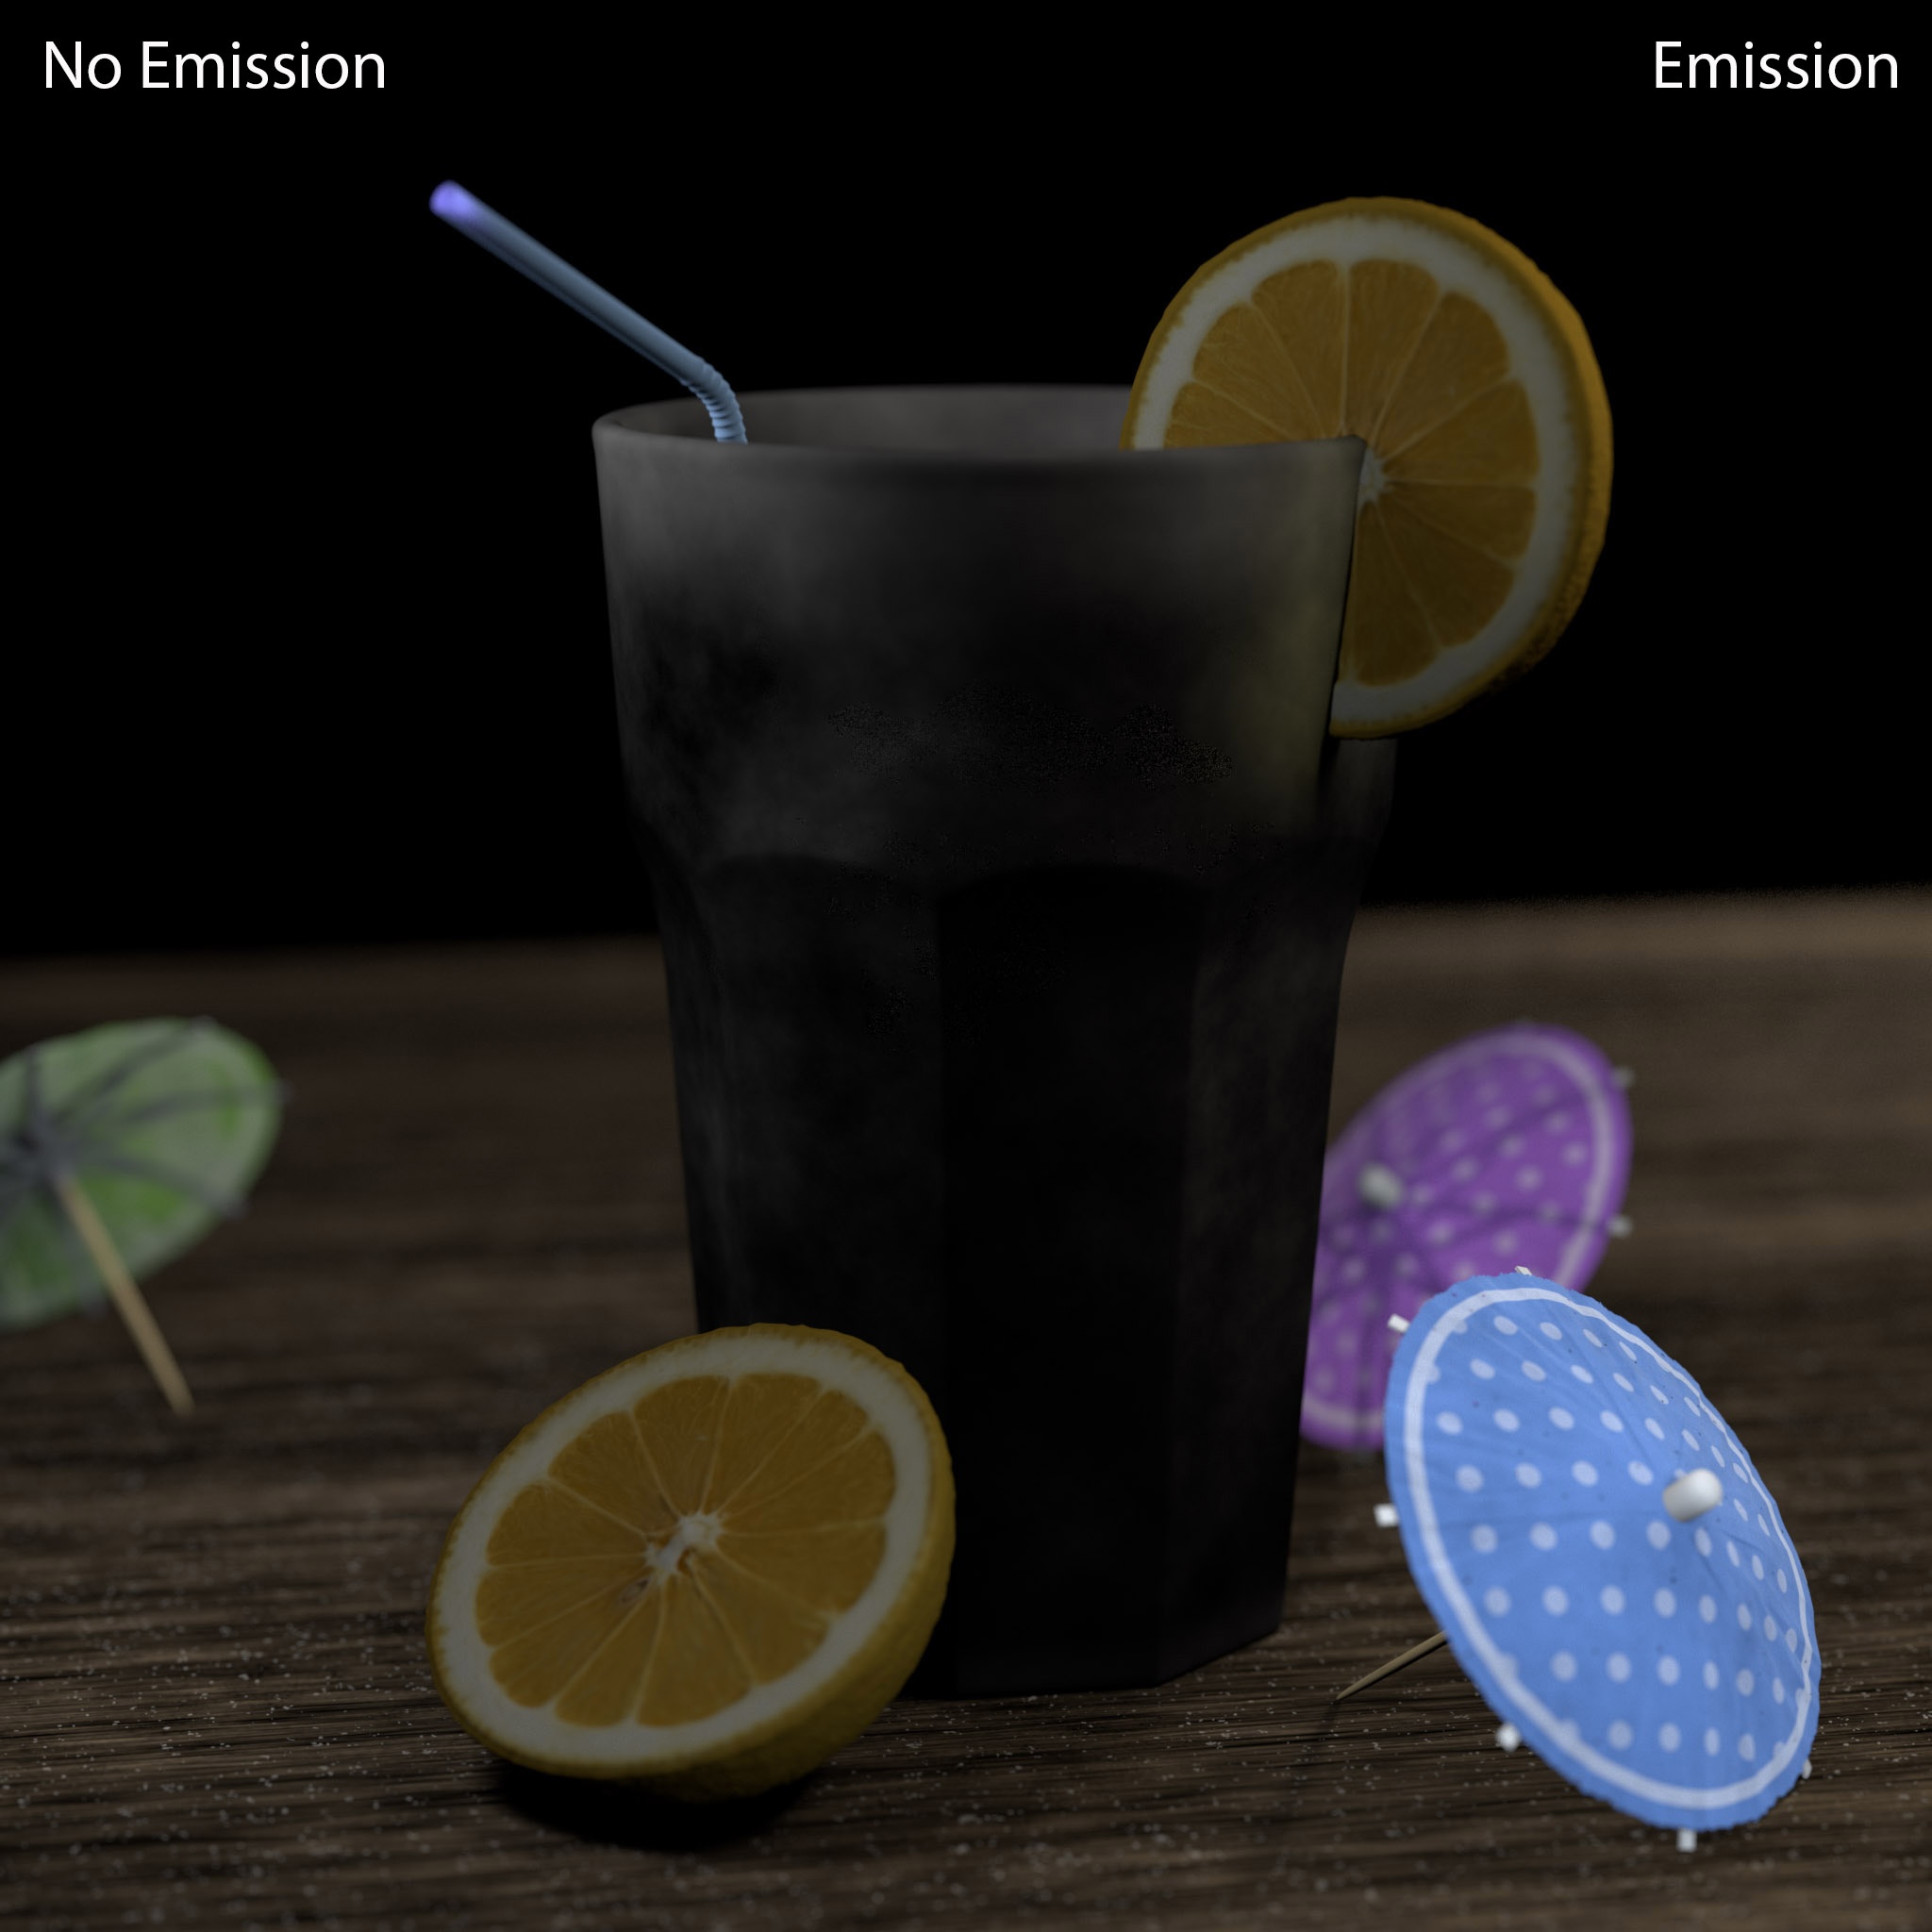
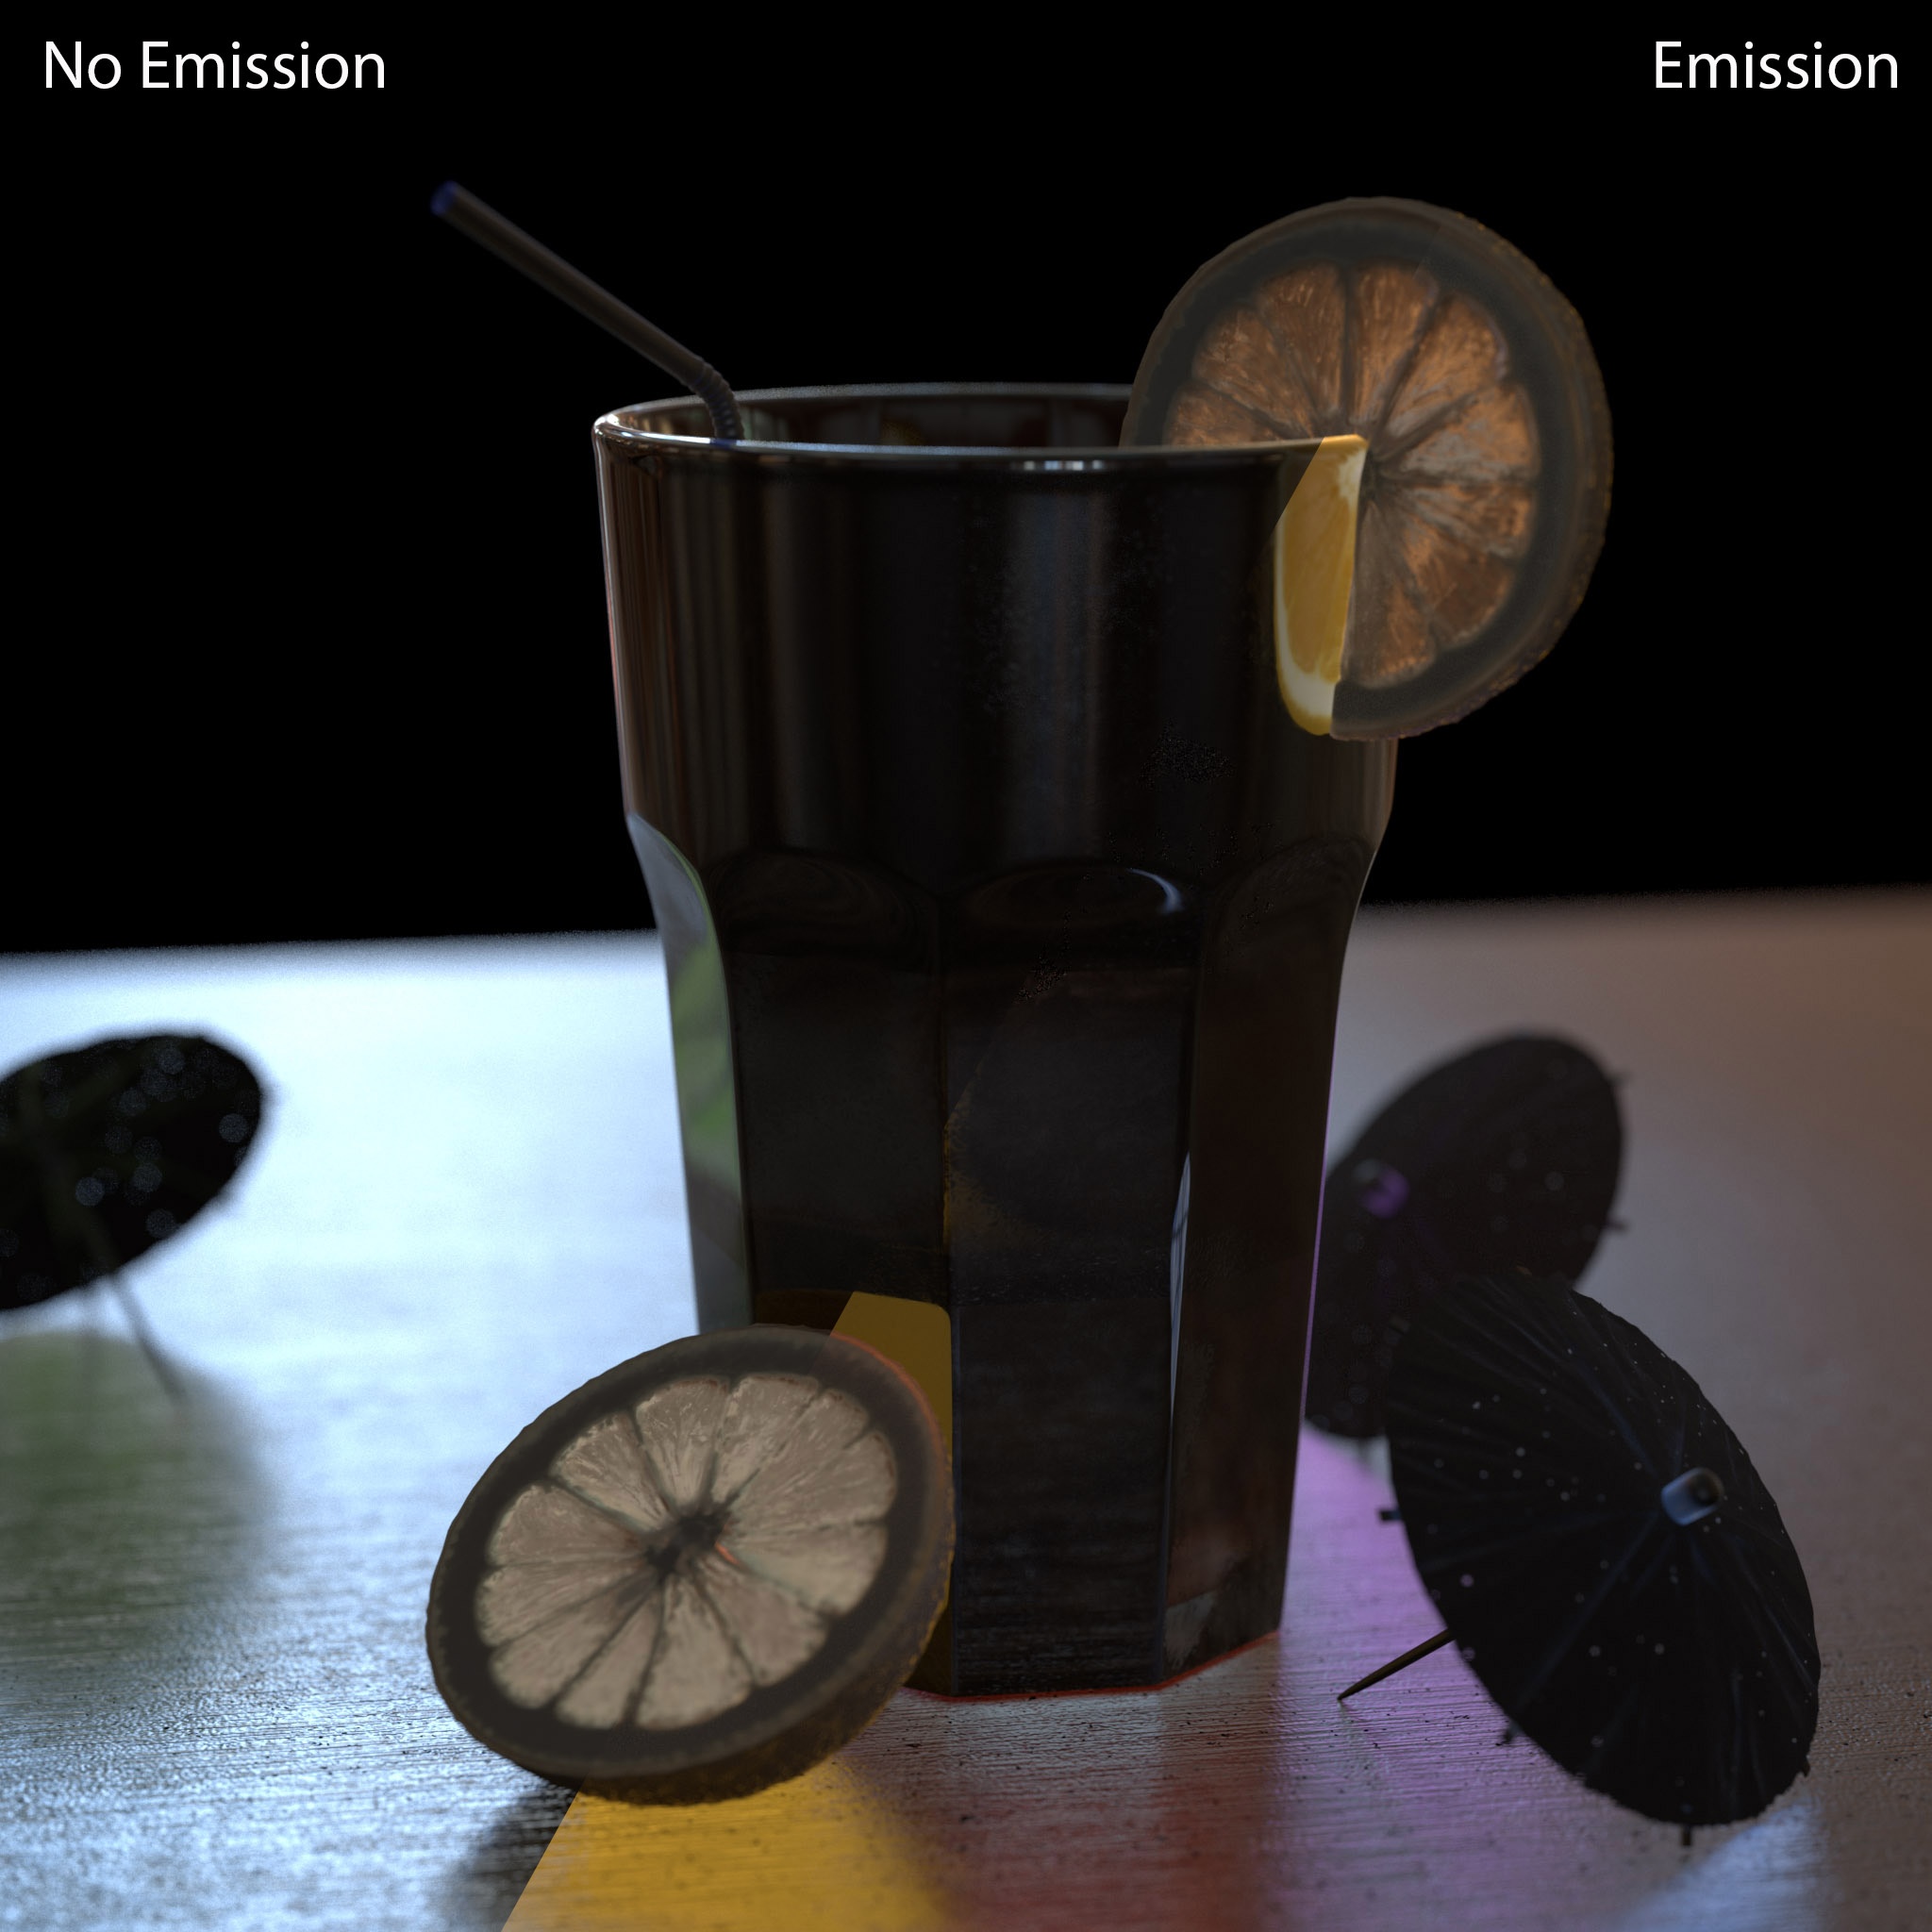
Below you can see a side by side comparison of how adding emission to the scene affects the beauty and different AOVs. In the case of the diffuse lighting there is no change at all.
|
|
|
|
| Beauty compare | Diffuse Lighting compare (no change) | Reflection Compare |
|
|
|
|
|
|
|
|
| Refraction compare | SSS compare | GI compare |
How to use:
Add the Emission AOV to the primary AOV composite.
Global Illumination
Global Illumination AOV
The global illumination (GI) AOV contains the indirect GI lighting component of the material's final shaded result. The GI lighting reaching a material is multiplied by the material's diffuse color. The GI AOV returns this multiplied result.
If this multiplication is not desirable, you can use the Global Illumination Raw AOV, instead, which returns the non-multiplied GI. Please see here for more information on raw AOVs.
How to use:
Add the Global Illumination AOV to the primary AOV composite.
Volume Lighting, Volume Fog Emission & Volume Fog Tint AOVs
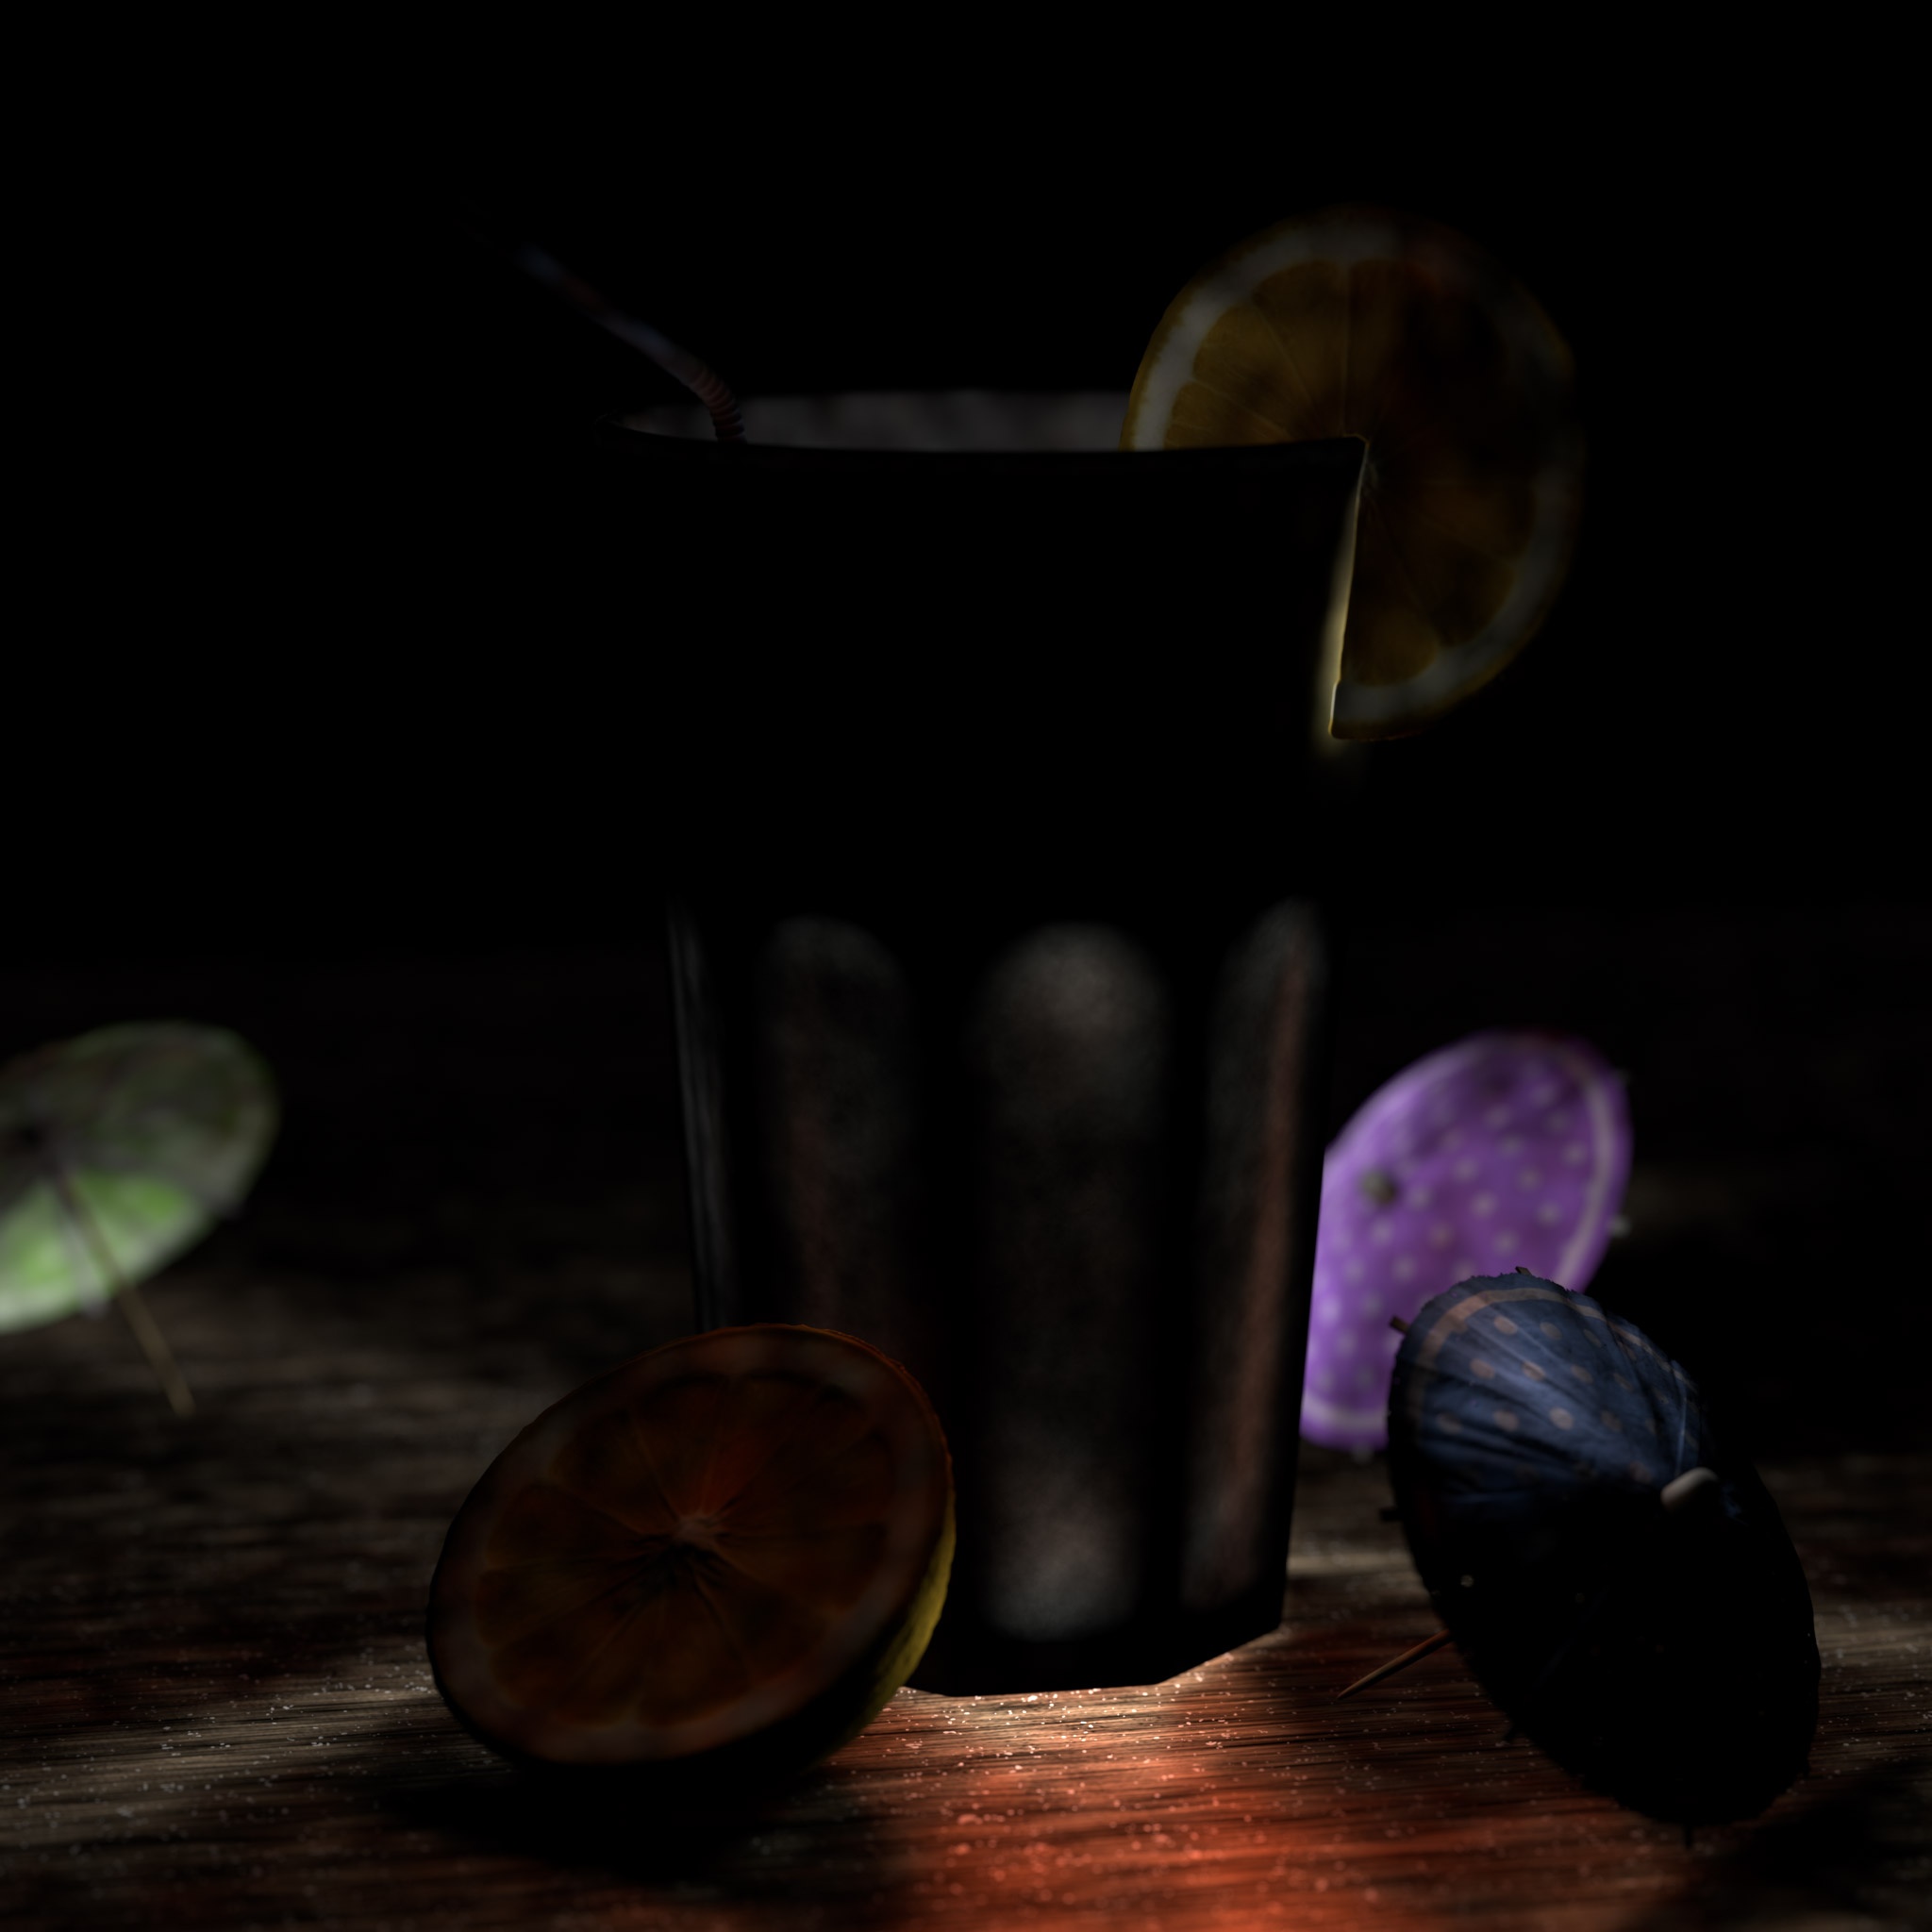
Volume Lighting AOV
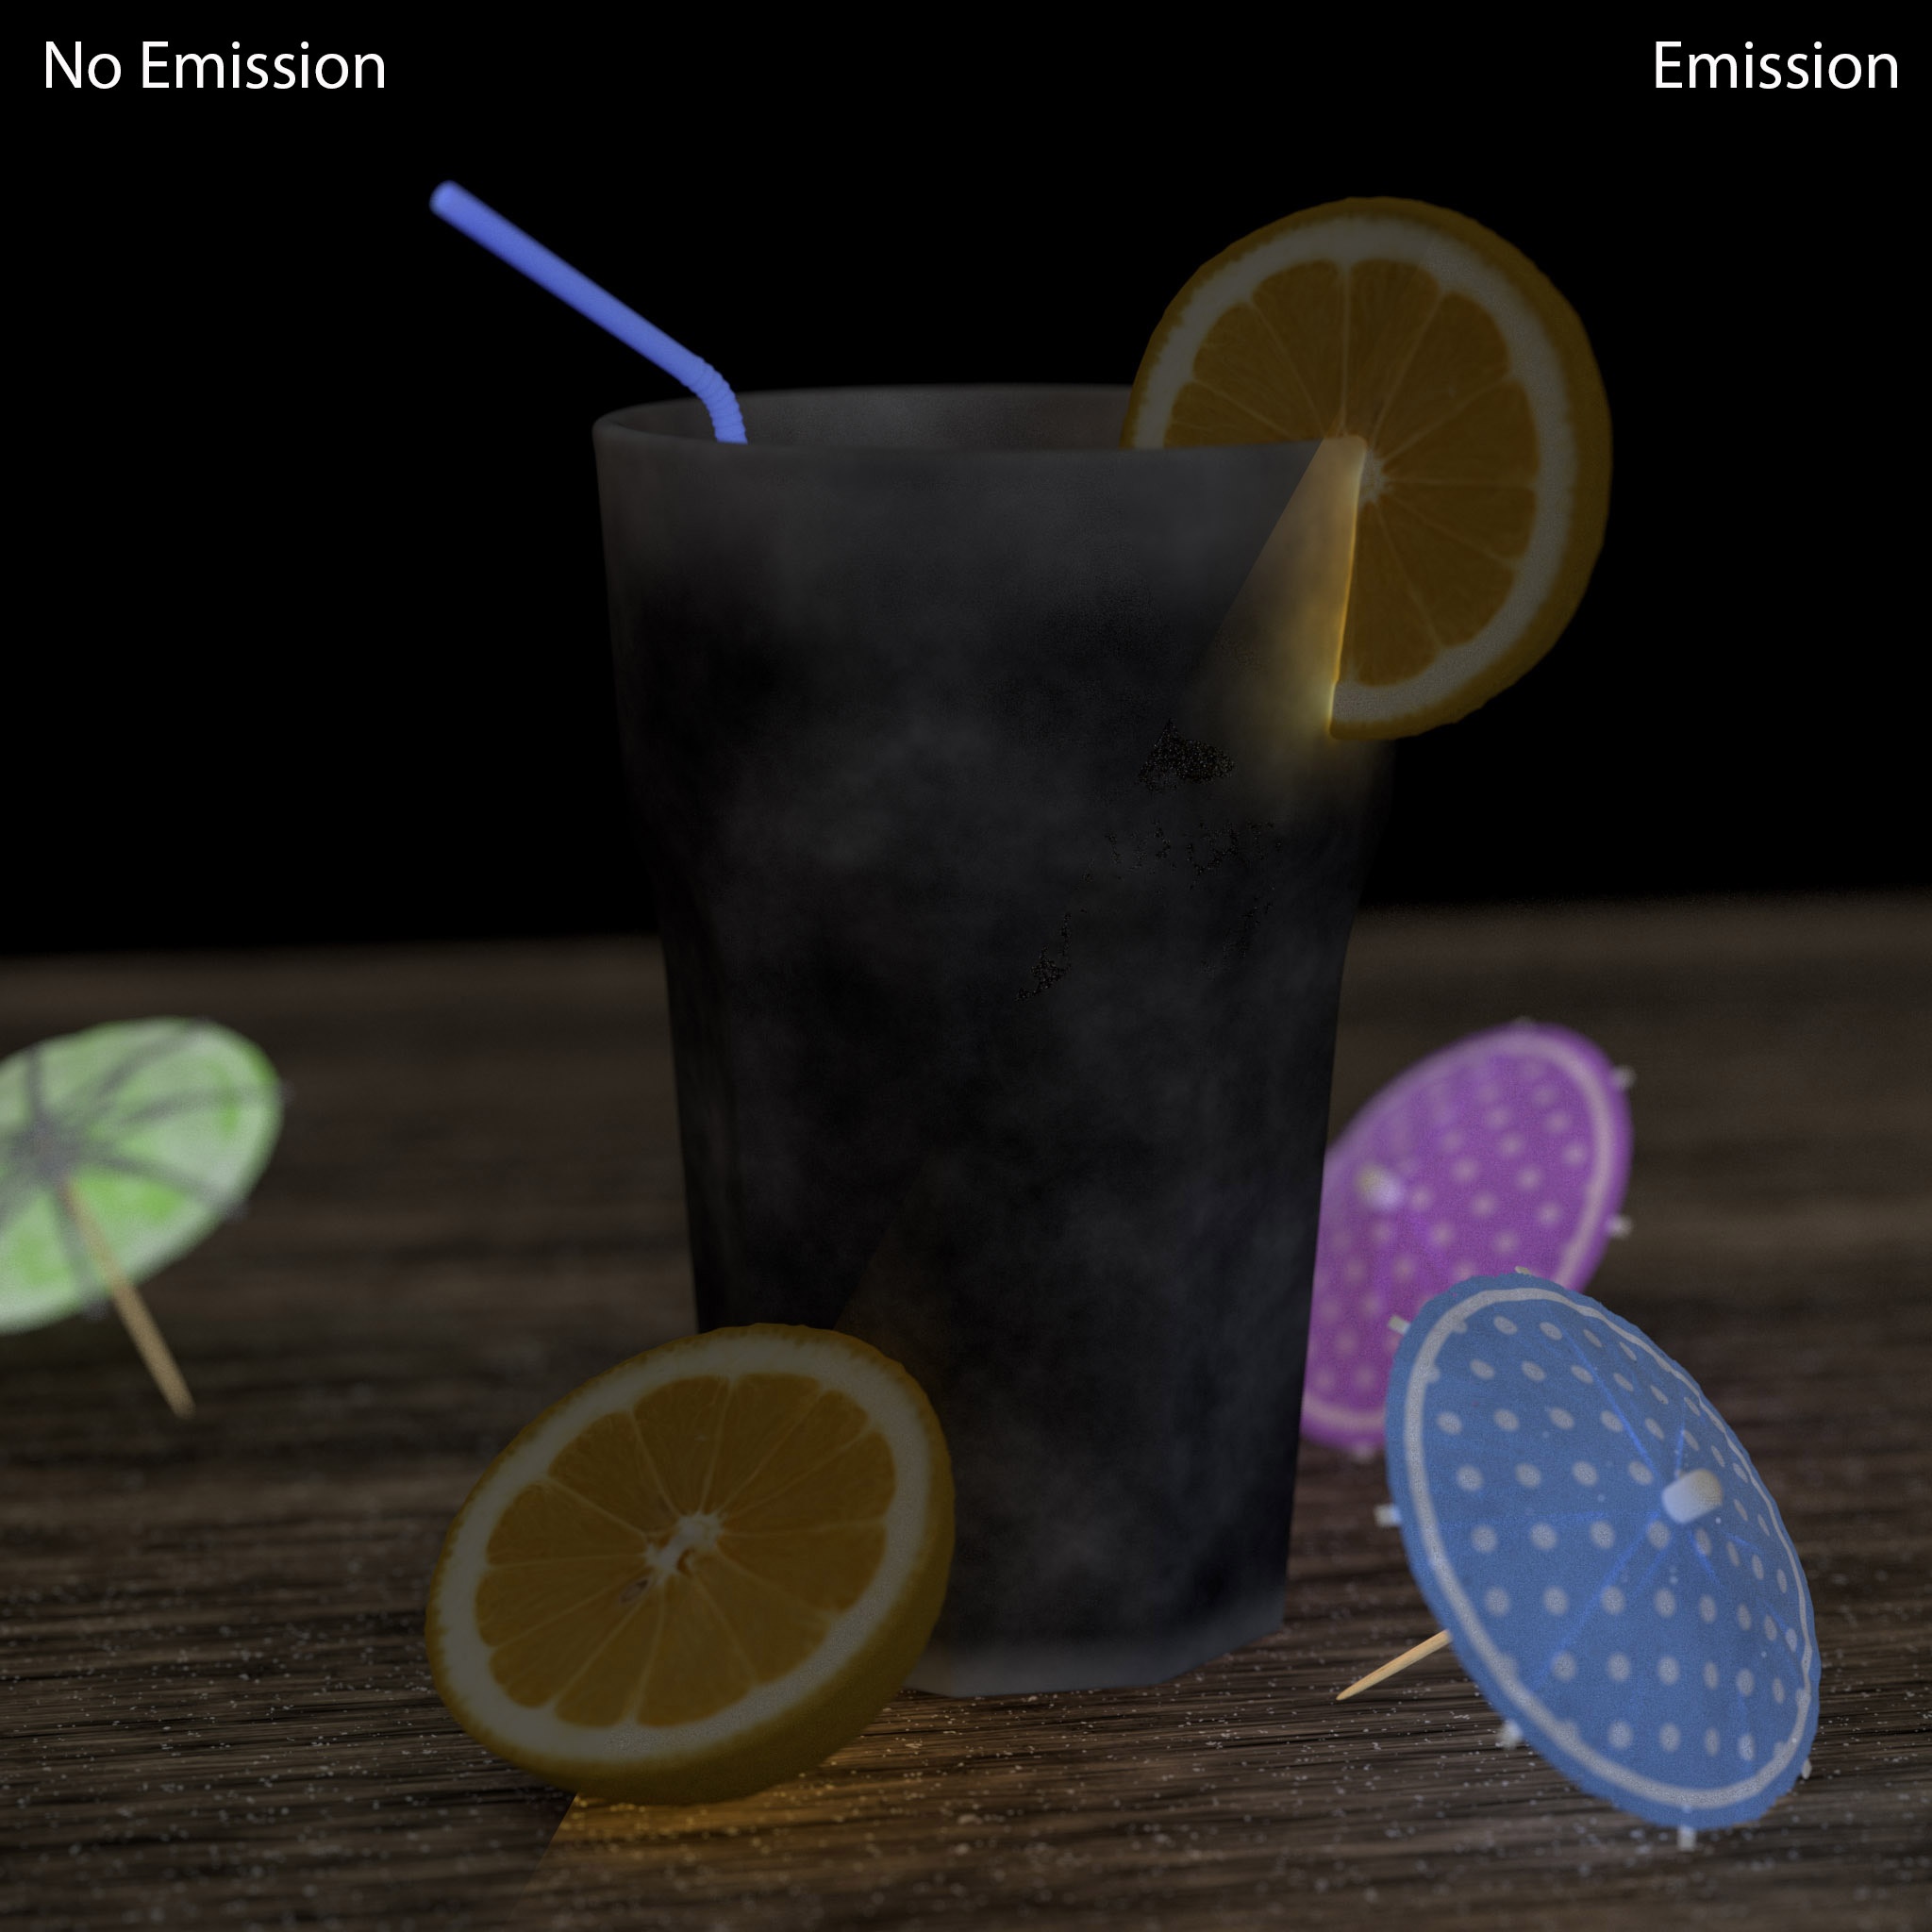
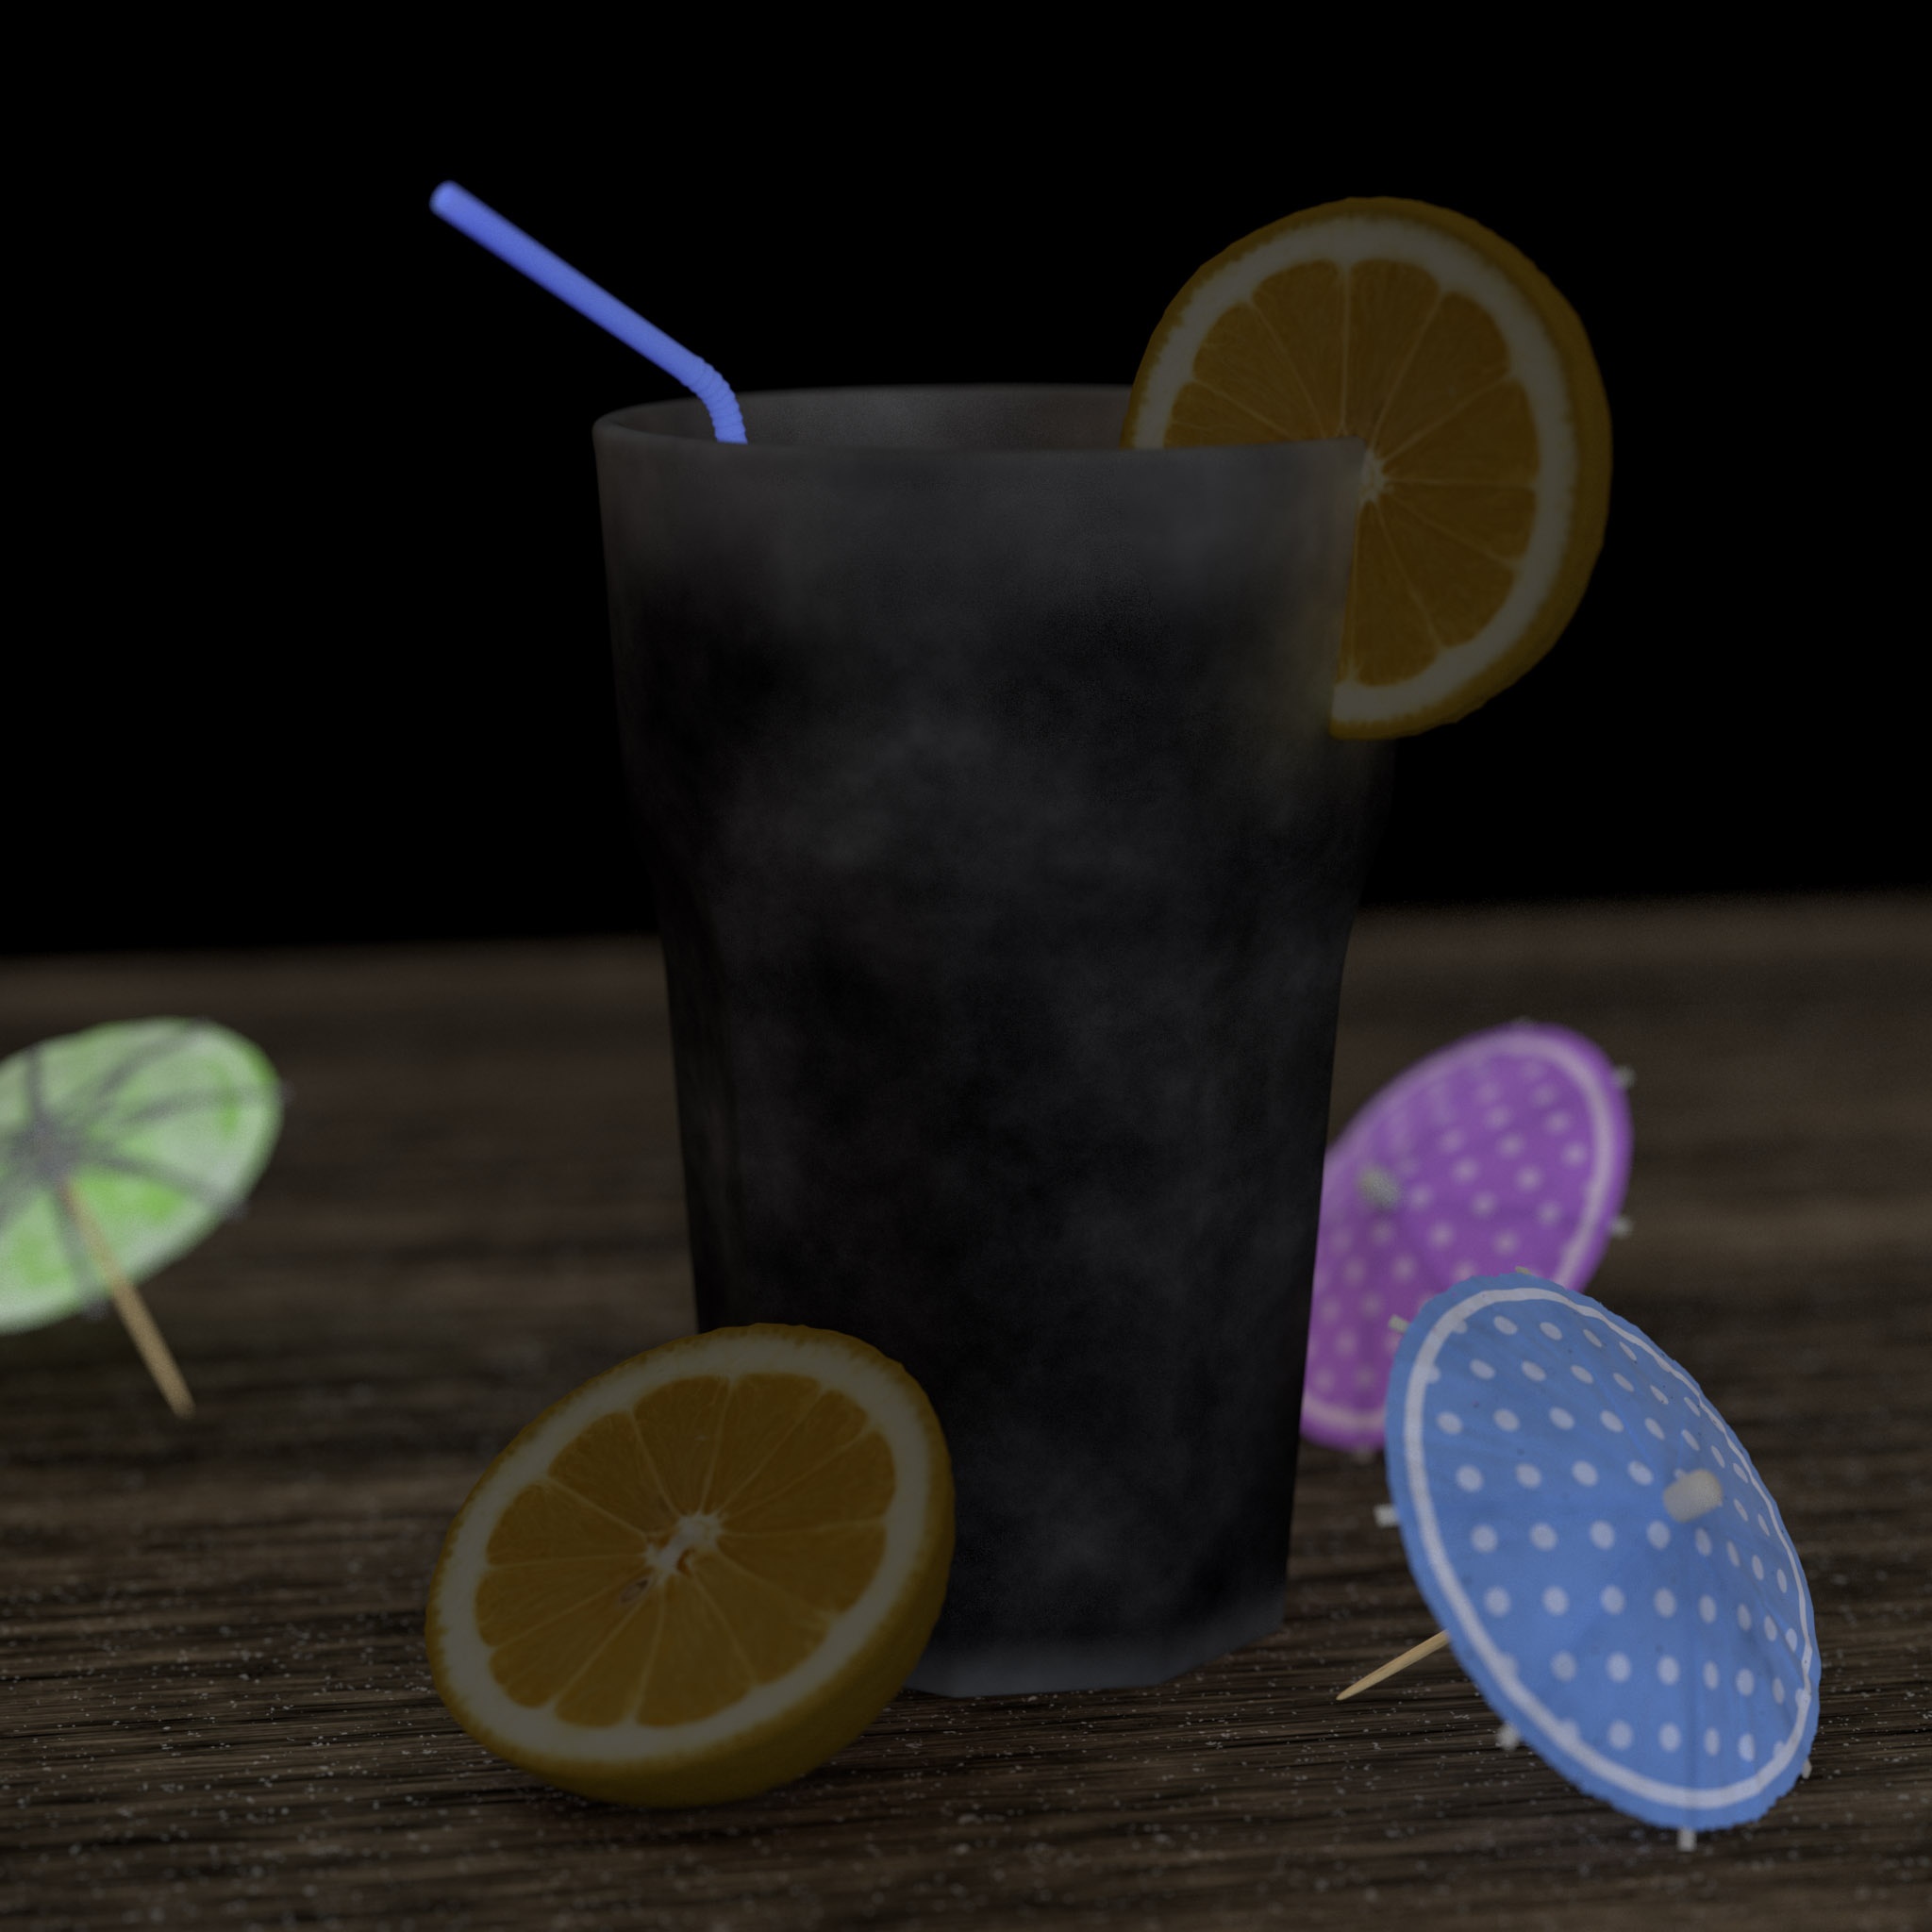
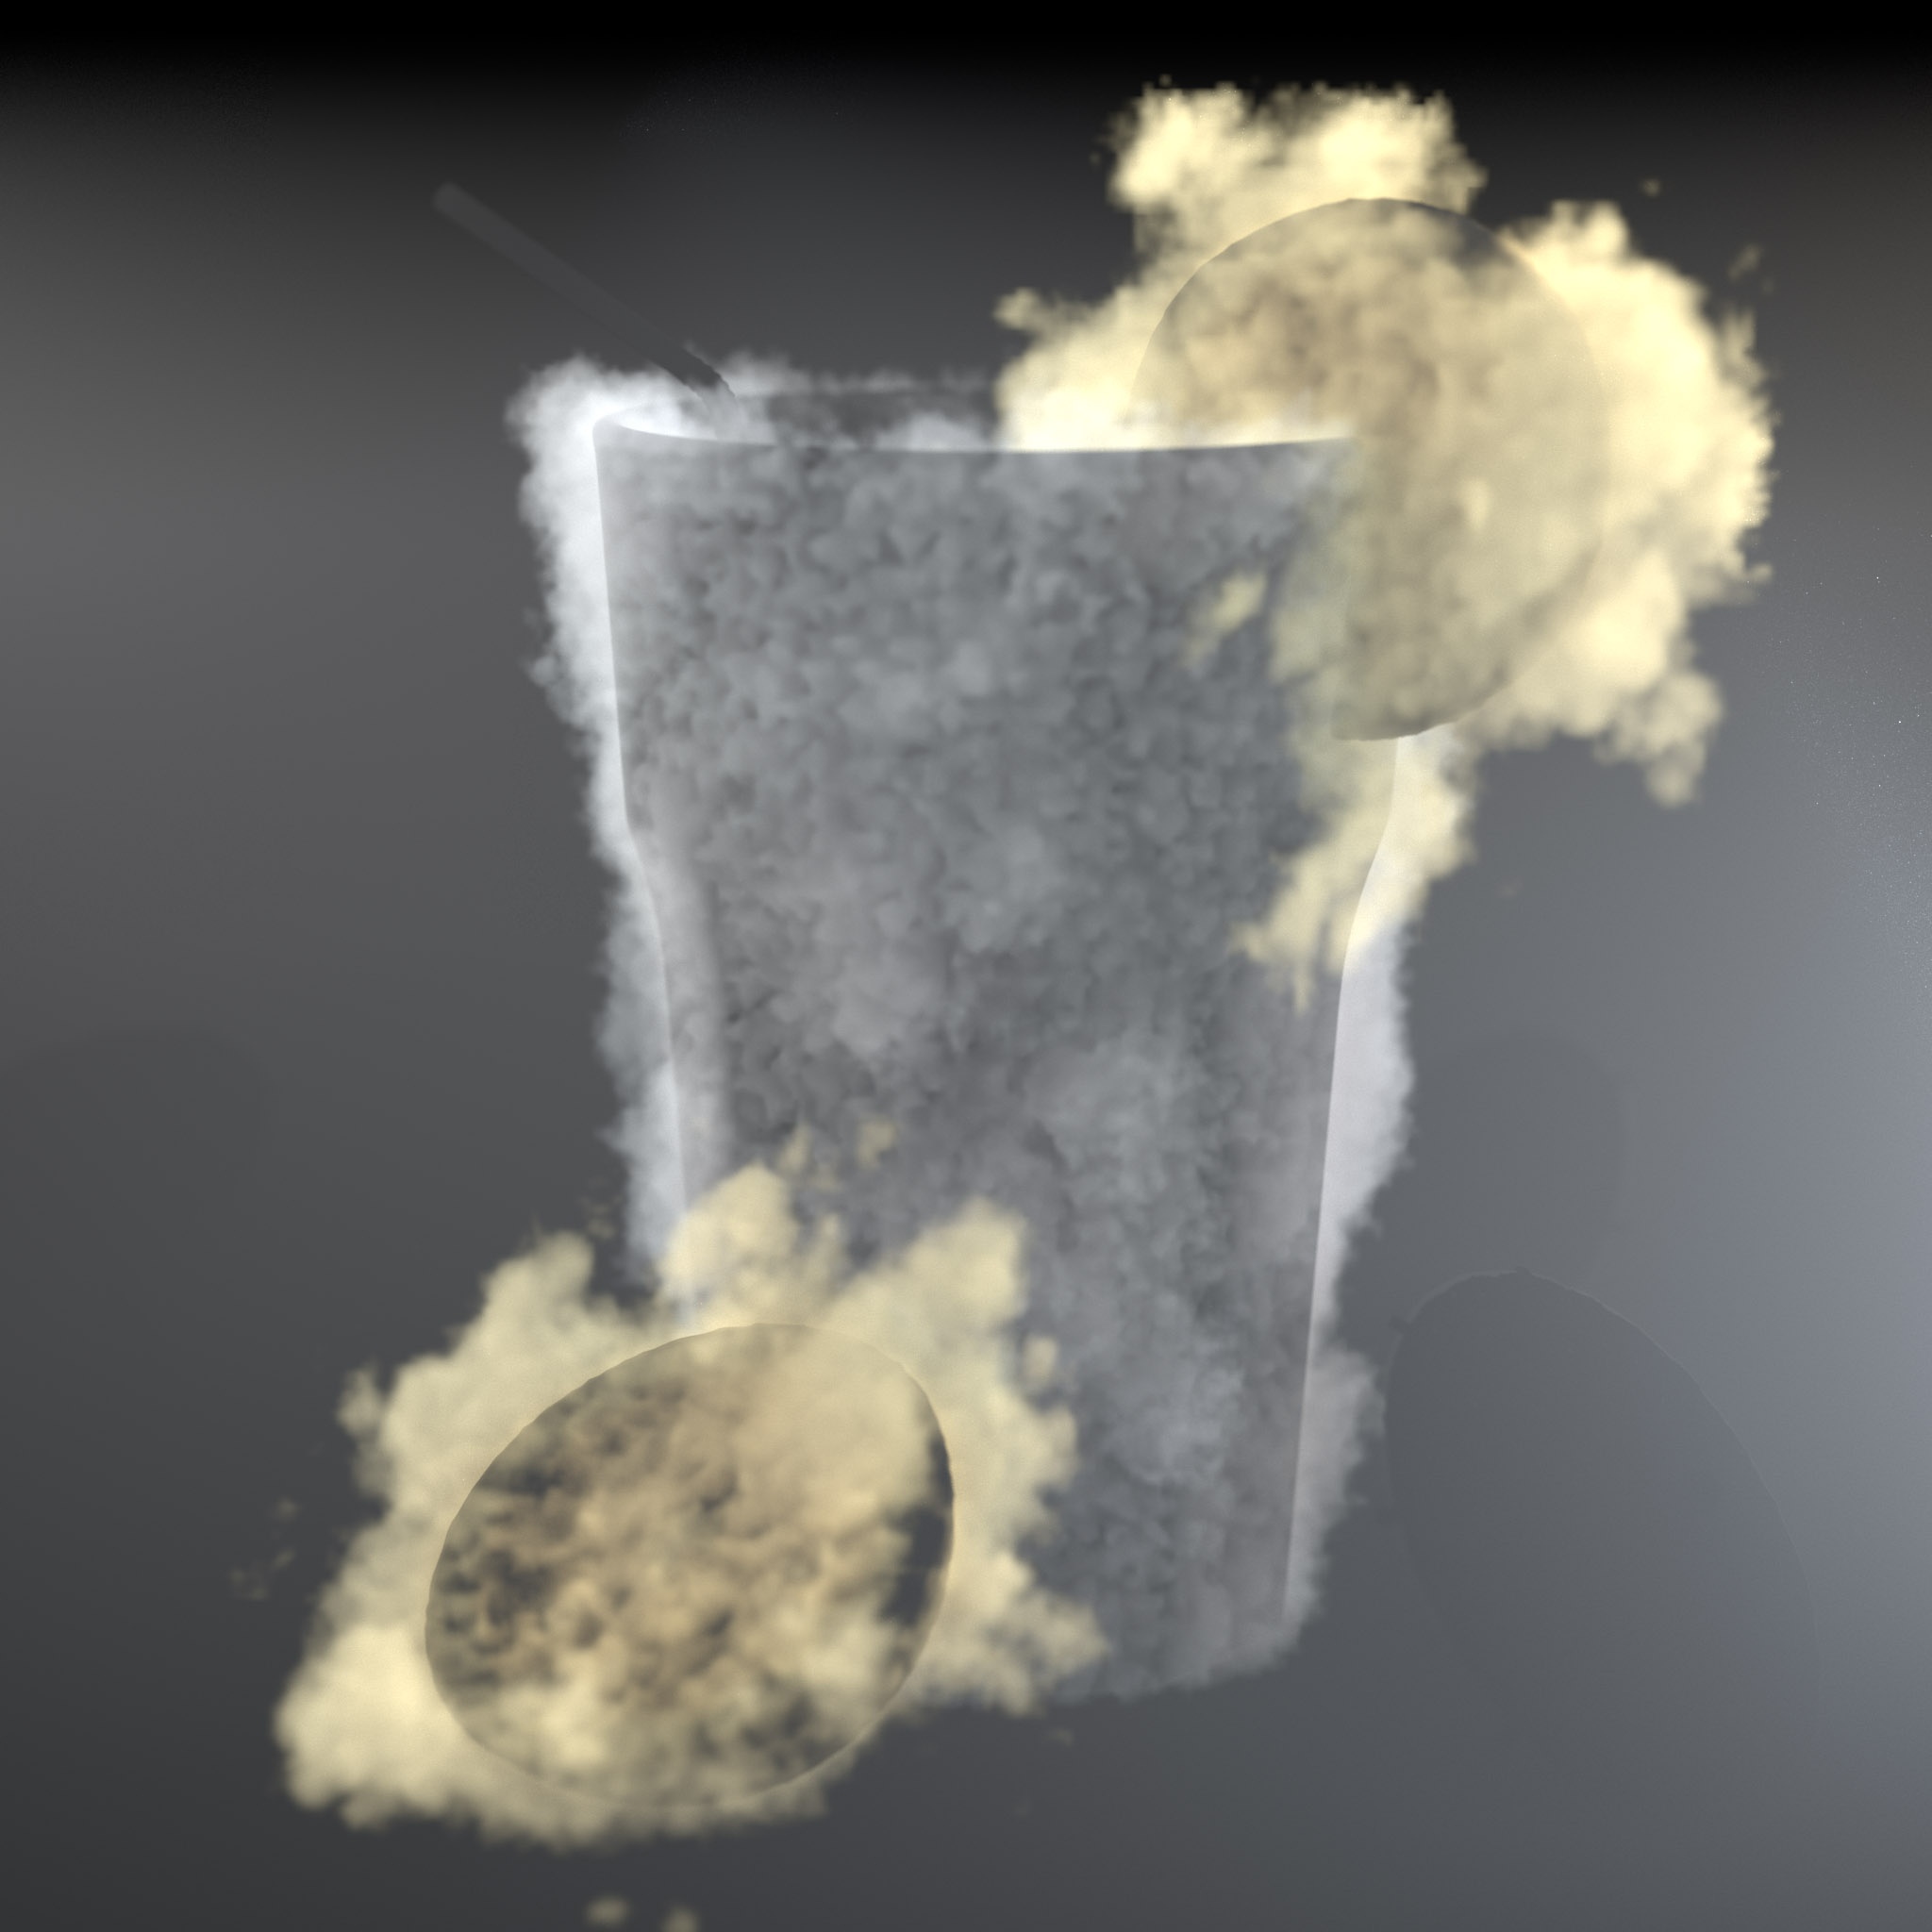
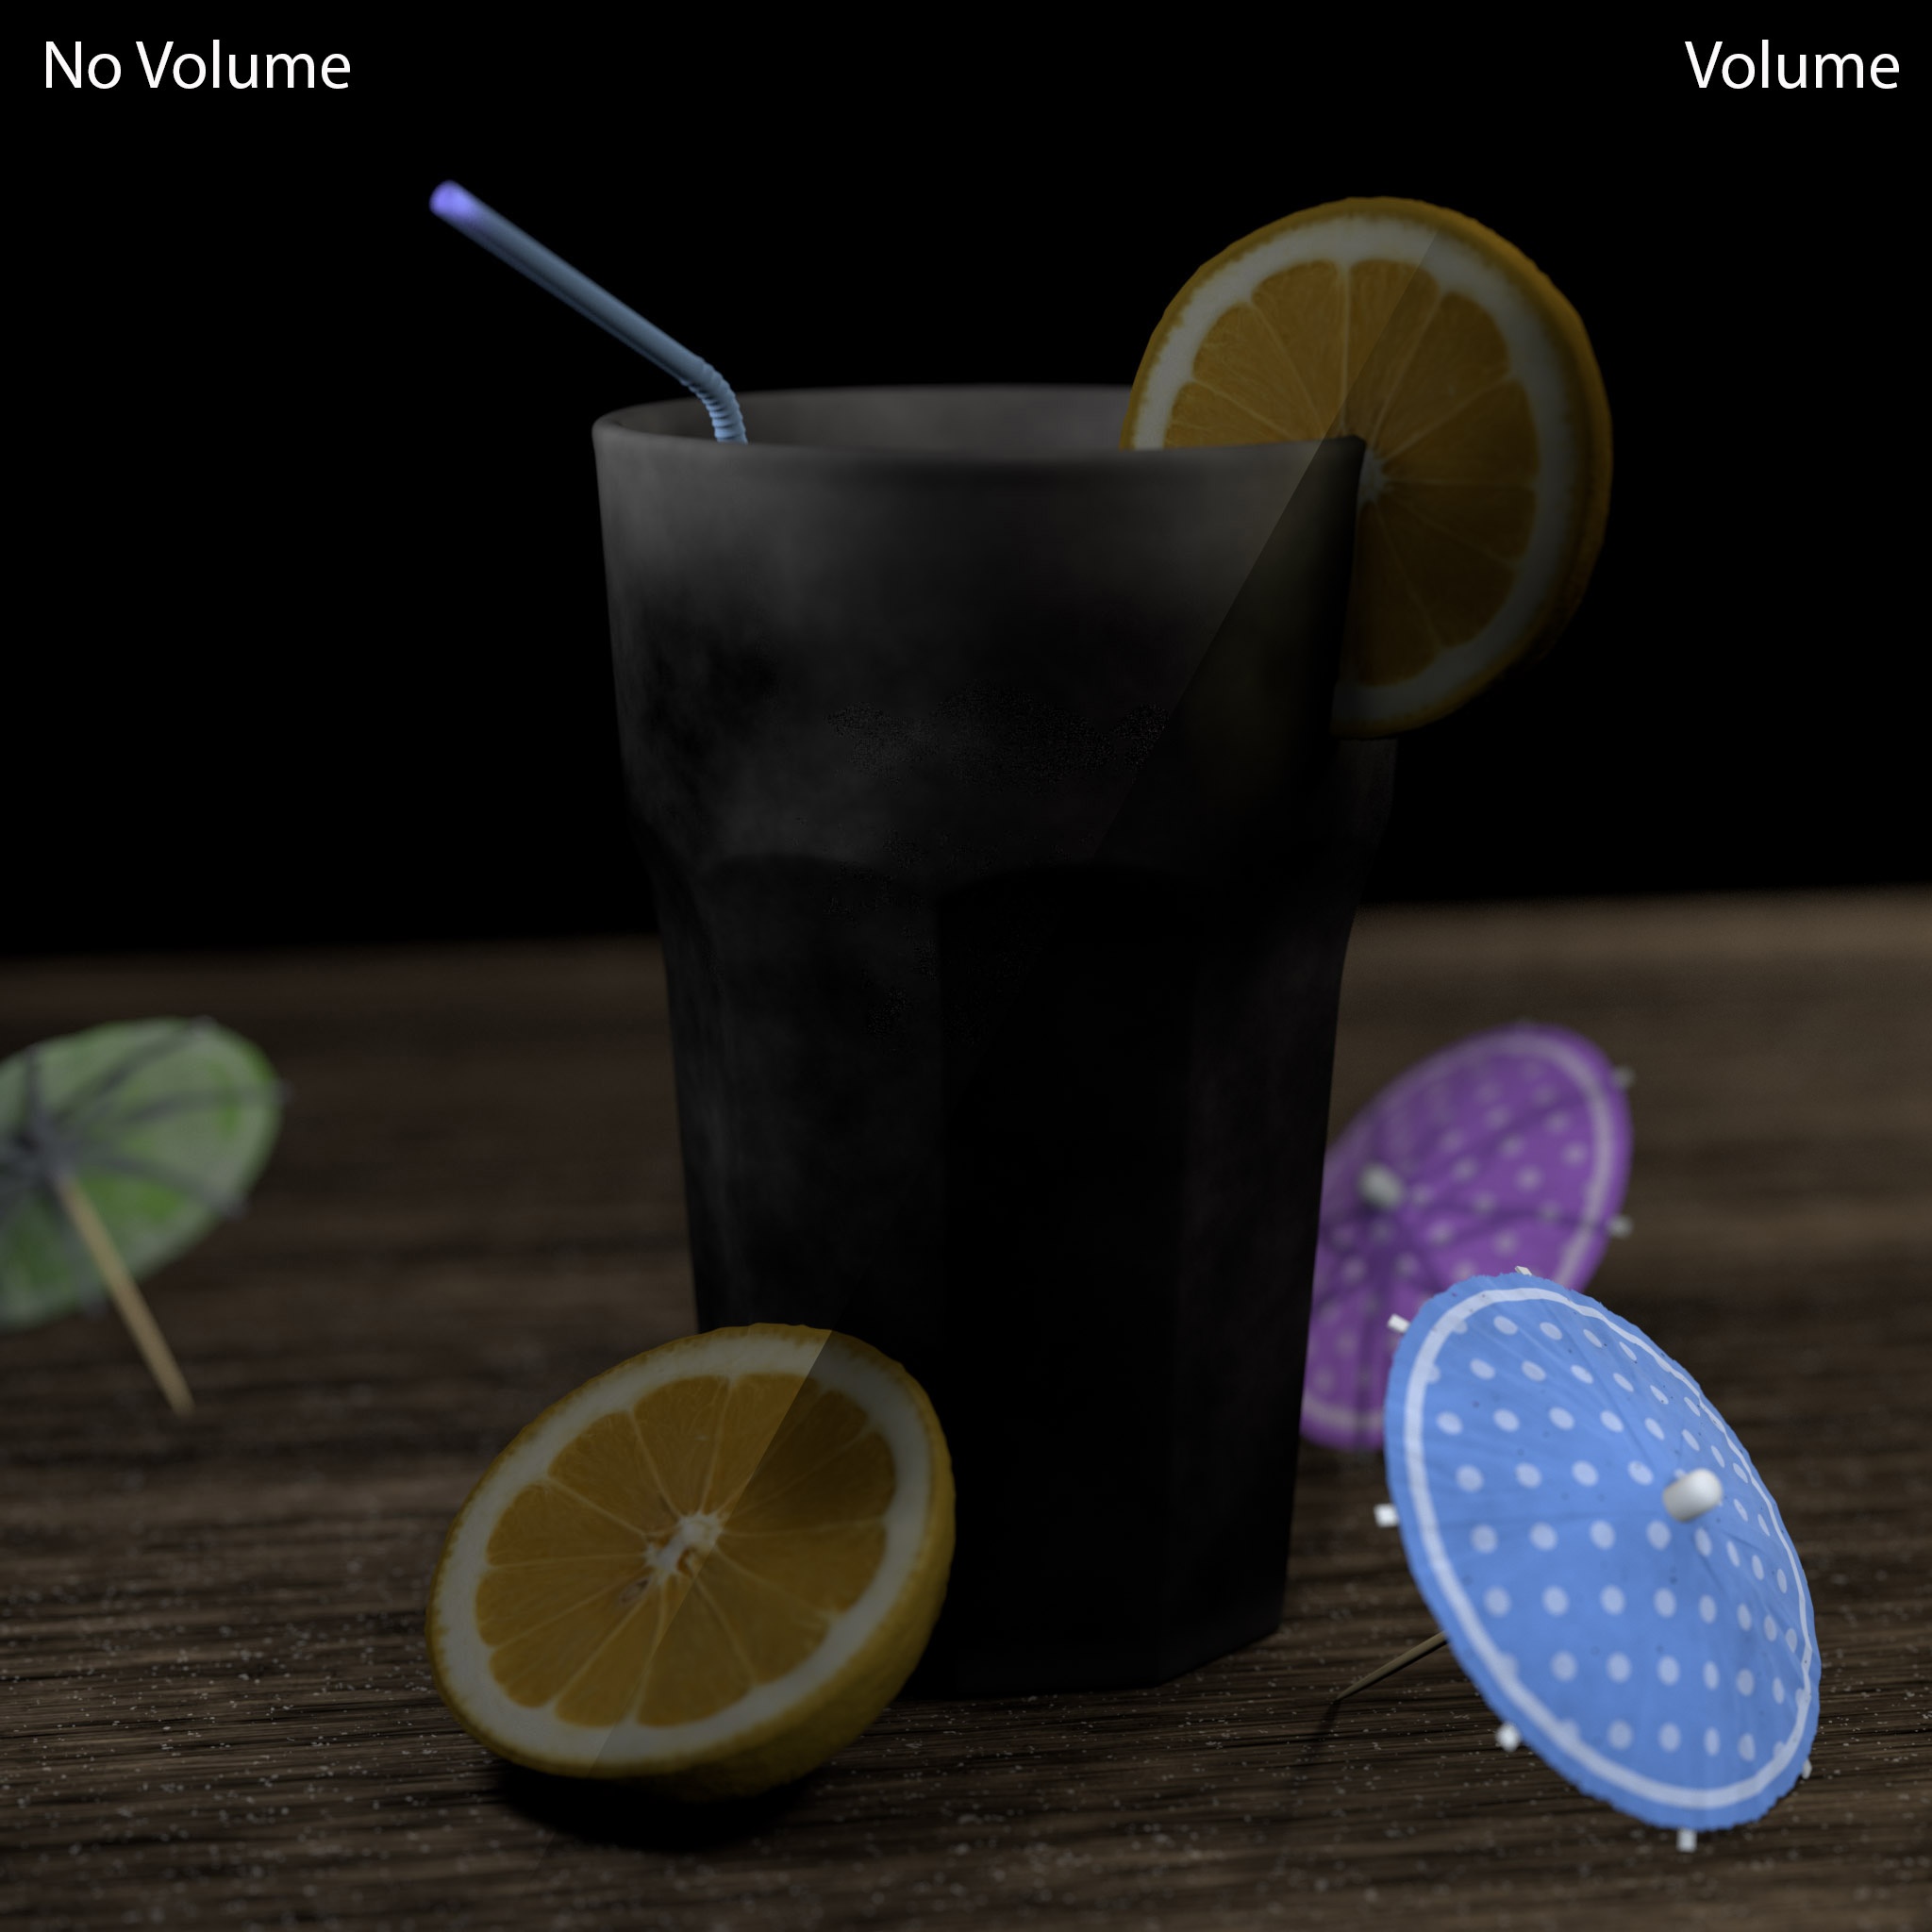
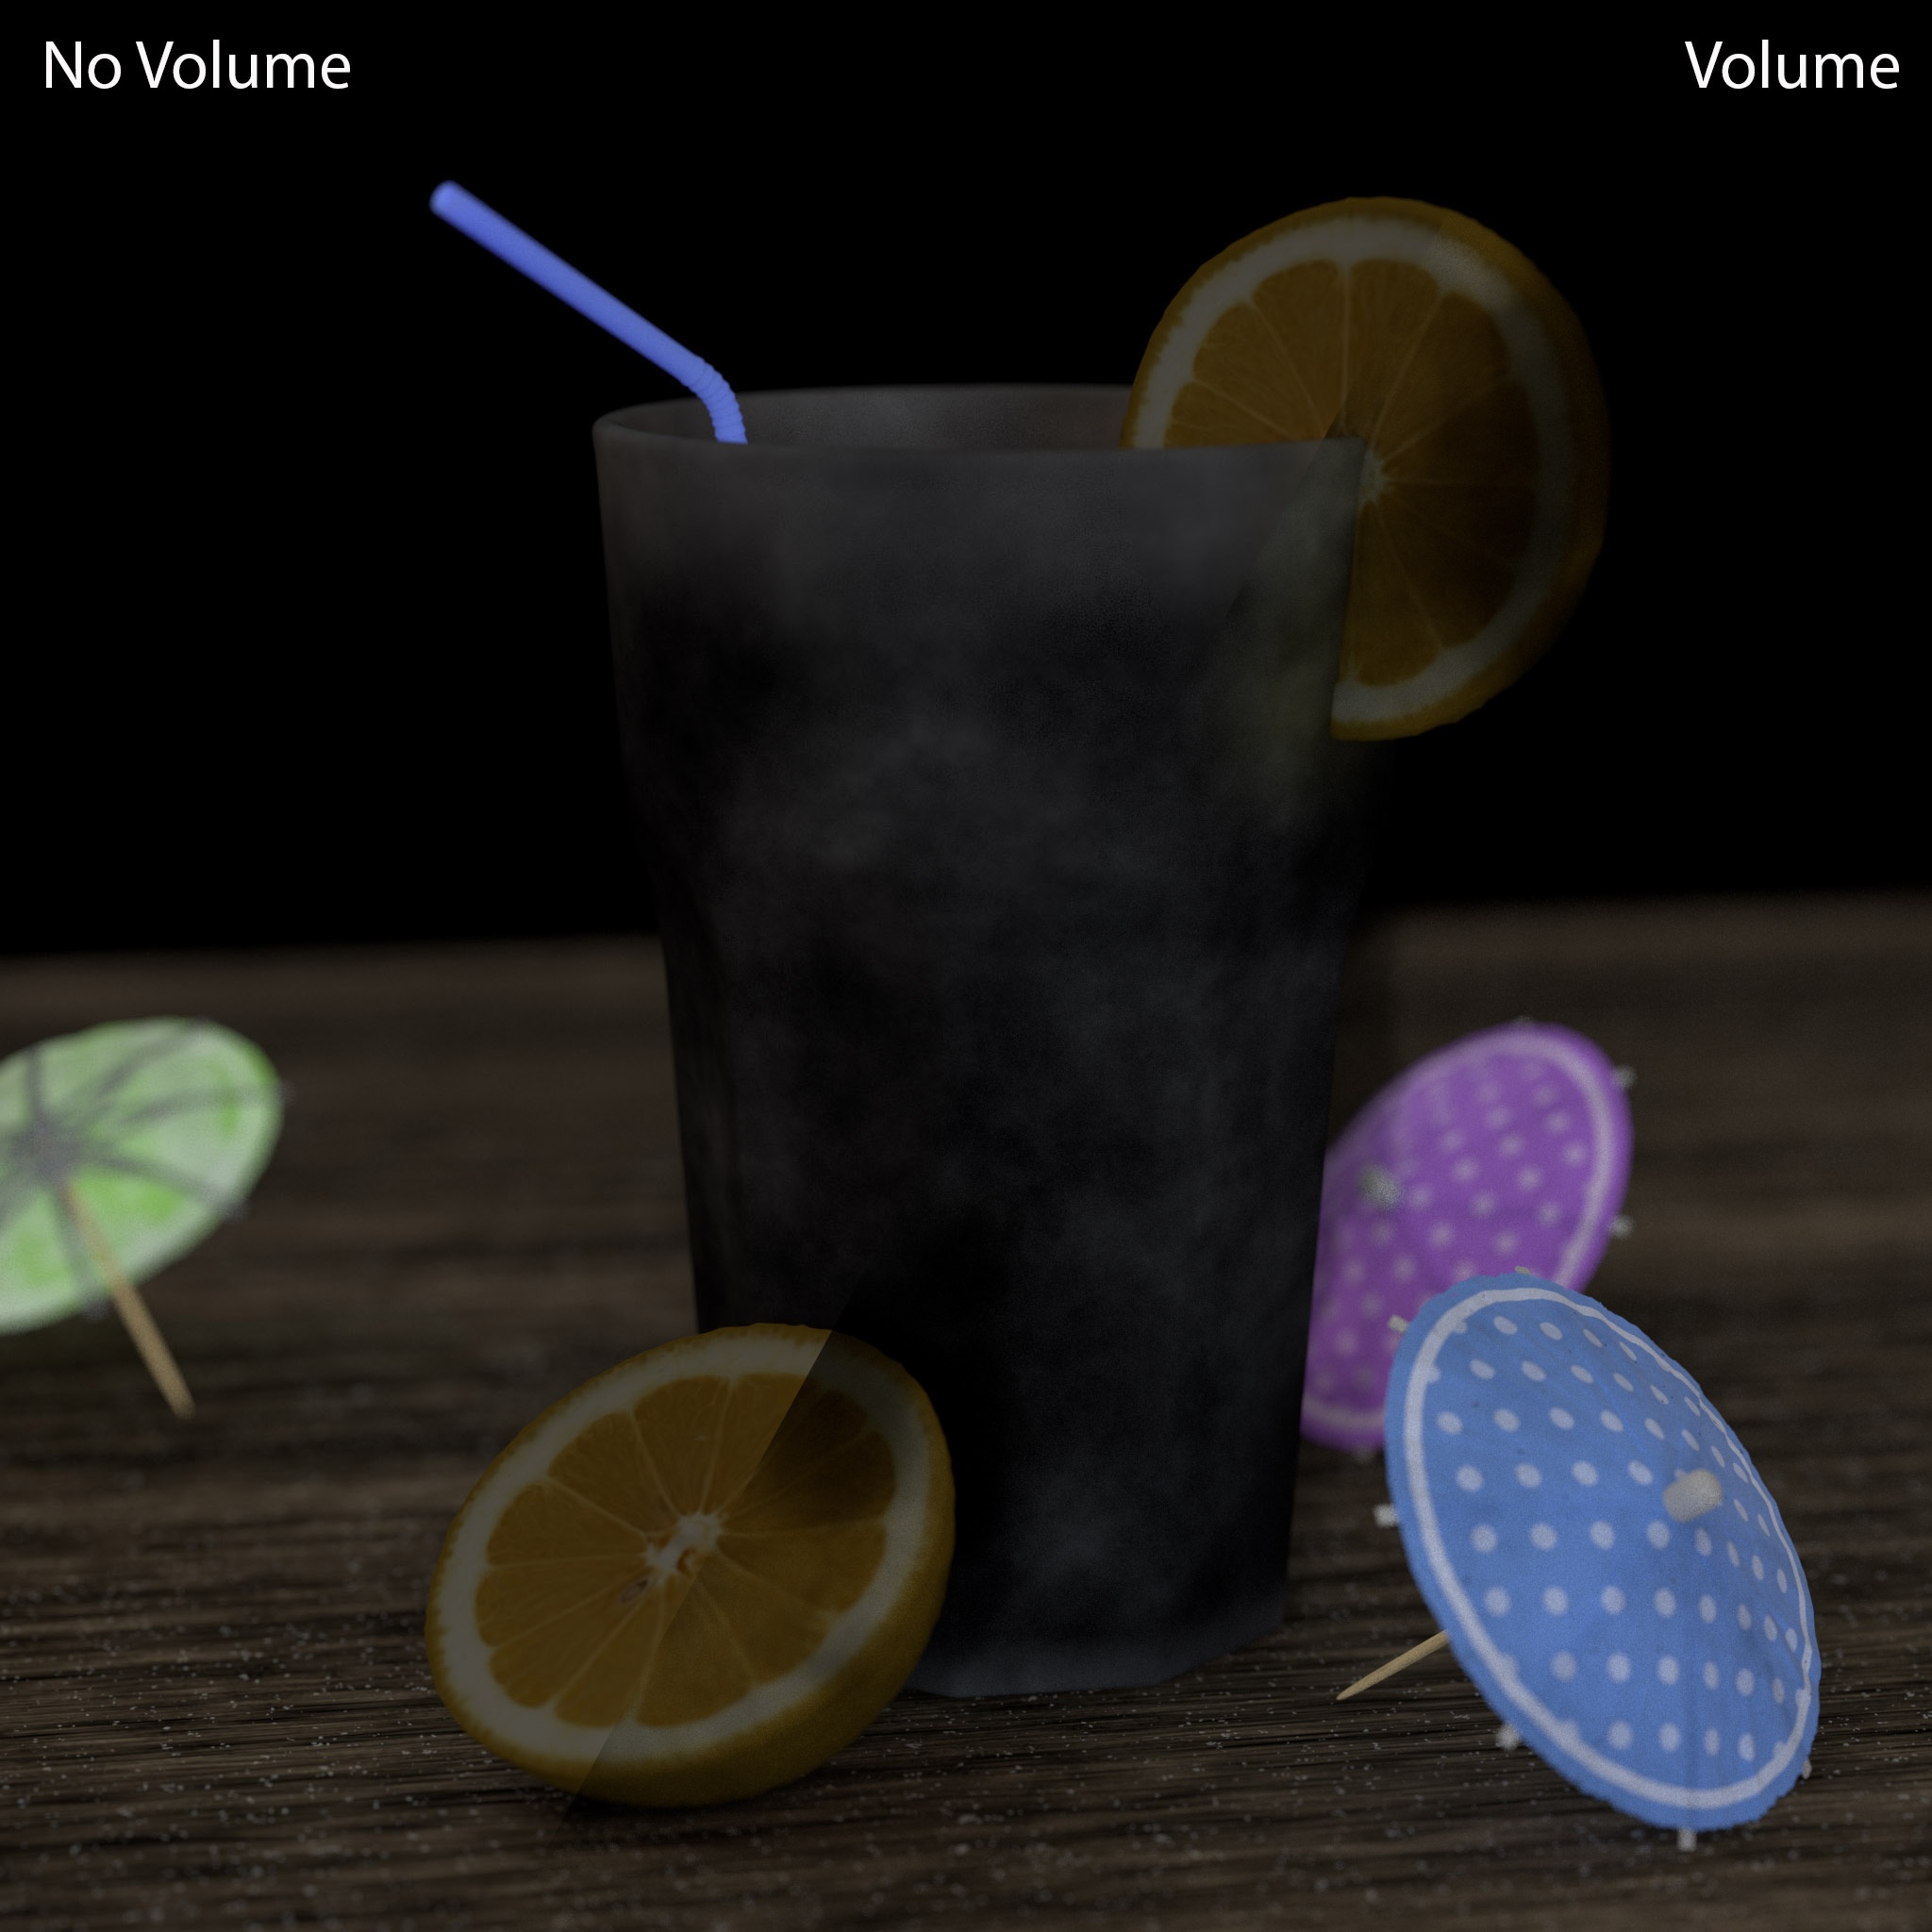
To demonstrate the Volume Lighting AOV the example scene has been modified to include volumetric elements. All the lights in the scene are contributing to global volumetric fog as well as lighting the two newly added volume objects, one around the drinking glass and another tinted yellow around the two lemons.
The Volume Lighting AOV is an additive layer that contains only the volume lighting information separate from the rest of the scene. This includes both global volume and ray-marched volume objects.
Volume Fog Emission AOV
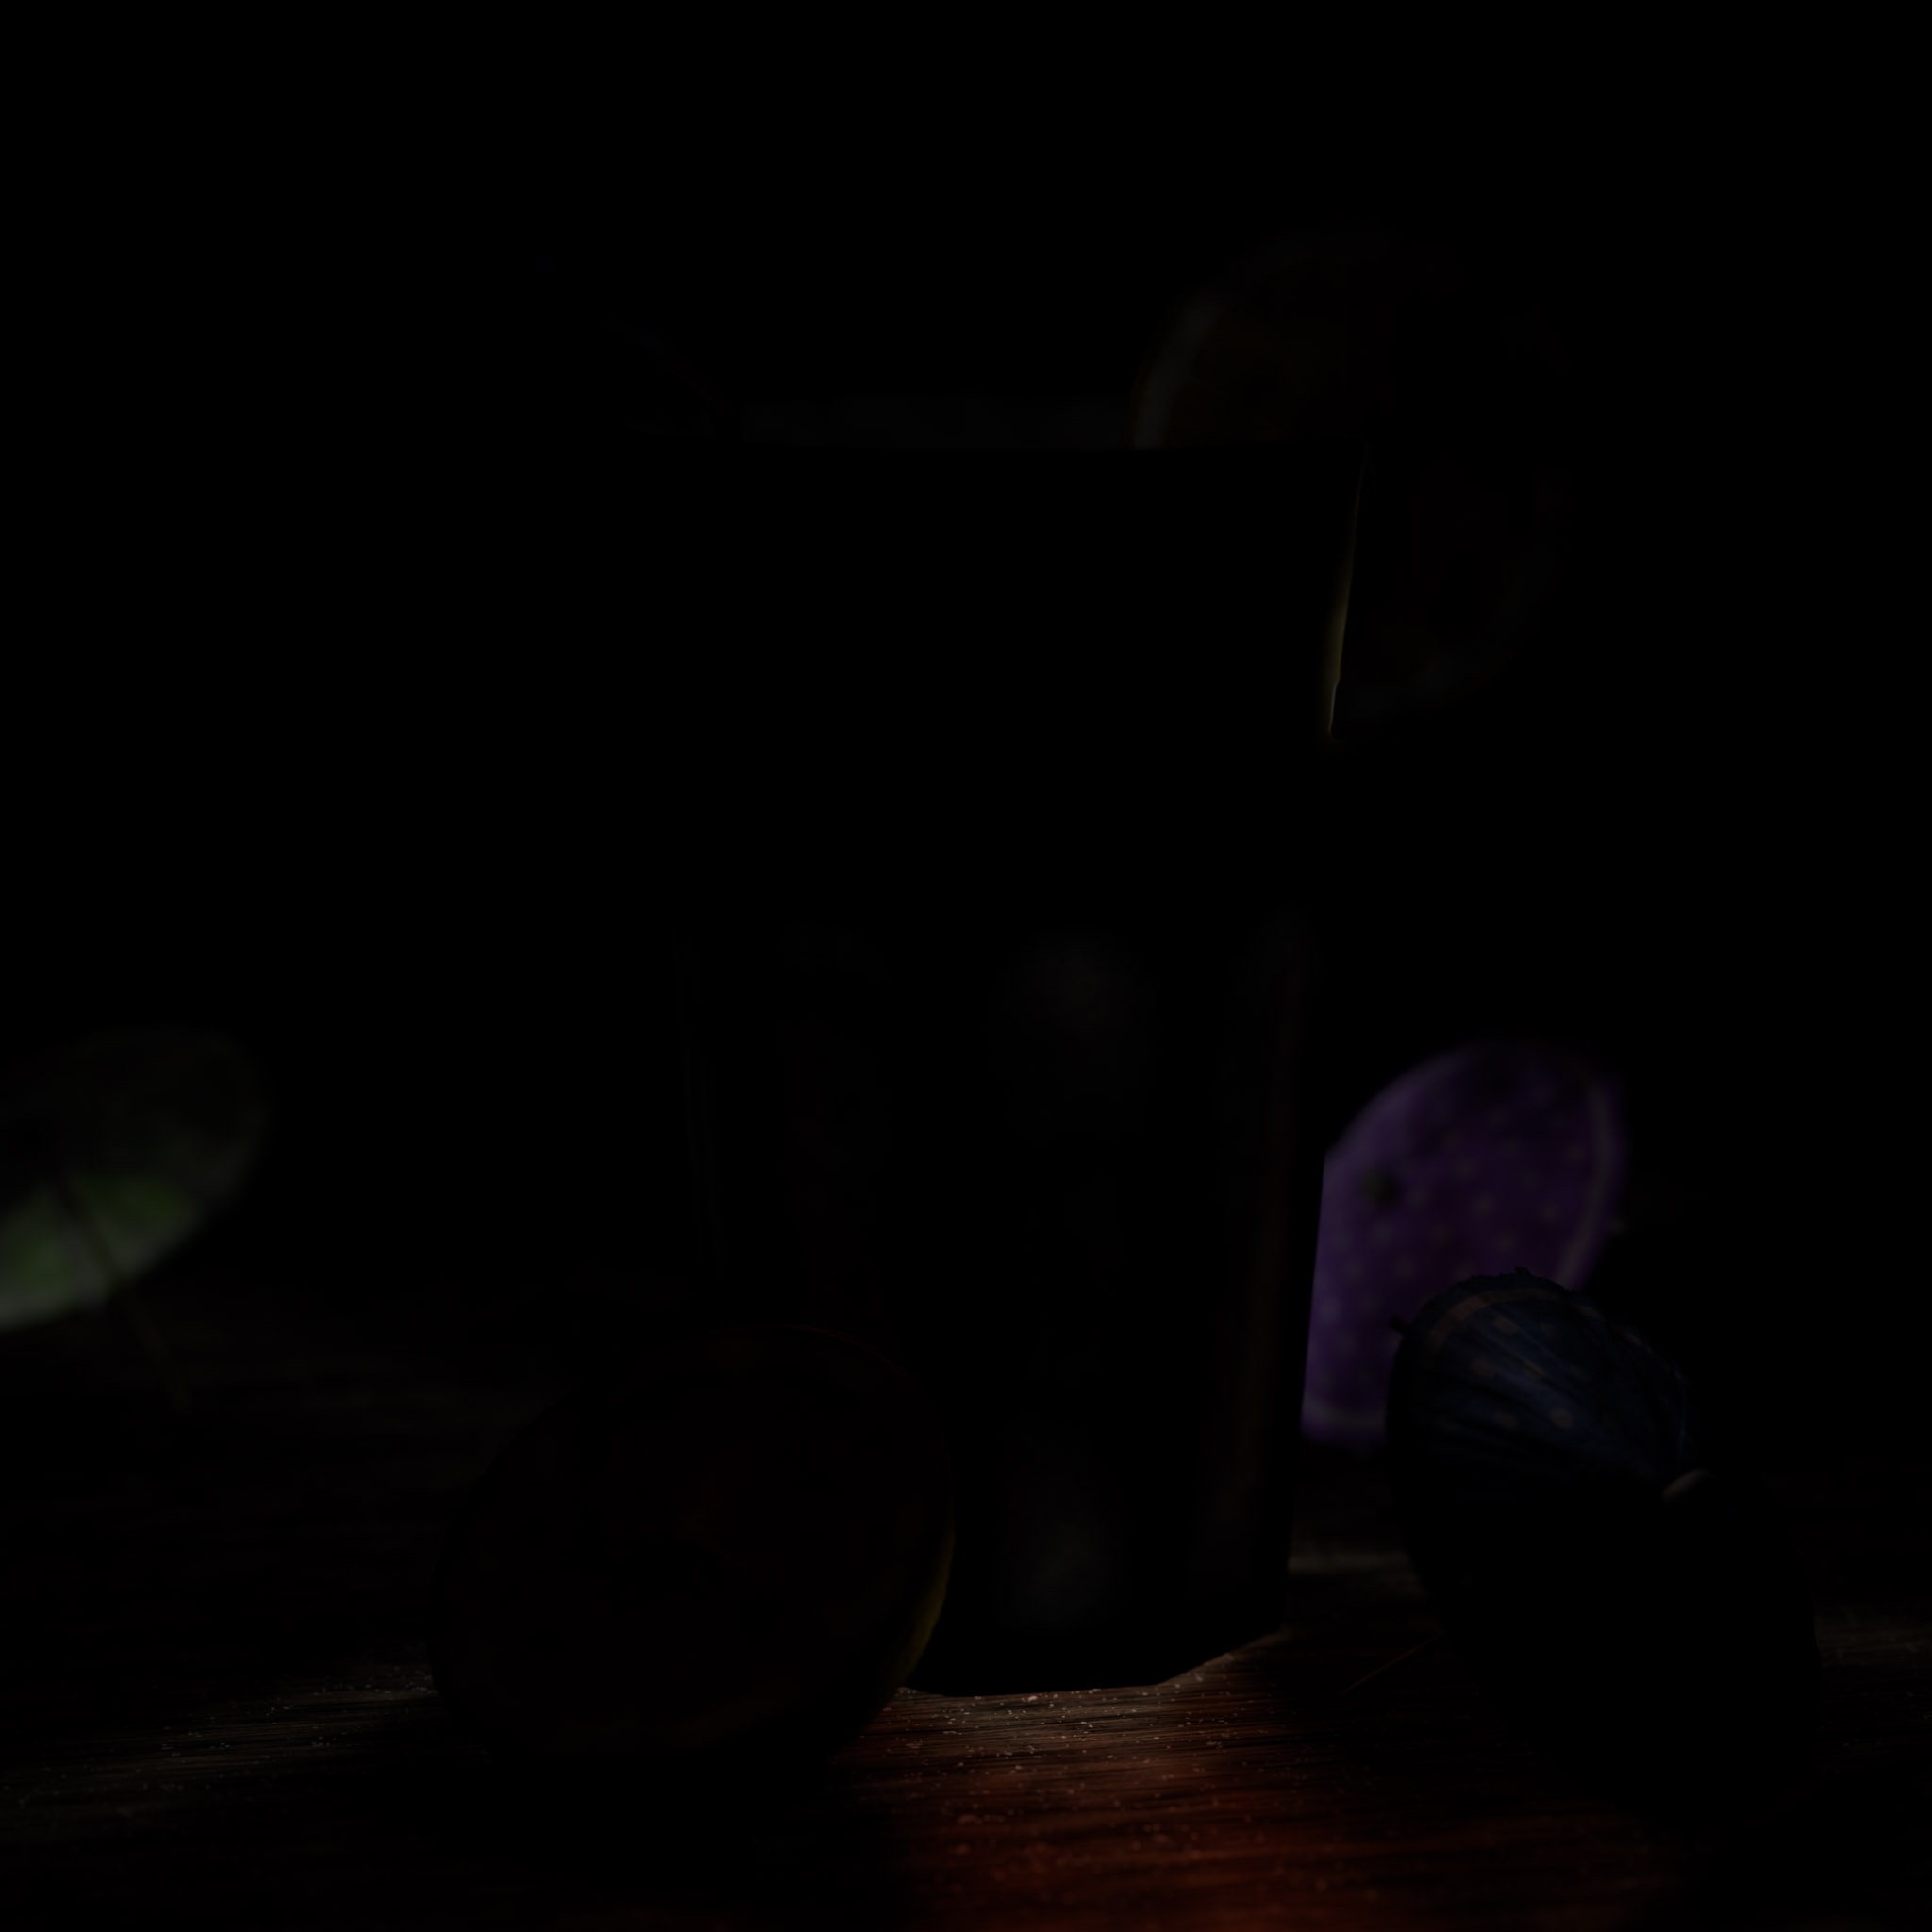
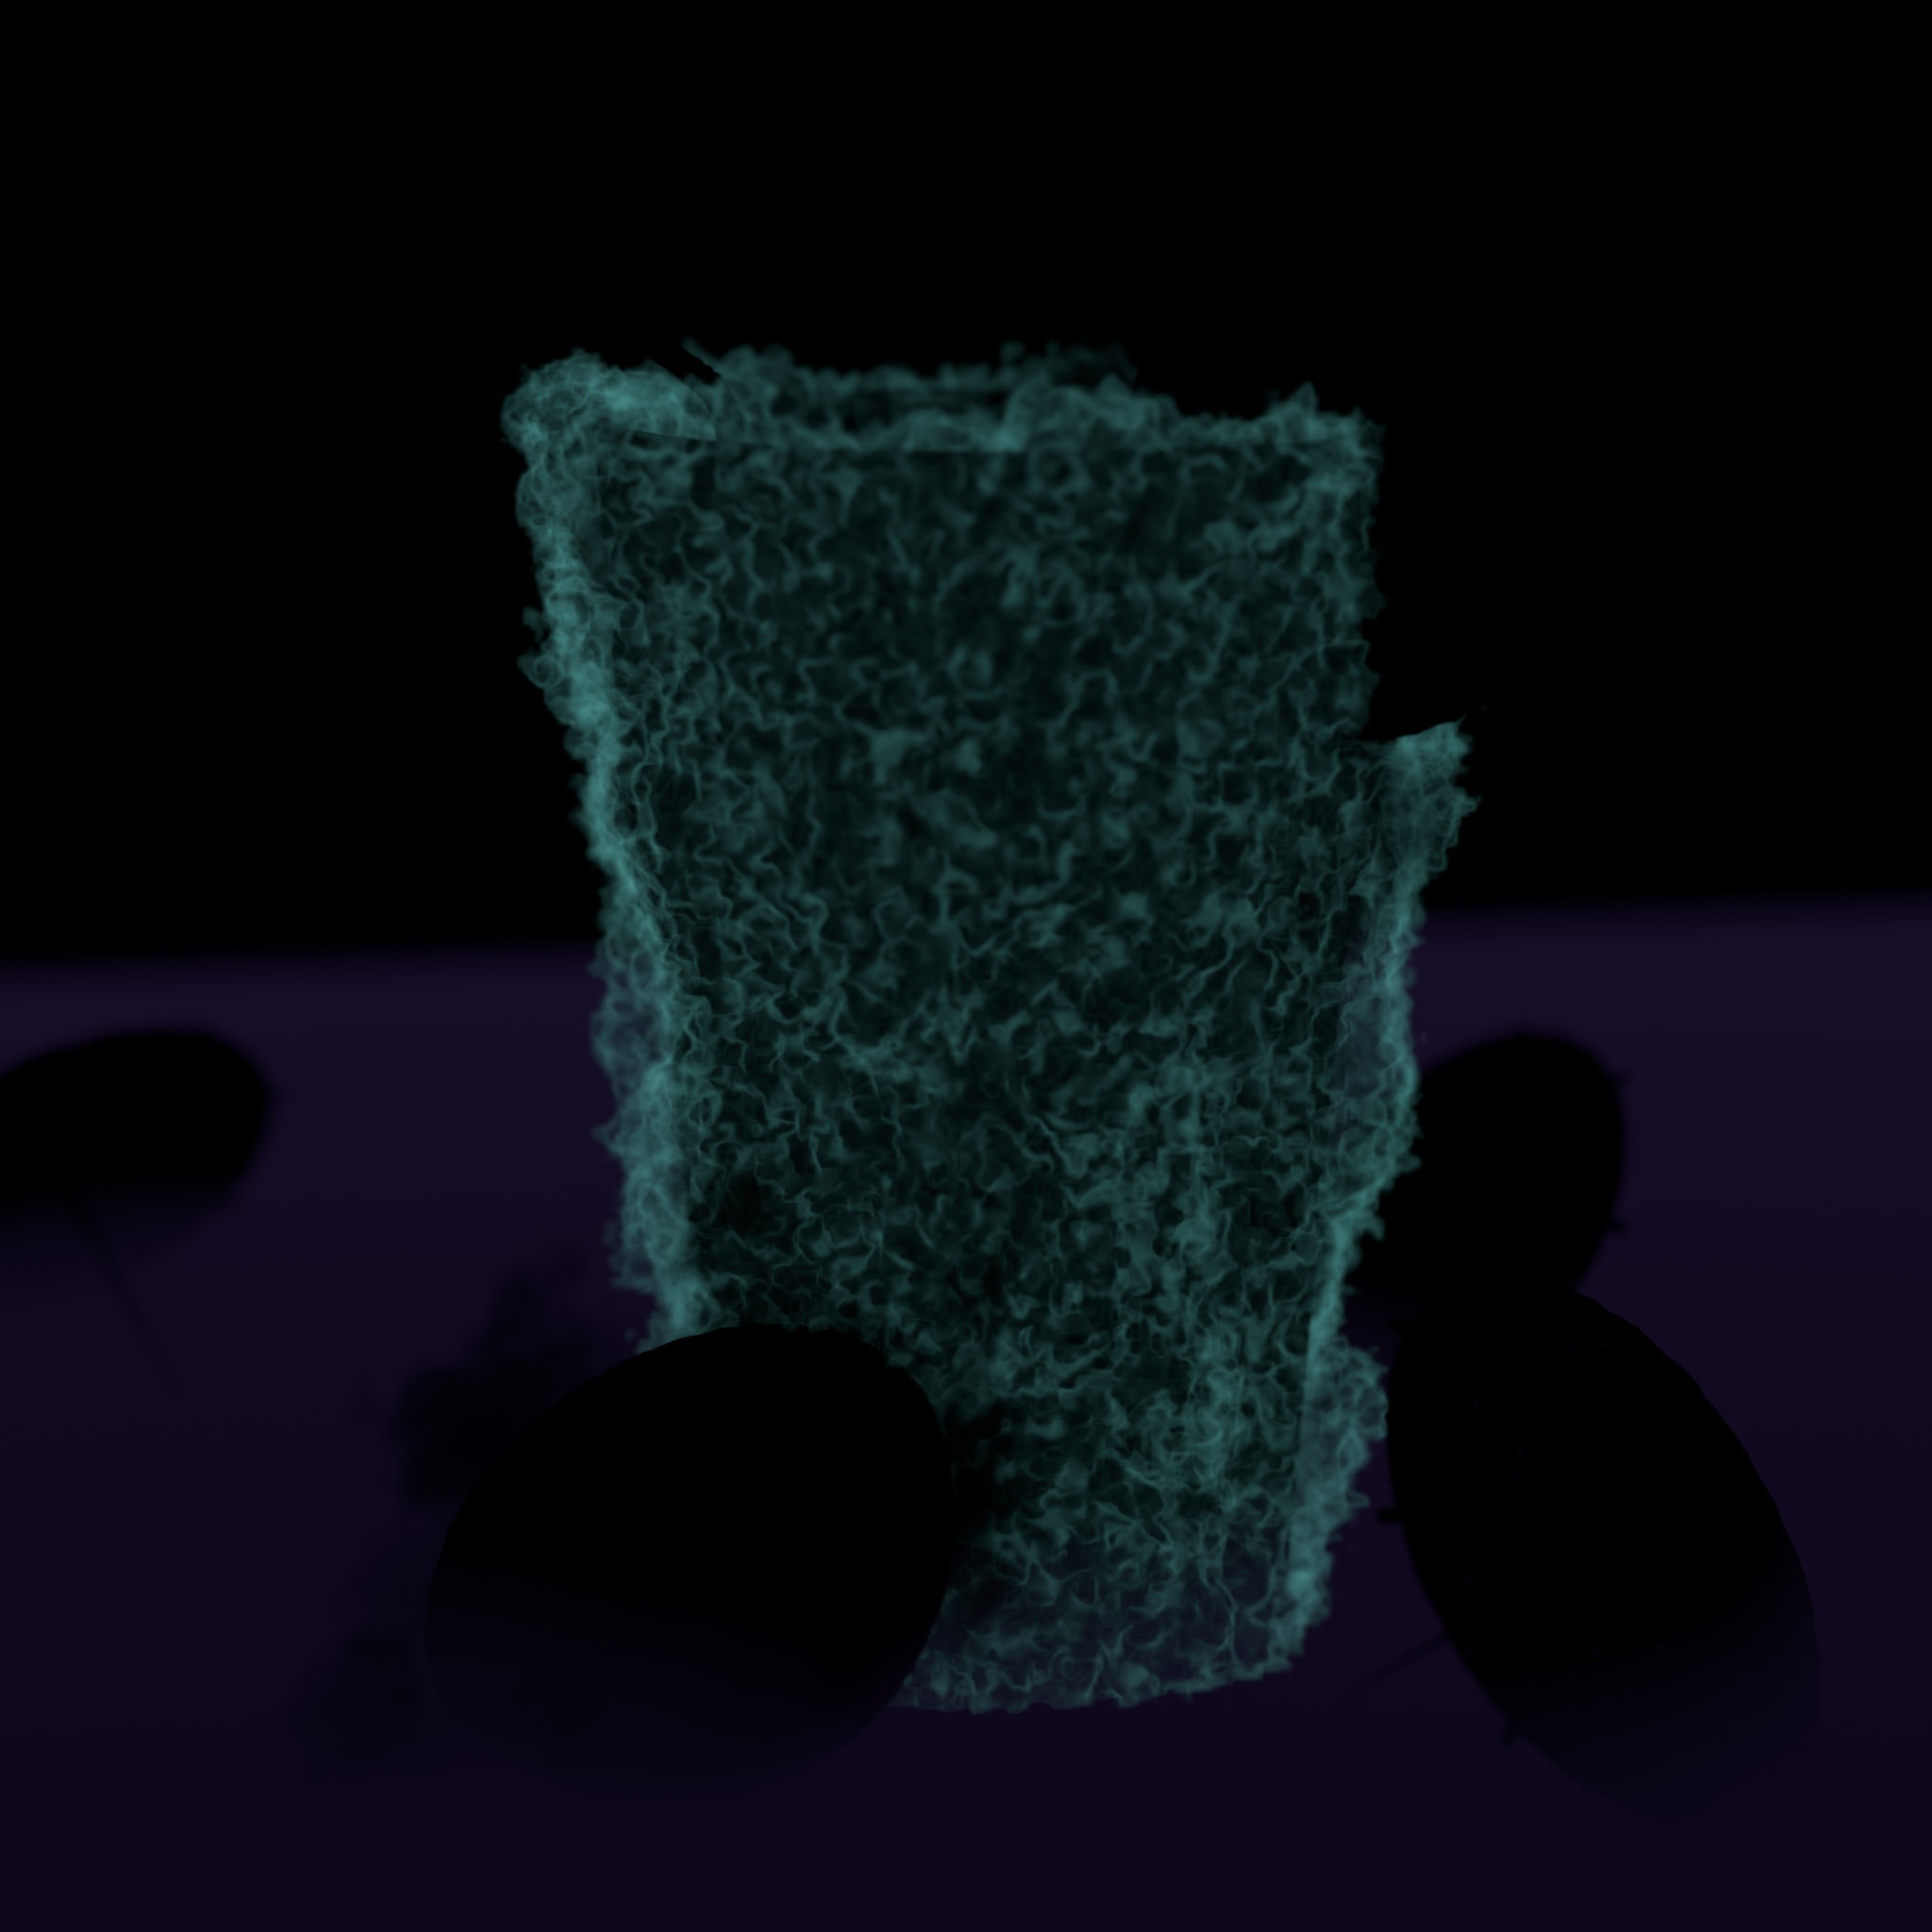
The Volume Fog Emission AOV is an additive layer that contains only the emission component for Redshift volume objects and volume fog. For this example scene, the drinking glass has a density remapped cyan colored emission and the global volume fog has a subtle purple colored emision. The yellow lemon volume objects have no emission so they appear completely black in the Volume Fog Emission AOV as pictured above.
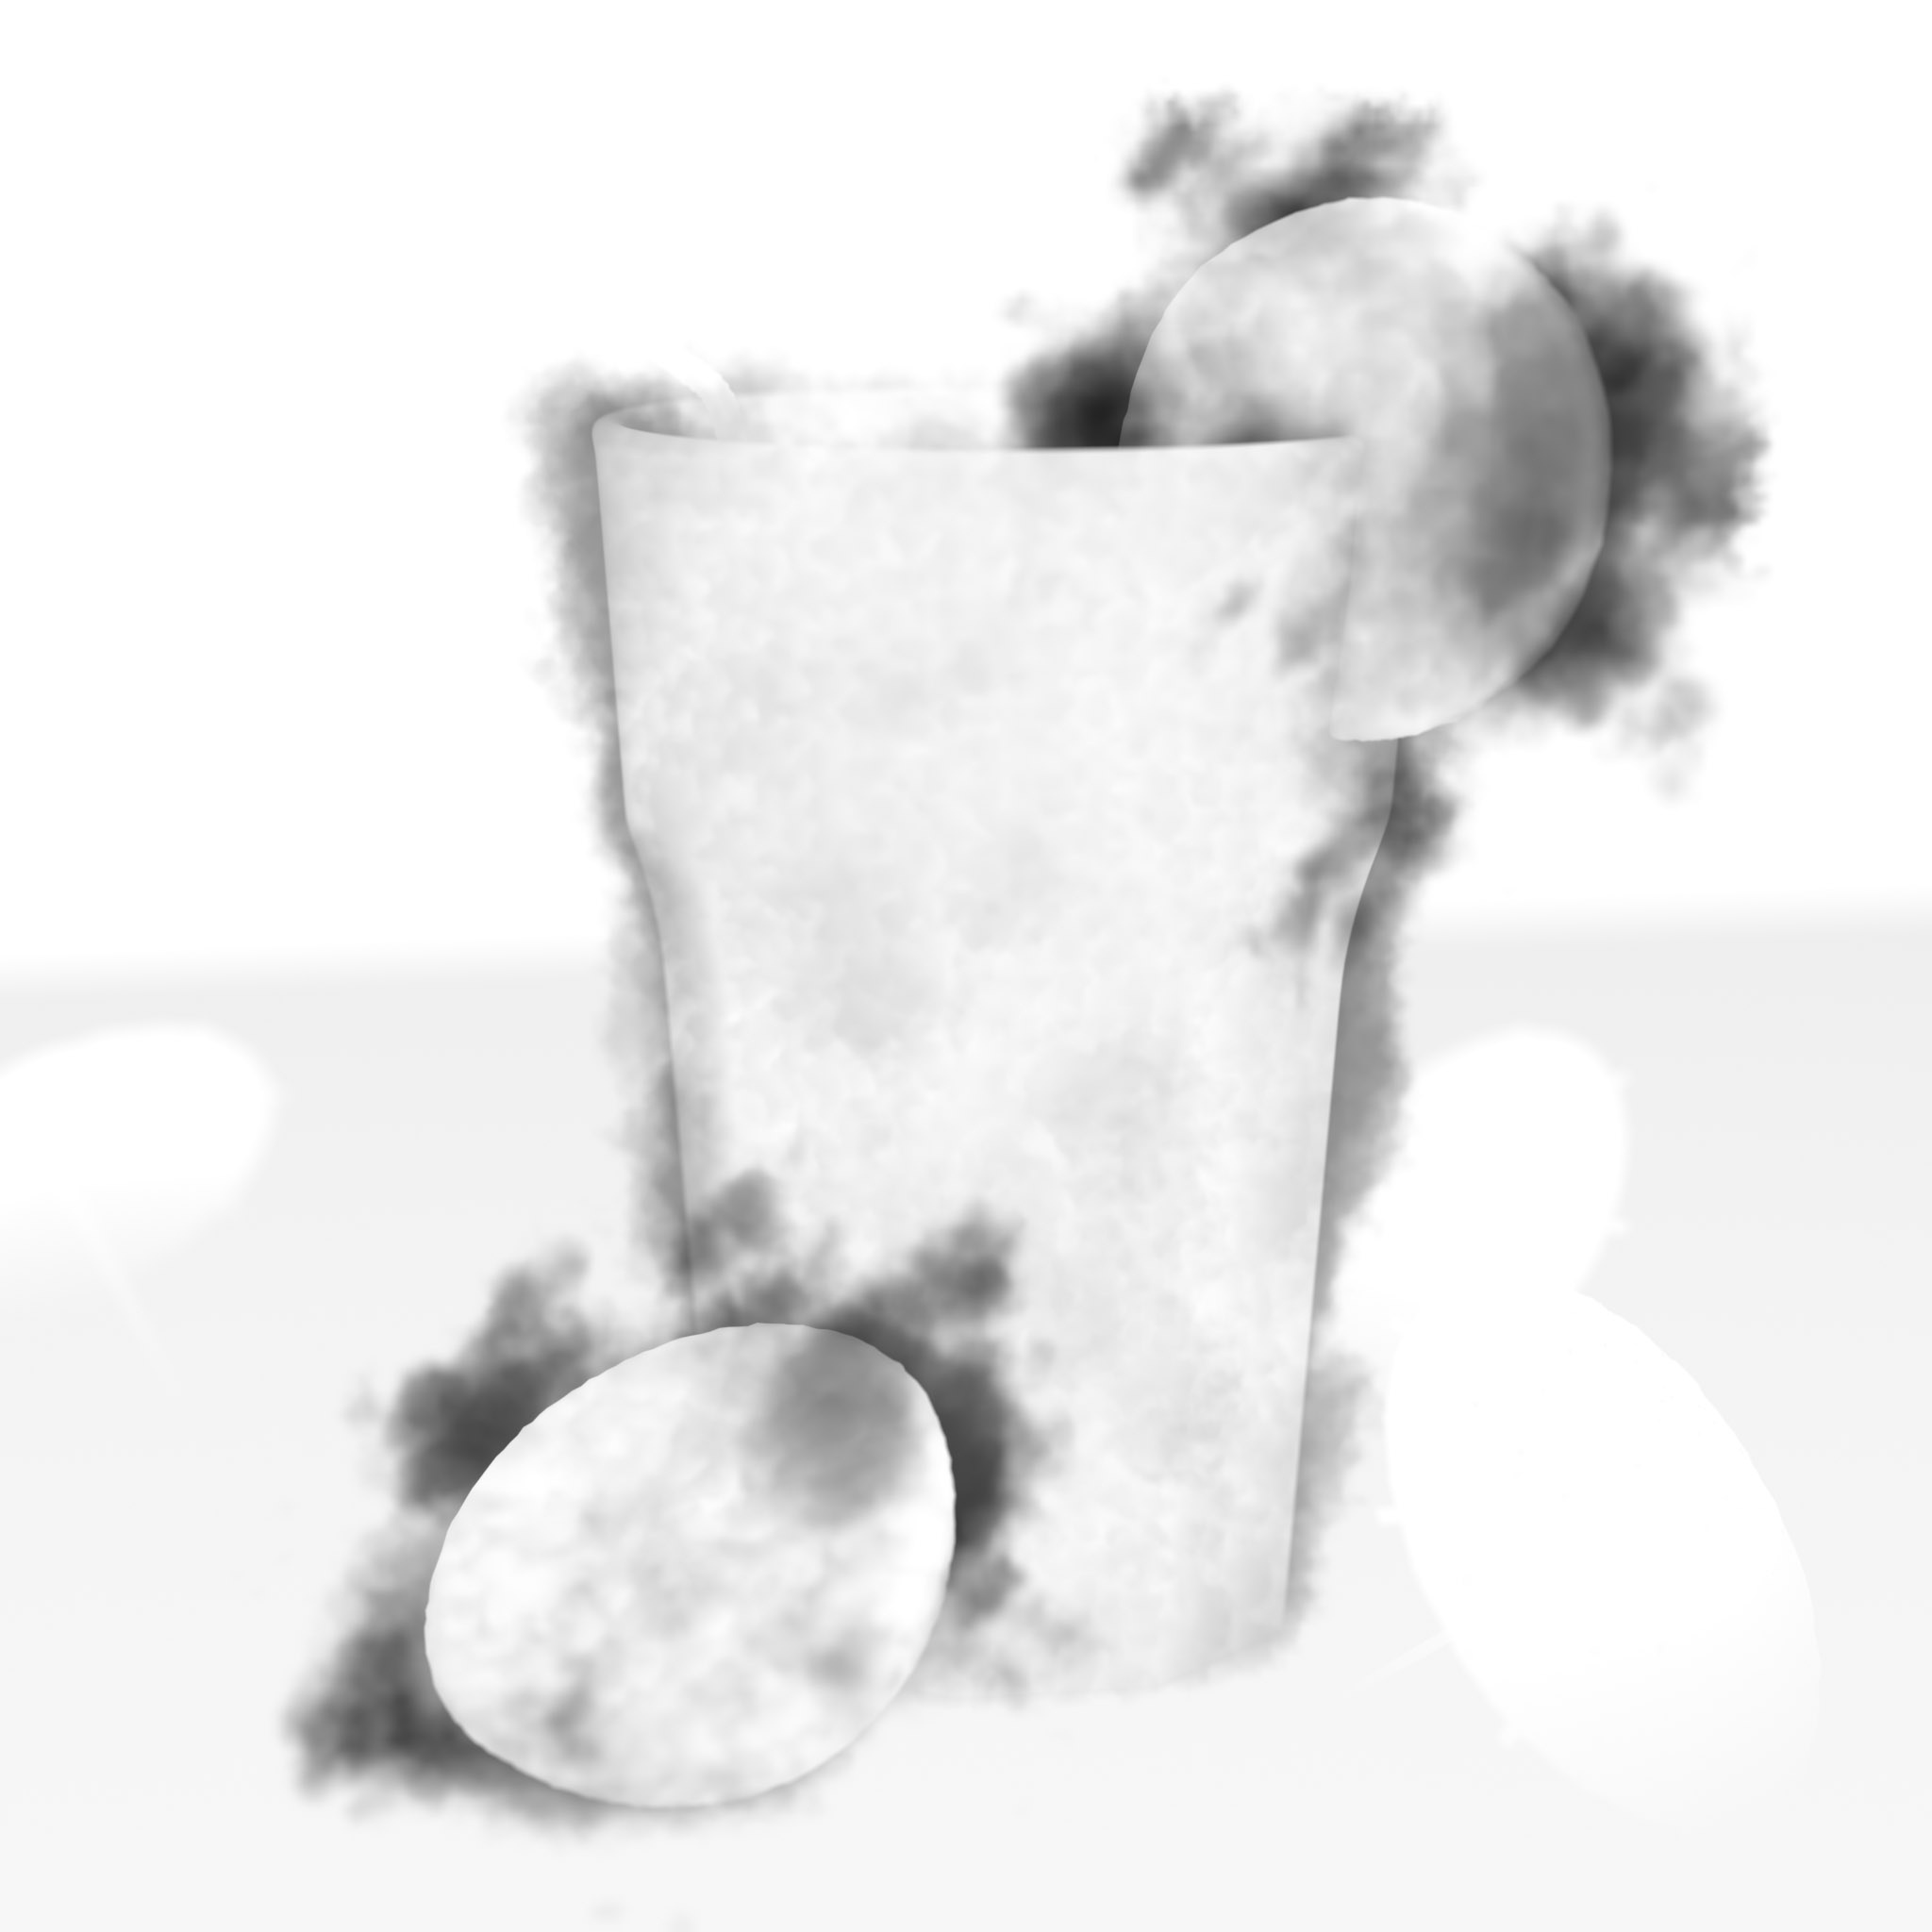
Volume Fog Tint AOV
The Volume Fog Tint AOV is a multiplicative layer that describes the effect of fogging through the medium, i.e. how objects become obscured by the fogging effect. The Volume Fog Tint can be thought of as the global volume transmittance and it serves to dim the scene accordingly before the Volume Lighting and Volume Fog Emission AOV's are added to the AOV composite.
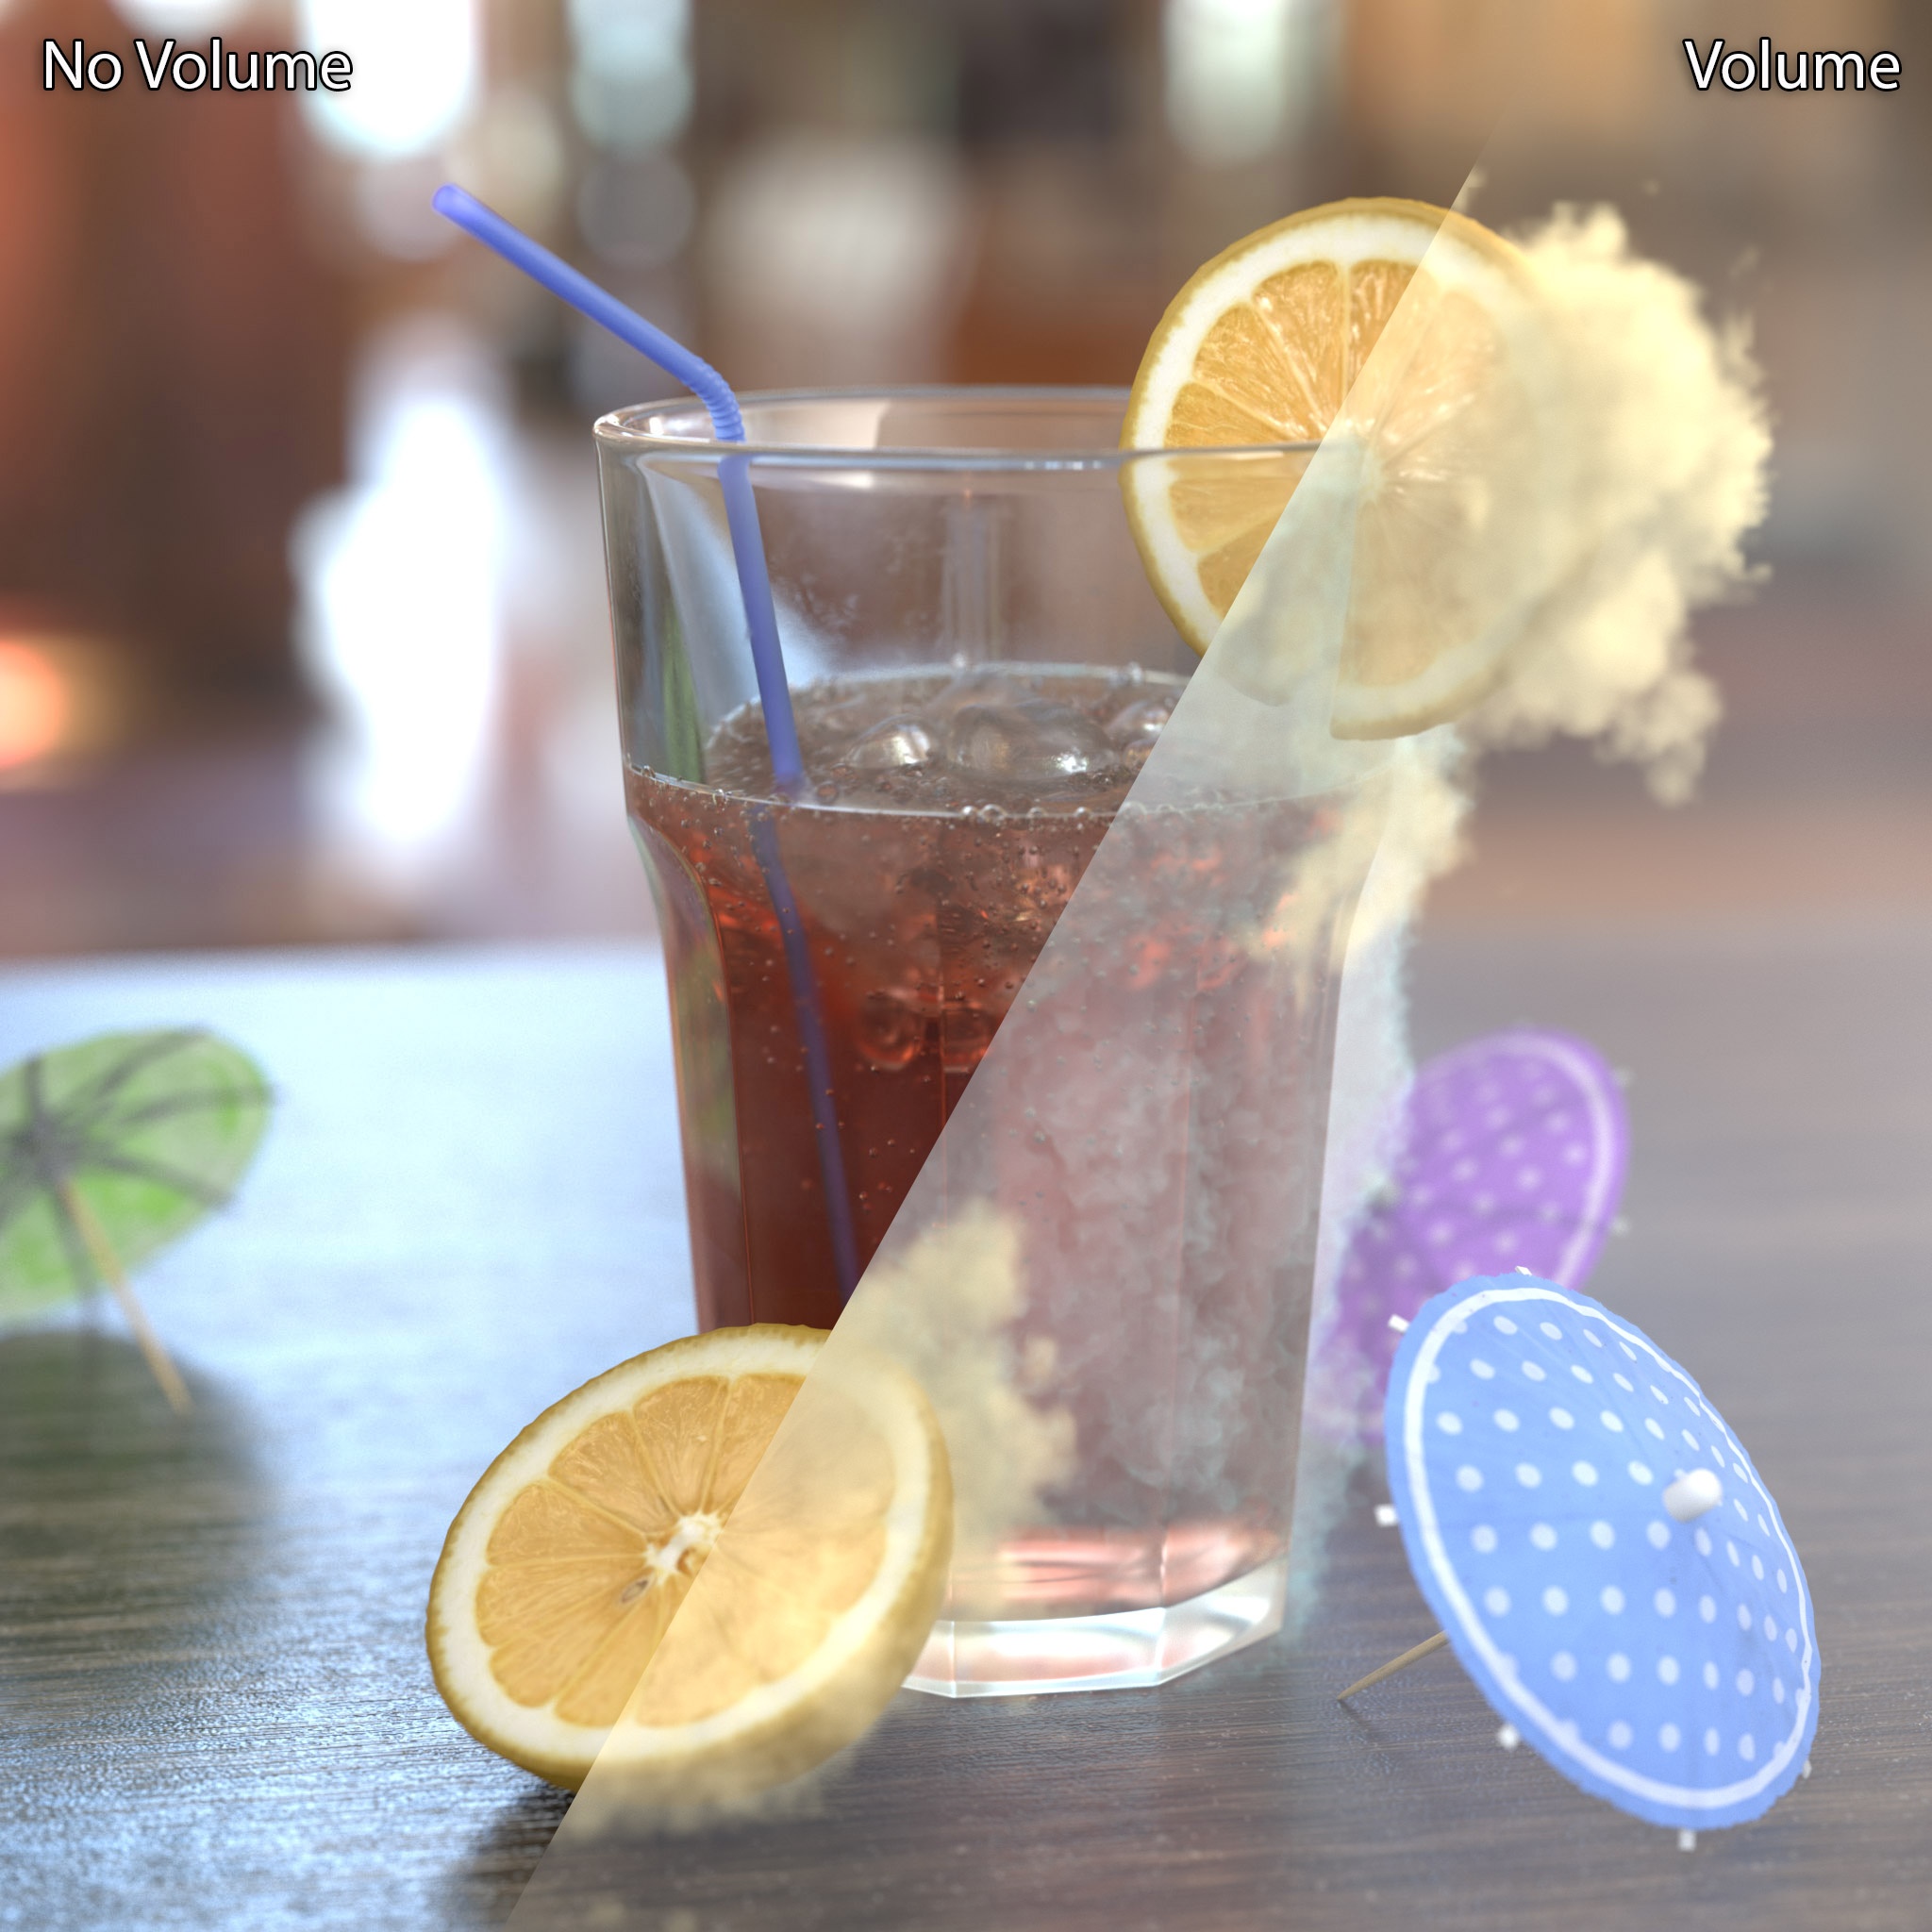
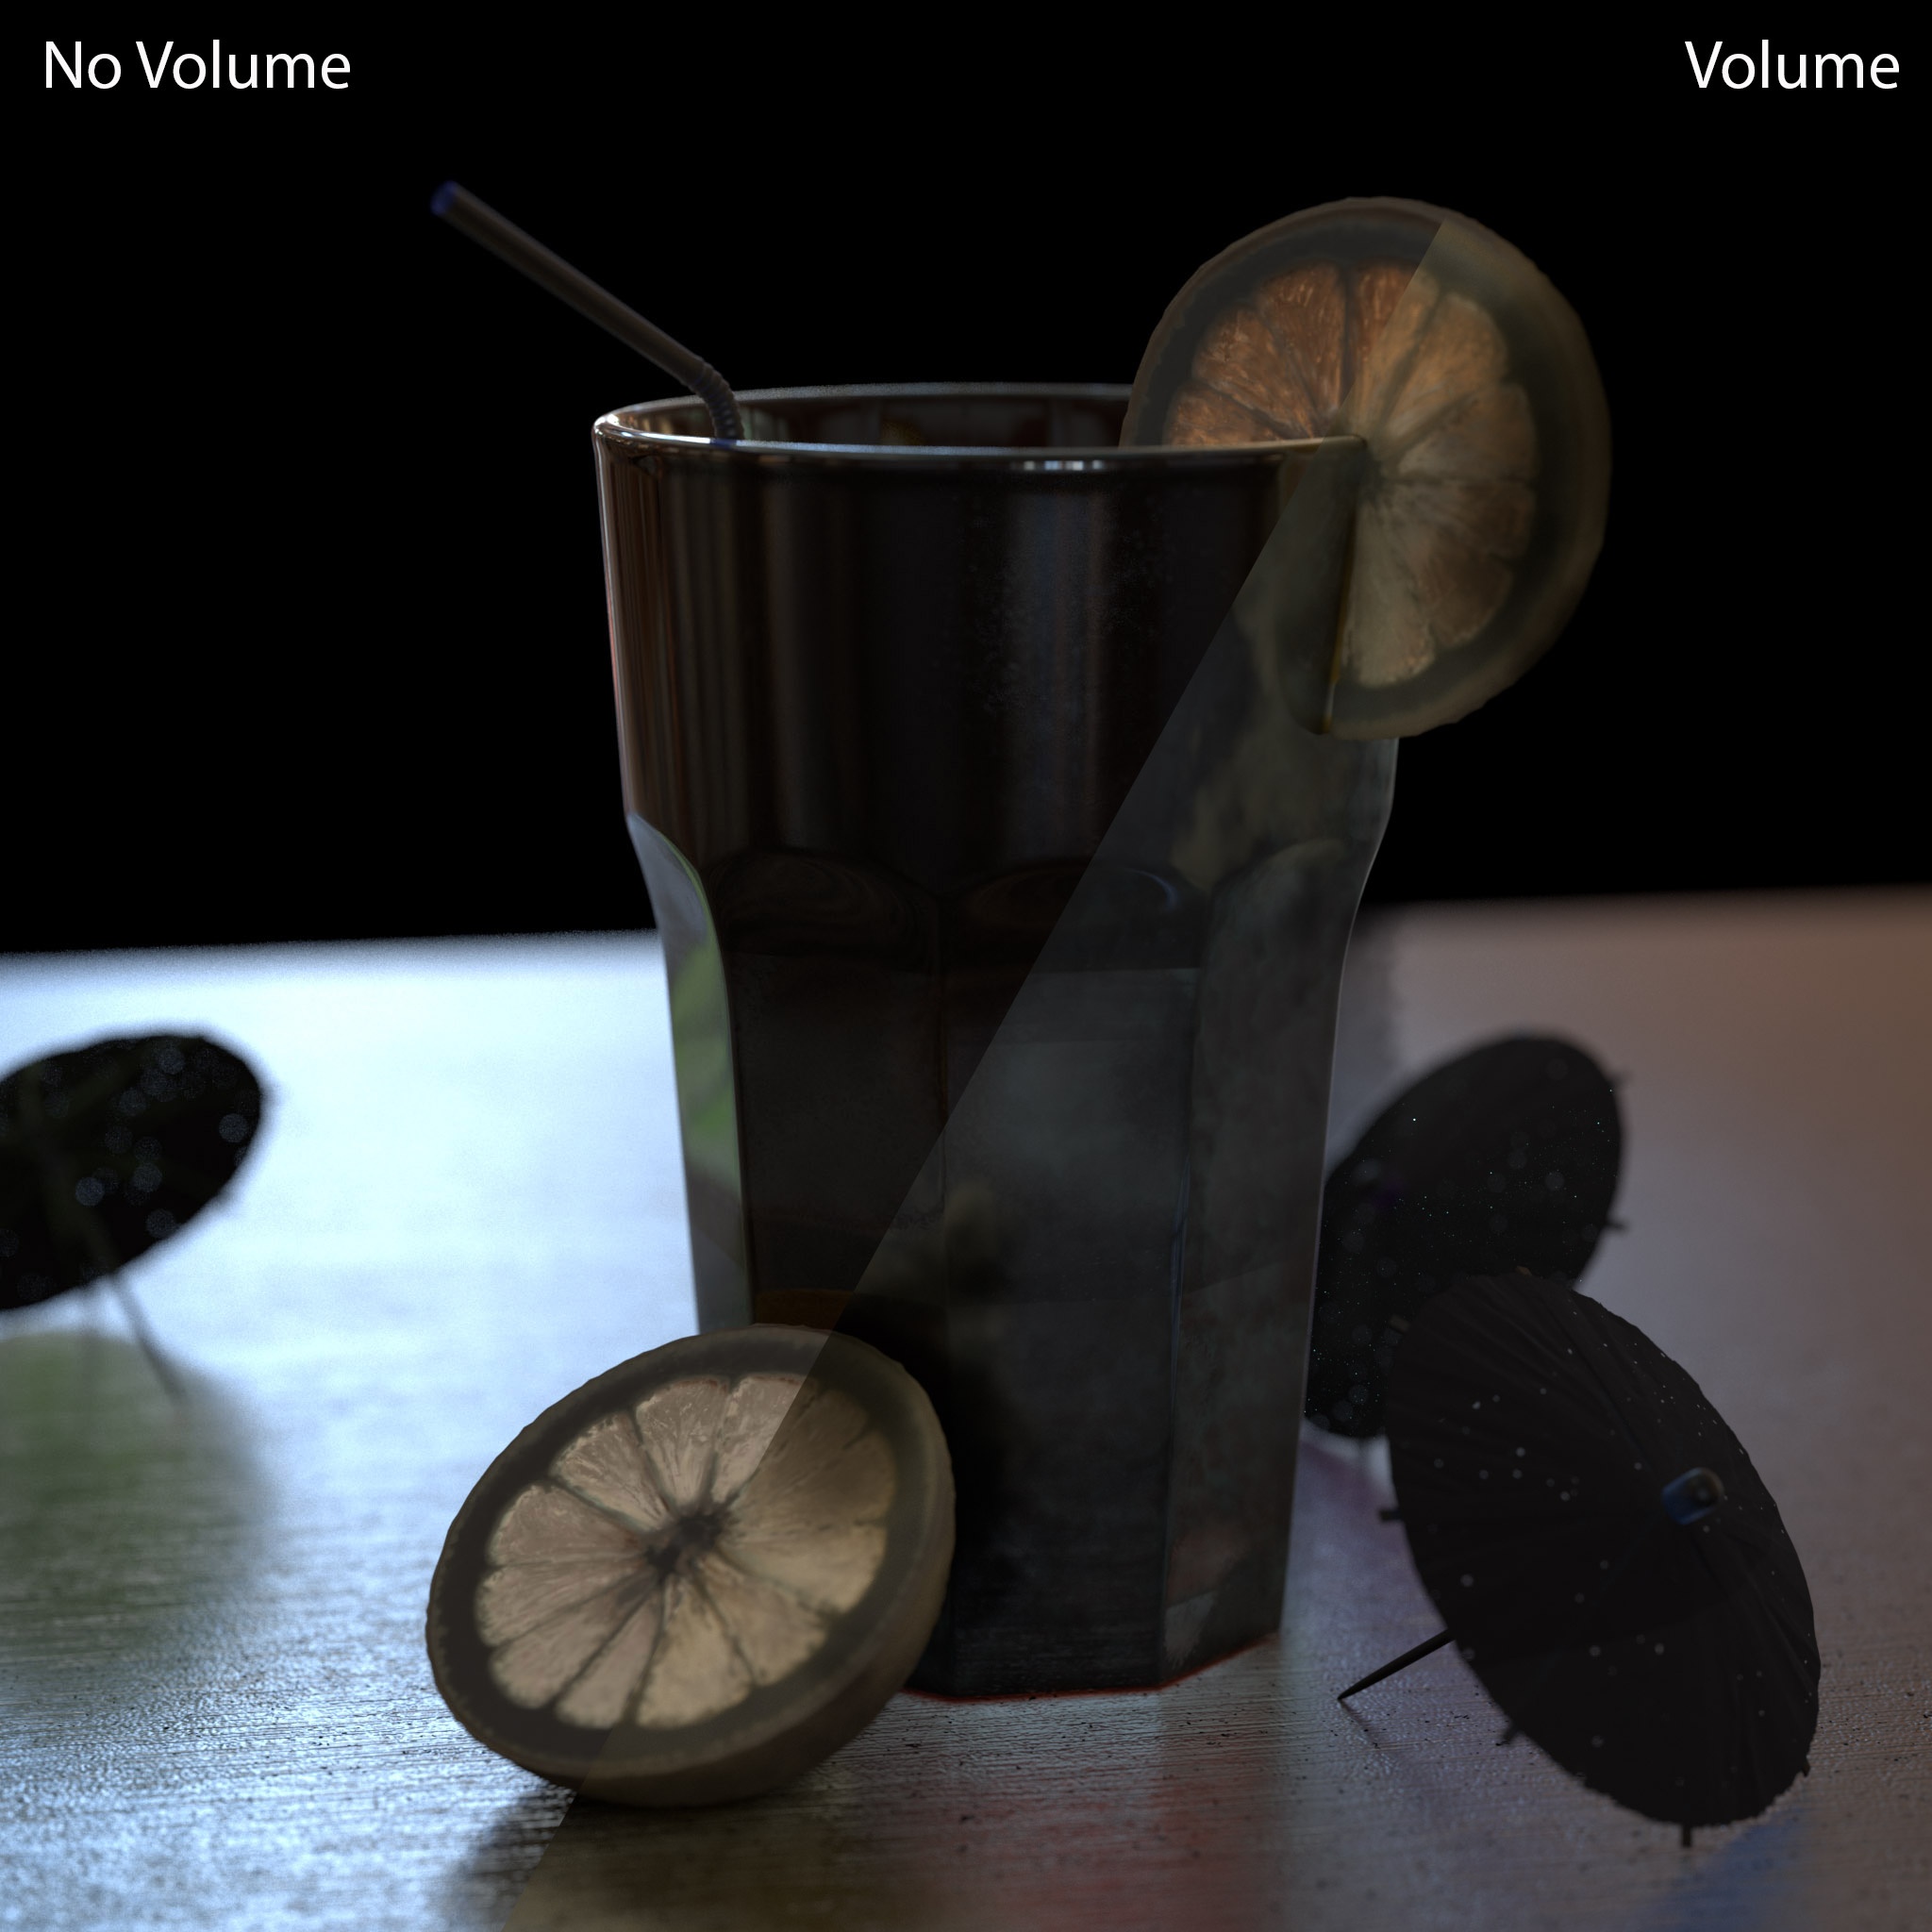
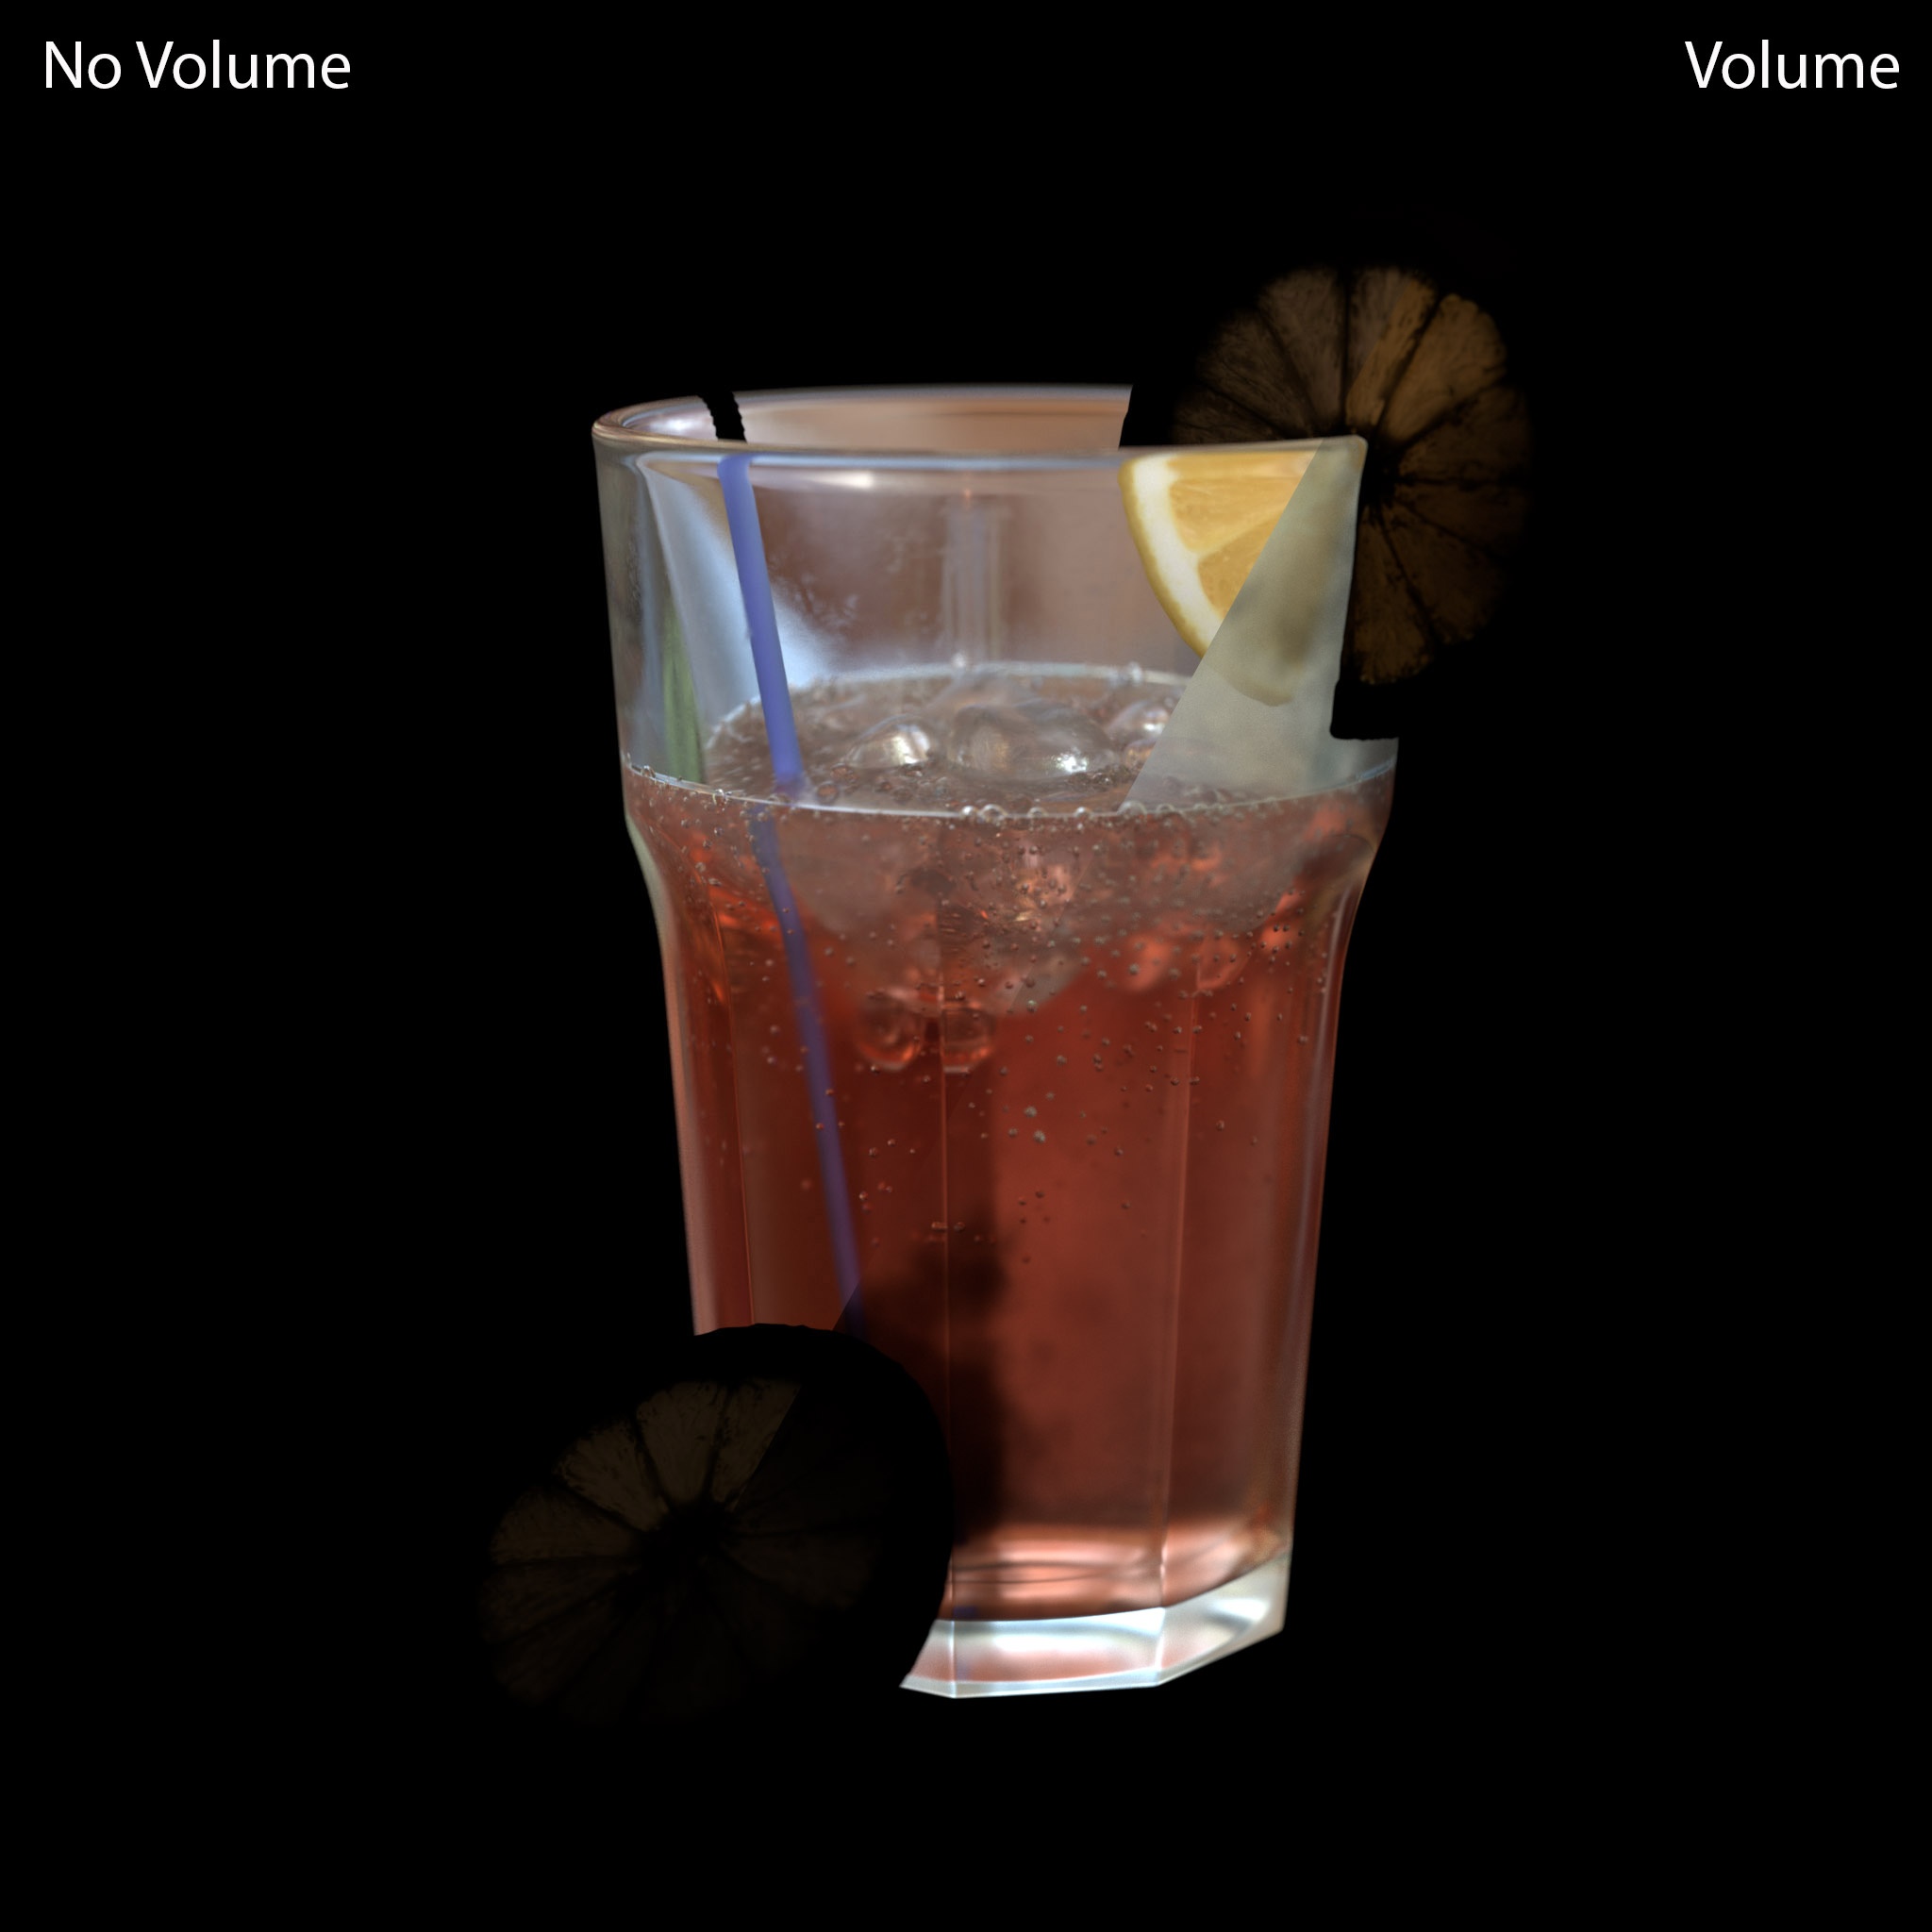
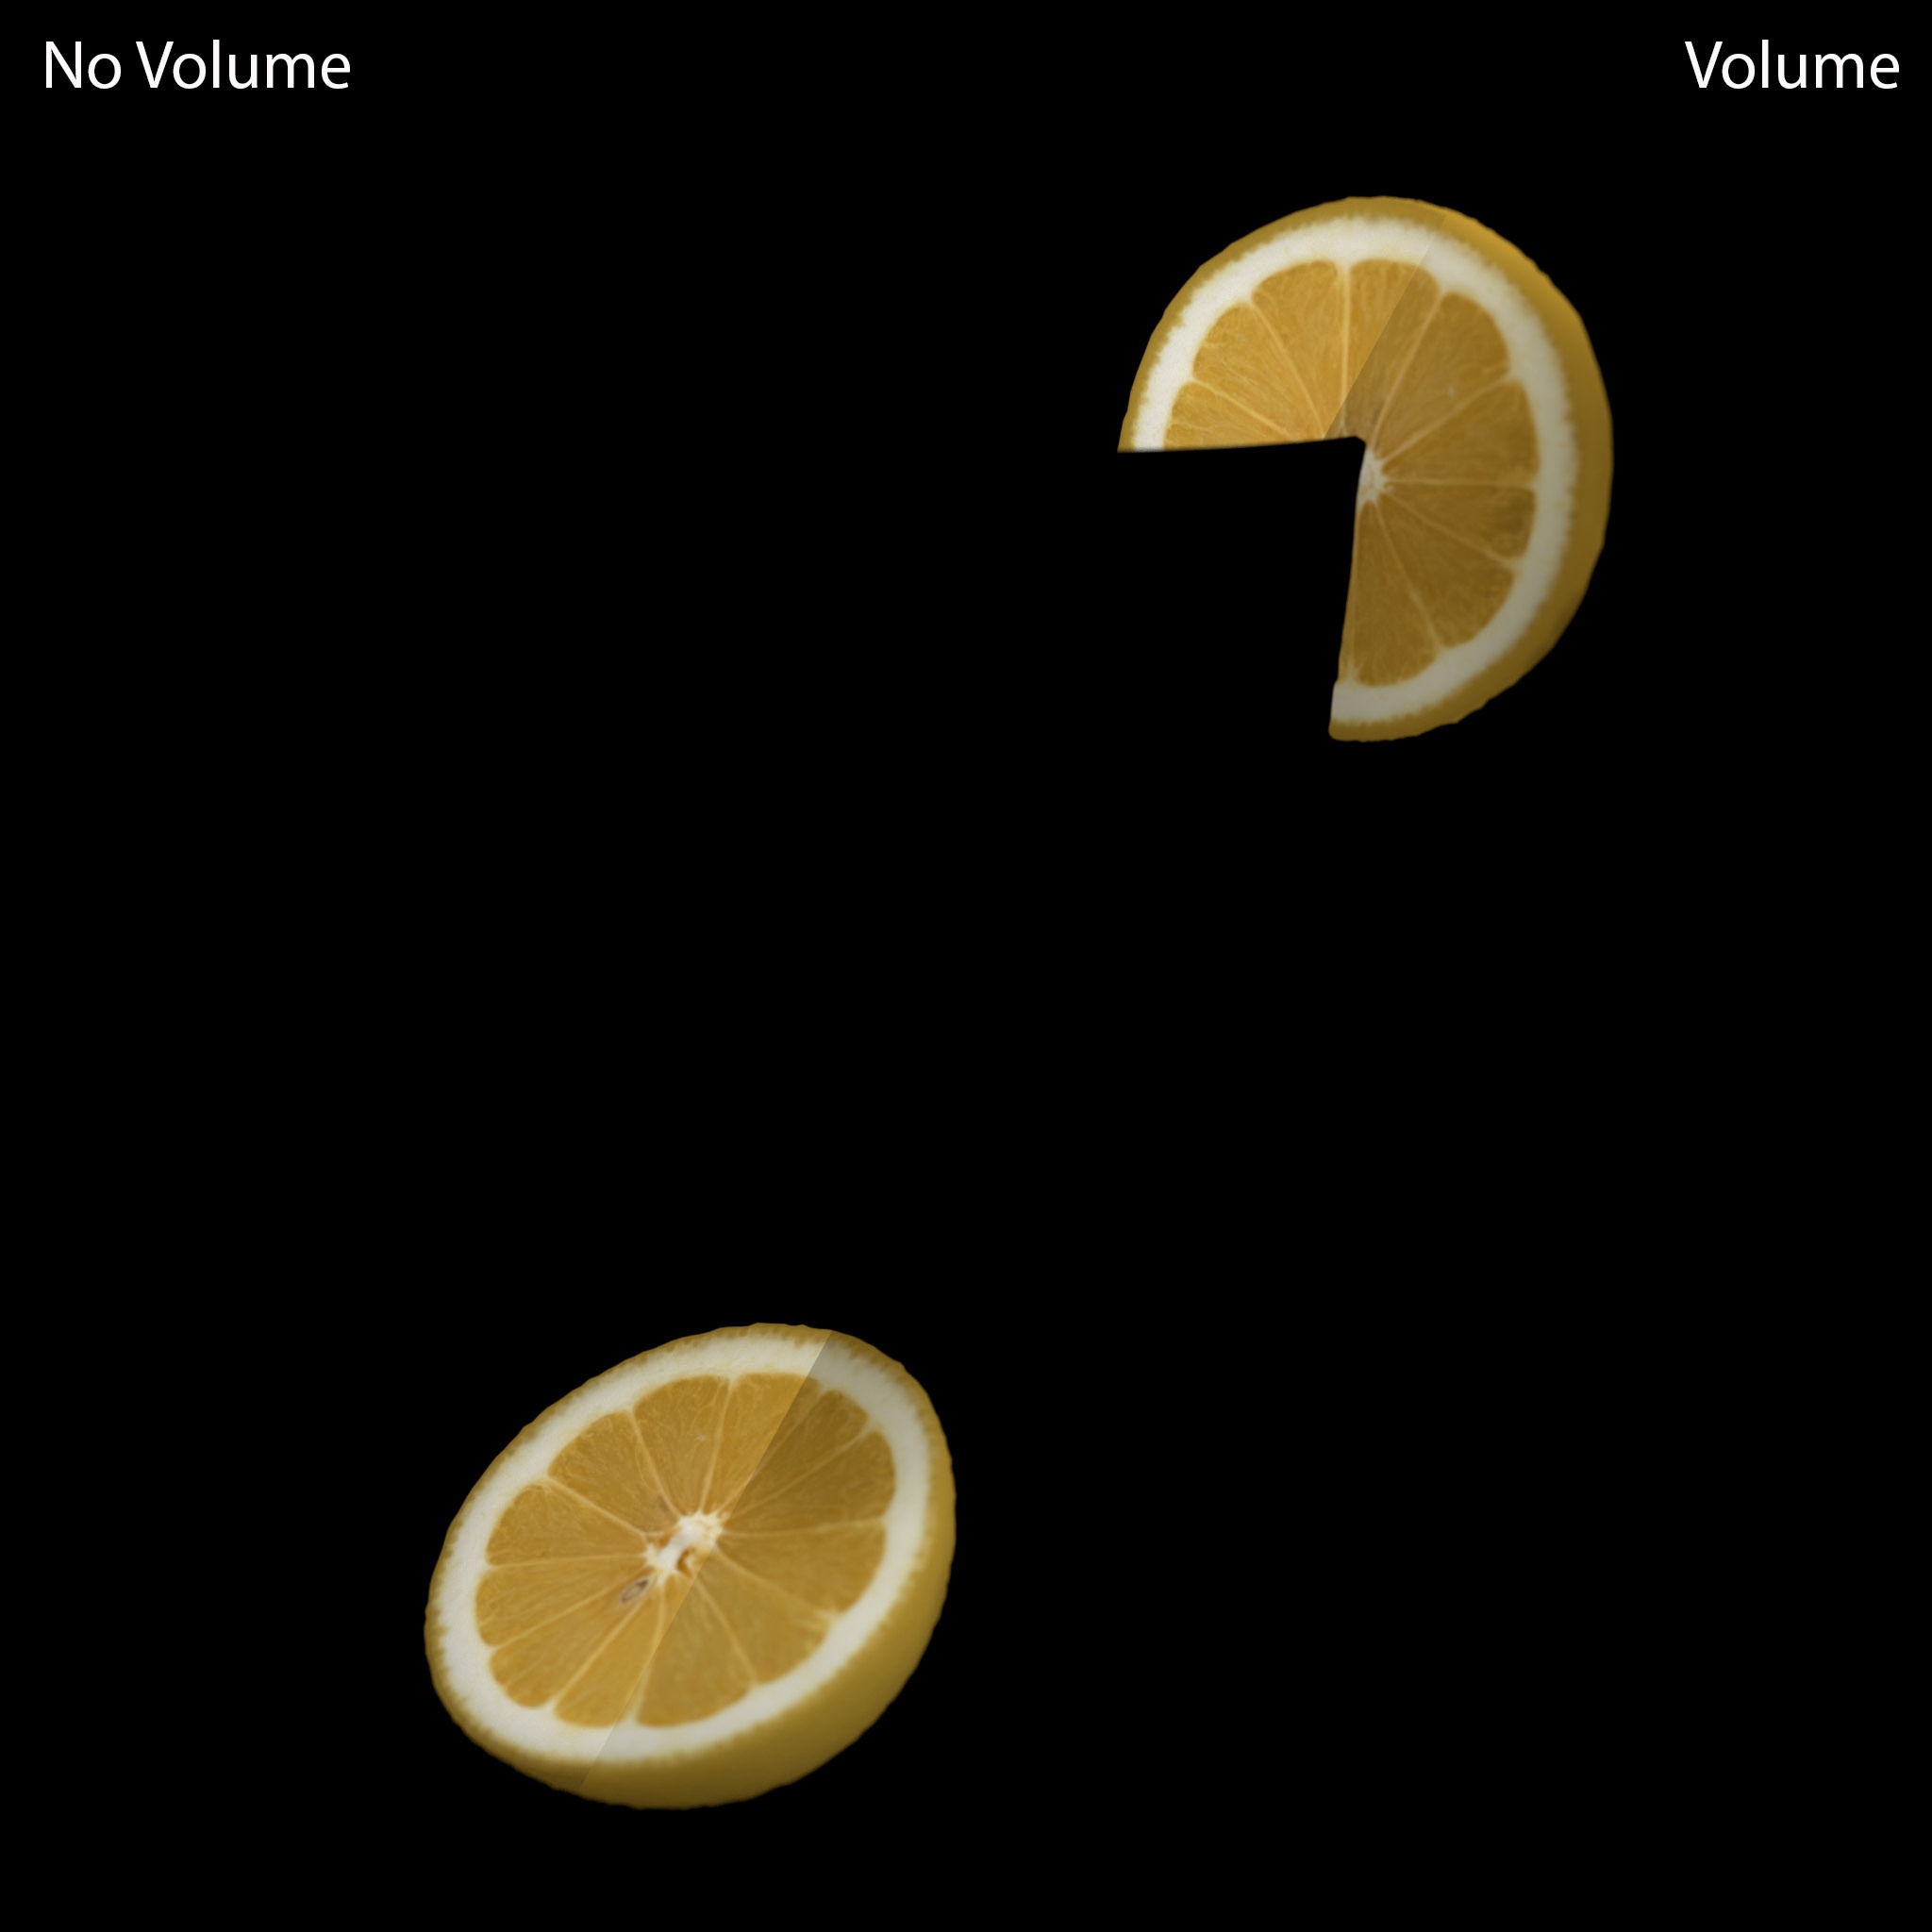
Below you can see a side by side comparison of how adding volumetrics to the scene affects the beauty and different AOVs.
|
|
|
|
| Beauty compare | Diffuse Lighting compare | Reflection Compare |
|
|
|
|
|
|
|
|
| Refraction compare | SSS compare | GI compare |
How to use:
Multiply the primary AOV composite by the Volume Fog Tint AOV.
This step must be taken before adding the Volume Lighting AOV and Volume Fog Emission AOV.
Add the Volume Lighting AOV to the primary AOV composite.
Add the Volume Fog Emission AOV to the primary AOV composite.
Background
Background AOV
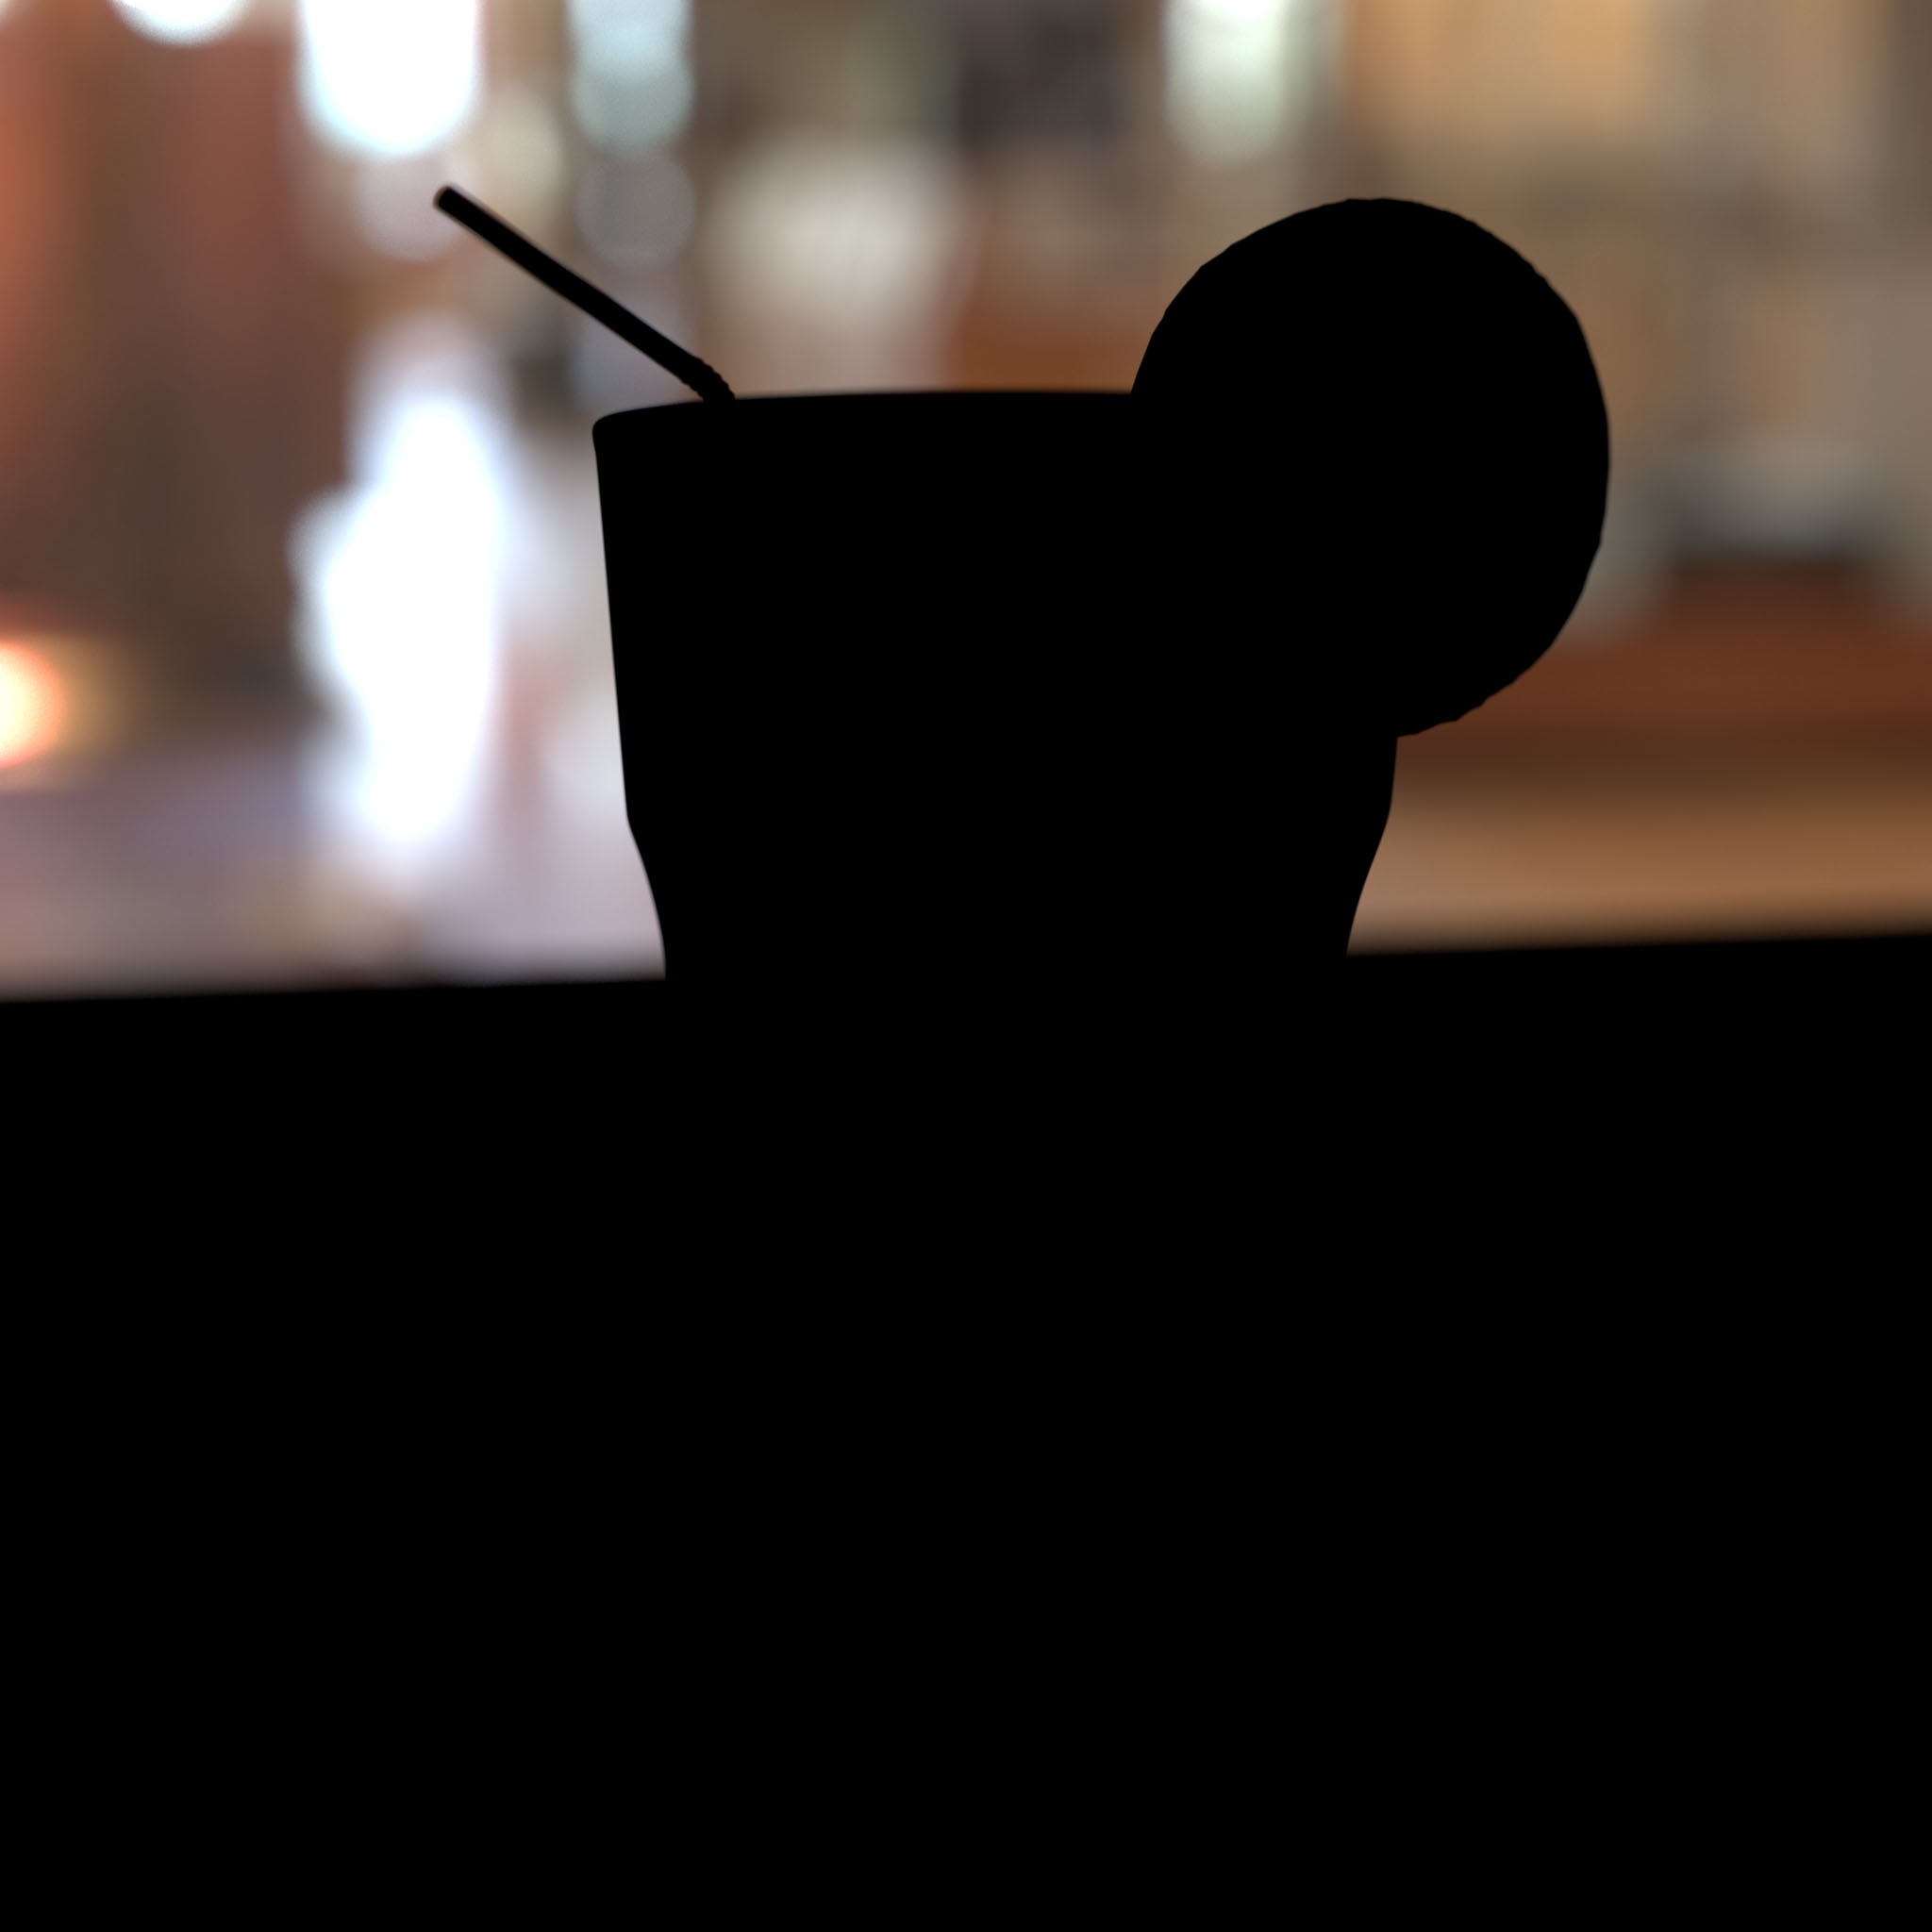
The Background AOV contains the backplate and background component from things like a Redshift Environment shader or Domelight.
In the example above an environment shader is used.
How to use:
Add the Background AOV to the primary AOV composite.
Compositing Standard AOVs
Nuke
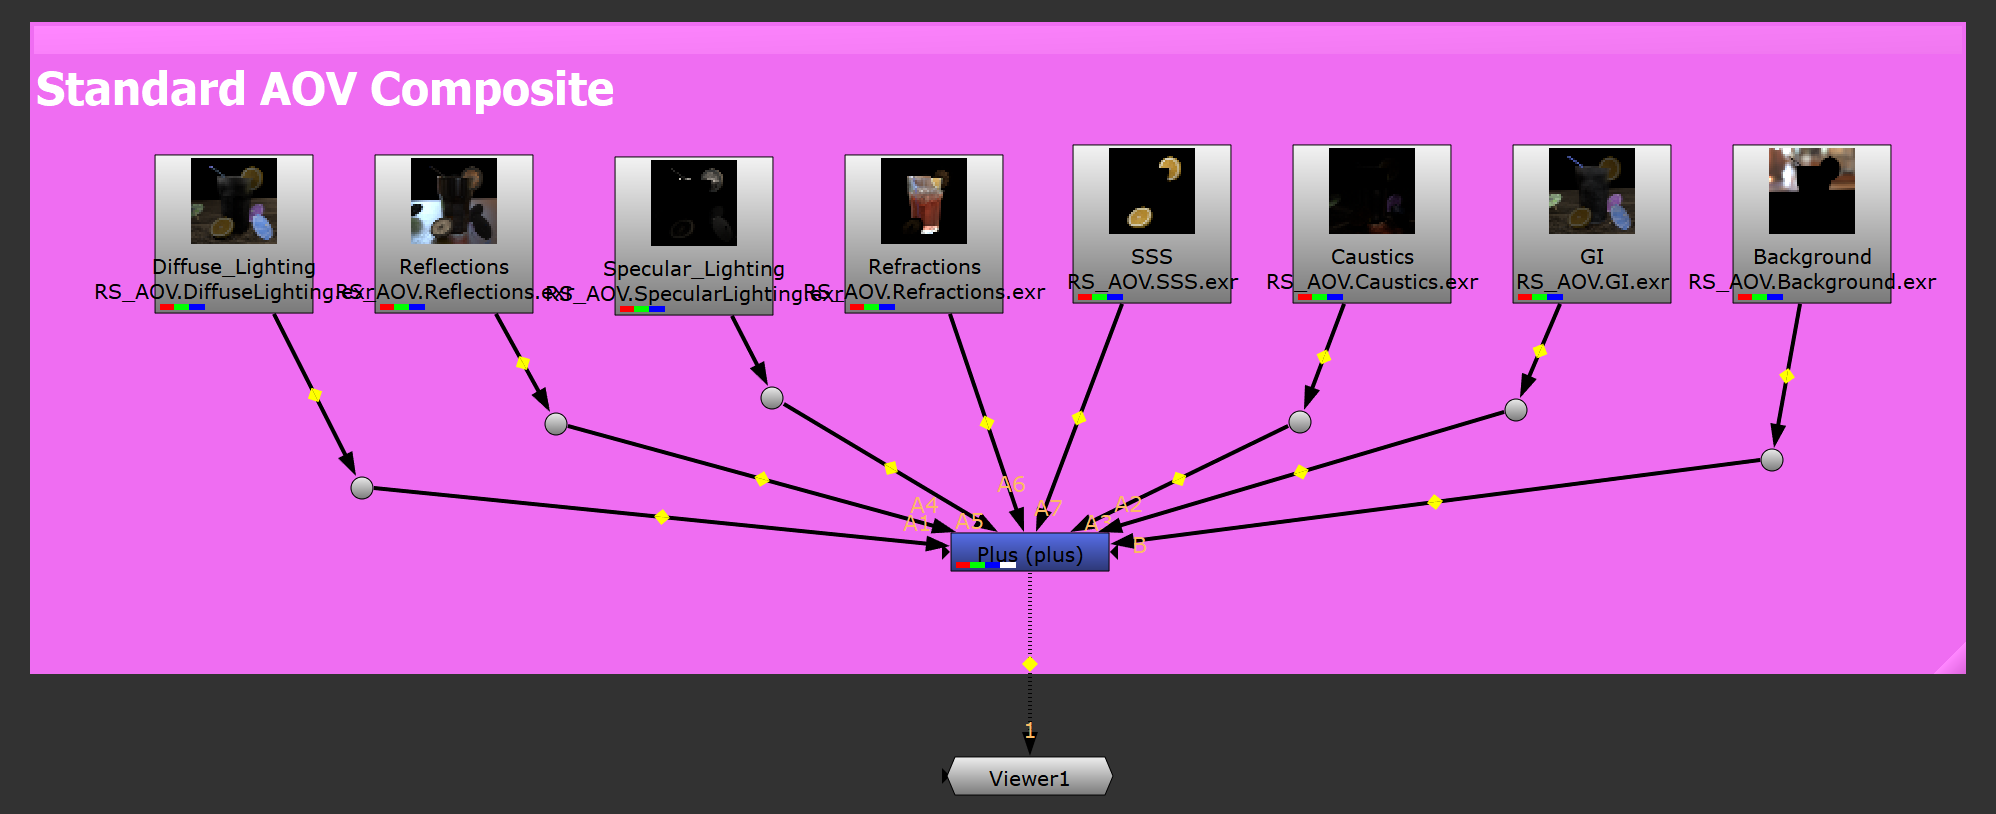
A basic example of how to composite the standard shading component AOV's in Nuke, all layers are added together using a "Plus" node
After Effects
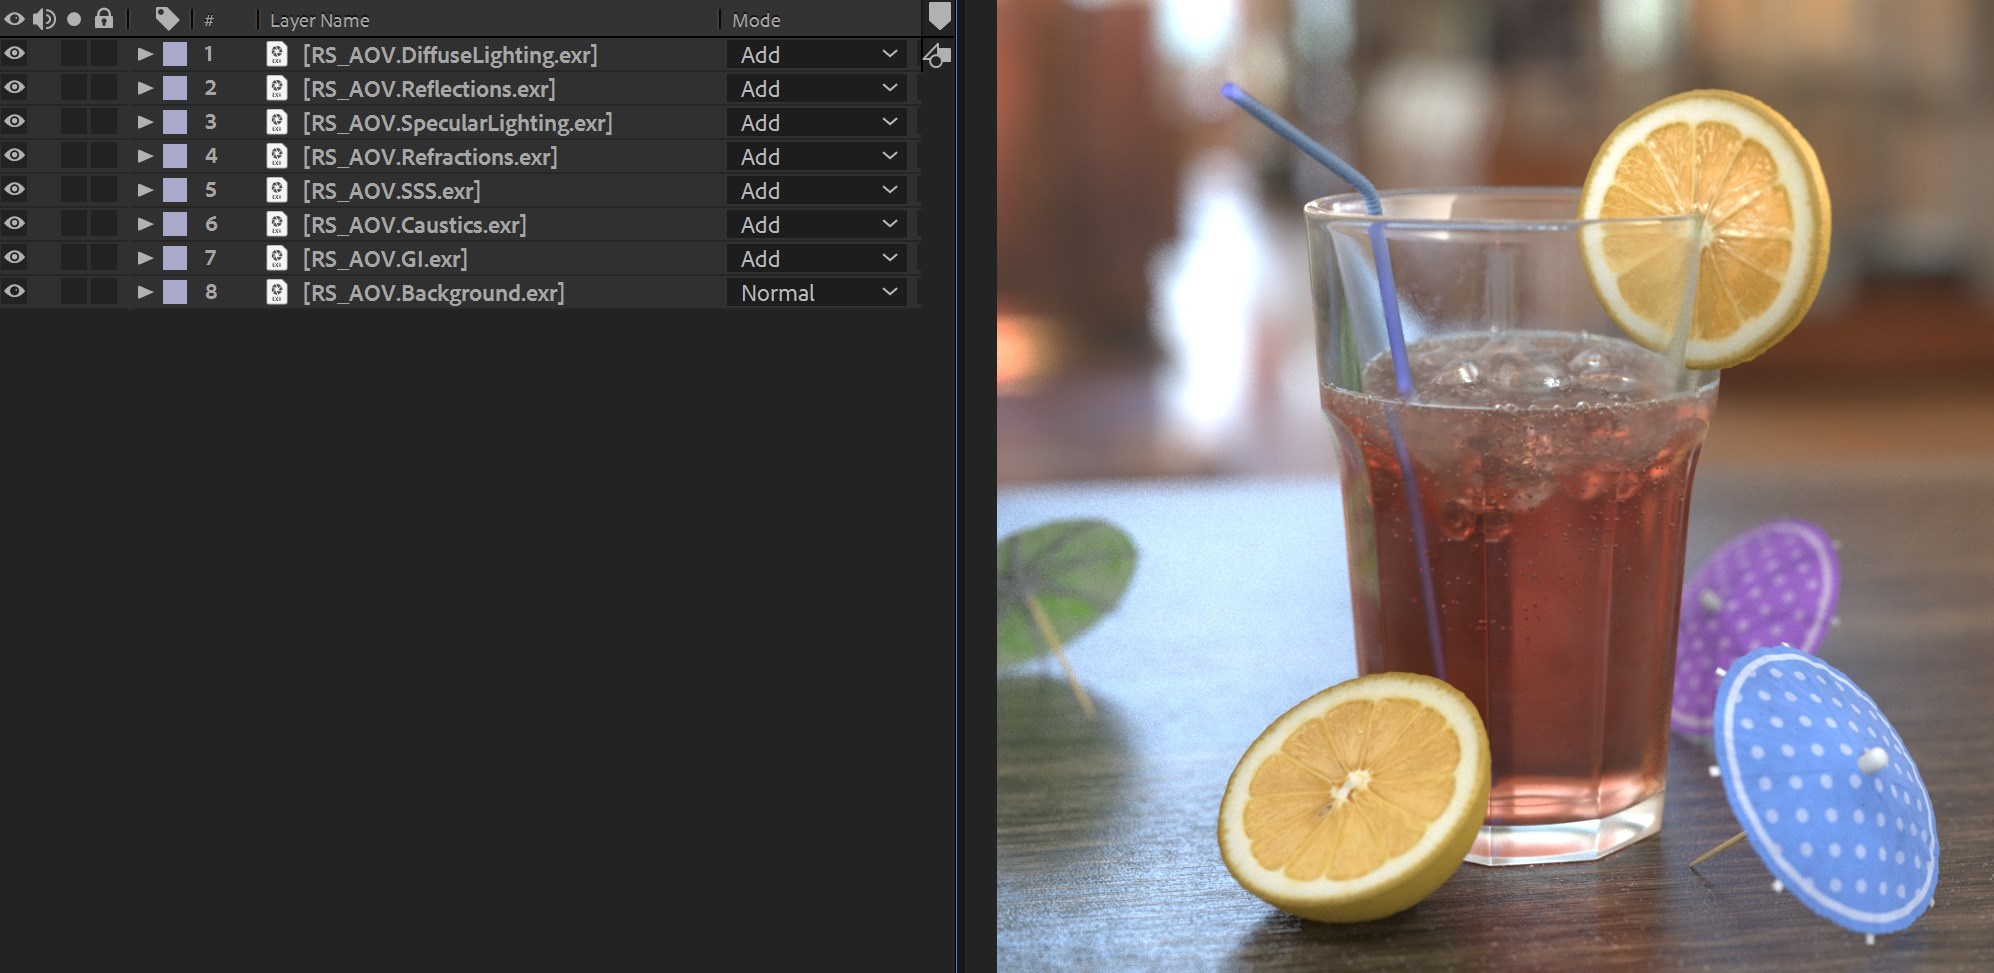
A basic example of how to composite the standard shading component AOV's in After Effects, all layers use blending mode: "Add"
Fusion
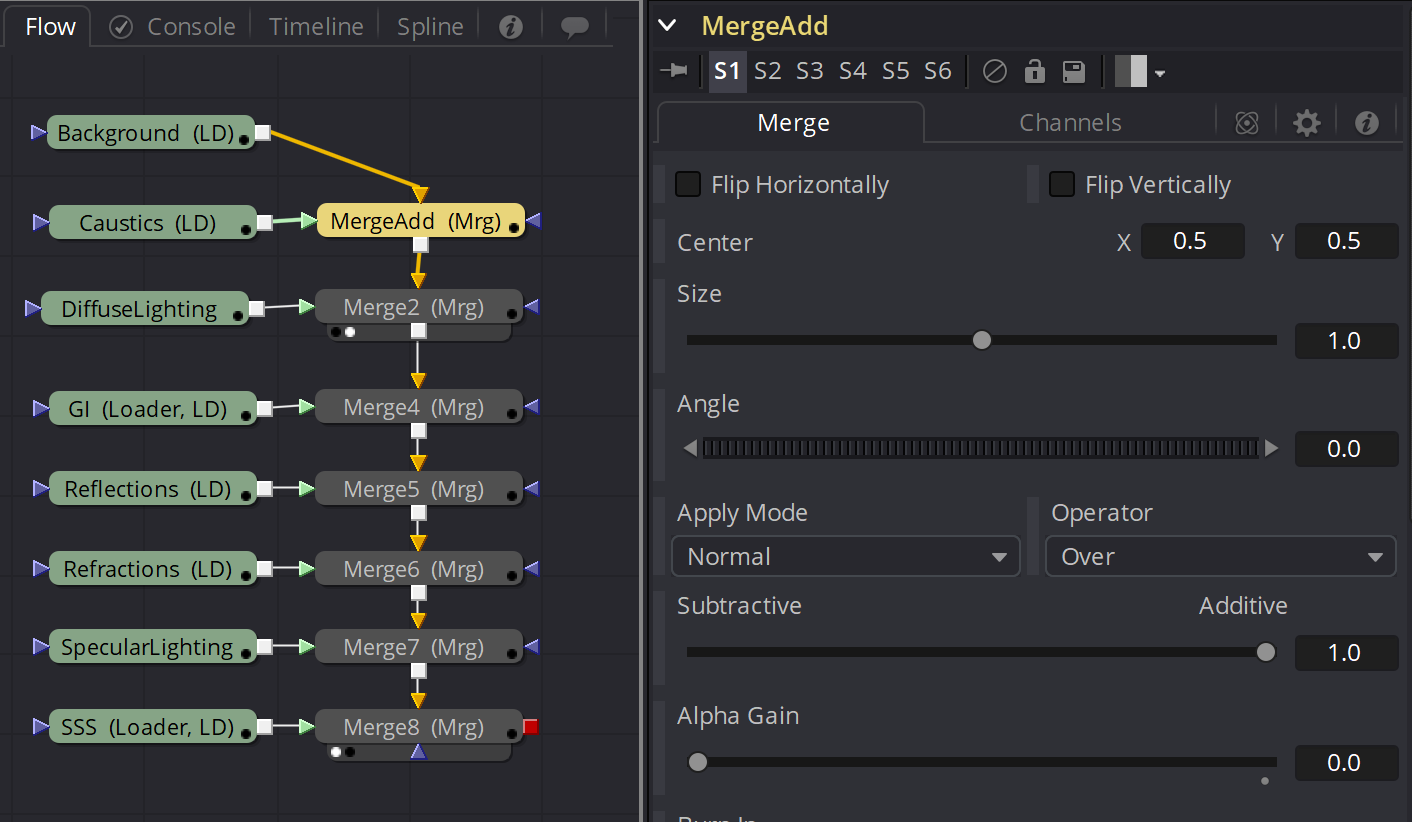
A basic example of compositing standard shading AOV's in Fusion, all image loaders are added together with a Merge node with "alpha gain" set to 0
Raw Shading Elements
Diffuse Filter & Diffuse Lighting Raw
|
|
|
| Diffuse Filter AOV | Diffuse Lighting Raw AOV |
The Diffuse Filter AOV contains only the diffuse color contents of a shader without any lighting contribution. Any material that performs diffuse lighting typically has a diffuse color port which can be textured, set to a constant color, or connected to an elaborate shading graph. The diffuse filter AOV in conjunction with 'raw' lighting AOVs allows the user to tweak the lighting results separately from each material's diffuse color.
The picture above shows the diffuse color of each object. Notice that the the objects are not purely diffuse but actually have a bit of reflection on their silhouettes (Fresnel effect). For this reason, the diffuse component is a bit dimmer around their silhouettes since reflection 'takes away energy' from diffuse lighting.
How to use:
Multiply the Diffuse Filter AOV by the Diffuse Lighting Raw AOV. Add the result to the rest of the primary AOV composite.
Reflection Filter & Reflection Raw
|
|
|
| Reflections Filter AOV | Reflections Raw AOV |
The Reflections Filter AOV contains only the reflection color contents of a shader without any lighting contribution. The Reflections Filter AOV in conjunction with Reflections Raw AOV allows you to tweak the reflection results separately from each material's reflection color.
How to use:
Multiply the Reflections Filter AOV by the Reflections Lighting Raw AOV.Add ;the result to the rest of the primary AOV composite.
Refractions Filter & Refractions Raw
|
|
|
| Refractions Filter AOV | Refractions Raw AOV |
The Refractions Filter AOV contains only the refraction color contents of a shader without ;any lighting contribution. The Refractions Filter AOV in conjunction with Refractions Raw AOV allows you to tweak the reflection results separately from each material's reflection color.
How to use:
Multiply the Refractions Filter AOV by the Refractions Lighting Raw AOV. Add the result to the rest of the primary AOV composite.
Subsurface Scatter Raw
Subsurface Scatter Raw AOV
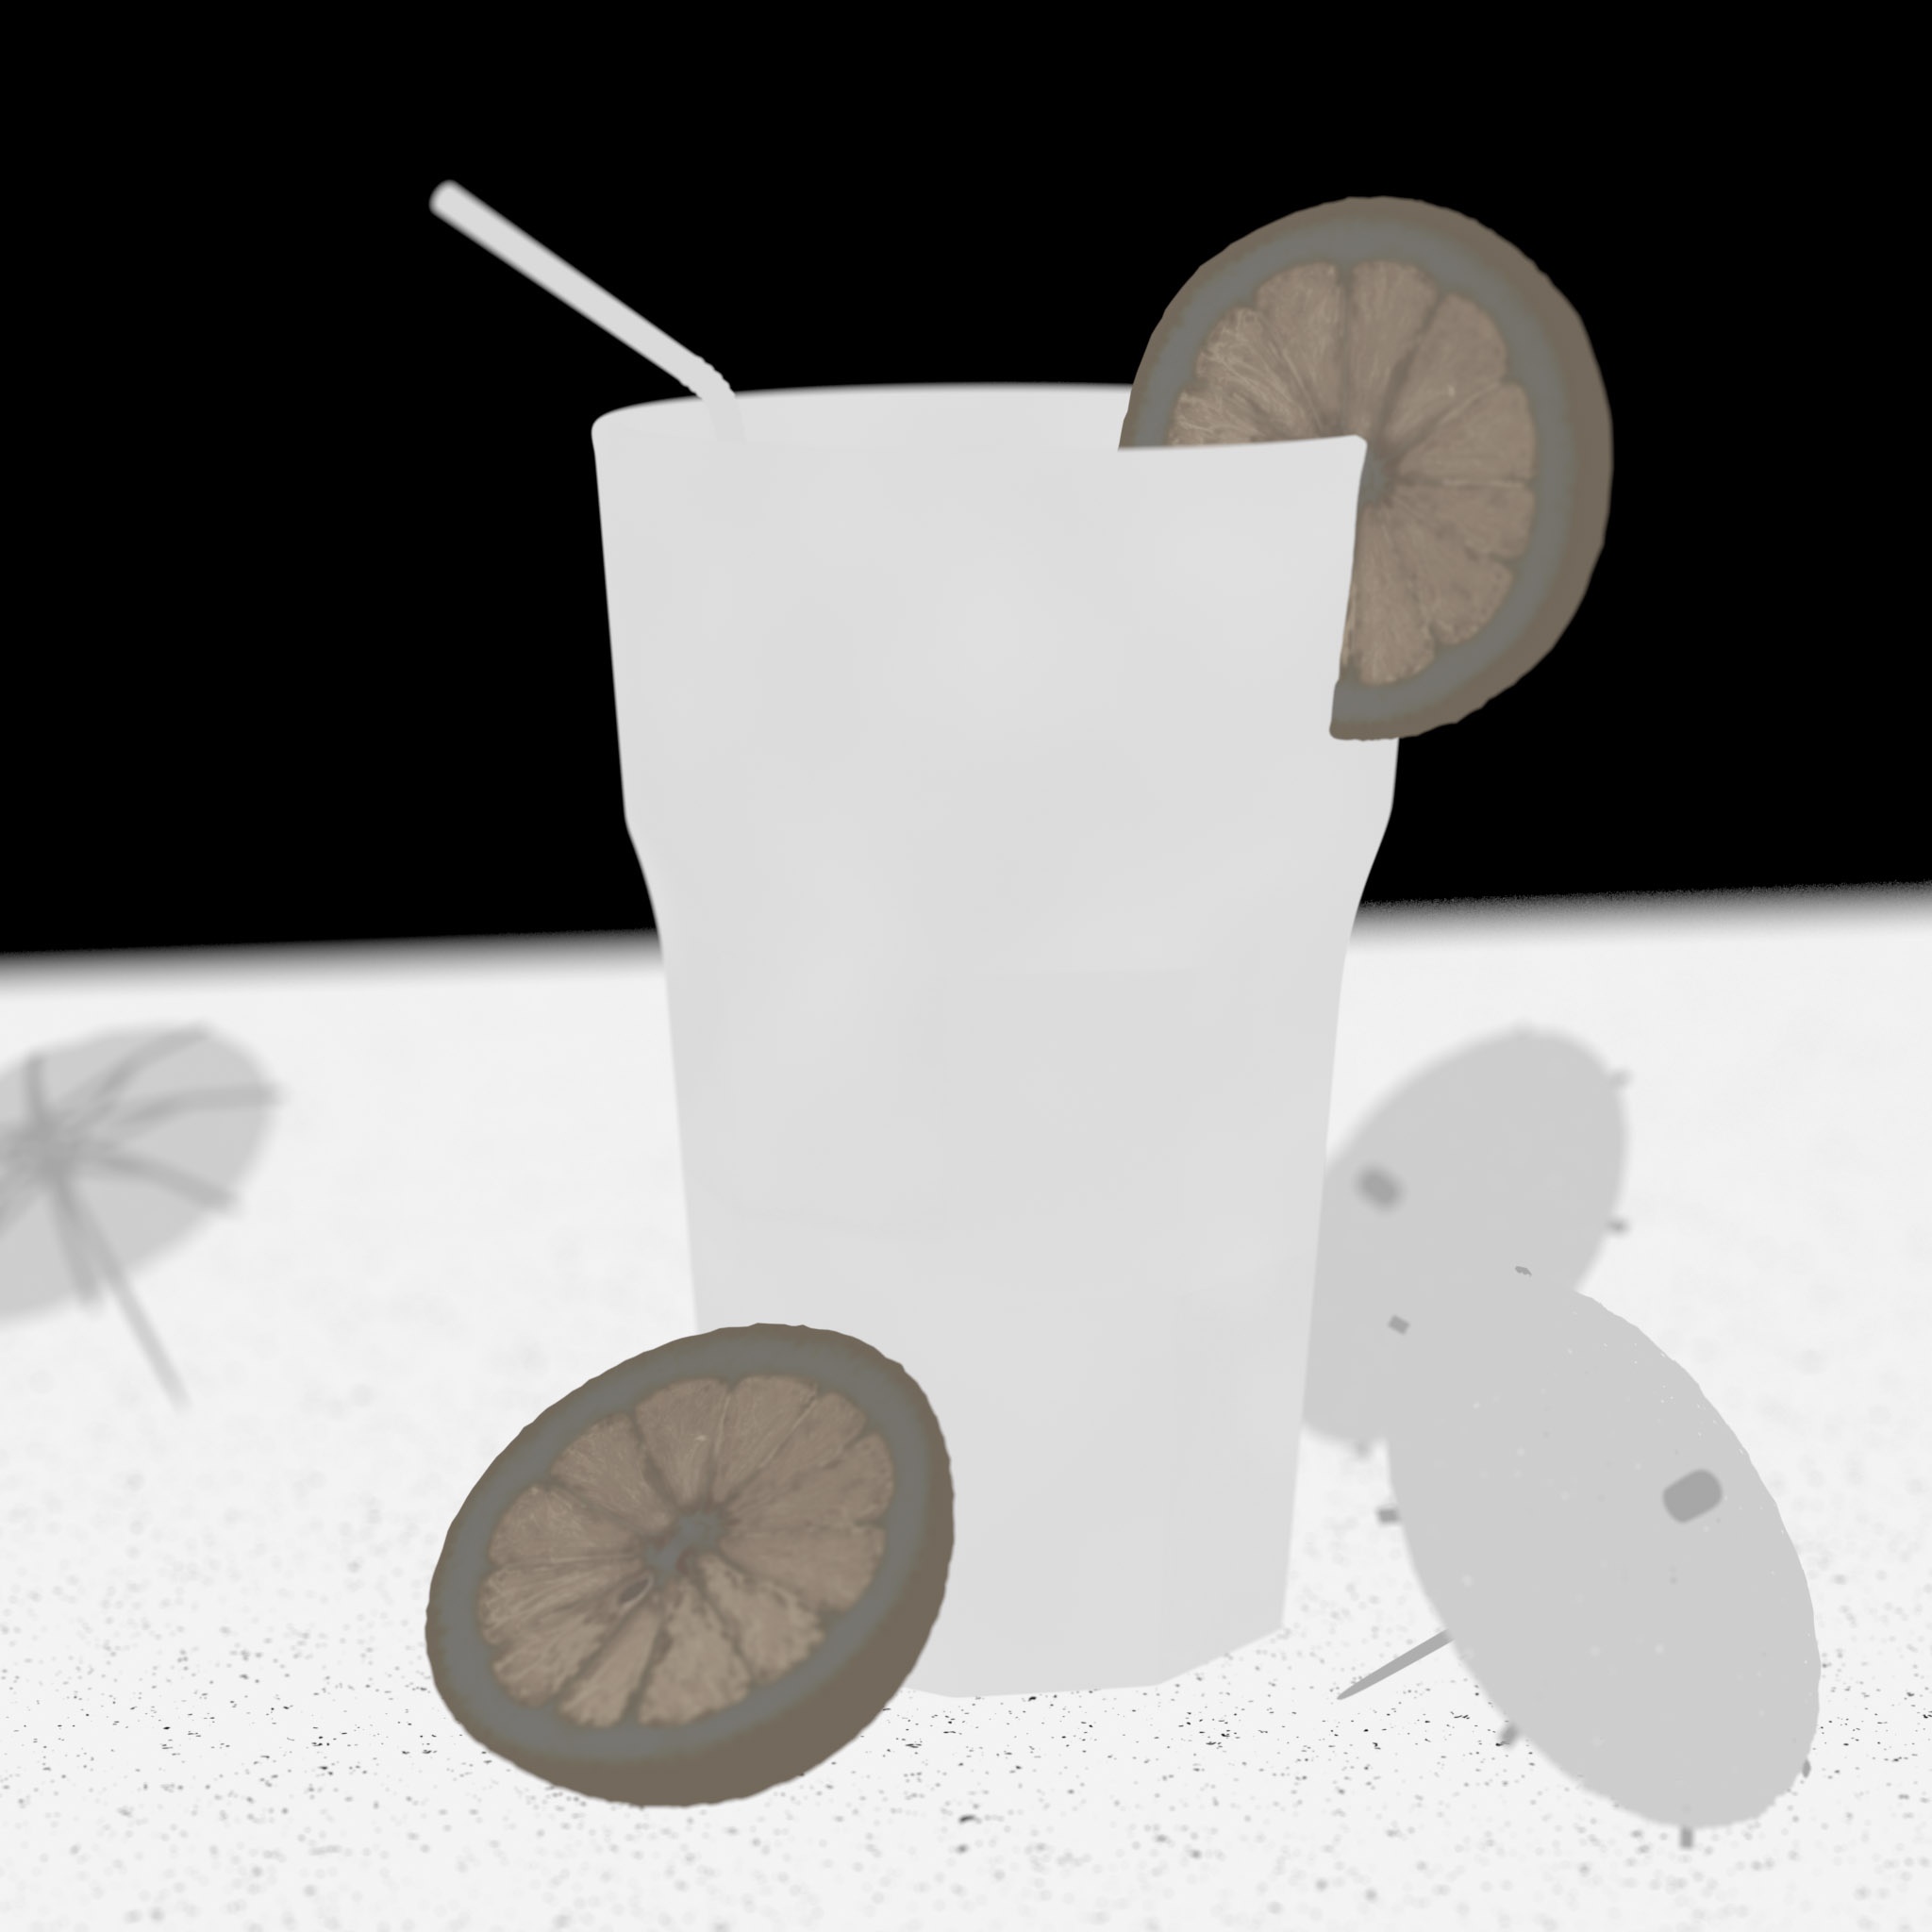
The Subsurface Scatter Raw AOV returns the result of any subsurface scattering separate from a materials diffuse color.
How to use:
Multiply the Subsurface Scatter Raw AOV by the Diffuse Filter AOV. Add the result to the rest of the primary AOV composite.
Global Illumination Raw
Global Illumination Raw AOV
The Global Illumination Raw AOV contains the indirect GI lighting component of a material's final shaded result separate from a materials diffuse color.
How to use:
Multiply the Global Illumination Raw AOV by the Diffuse Filter AOV. Add ;the result to the rest of the primary AOV composite.
Caustics Raw
Caustics Raw AOV
The Caustics Raw AOV returns the result of caustic lighting separate from a materials diffuse color.
How to use:
Multiply the Caustics Raw AOV by the Diffuse Filter AOV. Add the result to the rest of the primary AOV composite.
Translucency Filter, Translucency Lighting Raw & Translucency GI Raw
|
|
|
|
| Translucency Filter | Translucency Lighting Raw | Translucency GI Raw |
In Redshift 'translucency' refers to diffuse lighting through the back-face of a surface – i.e. 'back-lighting'. It is a cheap, fake version of sub-surface scattering that is useful for very thin, but translucent, objects like paper or leaves. In order to complete the lighting equation in comp, Redshift offers three AOVs for translucency that become necessary when compositing with 'raw' lighting AOVs.
The Translucency Filter AOV contains only the flat translucency color component of the final shaded result. The Translucency Lighting Raw AOV contains only the diffuse translucency lighting component of the final shaded result. The Translucency GI Raw AOV contains only the translucency GI result of the final shaded result.
How to use:
Add the Translucency Lighting Raw and the Translucency GI Raw together. Multiply the result by the Translucency Filter AOV. Add this result to the rest of the primary AOV composite.
Compositing Raw AOVs
Nuke
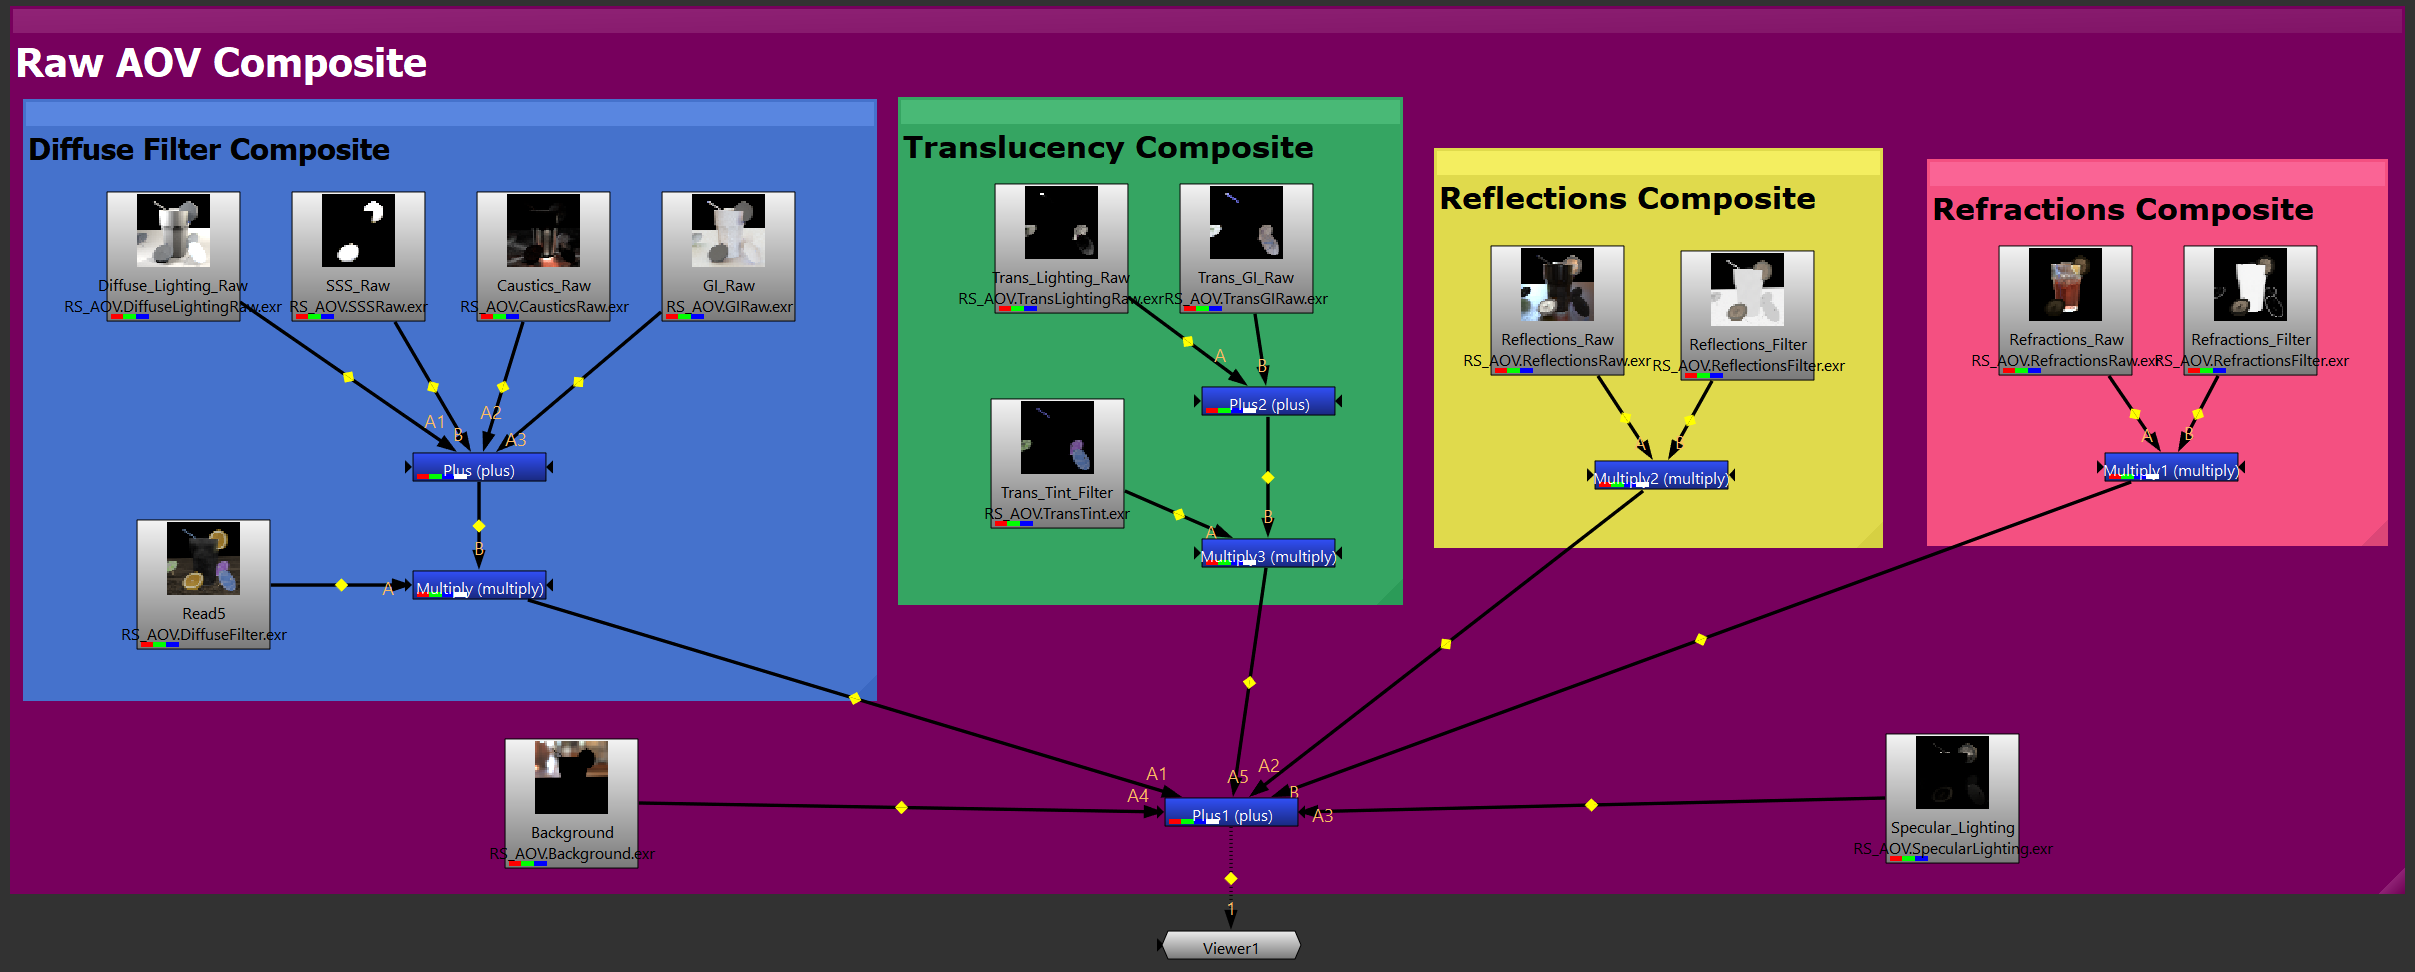
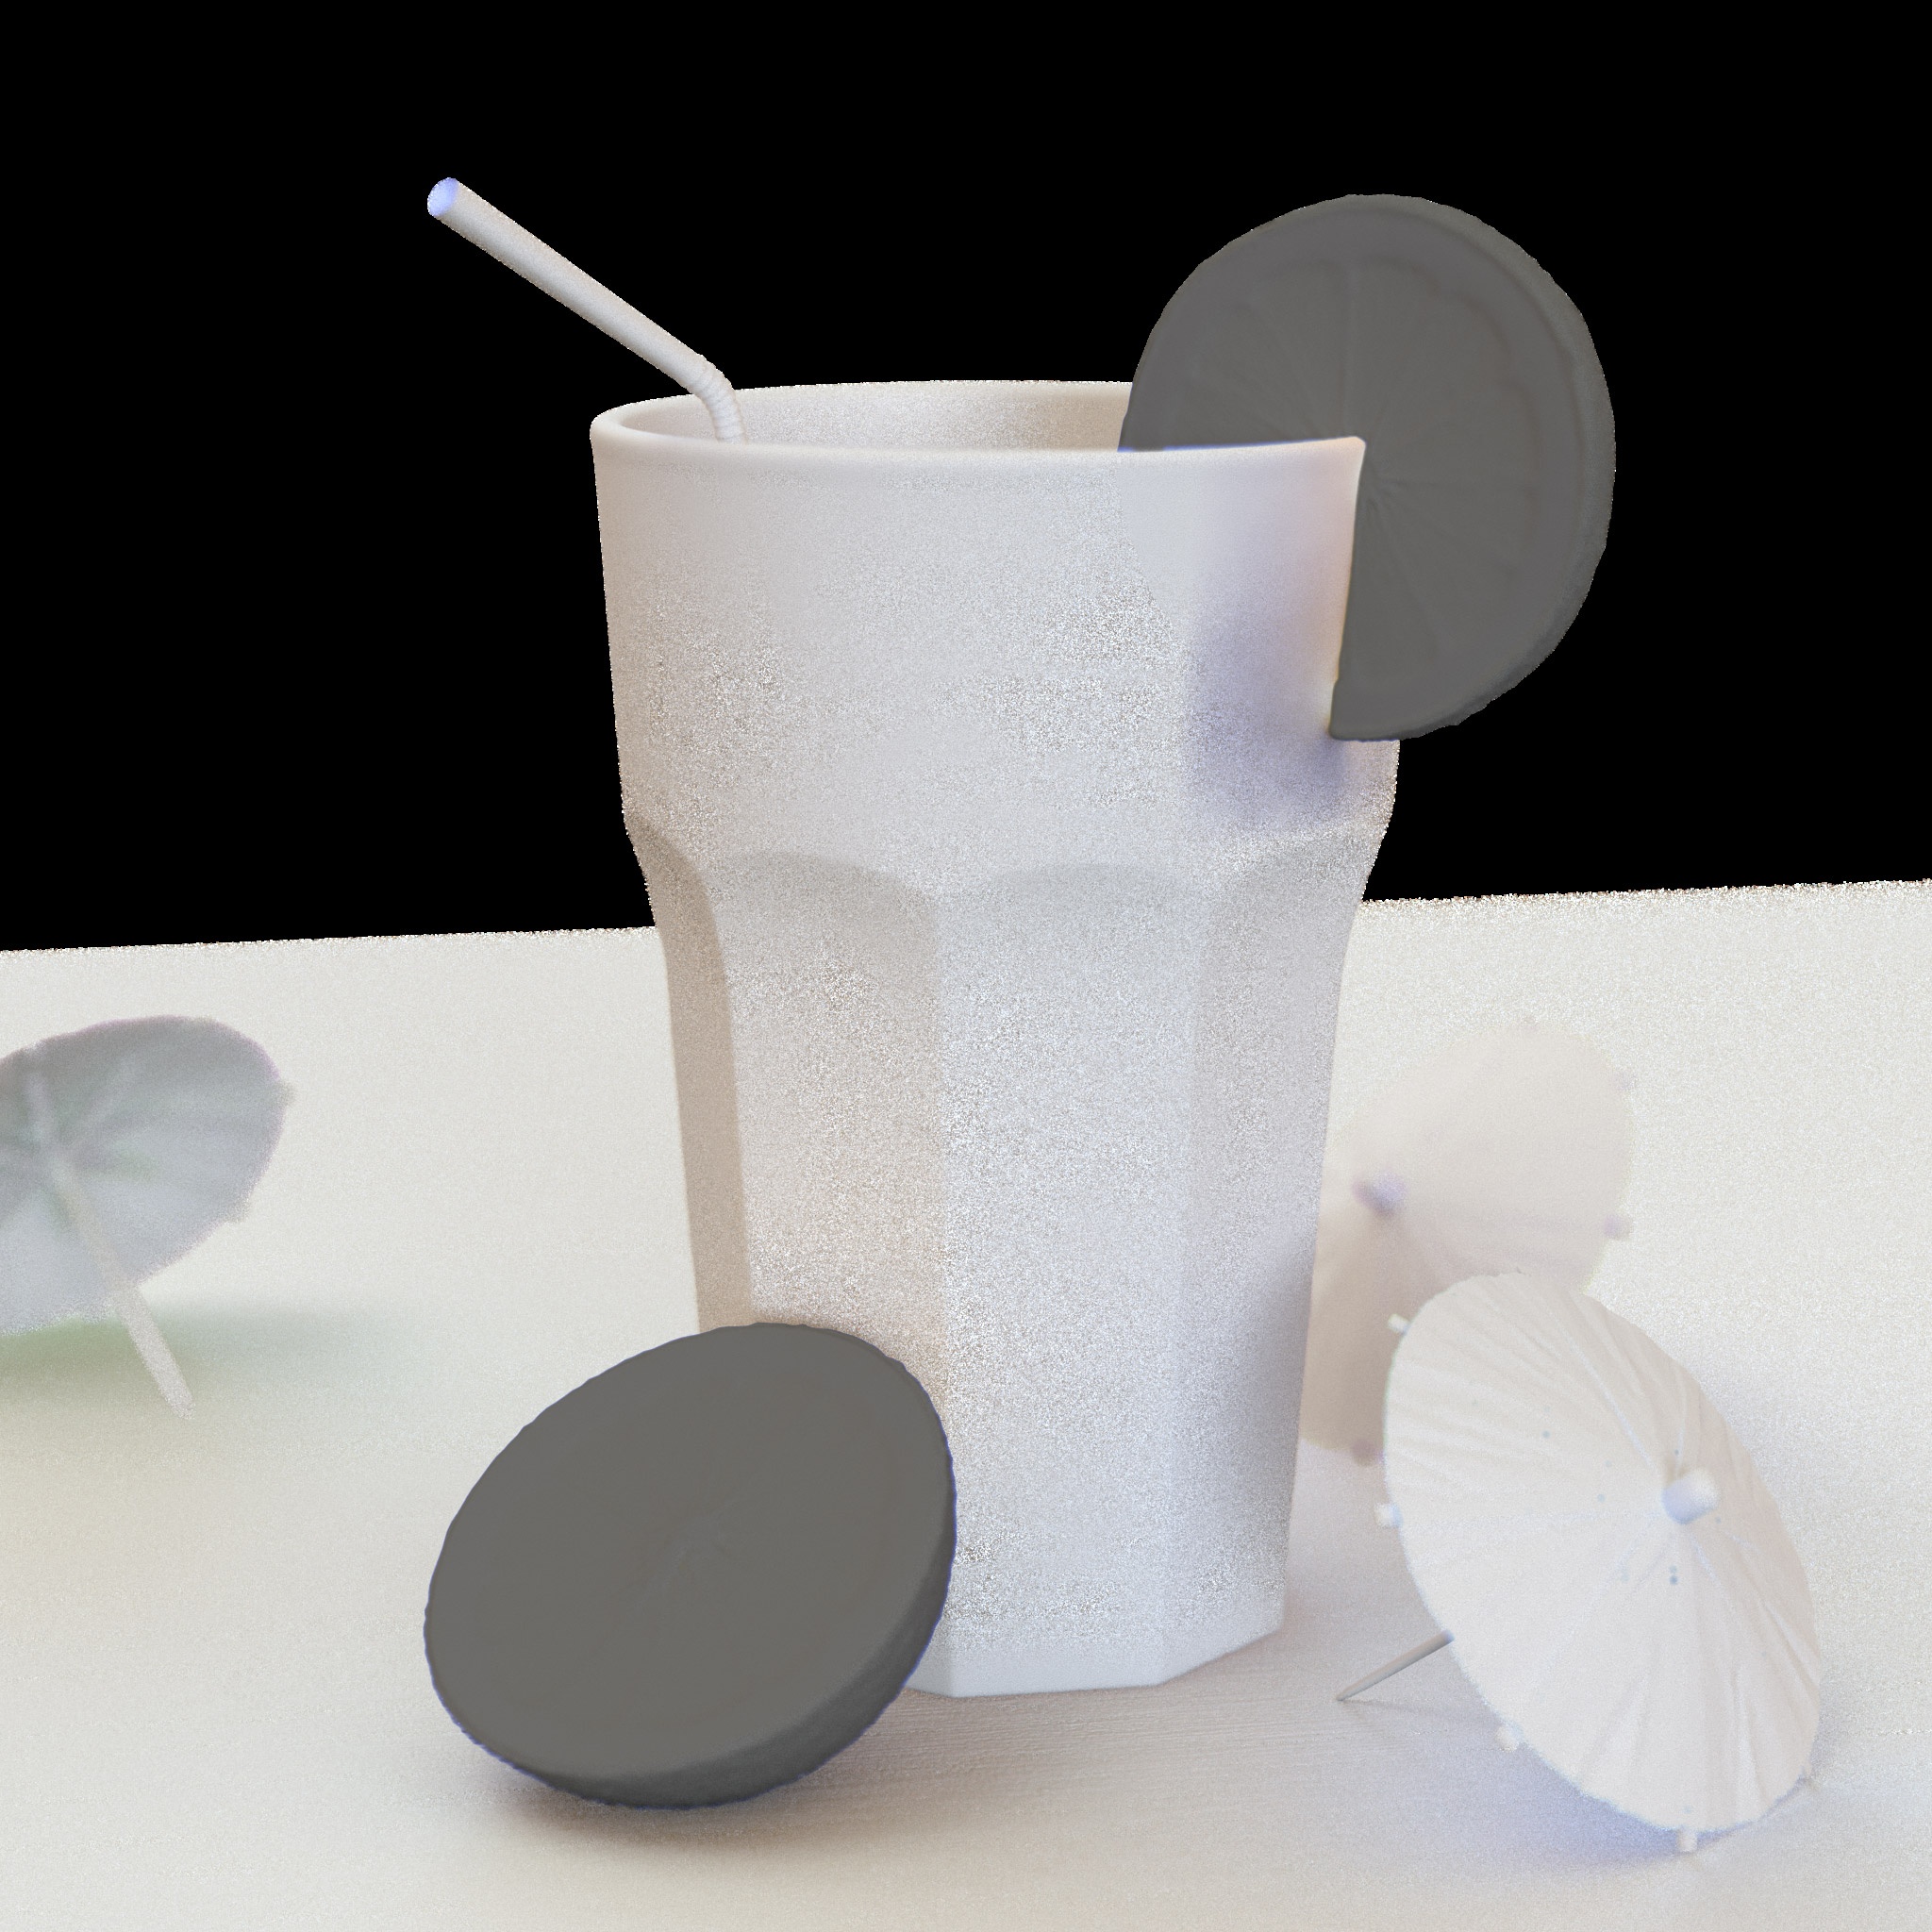
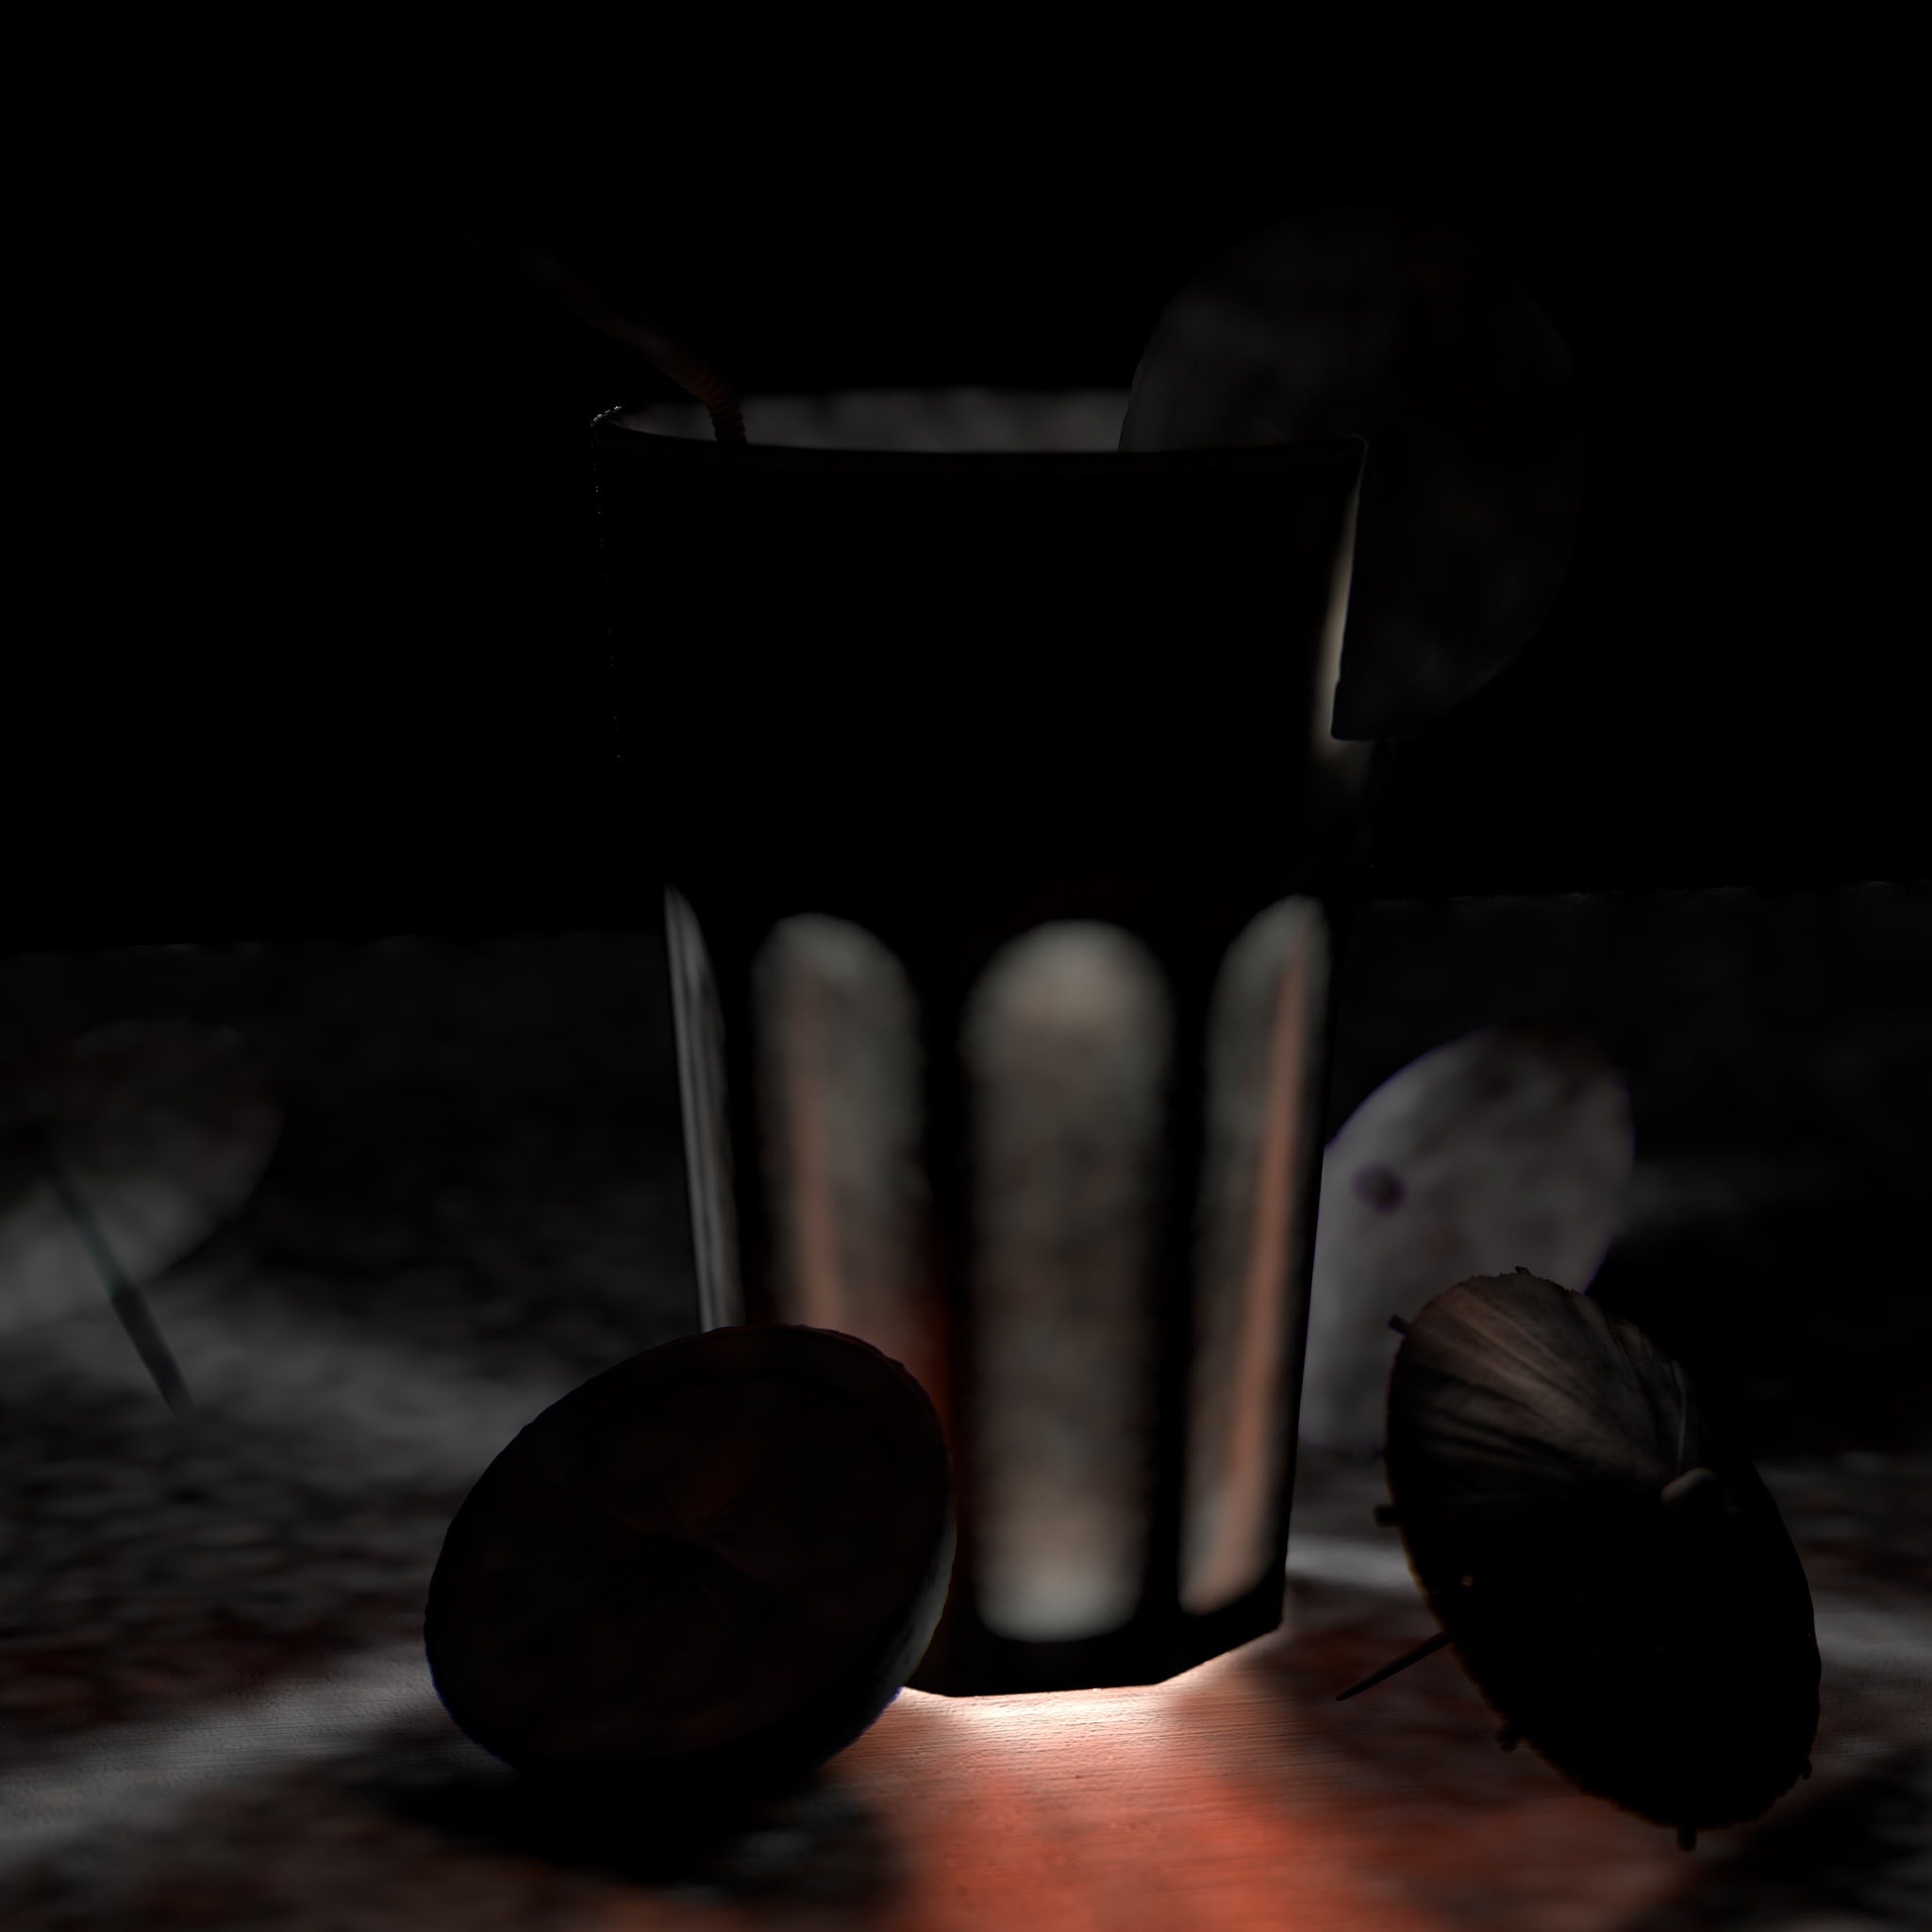
A basic example of how to composite the raw shading component AOV's in Nuke
After Effects
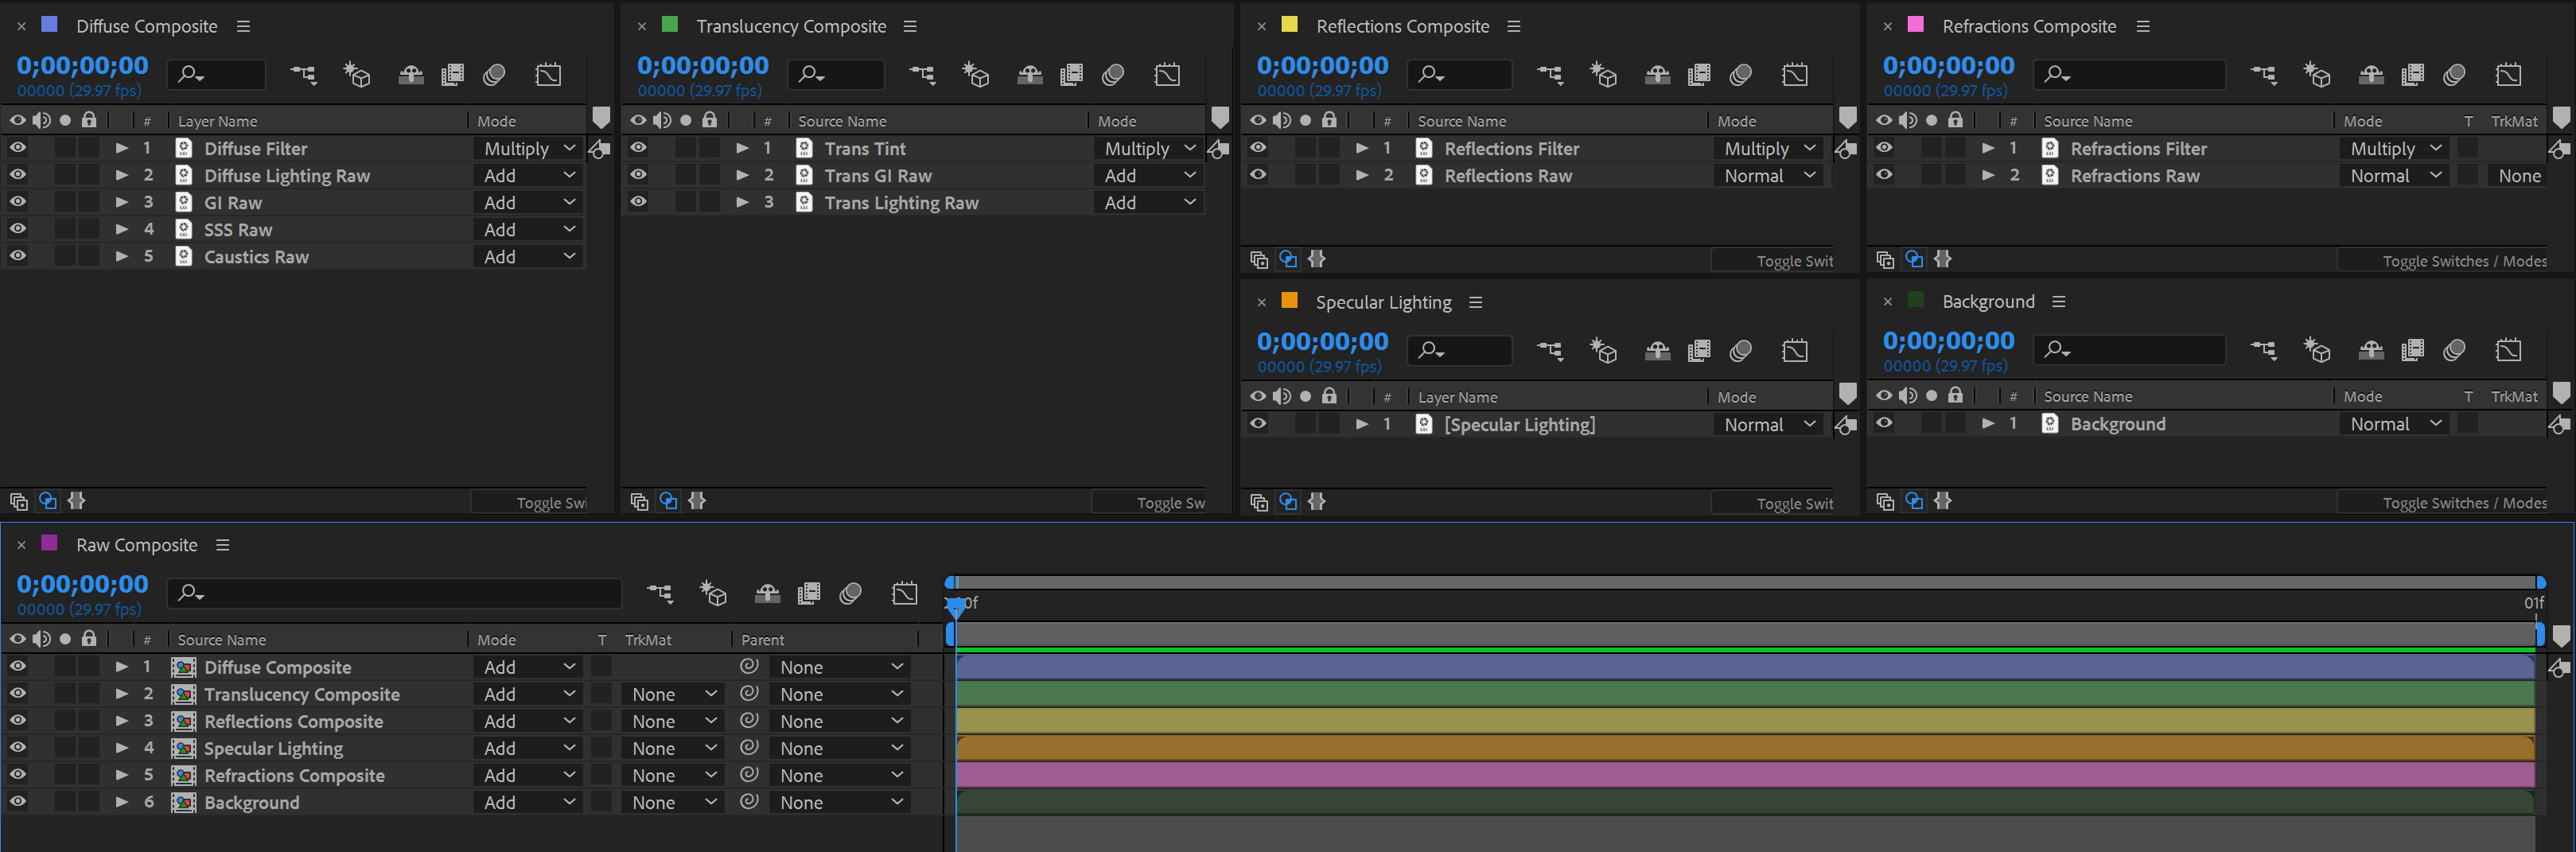
A basic example of how to composite the raw shading component AOV's in After Effects
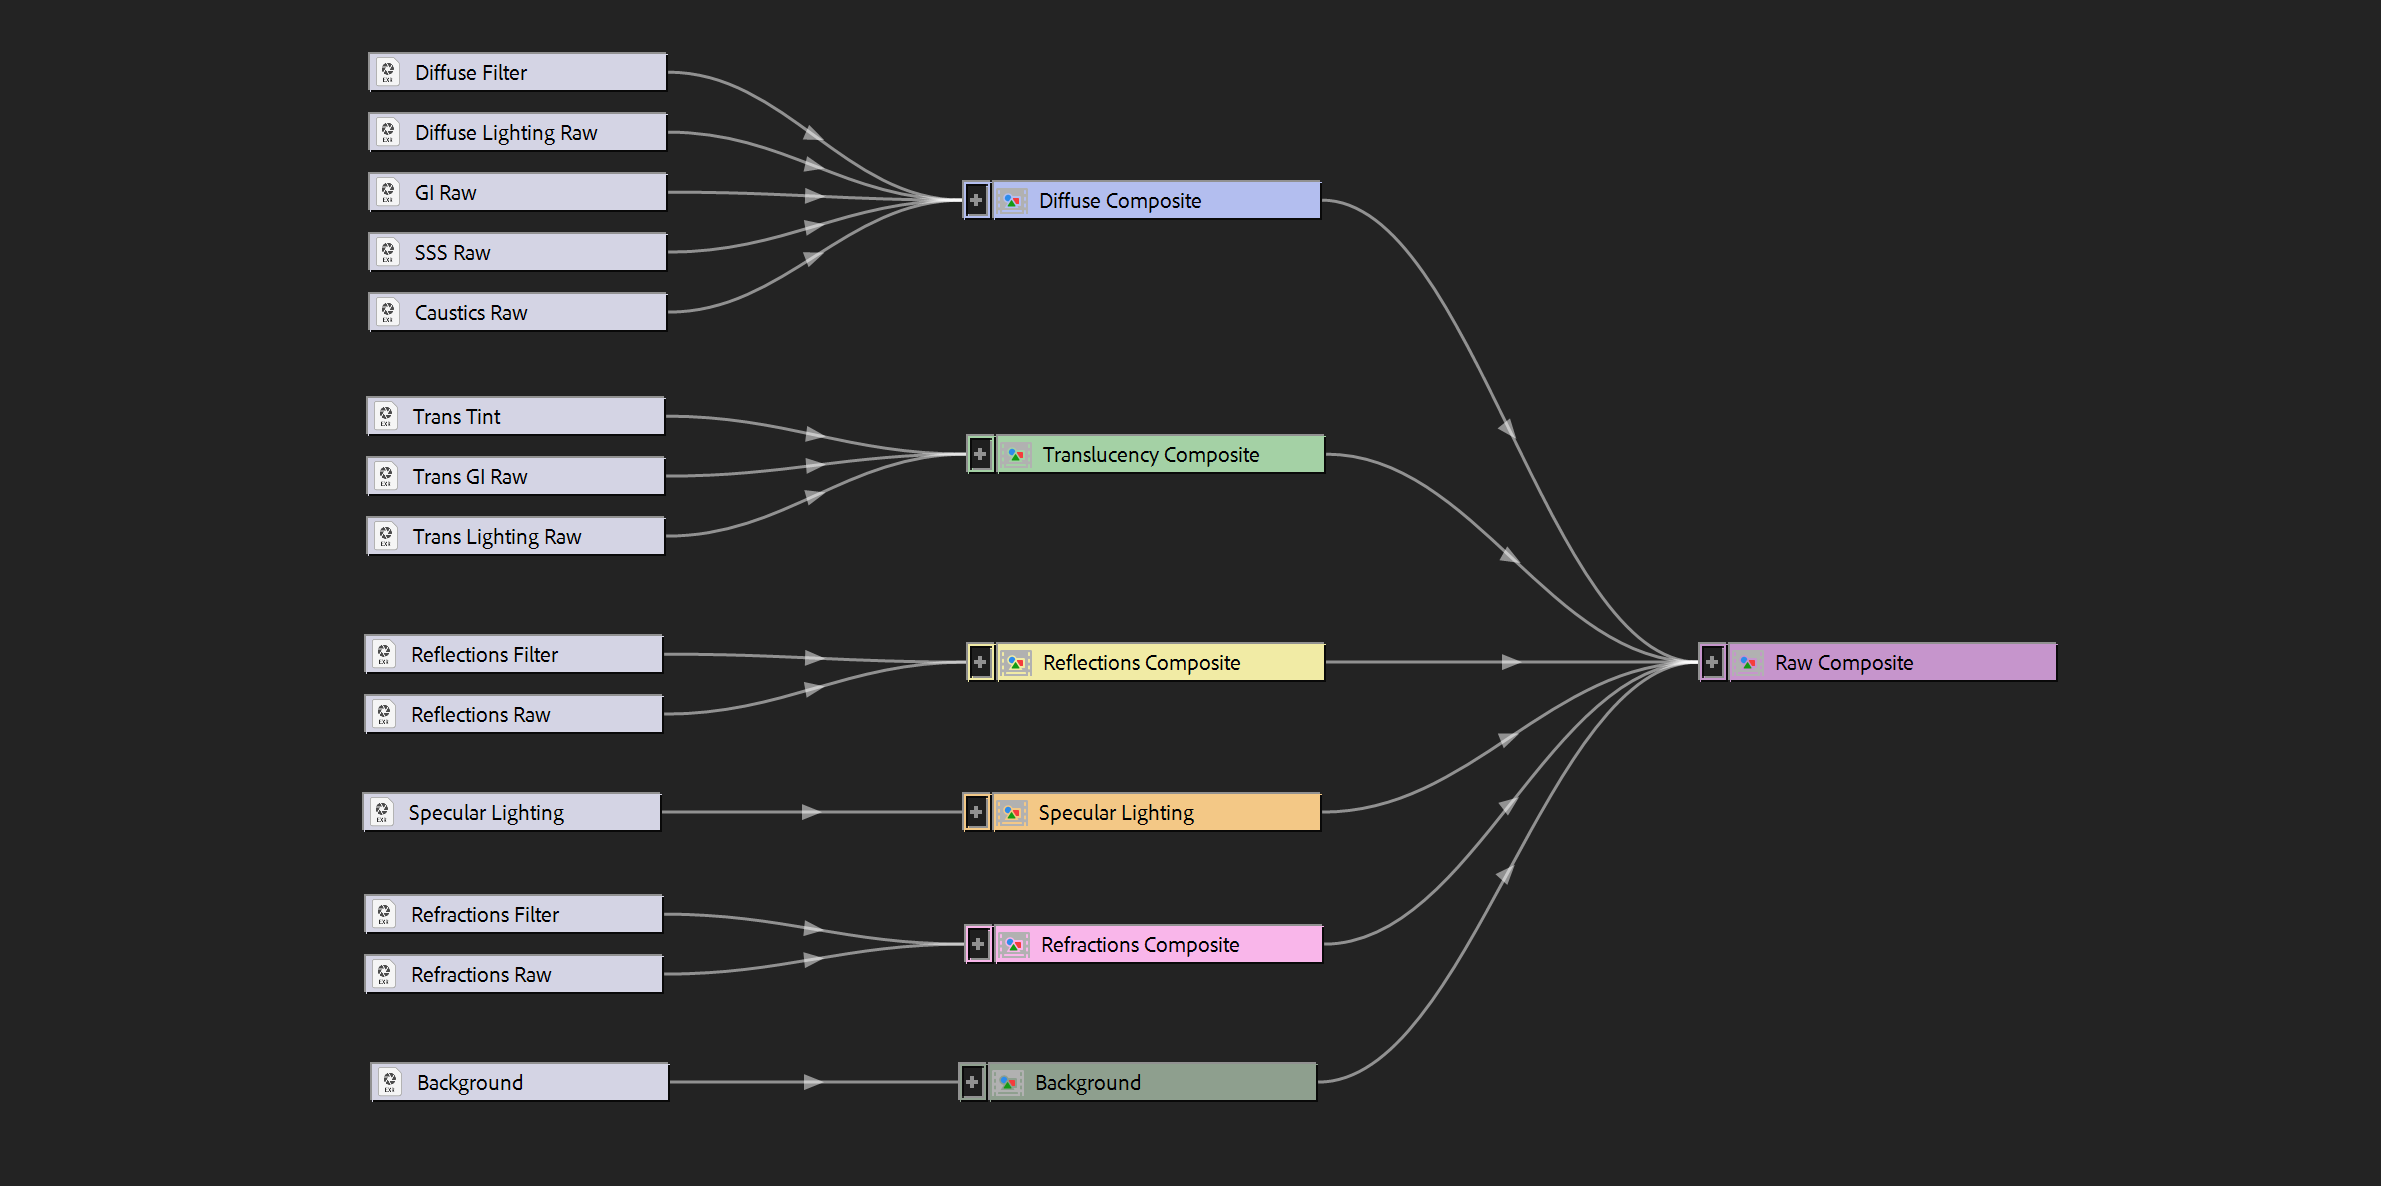
Flowchart for compositing raw shading component AOV's in After Effects
Fusion

A basic example of compositing the raw shading AOV's in Fusion
Utility AOVs
Ambient Occlusion
|
|
|
Ambient Occlusion AOV |
Beauty reference |
| Scene from Evermotion | |
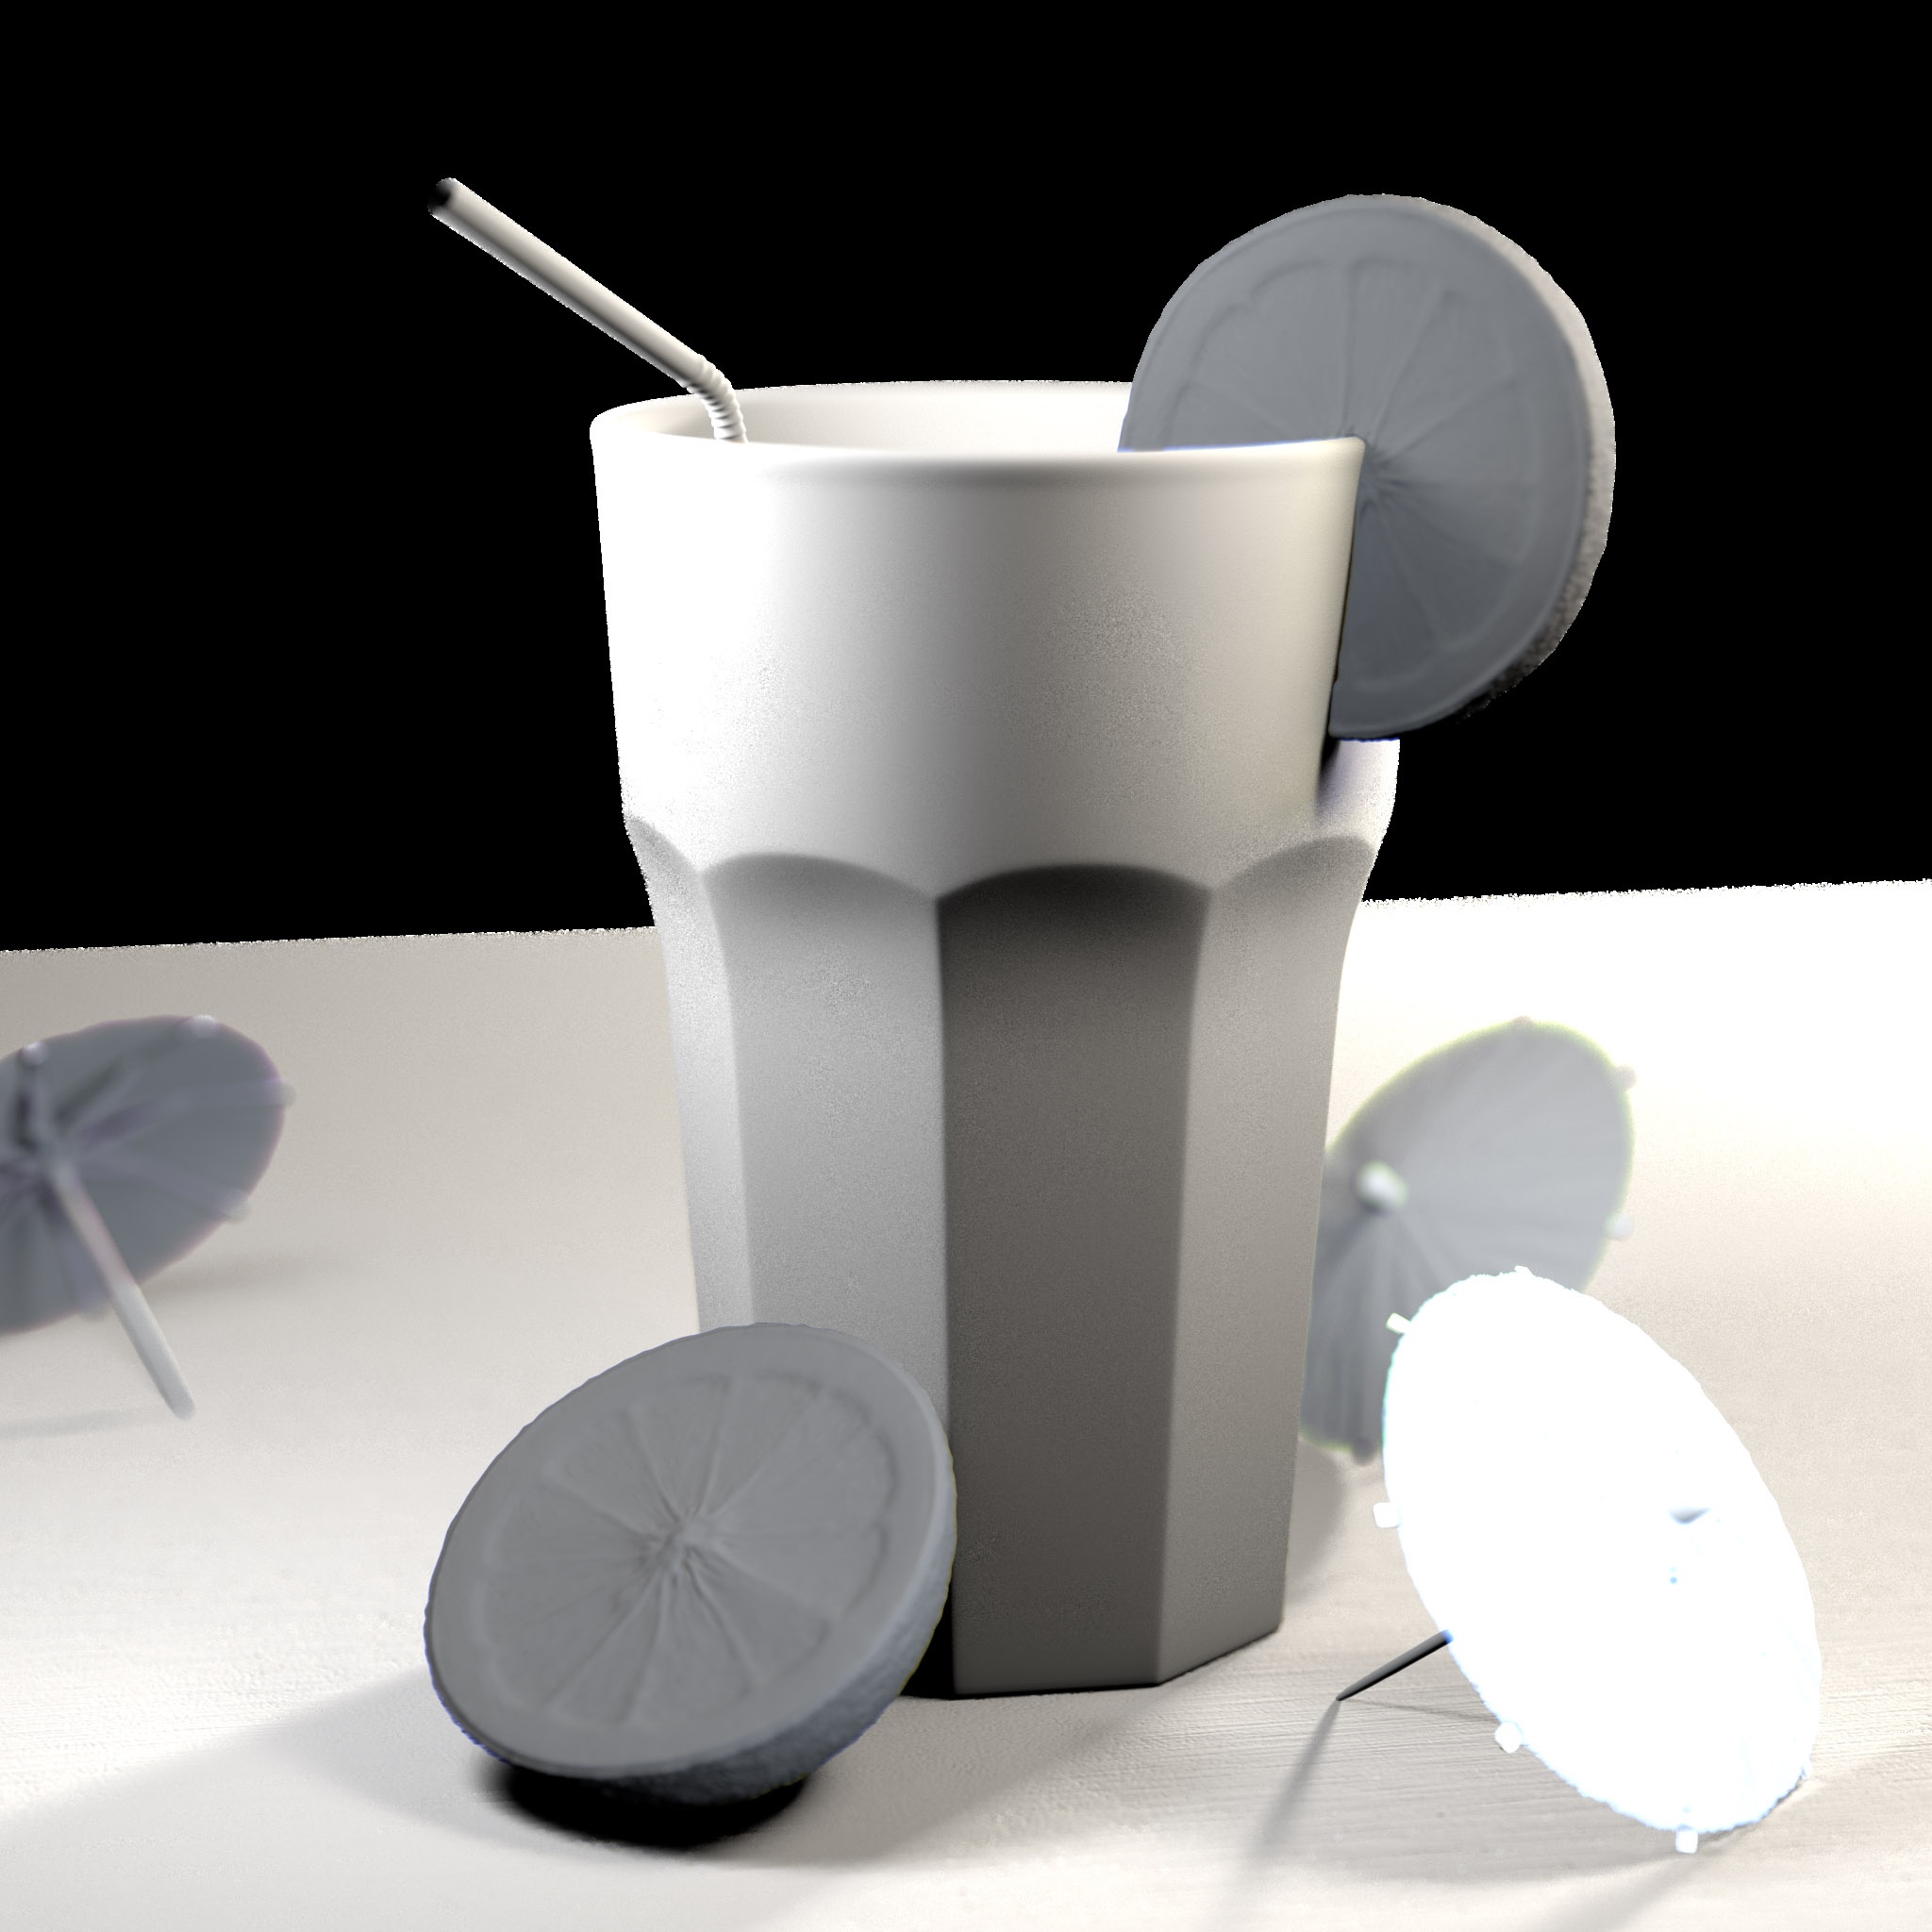
The Ambient Occlusion AOV can be used to quickly apply a localized contact shading effect to your entire scene, it featuring most of the same options as seen in the AO shading node. This is a great tool for adding contrast and tweaking the intensity in post. The Secondary Ray Visibility option can be adjusted to allow the AO effect to be seen in reflections or refractions of the scene materials.
For information on the individual AO shading parameters please refer to the Ambient Occlusion page, the AOV parameters functions exactly the same.
World Position
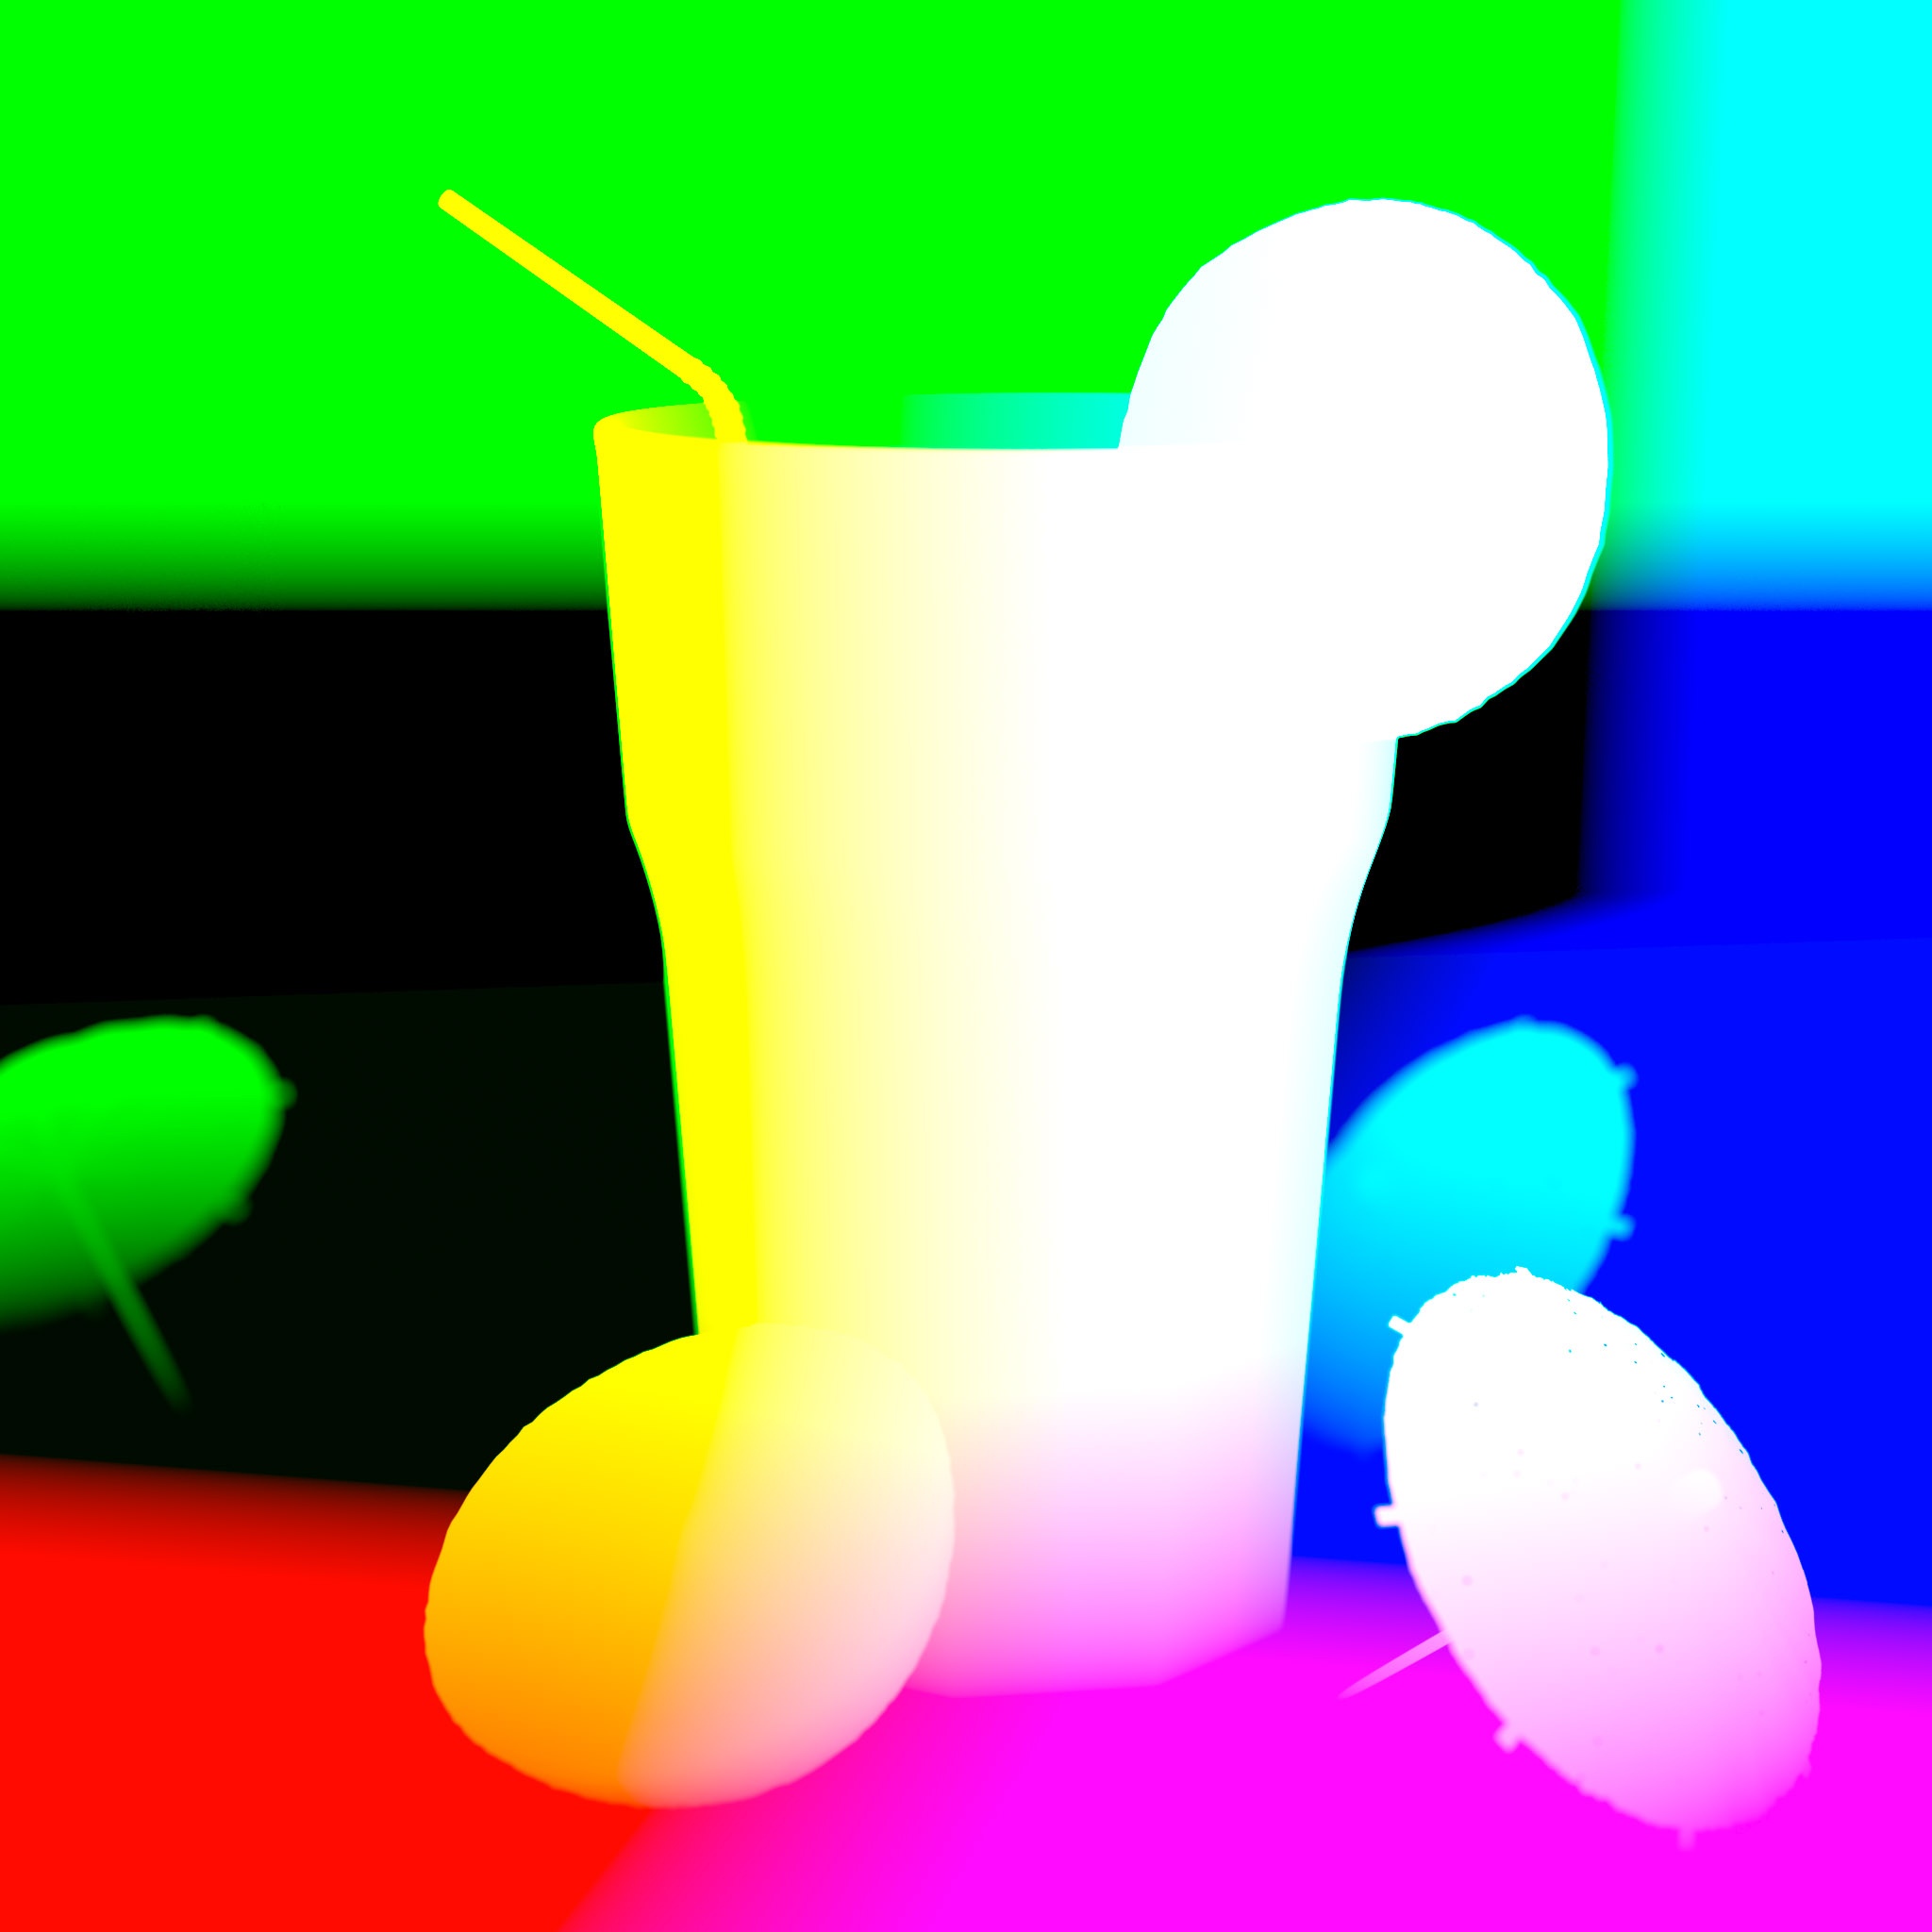
World Position AOV
The world position AOV produces per-pixel XYZ world coordinates in the R, G, B channels respectively.
Due to effects like antialiasing, depth of field and motion blur, Redshift has to generate multiple samples per pixels ('subsamples'). The filter option allows the user to define how these sub-samples are combined to generate the final per-pixel world position.
- The 'full' filter option will average the world positions together for the pixel using the same filter used for unified sampling.
- The 'min depth' option returns the world position of the closest-to-the-camera pixel sub-sample.
- The 'max depth' returns the farthest-to-the-camera world position.
- The 'center sample' option picks the position that corresponds to the middle of the pixel using a single sample.
Choosing these options depends on how you plan on using the world positions. If you need antialiased results, you should select 'full' filtering. If, on the other hand, you need non-antialiased results the 'center sample' option will provide the best results.
The world position AOV also has options to scale the X, Y, Z coordinates by user-defined factors. This can help convert them to other unit spaces (inches to meters, for example), if required.
The image above is an RGB representation of the world position AOV for the test scene. The origin is around the base of the drinking glass near the middle of the frame.
Object Position

Object Position AOV
The Object Position AOV produces per-pixel XYZ object-space coordinates in the R, G, B channels respectively.
Normals
|
|
|
| Normals AOV | Normals AOV: Edited for better visibility |
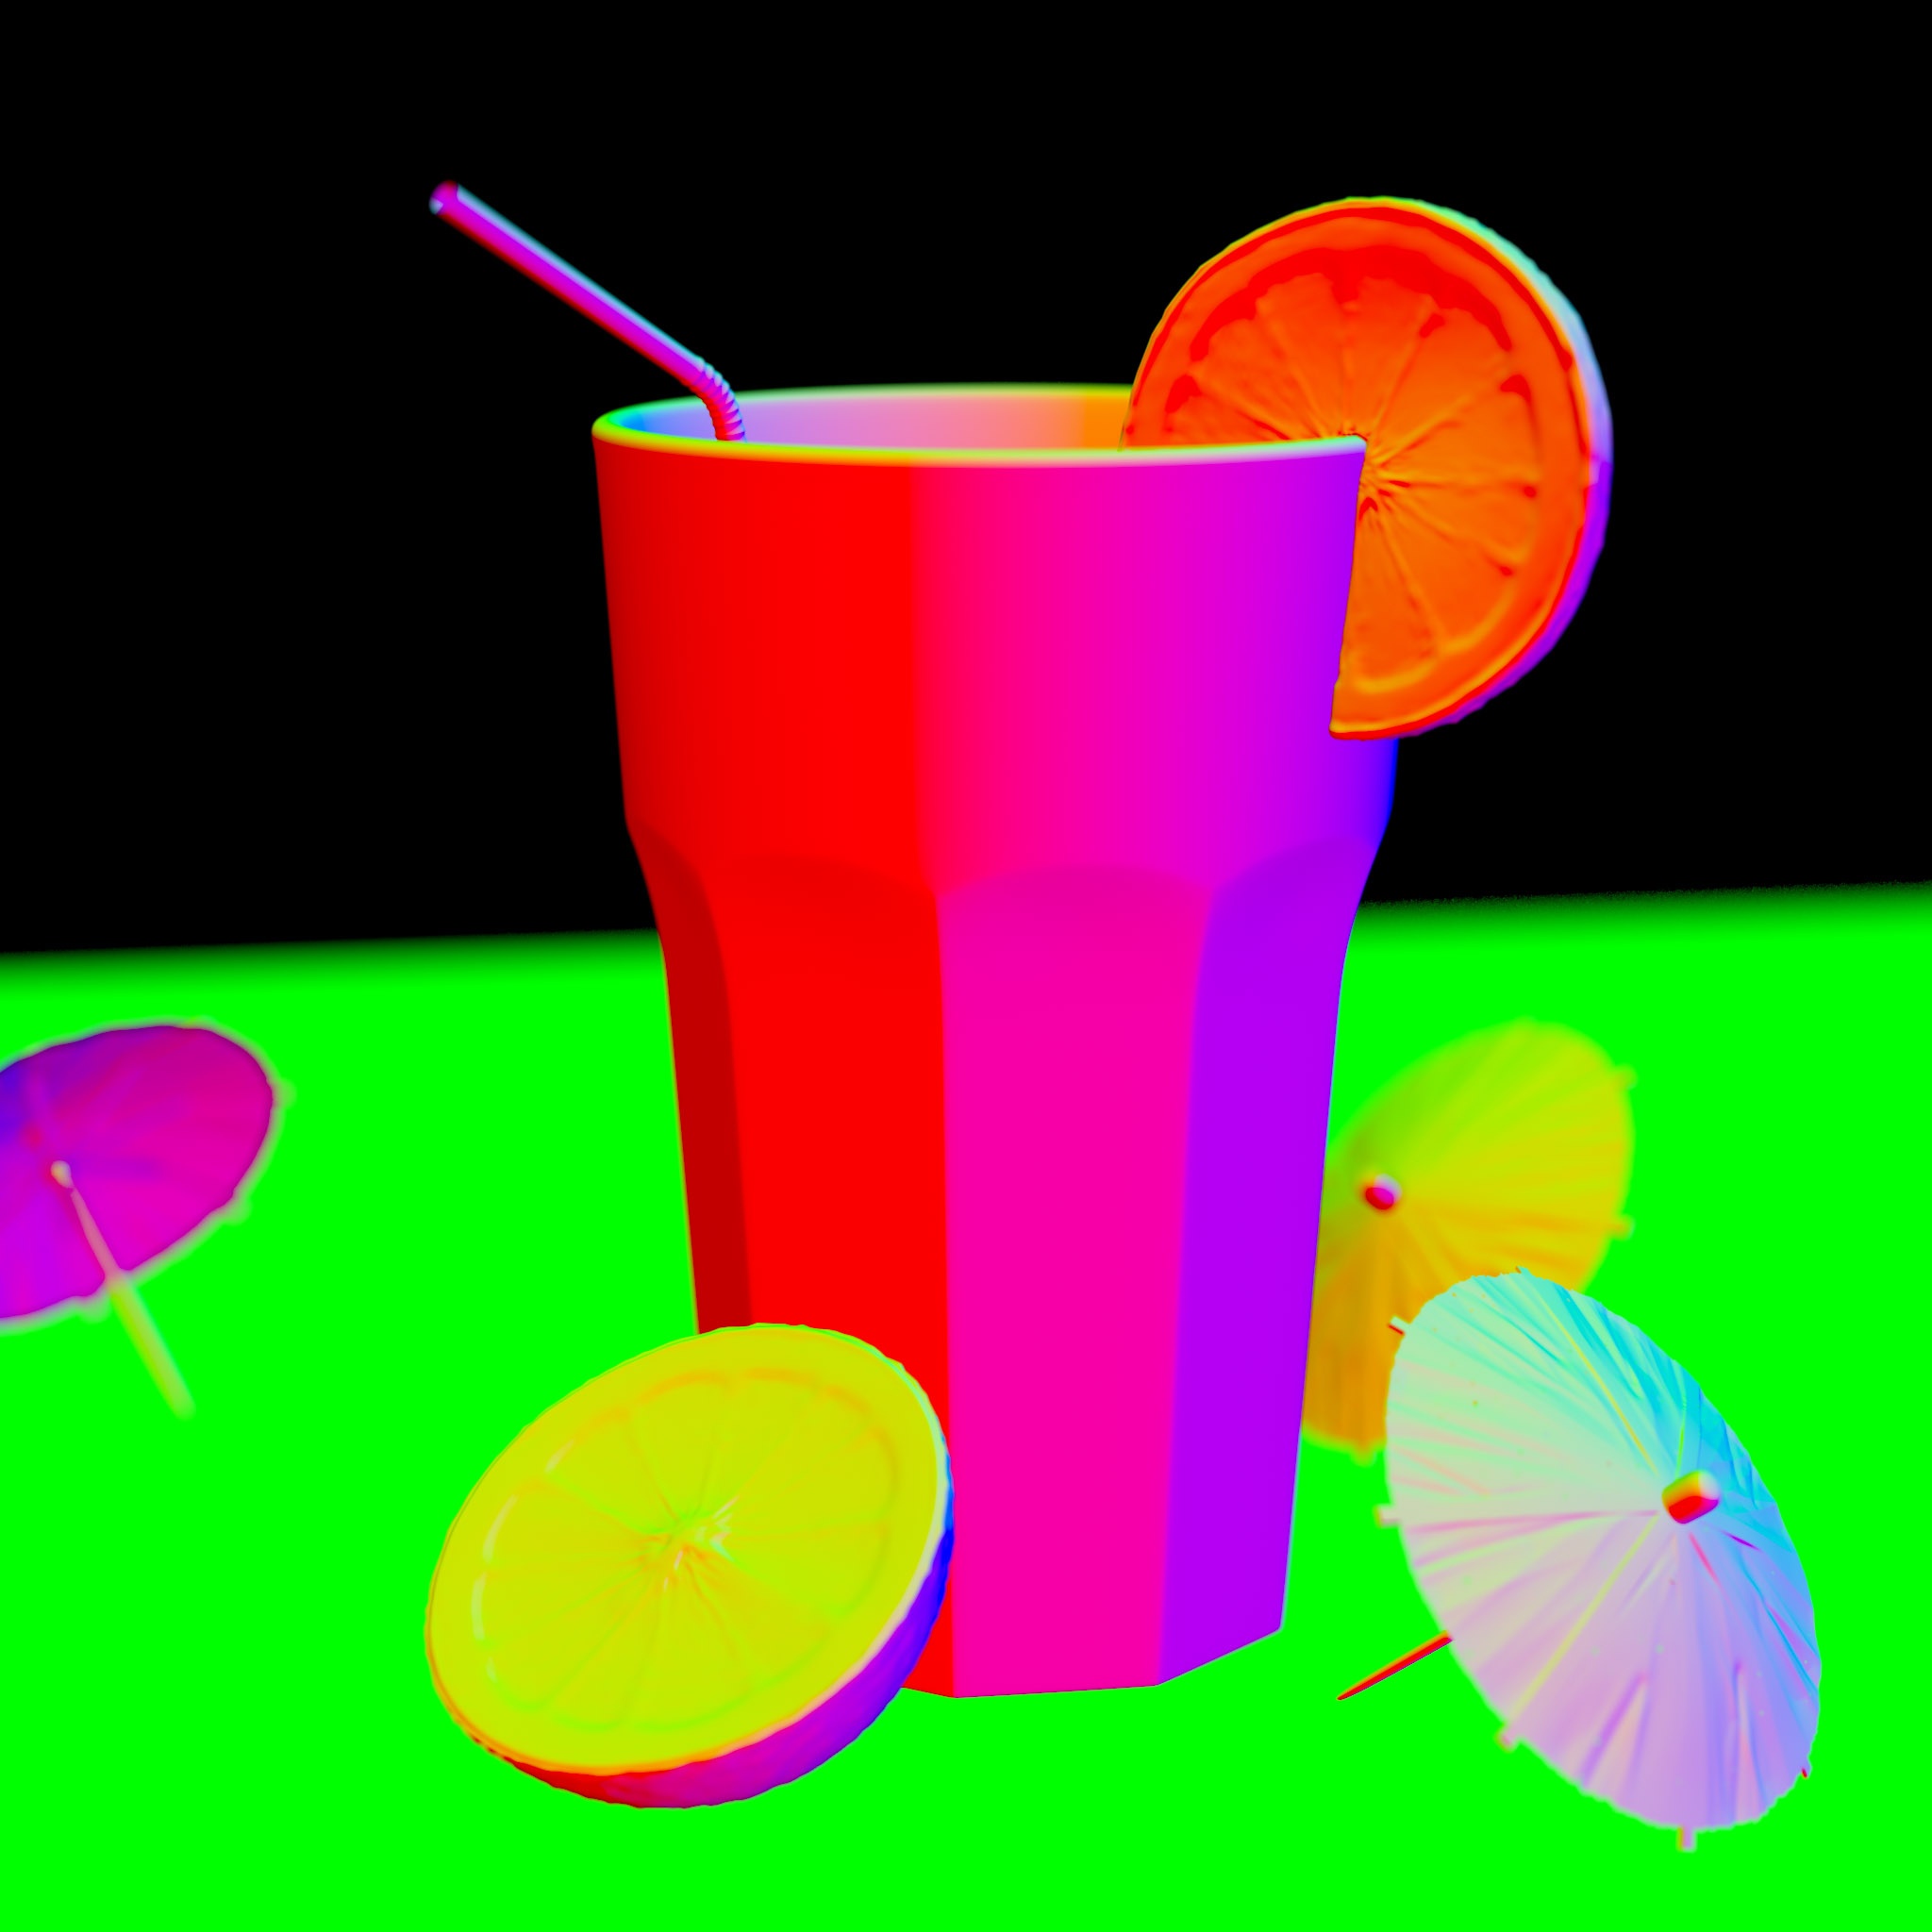
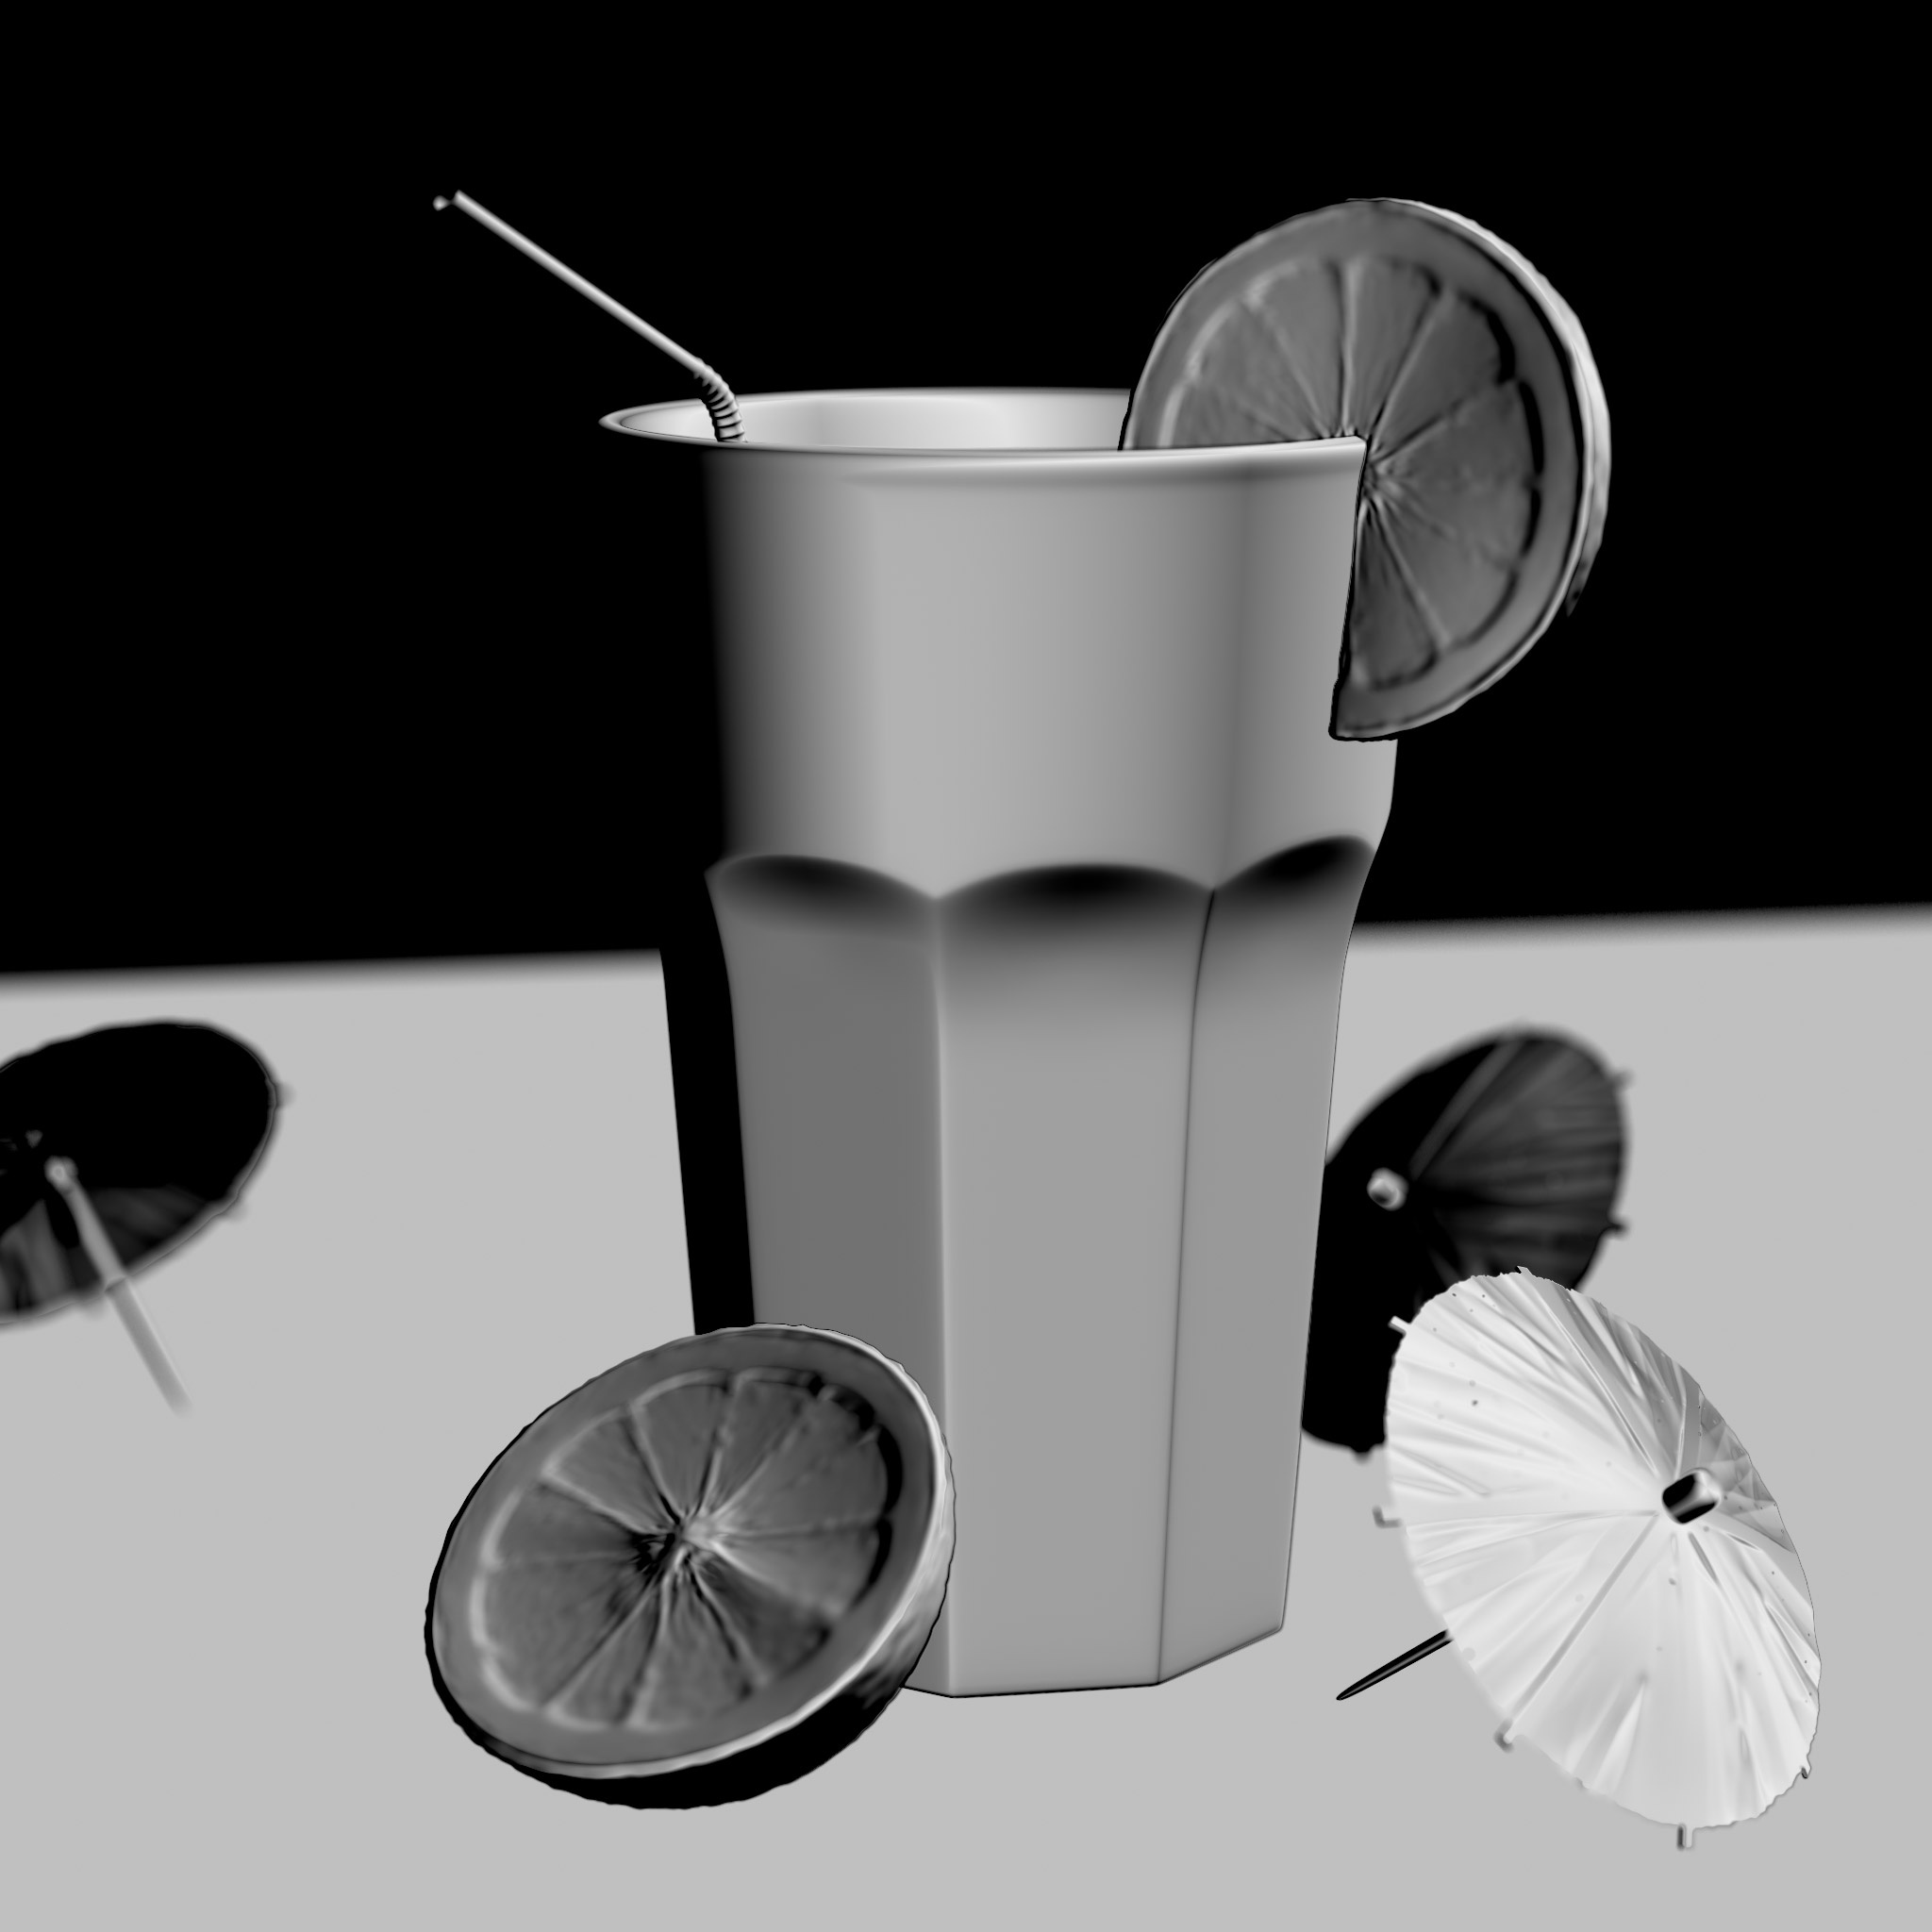
The normals AOV contains the per-pixel surface normal, in world space. Please note that these normal are non-bumped, i.e. they don't contain bump or normal mapping.
The green seen in the picture above is because the normal is pointing up (0, 1, 0), which corresponds to the green color (R=0, G=1, B=0).
Bump Normals
|
|
|
| Bump Normals AOV | Normals AOV: Adjusted for better visibility |


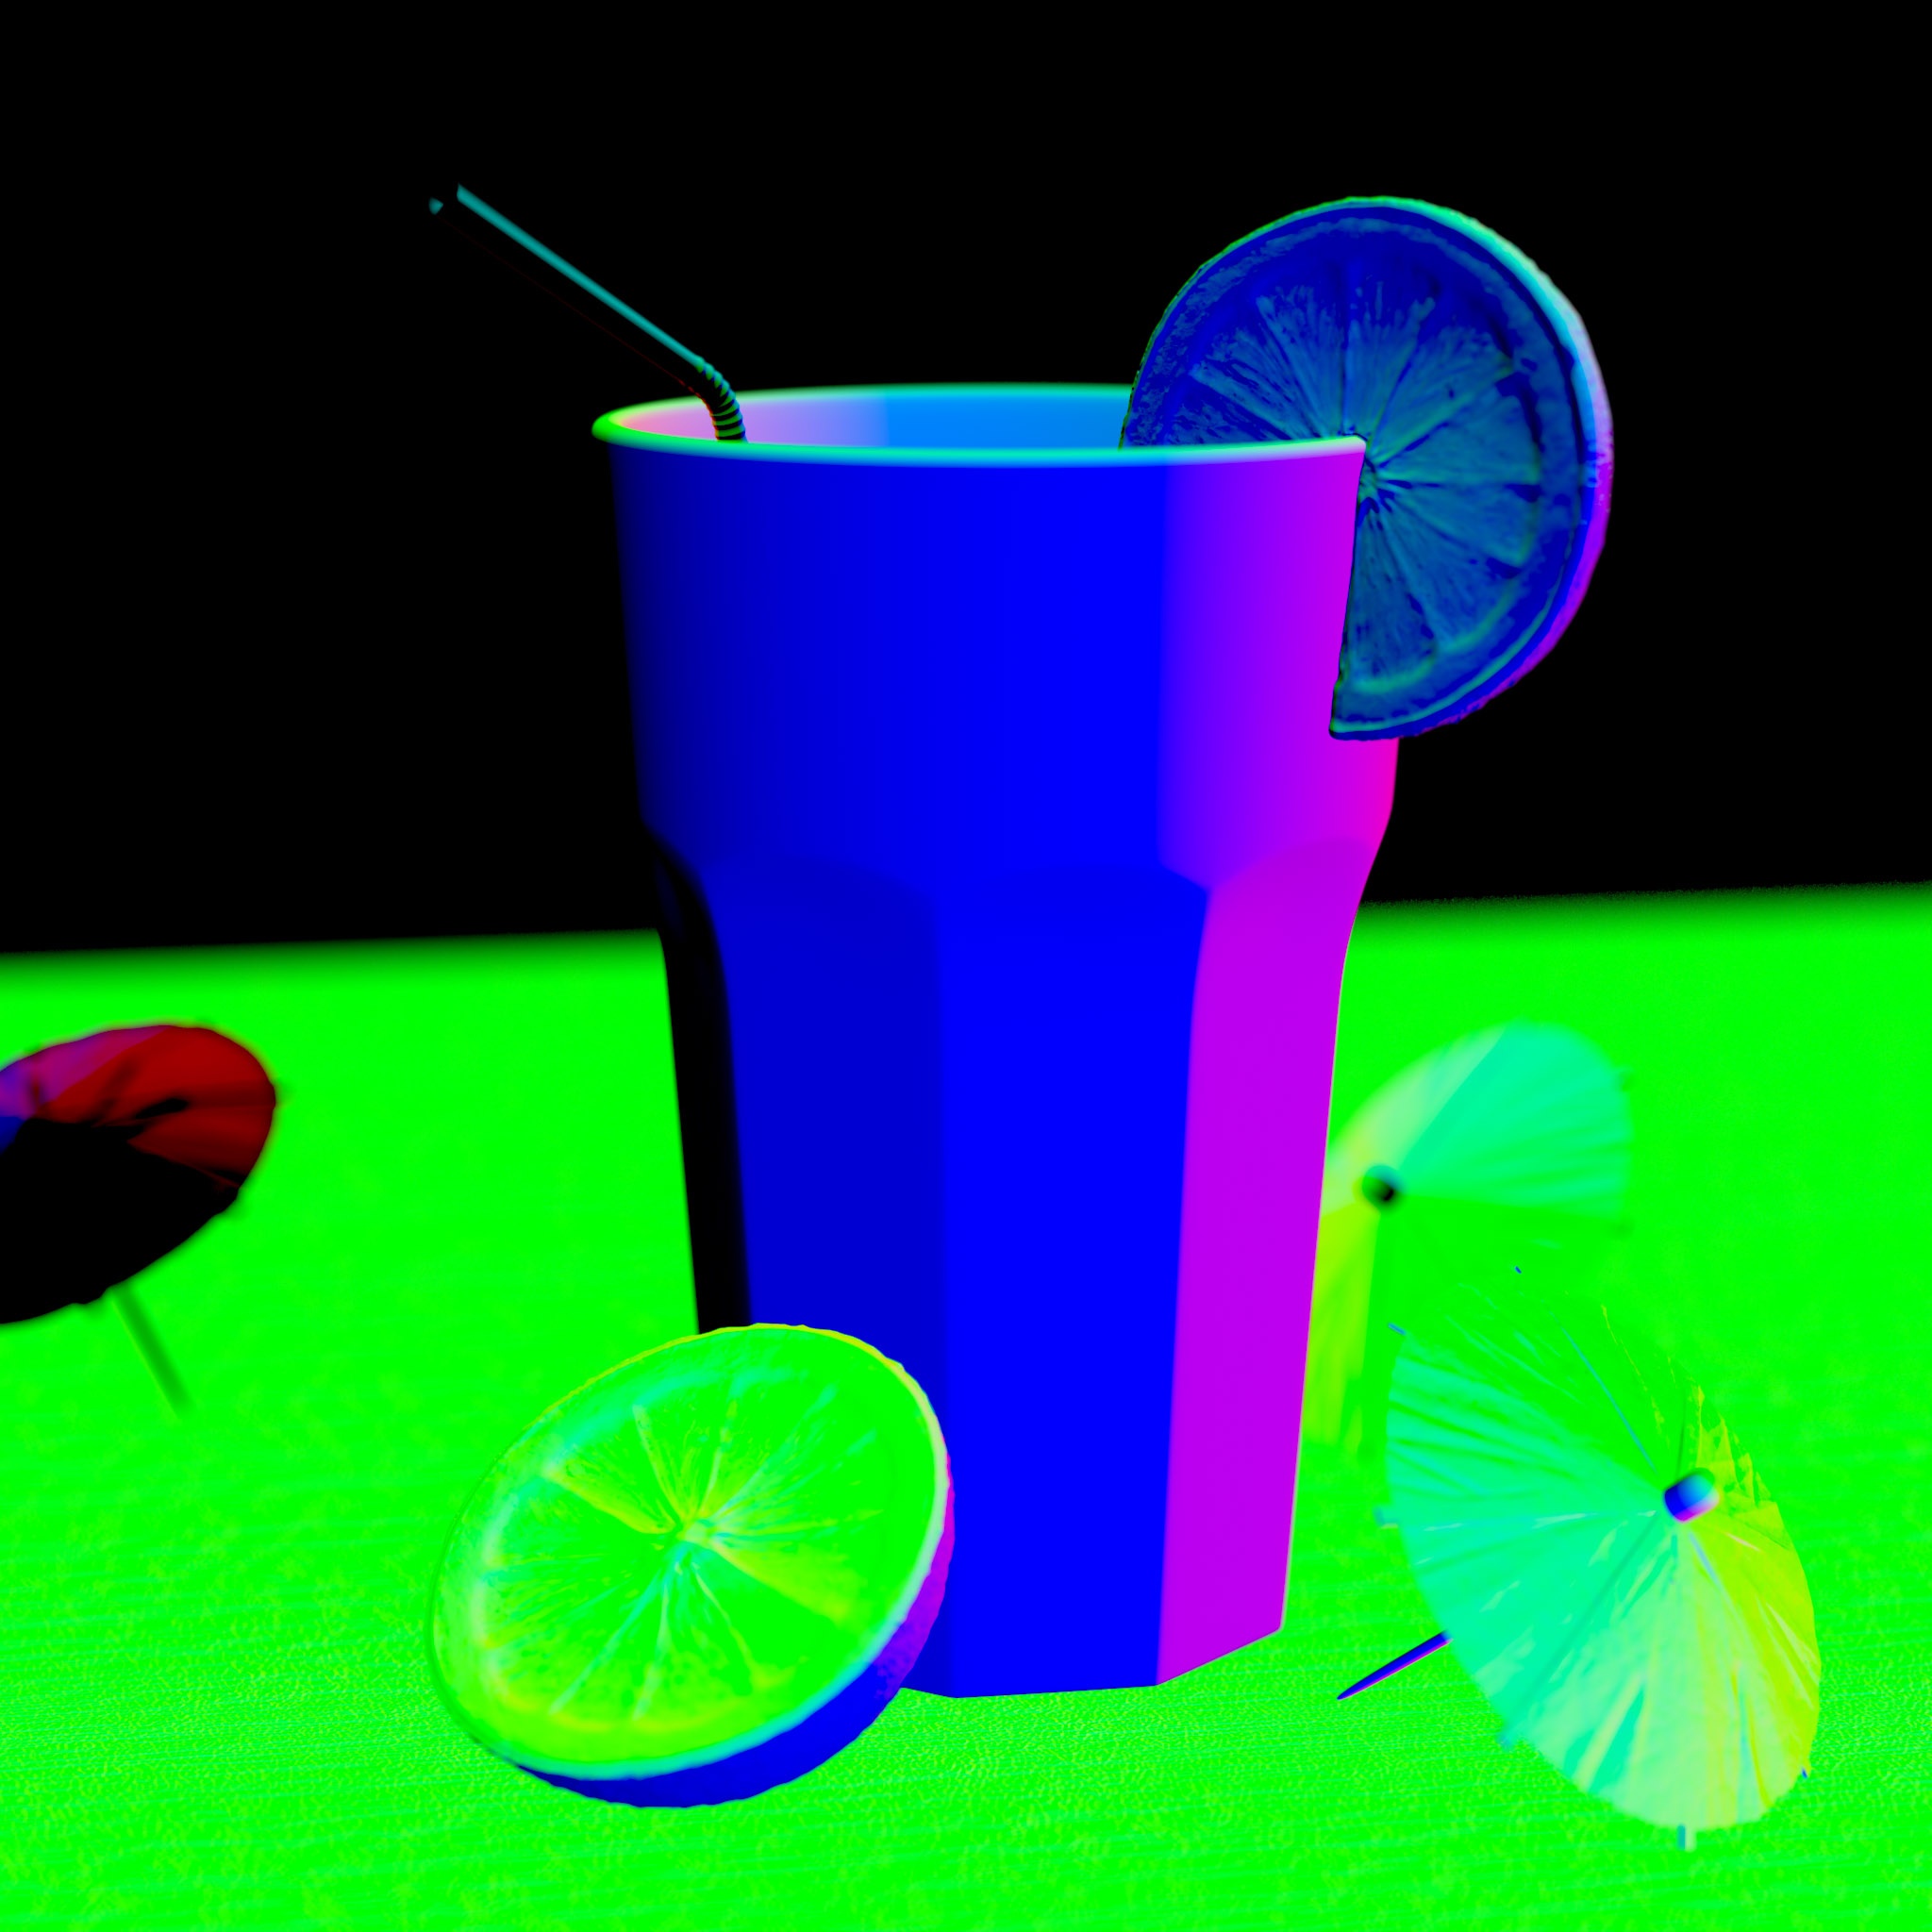
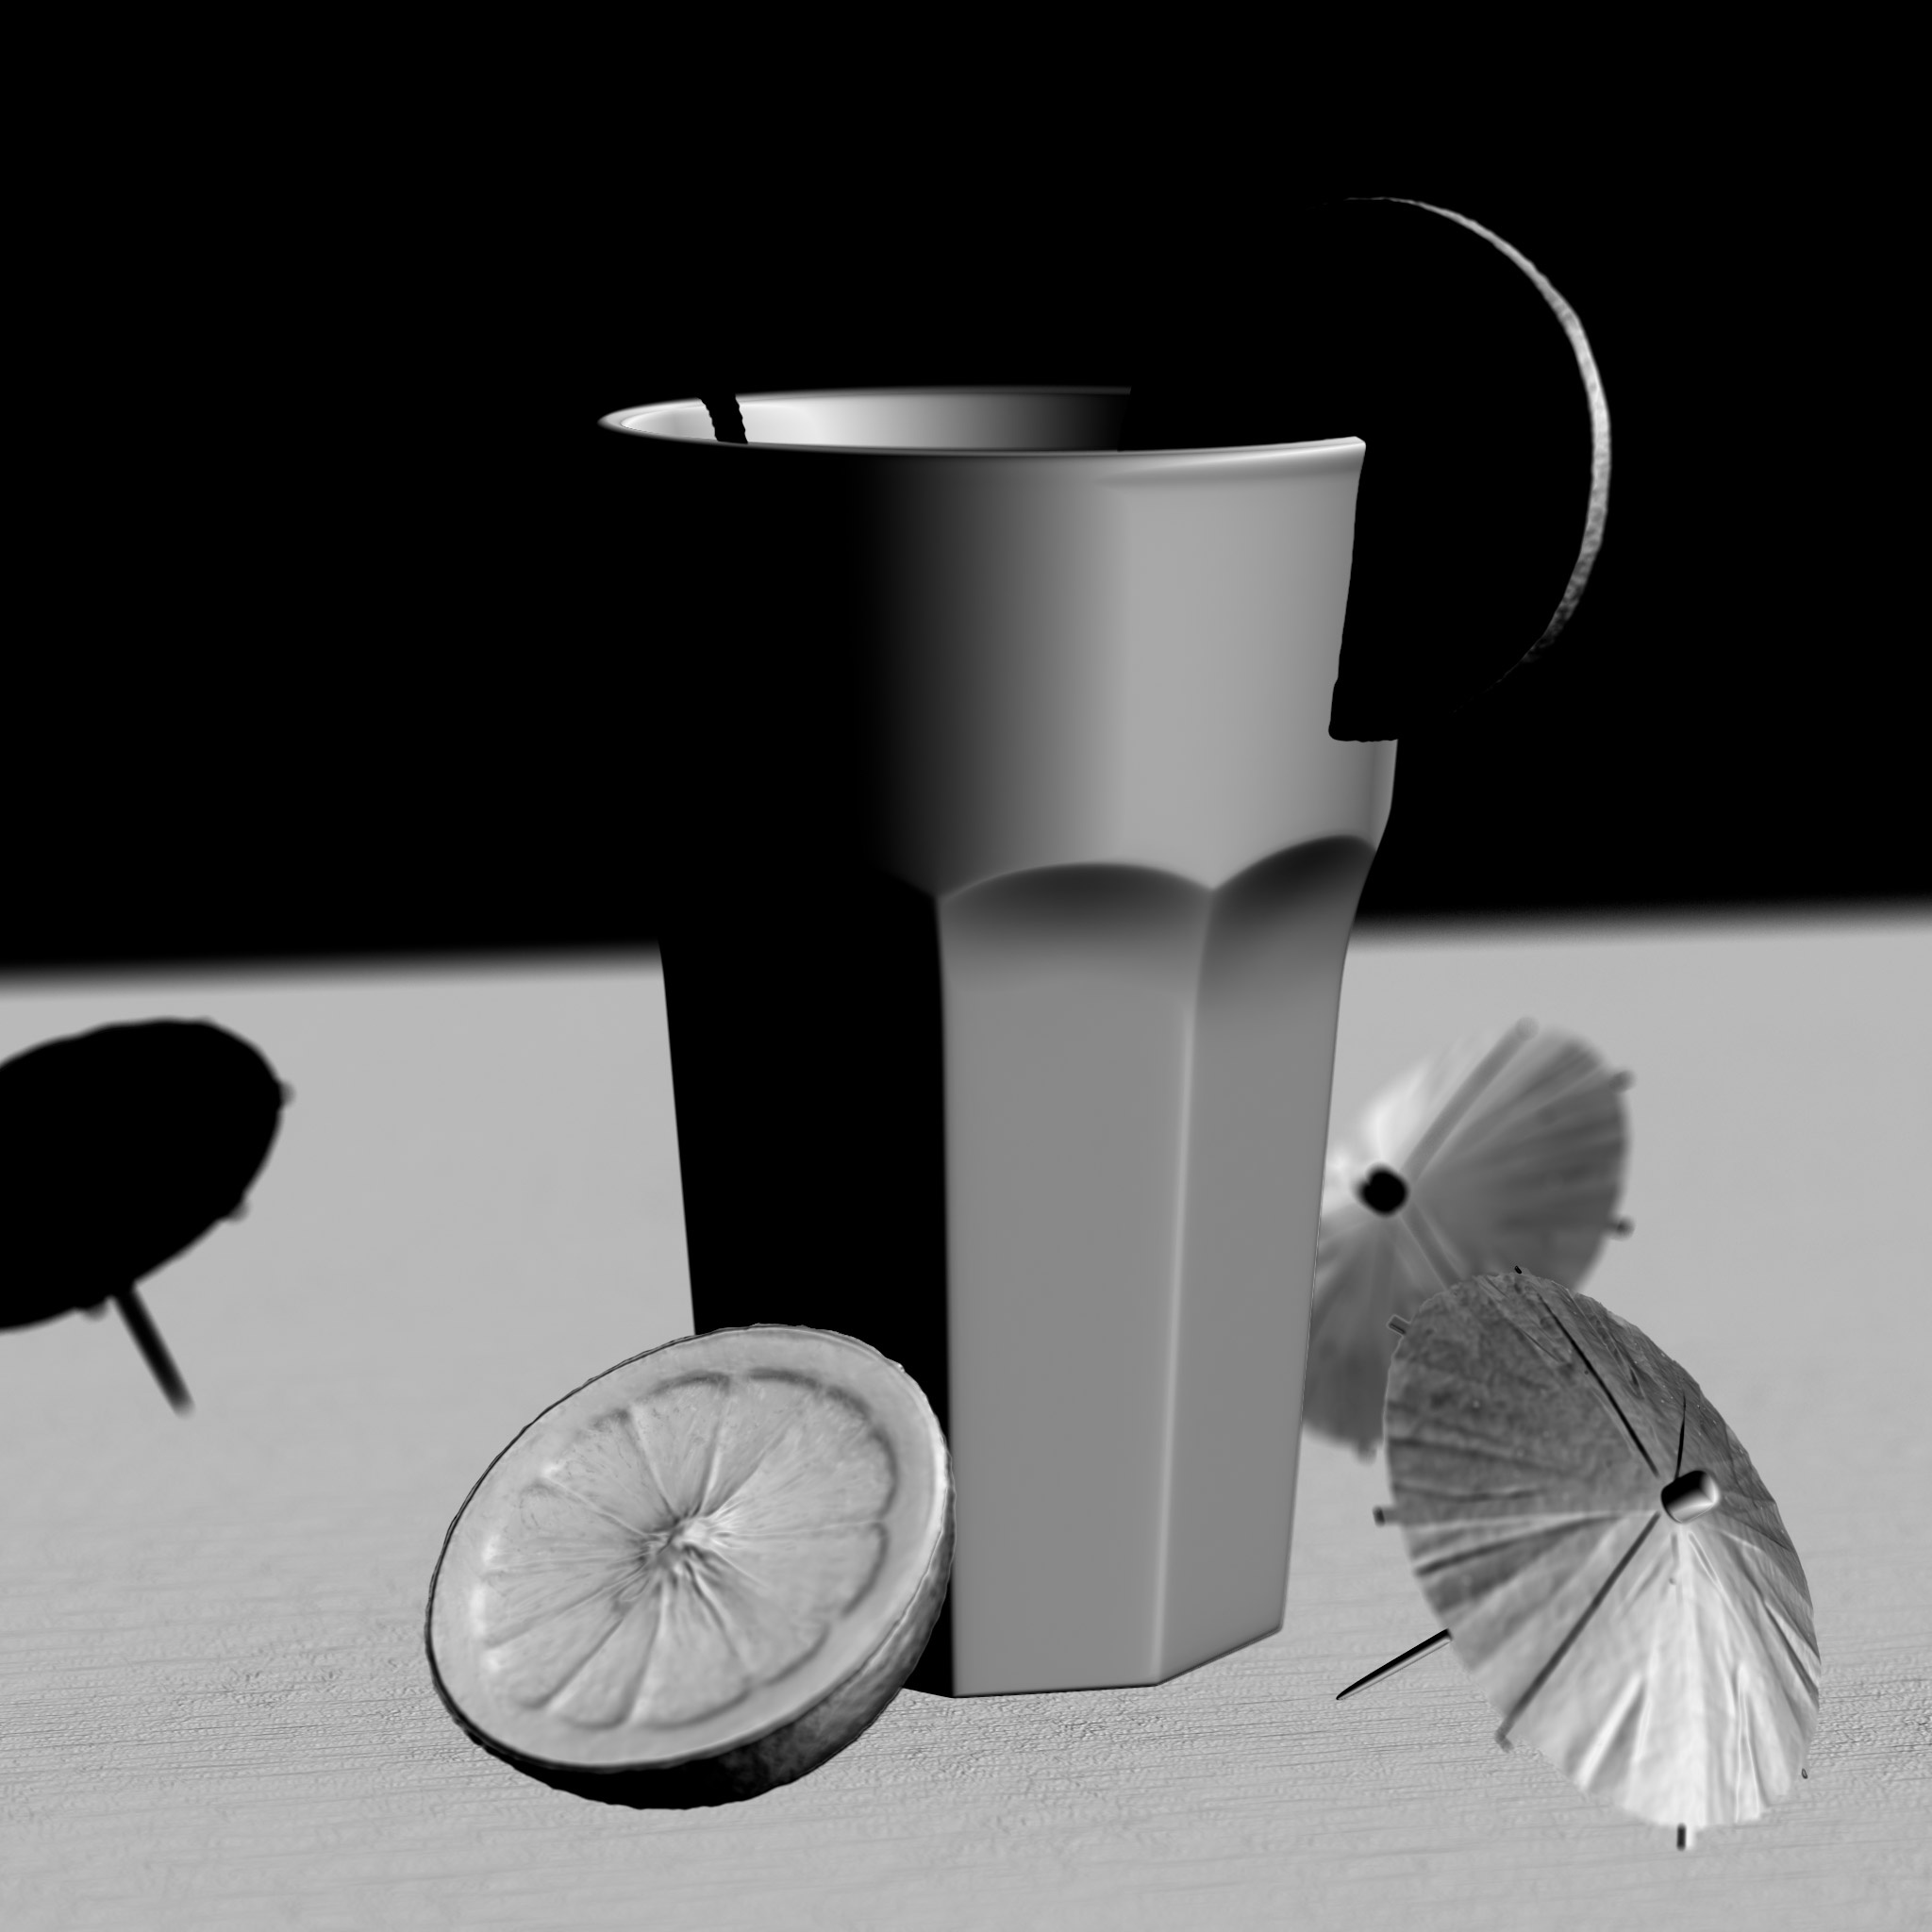
The Bump Normal AOV contains the per-pixel bumped surface normal in world space, from things like bump maps and normal maps.
In the pictures above much of the surface detail is actual geometry but you can see the added bump and normal mapping on the lemons, drink parasols, and the table under everything. If you compare this to the non-bump Normal AOV none of this detail is visible. To better display this contrast between the Bump Normal AOV and Normal AOV an edited black and white image of each is provided which makes these details more easy to discern.
Object Bump Normals
|
|
|
| Object Bump Normals AOV | Object Bump Normals AOV: Adjusted for better visibility |
The Object Bump Normal AOV contains the per-pixel bumped surface normal in object space, from things like bump maps and normal maps.
Depth
|
|
|
| Depth AOV | Depth AOV: greyscale |

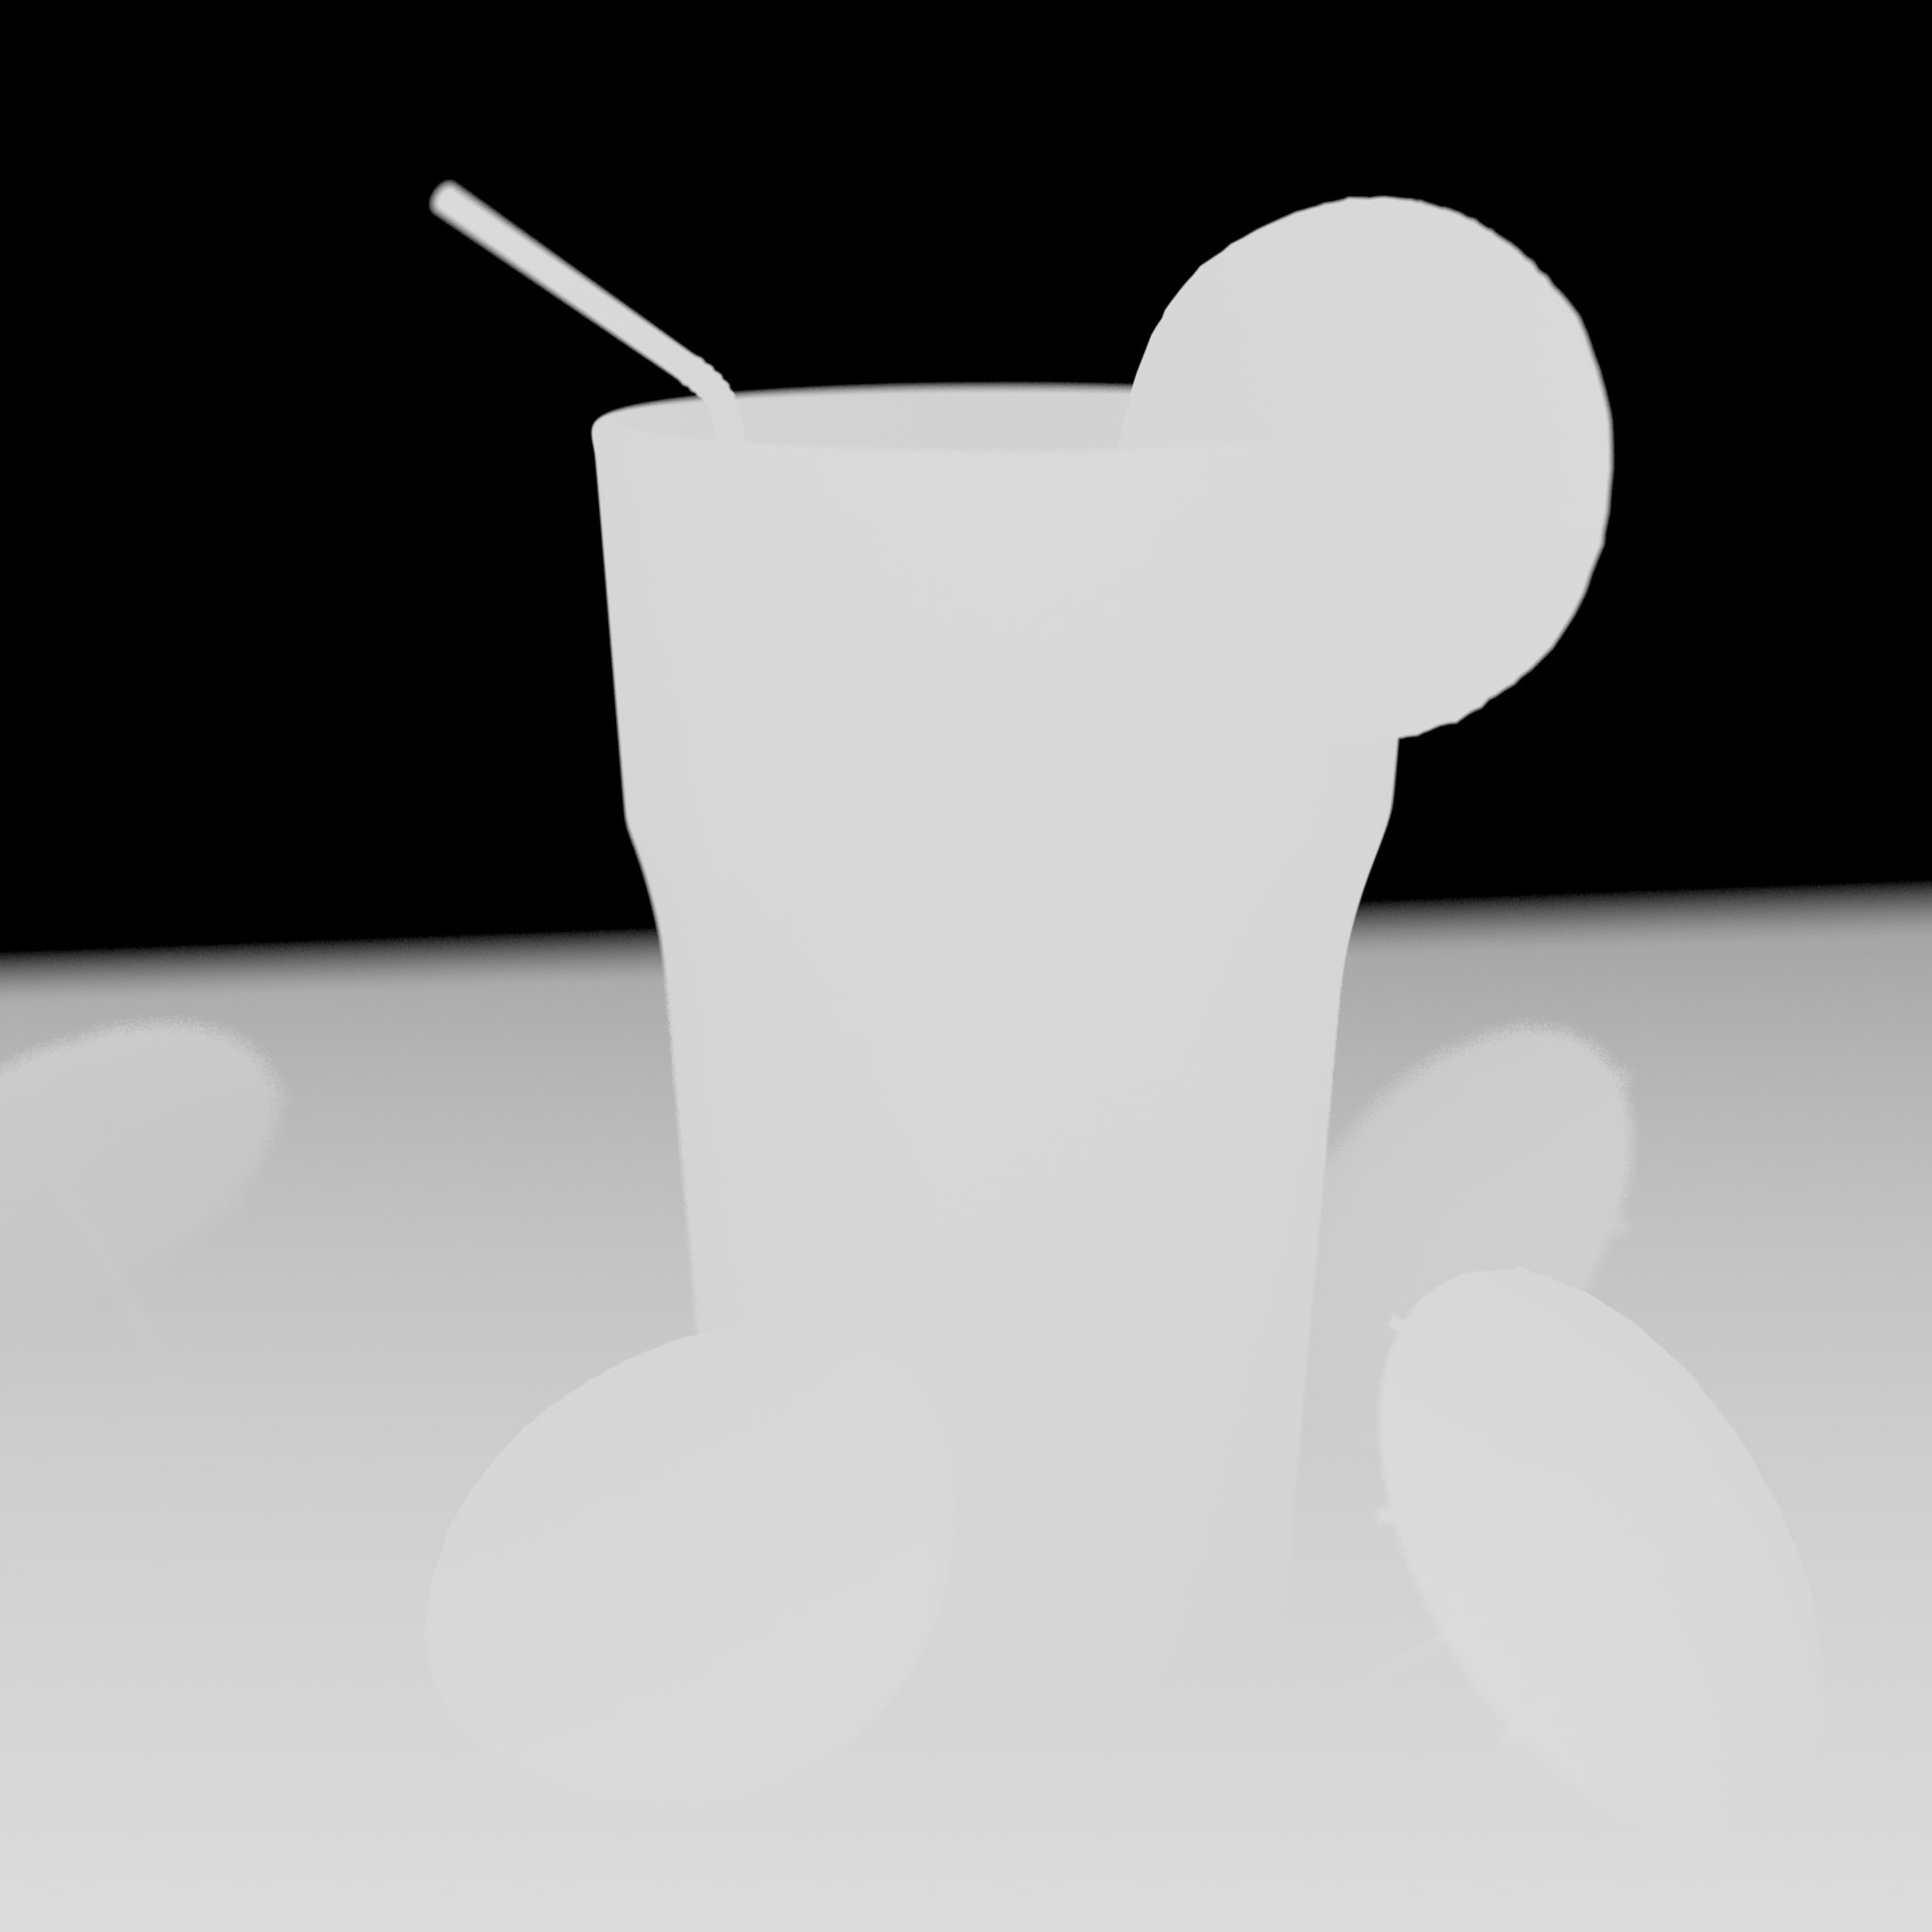
The Depth AOV outputs a single channel EXR file which contains per-pixel depth information. The channel is named 'Z' as this helps certain comp packages (e.g. Nuke) to automatically assume the image contains depth information.
The image above shows the Depth AOV for the example scene. The camera far plane was brought in with “Depth Mode†set to “Z Normalized†and “Use Camera Near/Far†enabled in order to demonstrate a full 0 to 1 range. Objects closer to the camera are darker than far away objects.
Redshift stores depth information in the red color channel only which is why opening them in compositing software displays them from red to black. When previewing the Depth AOV in the Redshift RV it is automatically displayed in black and white. Above is an example of the same Depth AOV in both color schemes for reference.
Due to effects like antialiasing, depth of field, and motion blur, Redshift has to generate multiple samples per pixels ('subsamples'). The filter option allows the user to define how these sub-samples are combined to generate the final per-pixel depth.
-
The 'full' filter option will average the depths together for the pixel using the same filter used for unified sampling.
-
The 'min depth' option returns the depth of the closest-to-the-camera pixel sub-sample.
-
The 'max depth' returns the farthest-from-the-camera depth.
-
The 'center sample' option picks the depth from the middle of the pixel using a single sample.
Choosing the correct filter option depends on how you plan on using the Depth AOV. If you need antialiased results, you should select 'full' filtering. If, on the other hand, you need non-antialiased results the 'center sample' option will provide the best results.
|
|
|
| Z Normalize | Z Normalize Inverted |
By default, the depths returned range between the near and far clip values of the camera (in world units) and visually this will result in an image that is completely white as almost all values are above 1. The images above demonstrate two other ways of outputting depth information. Sometimes what is needed is a "0 to 1" range where 0 should be returned for pixels closest to the camera and 1 returned for pixels farthest from the camera.Setting the “Depth Mode†option to “Z Normalize†will produce such values. “Z Normalize Inverted†reverses this, with 0 being returned for pixels farther from the camera and 1 being returned for pixels closest to the camera.
Volume Depth
|
|
| Volume Depth AOV | Volume Beauty Reference |
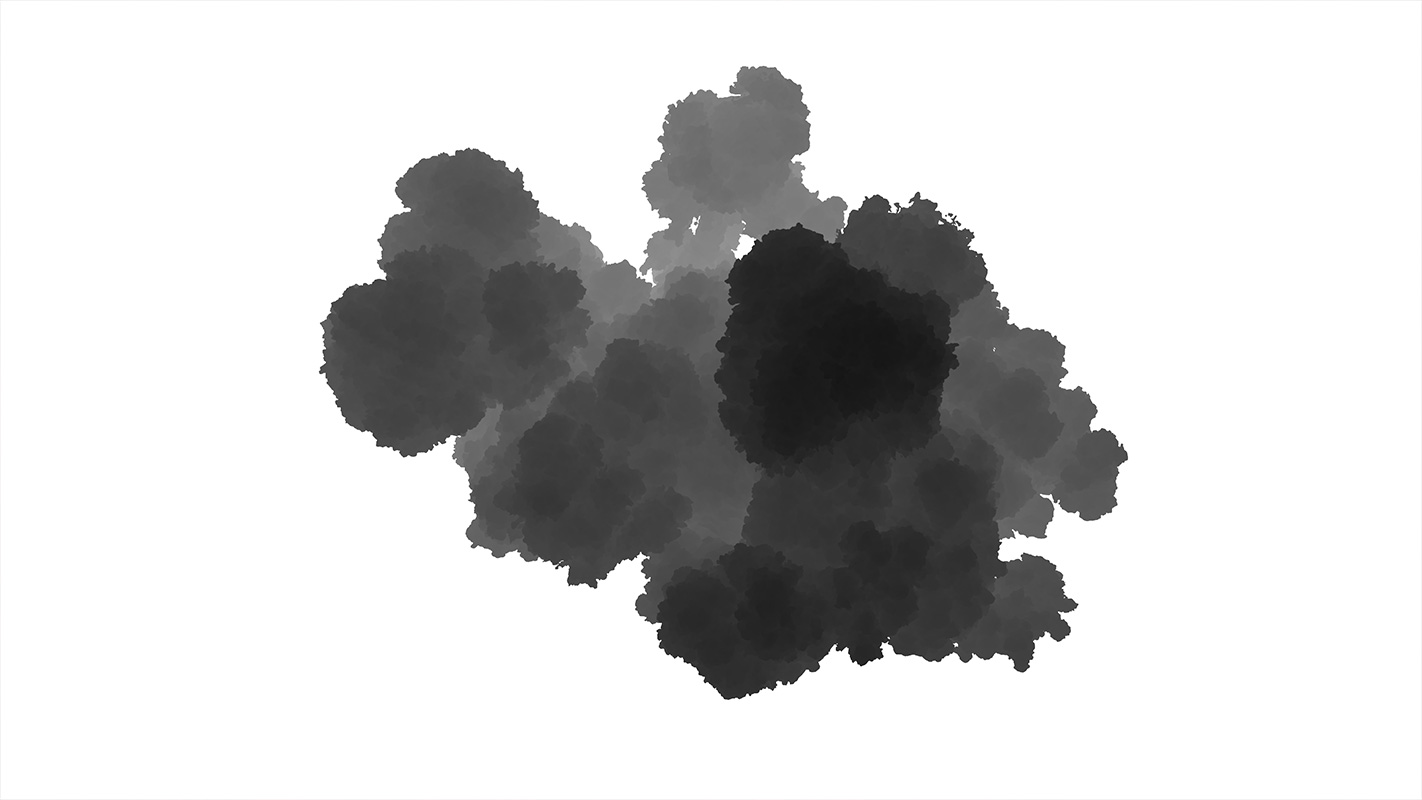
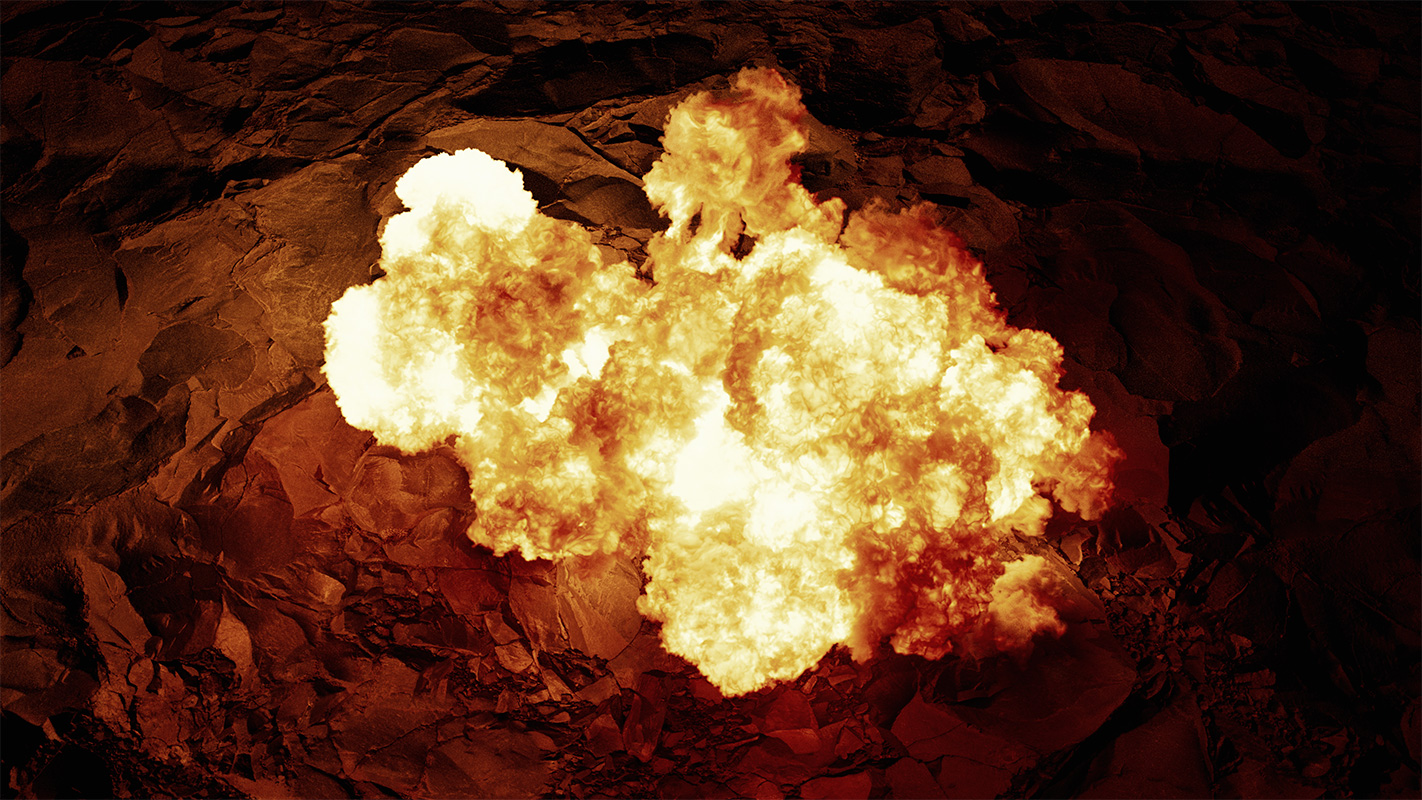
The Volume Depth behaves in exactly the same manner as the regular Depth AOV however it only detects volumetric scattering like clouds and smoke. It works by mapping the first volume scatter location found in world distance with per-pixel depth information written to a channel called VolumeZ.
The Volume Depth AOV includes all the same modes and settings as the Depth AOV, please refer to the Depth AOV section above for more information.
Volume Depth ignores all geometry and global fog volumes.
Shadows
|
|
|
|
Shadows AOV |
Shadow AOV * Diffuse Filter AOV |
The Shadows AOV is a raw AOV that outputs shadow information cast by objects as white. Please note that it won't highlight pixels that are in shadow because of the pixel's normal pointing away from the light.
How to use:
Multiply the Diffuse Filter AOV by the Shadows AOV. Add the result to the Diffuse Lighting AOV. Now you can control the final intensity of the shadows.
|
|
|
| Diffuse Lighting + Shadow * Diffuse Filter | Diffuse Lighting |

Motion Vectors
|
|
|
| Motion Vectors AOV | Beauty with Motion Blur (example) |
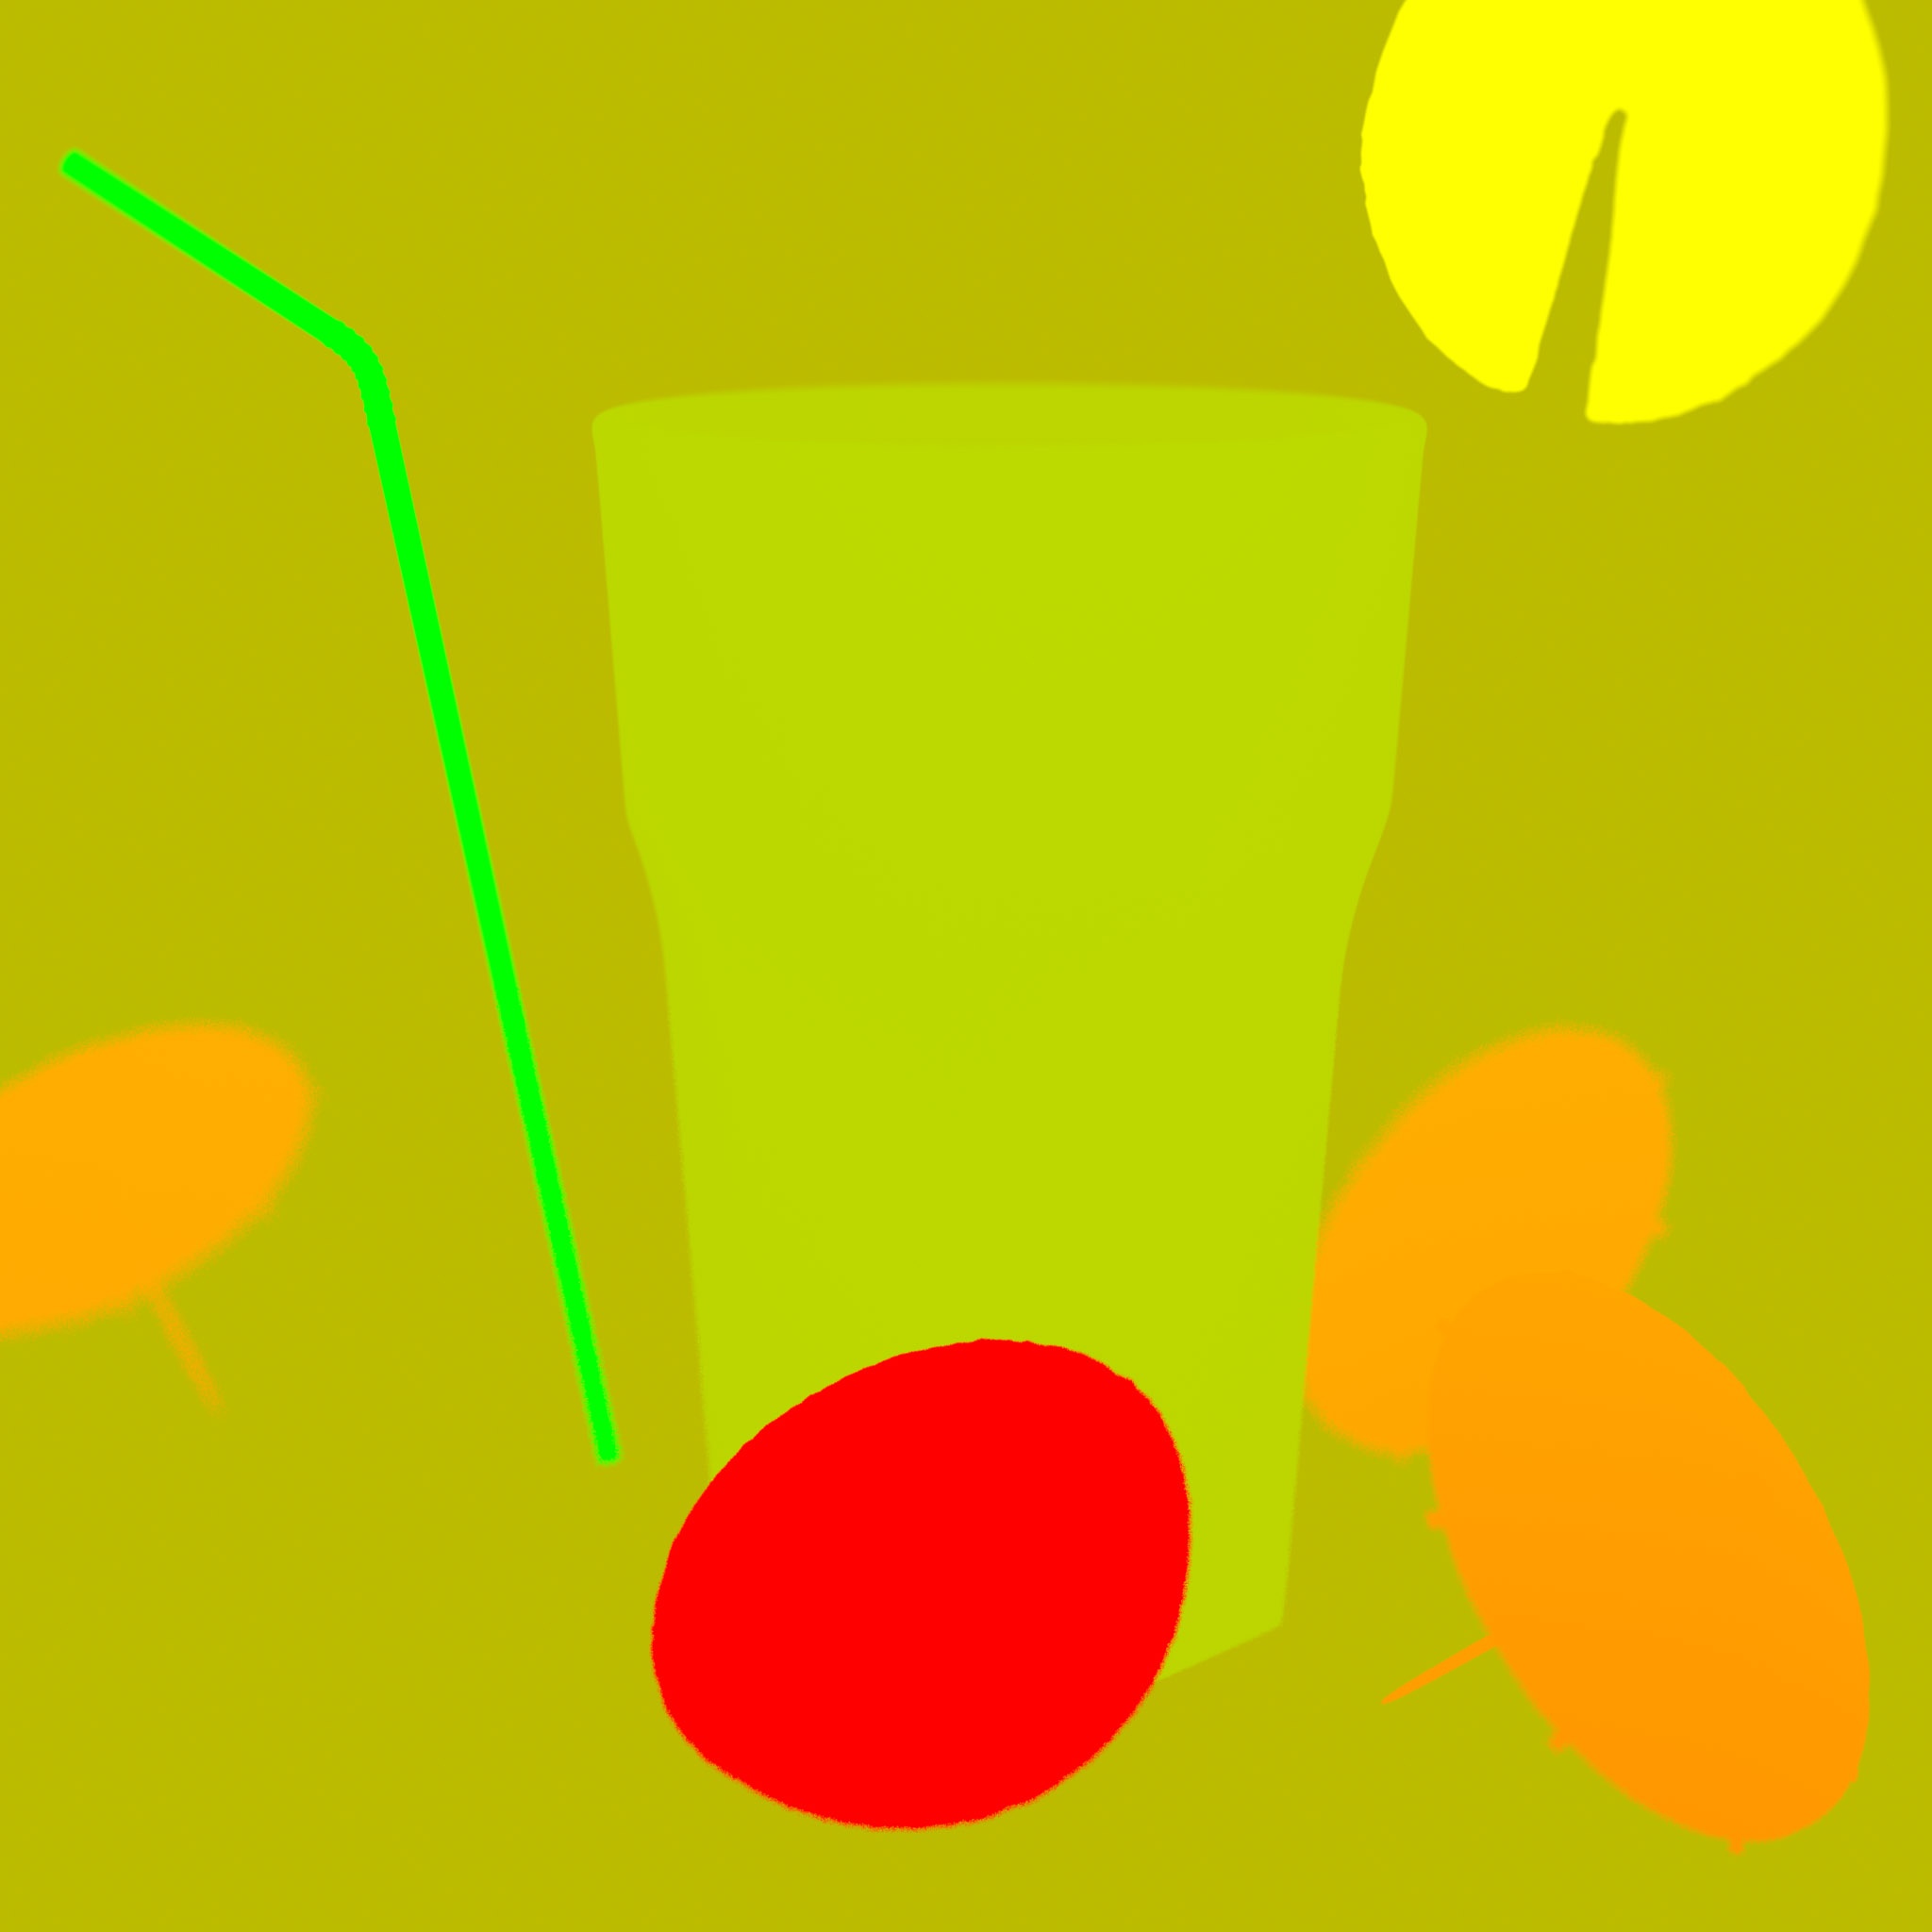
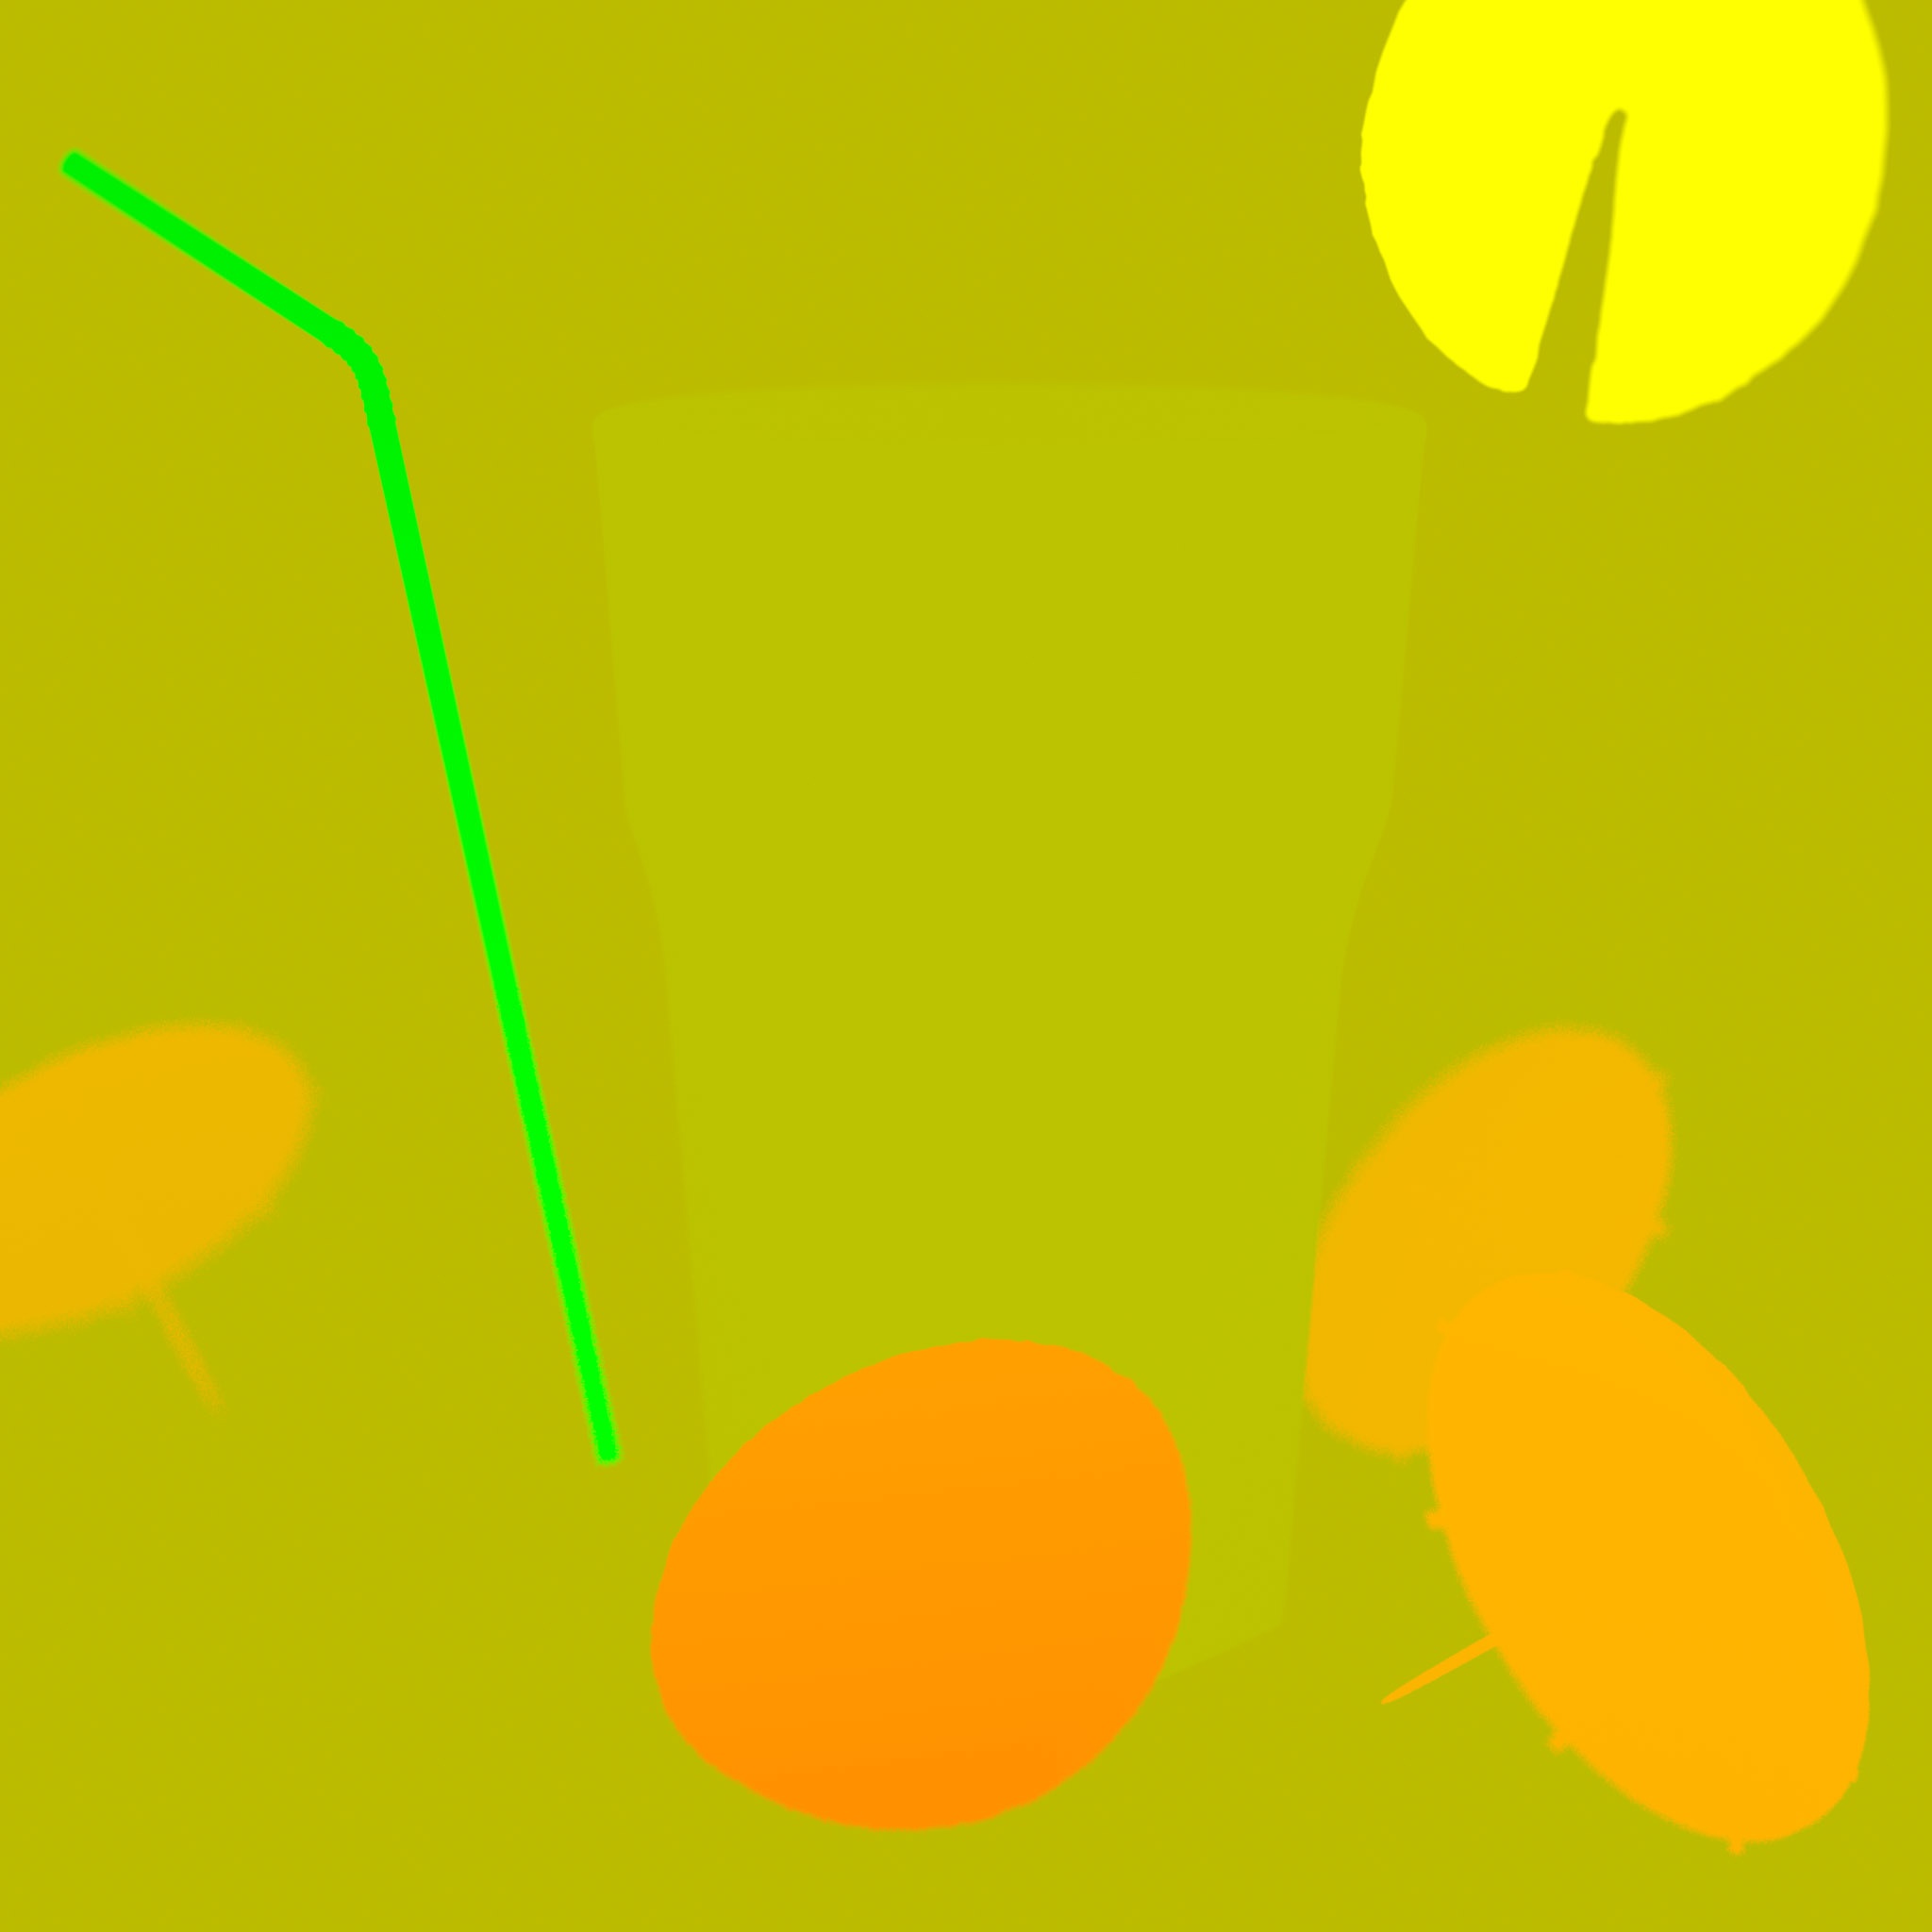
If the scene contains animation, the Motion Vectors AOV will contain per-pixel motion information. This includes any motion due to object transforms, object deformation and camera transforms. These motion vectors are two-dimensional and are therefore stored in the red and green channels of the Motion Vector AOV. The 'Filtering' options enables or disables antialiasing for the Motion Vector AOV.
Motion Blur must be enabled in the Redshift Render Settings in order to enable motion processing across frames.
The image above shows the Motion Vector AOV for the example scene. We have made several of the objects move about the scene but the camera remains static. We used the default AOV settings (8 pixels, and [0, 1] min/max range). As it can be seen, most of the pixels in the scene don't move and have an R=0.5, G=0.5 (mid-yellow) color. Given the [0, 1] min/max range, this translates into a zero vector, i.e. no motion. If the minmax range was [-1, 1], these pixels would have been black instead of yellow. The lemon on the rim of the glass is moving up which means a stronger Y (green channel) component. The table lemon and drink parasols are both moving to the right which means a stronger X (red channel) component. You will notice that the table lemon is a much brighter red compared to the parasols, this is because the table lemon is moving to the right much faster than they are. You can also see this difference in motion intensity illustrated in the accompanying beauty rendered with the Motion Vector AOV disabled to demonstrate this example with Redshift's real 3D motion blur.
When a Motion Vector AOV is enabled in your scene all Redshift motion blur will be disabled automatically for the beauty as this would be undesirable for a Motion Vector AOV.
We recommend using EXR files to store Motion Vector AOVs as they can contain enough precision and will successfully work with all the options described below.
|
|
|
|
Max Motion: 8 Image Output Min: 0 Image Output Max: 1 |
32 0 1 |
|
|
|
|
|
|
|
Max Motion: 8 Image Output Min: -1 Image Output Max: 1 |
128 -1 1 |
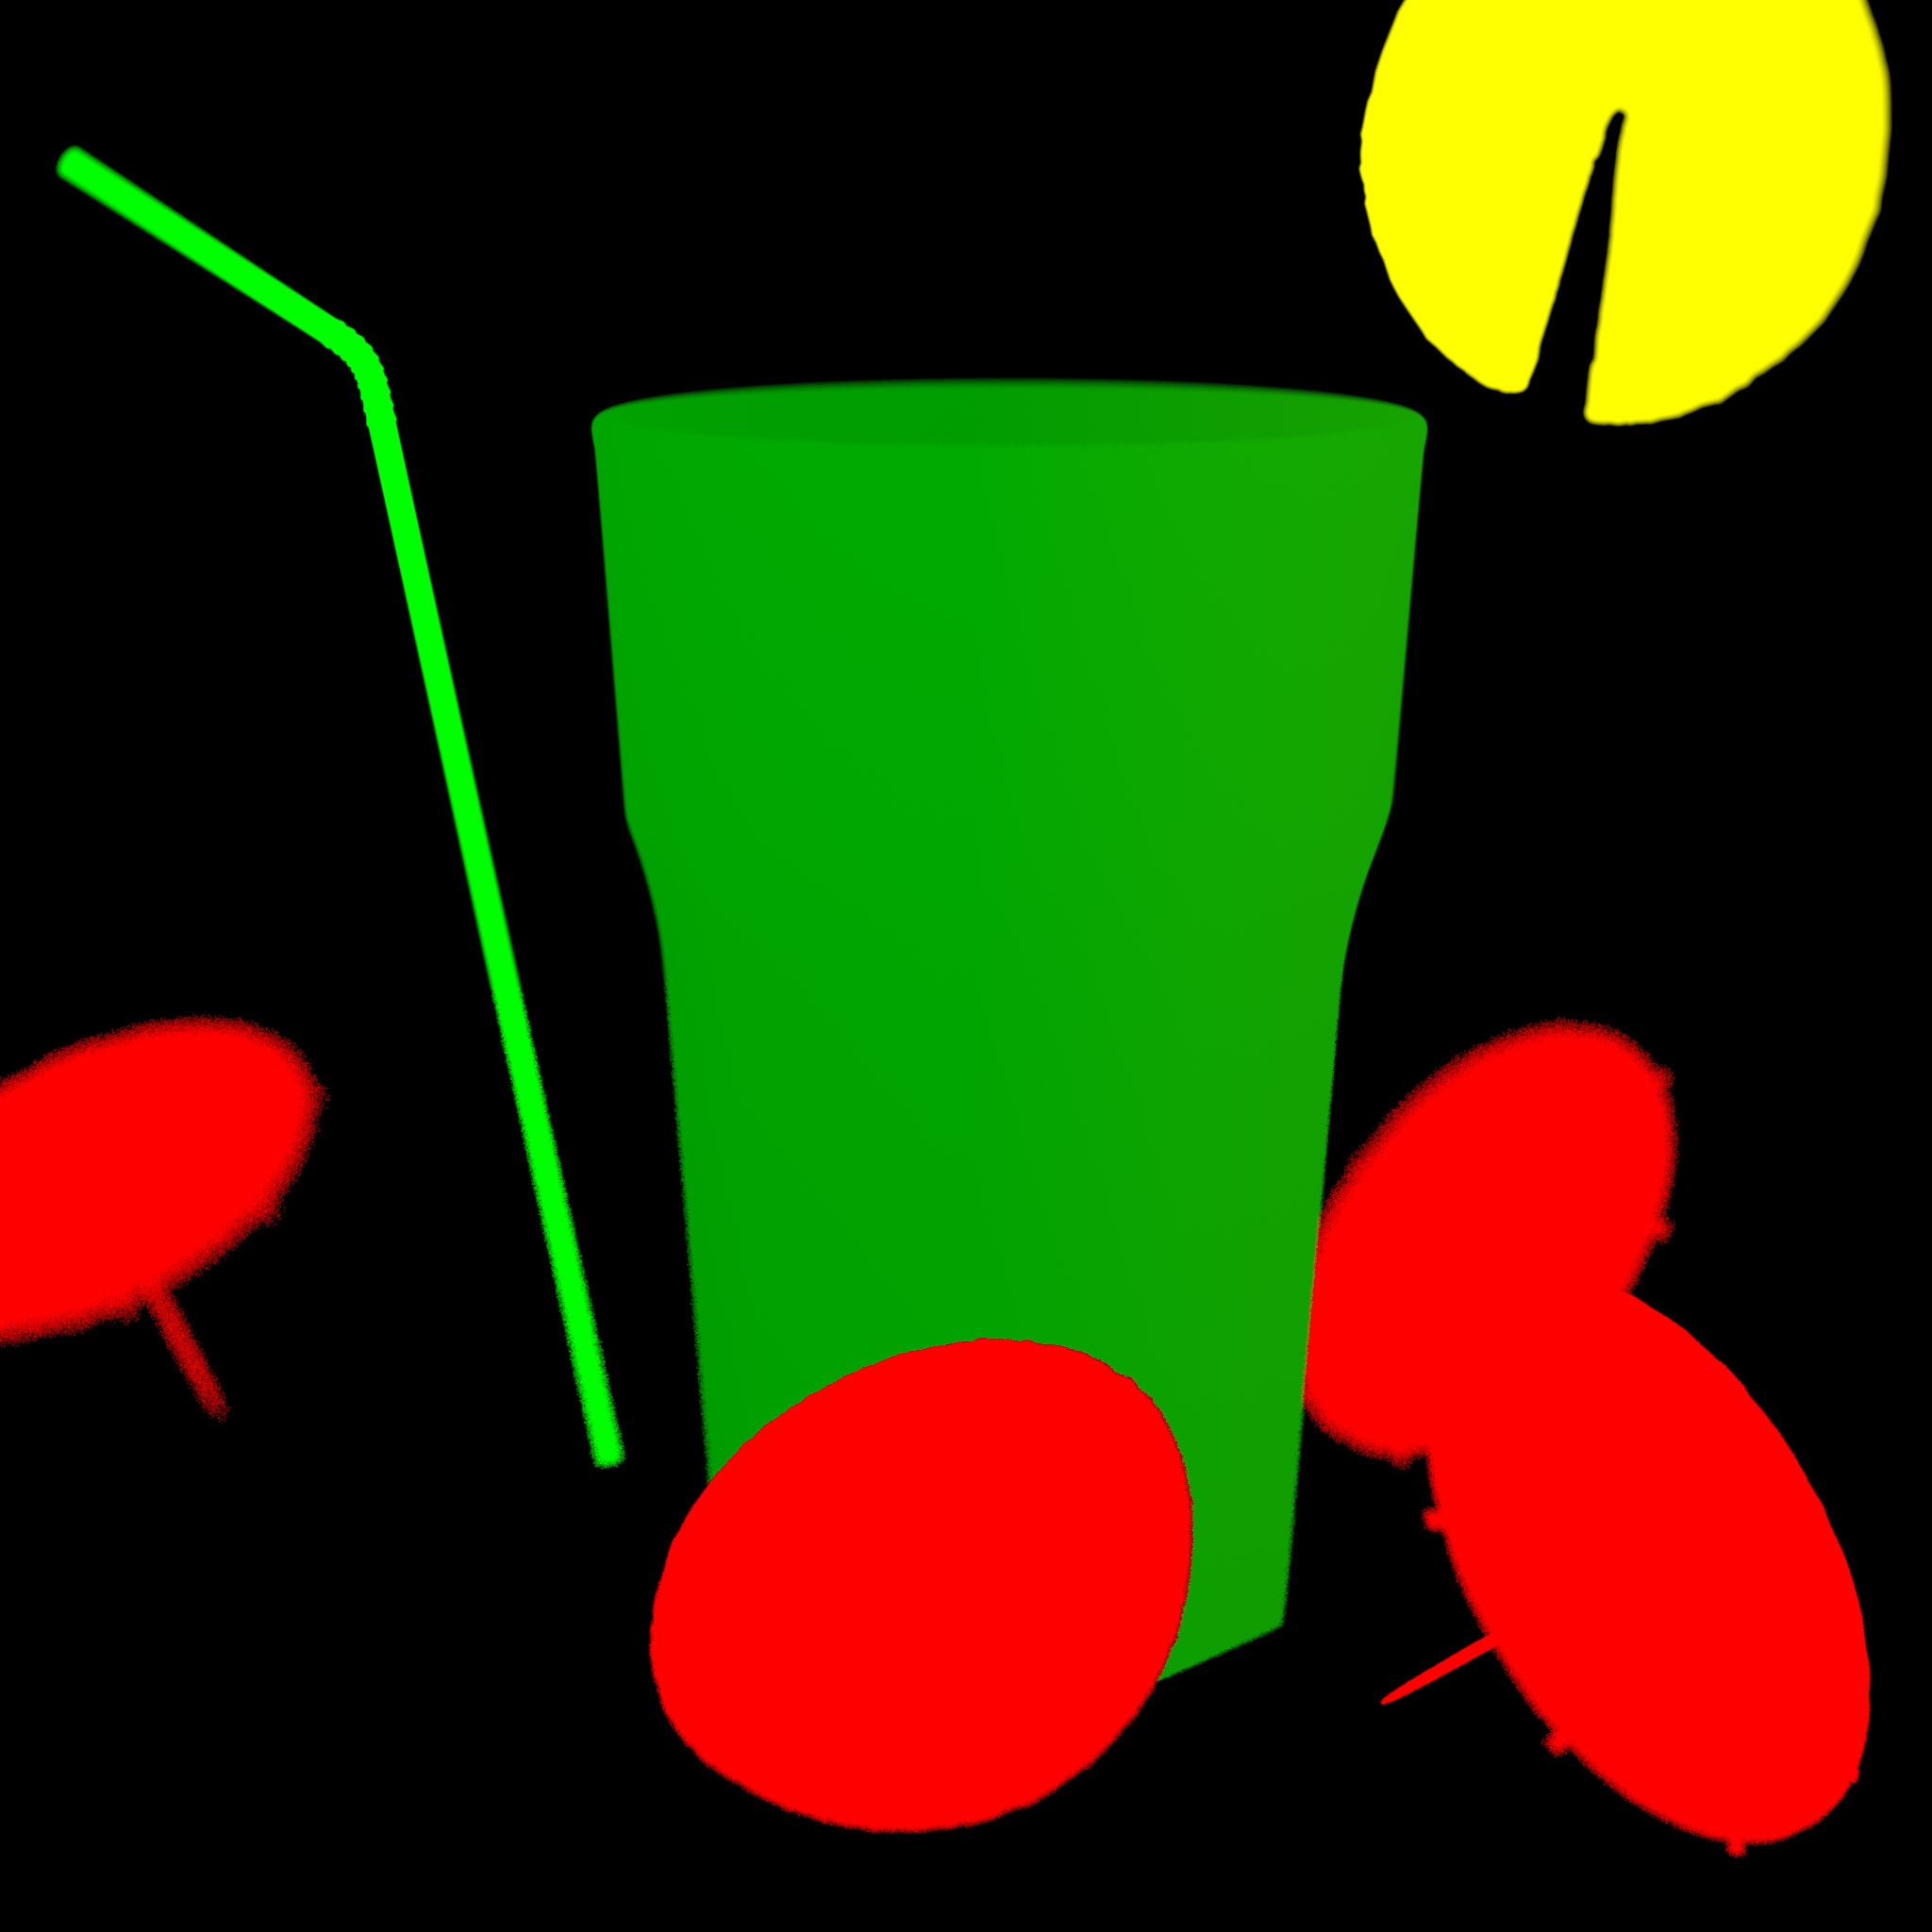
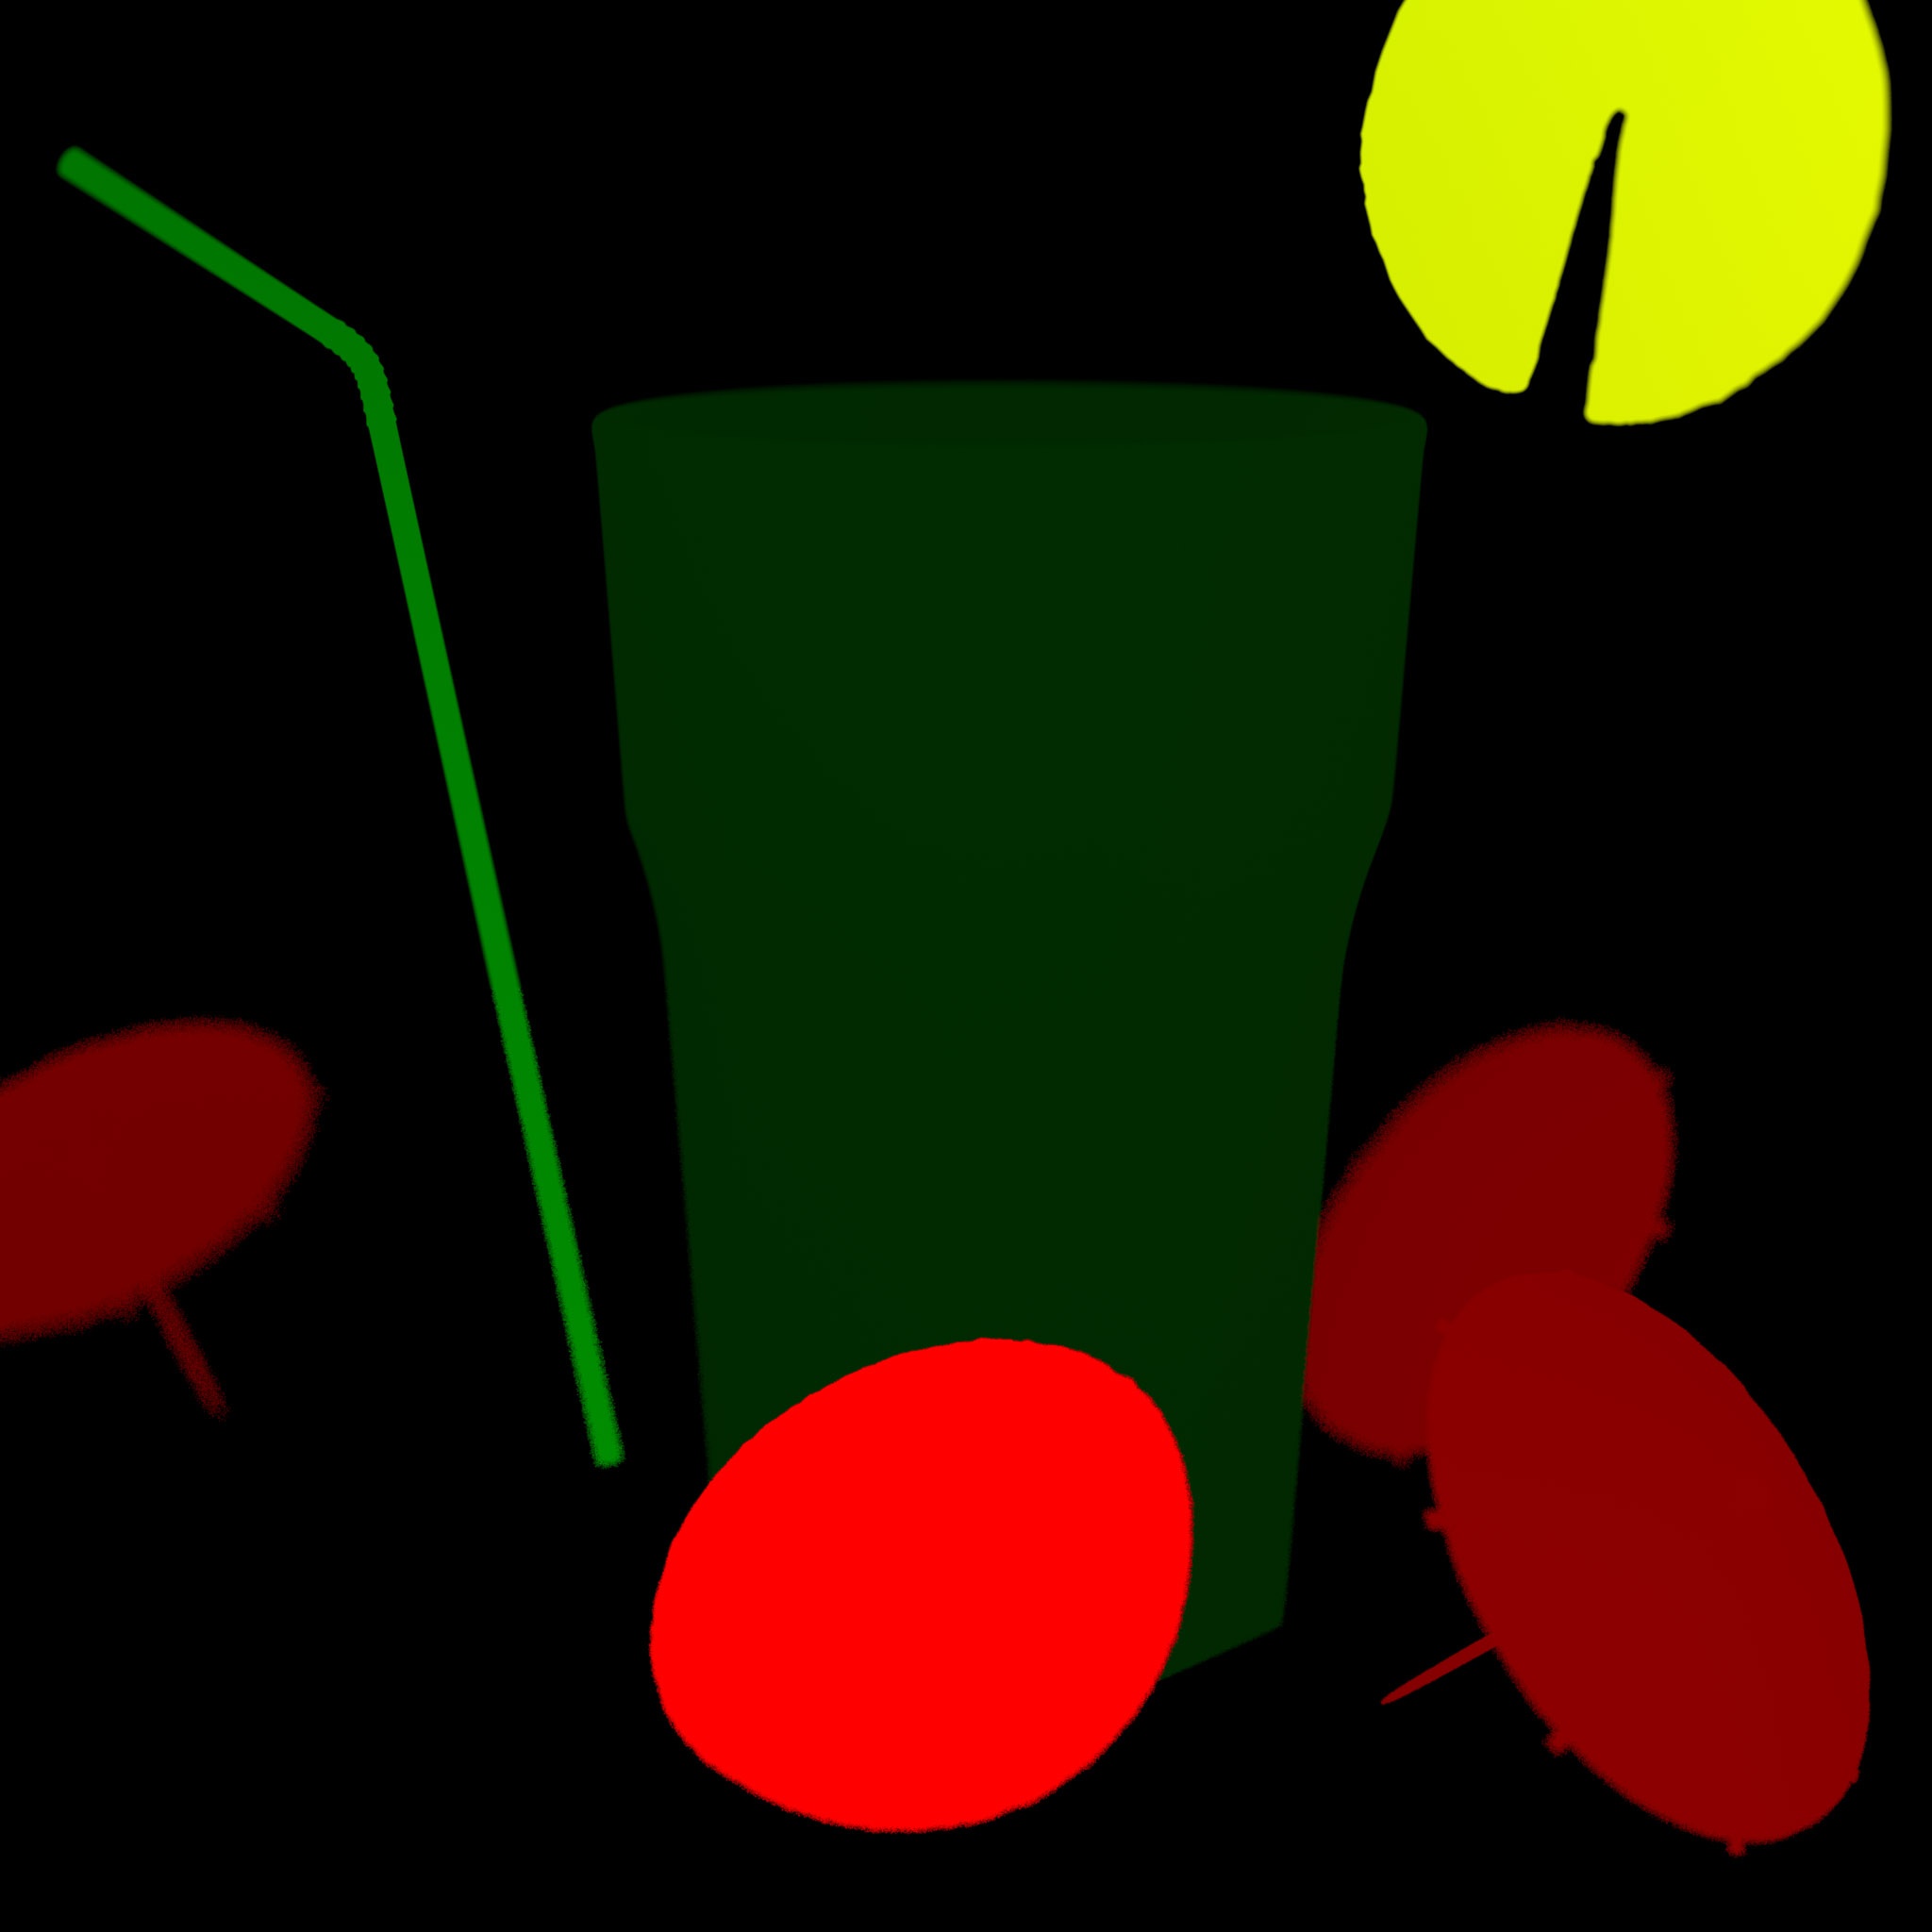
The 'max motion in pixels' option specifies the maximum possible motion that should be encoded into the AOV image. The default setting is 8. This means that any pixel that moves by more than 8 pixels will still be considered as if it moved by 8 pixels. Apart from clamping, this value also doubles as a normalization factor. I.e. the motion vector will be divided by it. The images above demonstrate how different Max Motion values extend the range between different motion intensities of objects in the scene.
The 'image output min/max' options control how the motion vector should be encoded to the final image's red and green channels. Typically, only two valid combinations exist: either the [0, 1] which is our default, or [-1, 1] which some comp packages need.
-
With the [0, 1] default setting:
-
Maximum negative motion will get a R/G value of 0.
-
No motion will get a R/G value of 0.5 (or 128 for 8-bit formats). In other words, the vectors are going to be 'centered' around 0.5 (or 128 for 8-bit formats).
-
Maximum positive motion will get a R/G value of 1.0 (or 255 for 8-bit formats).
-
With a [-1, 1] default setting:
-
Maximum negative motion will get a R/G value of -1.
-
No motion will get a R/G value of 0.0.
-
Maximum positive motion will get a R/G value of 1.0.
Please note that only EXRs can represent negative numbers so if you use a [-1, 1] range, make sure to avoid 8-bit formats!
The 'output raw vectors' option produces AOV values that contain the absolute motion that a pixel moved between frames. In other words, if a pixel moved 10 pixels to the left and 5 pixels up, the AOV red and green channels will be (-10.0, 5.0).
Please note that this option overrides all other options, except 'Filtering'.
If 'no clamp' is enabled, then no motion clamping will happen but computed motion vectors will still be divided by the 'max motion in pixels' value. This is explained with the examples listed below.
Here are a few examples to explain the 'max motion', 'no clamp' and 'image output min/max' options in practice:
-
Scenario 1: Motion vector (-8, 20) with 'max motion' set to 40 and 'image output min/max' set to [0, 1]
-
The max motion will first divide both axis by 40. So (-8, 20) becomes (-0.2, 0.5).
-
The [0, 1] range multiplies these values by 0.5 and adds 0.5. It does that to fit a [-1, 1] range into a [0, 1] range.
-
So (-0.2, 0.5) becomes (0.4, 0.75), which is what is stored in the final AOV.
-
Scenario 2: Motion vector (-80, 200) with 'max motion' set to 40 and 'image output min/max' set to [0, 1]
-
This is the same example as the one above but with much stronger motion.
-
Because the motion is greater than 'max motion', it will be clamped to 40 and then divided by 40. So (-80, 200) becomes (-1,1).
-
The [0, 1] range multiplies these values by 0.5 and adds 0.5. So (-1, 1) becomes (0.0, 1.0), which is what is stored in the final AOV.
-
Scenario 3: Motion vector (-80, 200) with 'max motion' set to 40 and 'image output min/max' set to [0, 1]. But with 'no clamp'!
-
This is the same example as the one above but with no clamping.
-
The same division by 40 happens but no clamping, so (-80, 200) becomes (-2,5).
-
The [0, 1] range multiplies these values by 0.5 and adds 0.5. So (-2,5) becomes (-0.5, 3), which is what is stored in the final AOV.
-
Scenario 4: Motion vector (-8, 20) with 'max motion' set to 40 and 'image output min/max' set to [-1, 1]
-
This is the same as Scenario 1 but with a different min/max range.
-
The max motion will first divide both axis by 40. So (-8, 20) becomes (-0.2, 0.5).
-
The [-1, 1] range means that no offset/scale happens to these values. So (-0.2, 0.5) is stored in the final AOV.
-
Scenario 5: Motion vector (-80, 200) with 'max motion' set to 40 and 'image output min/max' set to [-1, 1]
-
Same example as the one above but with stronger motion.
-
Because the motion is greater than 'max motion', it will be clamped to 40 and then divided by 40. So (-80, 200) becomes (-1,1).
-
The [-1, 1] range means that no offset/scale happens to these values. So (-1,1) is stored in the final AOV.
-
Scenario 6: Motion vector (-80, 200) with 'max motion' set to 40 and 'image output min/max' set to [-1, 1]. But with 'no clamp'!
-
Same example as the one above but with no clamping.
-
The same division by 40 happens but no clamping. So (-80, 200) becomes (-2,5).
-
The [-1, 1] range means that no offset/scale happens to these values. So (-2,5) is stored in the final AOV.
Puzzle Matte
|
|
|
| Puzzle Matte 1 AOV | Puzzle Matte 1 Reflections / Refractions |
|
|
|
|
|
|
| Puzzle Matte 2 AOV | Puzzle Matte 2 Reflections / Refractions |

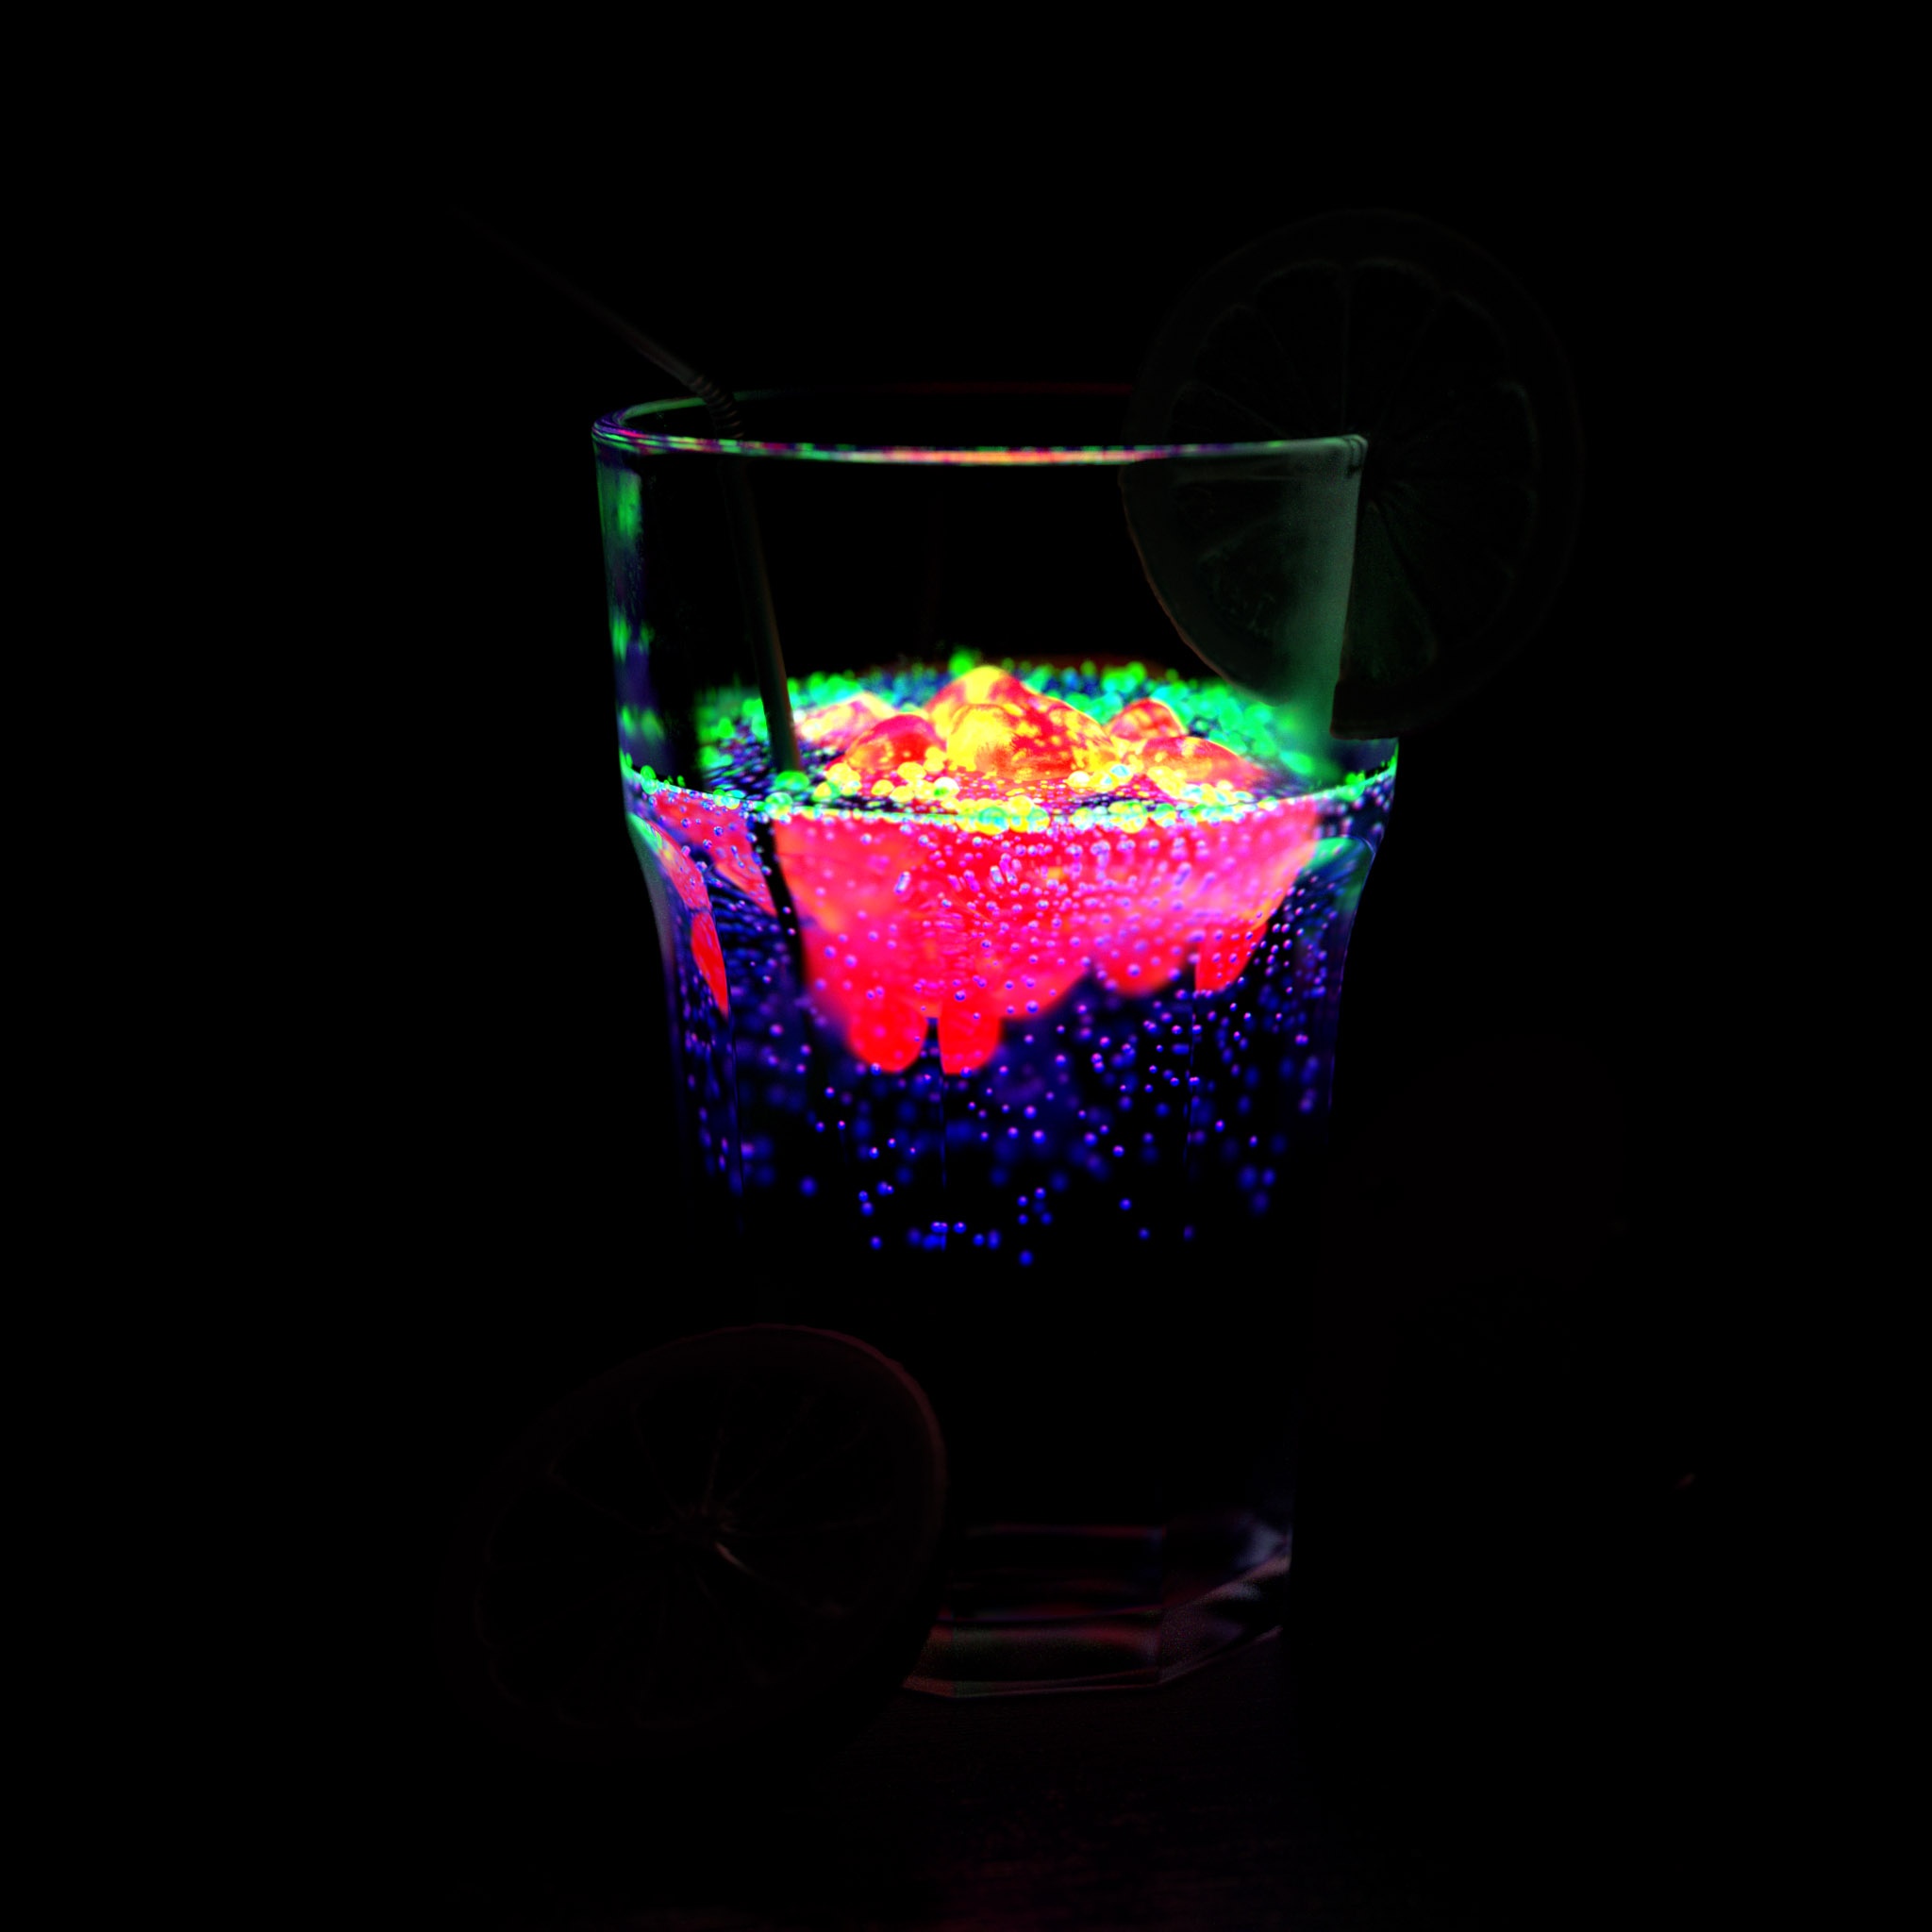
The Puzzle Matte AOV allows each of the R, G, B channels to contain the per-pixel contribution of a single object or material. Traditional objectID/materialID AOVs typically hold a single value per pixel which can produce aliasing-related issues when the same pixel can 'see' multiple objects/materials. This is especially true when the scene uses depth of field and motion blur. Additionally, having a single ID per pixel prevents the production of matte masks through reflections or refractions.
The Puzzle Matte AOV, on the other hand, holds per-pixel contributions of object/material IDs on separate RGB channels, which means the same pixel can 'mix' contributions from multiple (up to 3) objects/materials and be workable even in the presence of depth of field, motion blur and reflection/refraction. The 'reflect/refract IDs' option defines whether the puzzle matte channels should also be filled using reflection/refractions. This allows the creation of object/material ID masks not only as seen from the camera but also as seen through reflections and refractions.
In the examples above we have two different Puzzle Matte examples, Puzzle Matte 1 shows the lemons, drinking glass, and straw on their own respective color channels. Puzzle Matte 2 place the ice, underwater carbonation and surface carbonation bubbles on individual color channels. You can see that when reflections & refractions are disabled we can't see inside the glass at all, this is why the first Puzzle Matte 2 image is completely black, everything is behind the refractive glass in this Puzzle Matte.
Setting up a Puzzle Matte:
Depending on whether the user decided to work with object IDs or material IDs, the appropriate mode for the puzzle matte AOV has to be set.
Then, each puzzle matte AOVs (there can be multiple puzzle matte AOVs) needs its Red/Green/Blue channels filled with the appropriate object/material IDs. Say we had three objects with object IDs 11, 21, 33 and we set the Red/Green/Blue channels to 11, 21, 33. This means that the Red channel will contain object ID 11, the Green channel will contain object ID 21 and the Blue channel will contain object ID 33.
If you have more than 3 objects/materials you want to create matte masks for, you can create multiple puzzle mattes and use different combinations of the IDs for red/green/blue.
Deprecated AOVs
The AOVs listed below have been deprecated due to the existence of a newer and better method outlined in the AOV description.
Ambient Occlusion (Legacy)
Please use the new "Ambient Occlusion" AOV or create a Custom AOV with more flexibility and fewer limitations.
|
|
|
| Ambient Occlusion AOV | Ambient Occlusion AOV: greyscale |

The Ambient Occlusion (AO) AOV contains the ambient occlusion component of the final shaded result. Redshift outputs AO information as a scalar in the red channel.
In the image above only the drinking glass has any information available in the Ambient Occlusion AOV, this is because there is an AO shader being used as a part of its procedural texturing.
If no AO shader exists in your scene, this AOV will be completely black.
For more flexibility in AOV output and compositing please use an Ambient Occlusion shader as your Default Shader in a Custom AOV, please see here for more info.