Object Manager
![]()
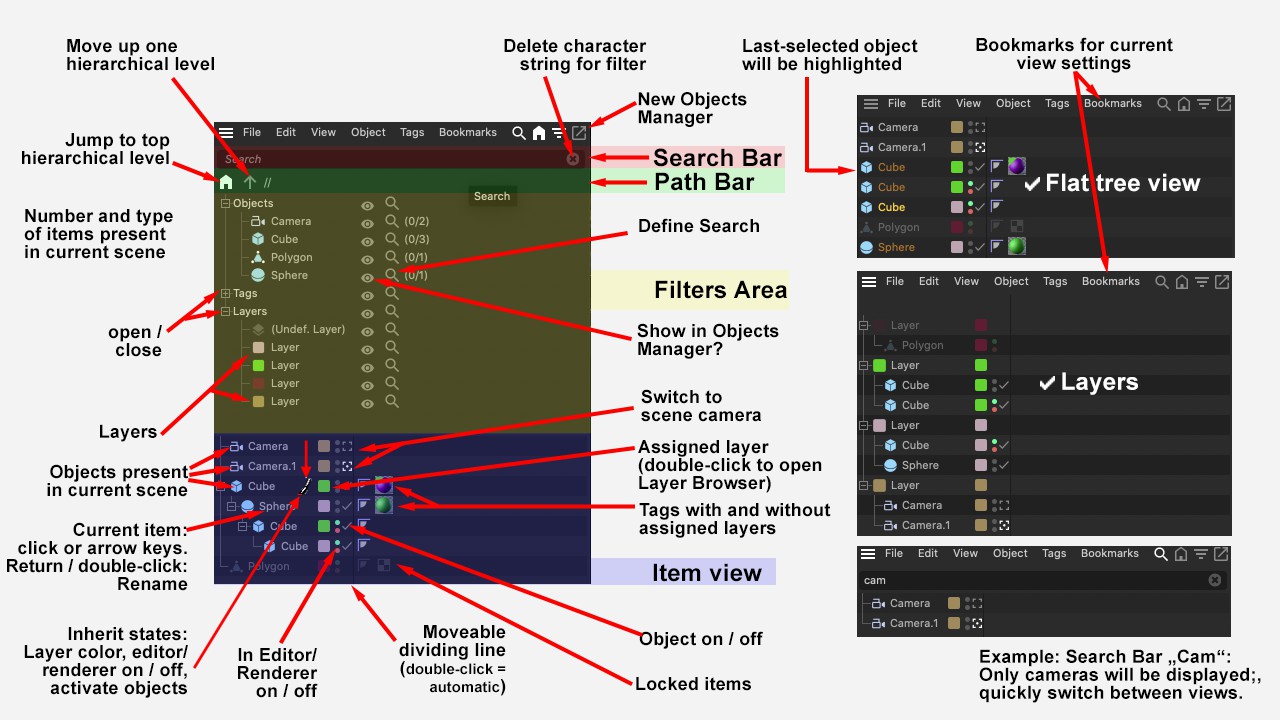 Various states (depending on the view settings) of the Object Manager, which offers extensive filter settings in addition to the display of objects and tags.
- Are the corresponding elements hidden in the filter area (View: Show filters)?
- Is there a string in the search line (View: Show search line) that hides all other elements?
- Does the Layer Manager hide any elements in the managers (Layer Manager: View/Manager)?
The Object Manager is the control center for all scene objects and their tags. You can freely decide what the Object Manager should display. You don't want to see anything other than the polygon object itself when modeling? No problem, just display this object and hide everything else. You only want to take care of the 17 lights of a monstrously large scene? No problem, hide everything else.
This is what it looks like when parts of a hierarchy are hidden:
 On the right after the cube of the green layer has been faded away.
A dashed line is then displayed. This tells you: Something here does not correspond to the true (internal and used for rendering) hierarchy!
During development, the focus was on maximum flexibility. Depending on the view mode and filter, the Object Manager can look completely different. Thanks to powerful filters, you can (almost) freely determine what the respective Object Manager - up to 3 additional Object Managers can be opened and placed in the layout - should display at all. It is easy to keep track of even extremely large and substantial scenes with a correspondingly large number of elements. By using bookmarks, you can quickly switch between completely different view variants.
The main tasks of the Object Manager:
- Management of all objects with regard to names, hierarchy, visibility, etc.
- Management of other elements such as tags that can be assigned to objects here.
- In conjunction with the Layer Manager, elements can be assigned to different layers, which can then be handled layer-specifically (e.g., hide all elements of a layer, lock, etc.).
The following description applies to the Object Manager in its default state without the search bar, path bar or filter displayed. Depending on the defined Object Manager view (View menu), it may also look different. This is then described under the corresponding menu item.
On the left-hand side of the Object Manager, all the elements that make up a scene are displayed graphically in a tree structure.
Tree structure branches can be expanded and collapsed as follows:
- Click on + or -. Also press the Ctrl/Cmd key if you want to expand the substructure completely.
- Left and right arrow keys: the active branches expand and collapse.
Within the Object Manager, individual elements or element groups can be rearranged or copied using drag & drop (press the Ctrl/Cmd key at the same time). Objects can also be subordinated to other objects.
The filter and search bar functions described below can be used to restrict the display of elements. The description of objects, tags and materials can be found in the corresponding sections of this documentation.
Elements are selected by clicking with the mouse, dragging a selection (an additive selection is made when the Shift key is also pressed) or using the arrow keys if a selection already exists.
The following keyboard shortcuts apply when clicking on an object in a hierarchy:
- Middle mouse button: The clicked object including all sub-objects is selected.
- Alt + middle mouse button: The clicked object including all objects in the same hierarchy level are selected. Sub-objects are excluded.
Multiple selection is of course possible in several ways. These are the primary methods:
- Drag a selection with the mouse.
- Click on an element and, holding down the Shift key, click on another element. This and all elements in between are selected.
- Press the Up and Down arrow keys while holding down the Shift key.
- With some commands from the Edit menu of the Object Manager.
- Elements can be inverted in their selection status using the Ctrl/Cmd key.
In the Attribute Manager, the common properties (all properties for individual selections) of the selected elements are displayed and can be changed there.
Selected elements are highlighted in color in the Object Manager.
The last selected object becomes slightly brighter (see above) first image top right). Some functions, such as the Spline Pool commands, take this into account.
Sub-objects of selected objects that are not selected themselves are drawn in a darker color.
Element names can be renamed as follows:
- Double-click on name
- Select an object and press the Returen button.
In this state (open name input field), you can use the arrow keys to jump up and down in order to rename many elements at maximum speed. It is not necessary to press the Return button.
The middle narrow bar of the Object Manager contains some buttons that can vary slightly depending on the object (from left to right):
Layer color, editor/renderer on/off (these buttons can also be found in the basic tab of the objects as well as partially under objects/object display and are also described there), activate/deactivate object and, in the case of cameras, a button with which you can quickly switch the scene camera for the perspective view.
The states of layer colors, editor/renderer on/off and object activation can be inherited to other similar buttons by holding down the mouse button. The cursor turns into a brush. Then simply paint these states on elements above or below them.
The right-hand side of the Object Manager shows the tags assigned to objects.
Drag & drop in the Object Manager
Drag & drop refers to the method of clicking on an object/tag, holding down the mouse button, dragging the object/tag to another location and dropping it there by releasing the mouse button. Different actions are triggered depending on where you release the mouse.
Reordering the object/tag sequence
Move an object/tag between two existing objects/tags or to the end of the list. The fixed object/tag is moved to this position. The mouse pointer changes to the following symbol:

If you want to create a copy, hold down the Ctrl/Cmd key while sliding. The mouse pointer changes to the following symbol:

The insertion position is indicated in advance by a line.
Changing the object hierarchy
Move an object onto an existing one. The object being held now becomes a sub-object of the other object. The mouse pointer changes to the following symbol:

If you want to create a copy, hold down the Ctrl/Cmd key while sliding. The mouse pointer changes to the following symbol:

Drag & drop can also be used on the right-hand side of the Object Manager. To assign a tag to another object, move the relevant property symbol into the row of the other object. The mouse pointer changes to the following symbol:

If you want to create a copy, hold down the Ctrl/Cmd key while sliding. The mouse pointer changes to the following symbol:

The future parent object is displayed in advance in the list with a colored background.
If an action is not possible, a prohibition sign appears:

Shortcuts when working in the Object Manager
New object creation
Note the following buttons when creating a new object (this also works with an existing multi-selection, several new objects are then created accordingly):
- Shift: Object is inserted as a Child object of the active object. In the case of multiple selection of sub- and super-objects, only 1 object (intended for deformers) is created. This can be used, for example, to assign a deformer to each object with the same position for complex object selections.
- Shift + Alt: Like Shift, except that the newly created object is subordinated to EVERY selected object.
- Alt: Object is inserted as a parent object of the active object.
- Alt + Ctrl/Cmd: similar to the command
 Group Objects, except that any object is used as the parent object instead of the null object.
 - Ctrl/Cmd: Object is arranged on the same hierarchy level as the active object (behind it).
- Ctrl/Cmd + Shift: Object is arranged on the same hierarchy level as the active object (before it).
Other functionalities
Alt + click on green tick/red cross: deactivates/activates the object and all its sub-objects. This allows you, for example, to switch all generators/deformers in a hierarchy on and off at lightning speed.