Key Properties
The key is shown in this frame of the animation.
This option fixes the key at the current time and thus protects it against unintentional movement, for example.
See Breakdown Color.
This mutes the key, which means that none of the stored values of these keys are evaluated in the time intervals between these muted keys. Instead, the values of the neighboring keys that are not muted continue to be evaluated. The effect is therefore as if the muted keys were not there at all. This can be used, for example, to temporarily deactivate the secondary movements of an animation in order to concentrate on the key poses of the remaining active keys and, for example, to be able to fundamentally examine their timing.
See Breakdown.
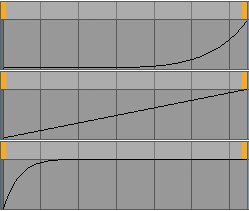 From top to bottom, the effects of the Bias values 40, 0 and -100 on the interpolation between two keys are shown here as an example.
This controls the interpolation between the keys. You can use the Bias to speed up or slow down the morphing between the keys. However, this does not affect the fundamentally linear interpolation of the position or tangent values, but only their transition over time. The following video also shows this in comparison.
Normally, only neighboring keys are interpolated. If you activate the Soft option, any existing keys before and after it will be taken into account. This makes the movement more harmonious and organic.
Example
PLA animation is also known as 'vertex animation'.
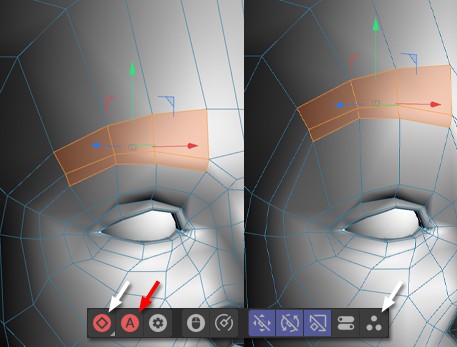 Switch to PLA recording mode and create PLA keys at different times (the auto-keying mode is marked in red). Head: © Bunk Timmer
For example, if you want this face to raise an eyebrow, proceed as follows:
- Select the corresponding points or polygons and create a PLA key.
- Move the time slider to another time. Then move the corresponding points/polygons and create another PLA key. Done. As soon as you run the animation, the right eyebrow is raised mockingly. Of course, you can also have the figure open its mouth, pull out its ear or play other mischievous tricks.
You can also use Autokeying to save yourself extra clicks on the record button. In addition, no selection of points or polygons on the object is required to record the keys. The Magnet or Brush tools can therefore also be used for shaping, for example.