OpenGL
For best OpenGL display results you should always use state-of-the-art graphics cards.
Texture Interpolation controls which method is used to interpolate the textures when you zoom objects in the viewport: Nearest or Linear. Nearest uses the color of the nearest pixel in the texture, causing hard transitions in the zoomed texture. Linear uses linear gradients (i.e. linear interpolation) to create smooth or blurry transitions in the zoomed texture.
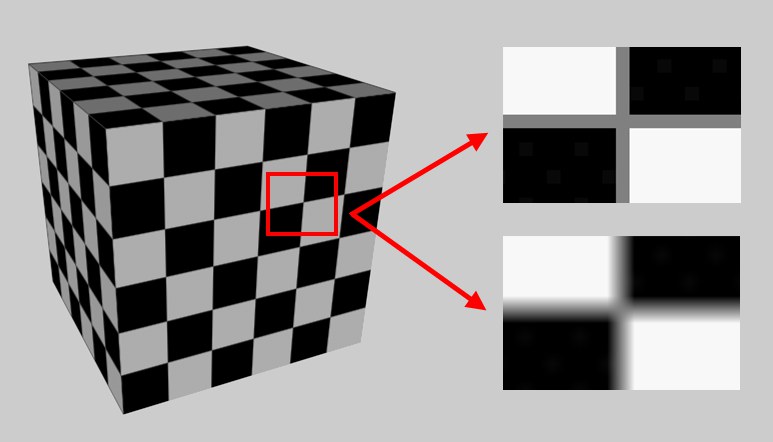 Texture Interpolation set to Nearest (top right) and Linear (bottom right).
This method, which transitions between consecutively, internally "stockpiled" effigies of the texture that are continuously reduced in size, offers the best image quality:
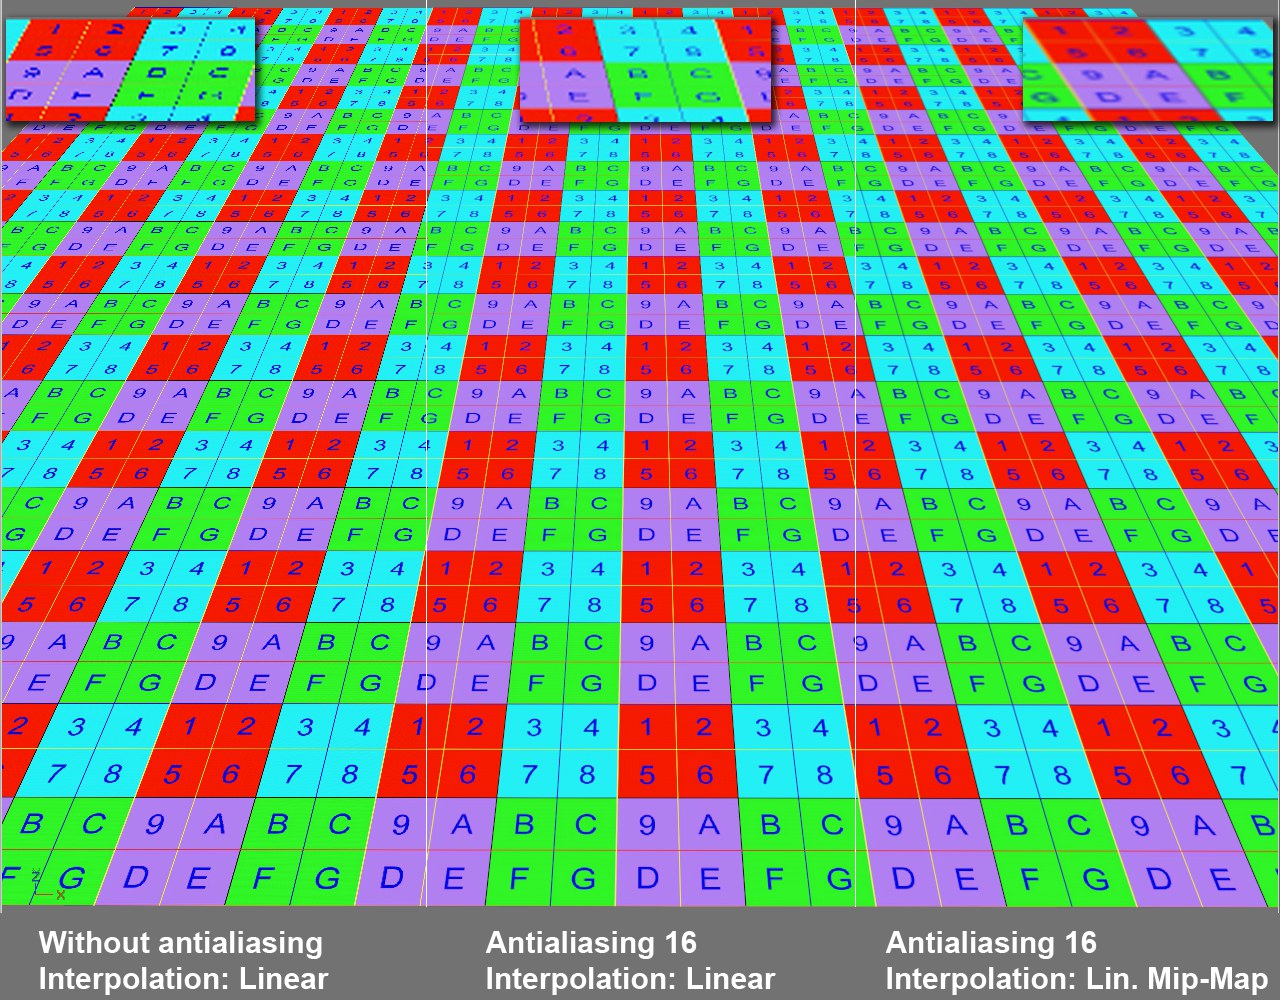 Various settings and their effects.
Use this selection menu to define the degree of antialiasing that will be displayed while working in the Viewport (not when rendering).
Antialiasing does not work if:
-
 Transparency
This option is not that easy to understand. This value defines the number of transparency layers that will be drawn correctly. It can be increased if faulty displays occur for several consecutive objects in a row that have different transparent materials:
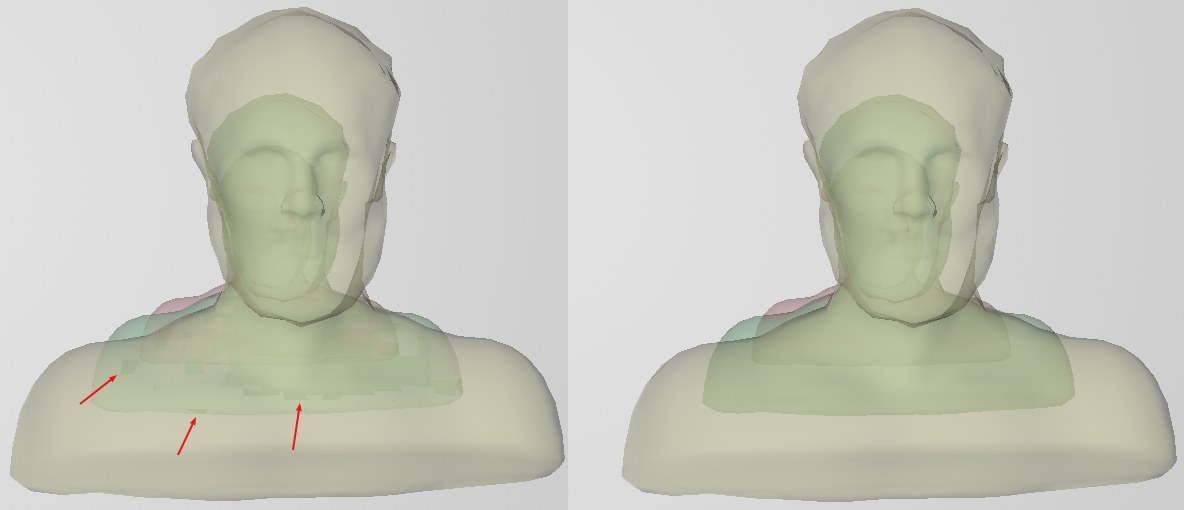 At left a value that is too small, at right a larger Maximum Transparency value.
A value of 0 will disable the correct rendering and will display the transparency as a raster effect.
Use this setting to define the maximum number of light sources will calculate (in the order in which they appear in the Object Manager). Higher values will lead to slower display times.
RELEASE 21
The texture view can also be smoothed using the UV meshes displayed there. However, this is not always desired when working with UV polygons and points. Non-smoothed points or polygons can sometimes be positioned more precisely - if snapping isn’t used.
Use this setting to define how the shadows of light sources are displayed (in the order in which they appear in the Object Manager). A value of 0 will result in no shadow being displayed. The presence of very many shadows can slow down the display. Shadows are one of the most render-intensive OpenGL features, which is why this option can be used to define a maximum number.
If enabled, the compiled Shaders in the Project will be saved. In rare cases, enabling this option can cause the graphics card’s driver (applies only to Hardware OpenGL) to crash the application. If this occurs, disable this option.
 Note the marked brightness gradations at the left (don’t be irritated by the JPEG artefacting).
Banding can occur when you have gradual gradations in brightness (in the example above it occurs on the transition from RGB 69, 69, 69 to RGB 70, 70, 70). Dithering can visually resolve hard color transitions.
Click on this button to display the OpenGL capabilities of your system. The following window will open:
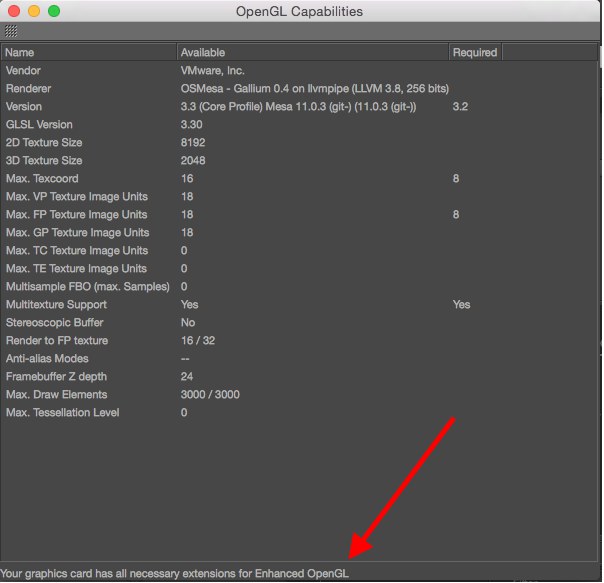
Several values will be listed:
- Center column: Your graphic card’s values.
- Right column: The minimum requirements for Enhanced OpenGL.
More important than the values shown is the statement at the bottom of the window; it should read: Your graphics card has all necessary extensions for Enhanced OpenGL. Only if you see this message will you be able to select Enhanced OpenGL in the OpenGL shading settings. This test is also performed automatically when the application is launched.
More information about this special type of OpenGL can be found in the OpenGL shading settings of this chapter:
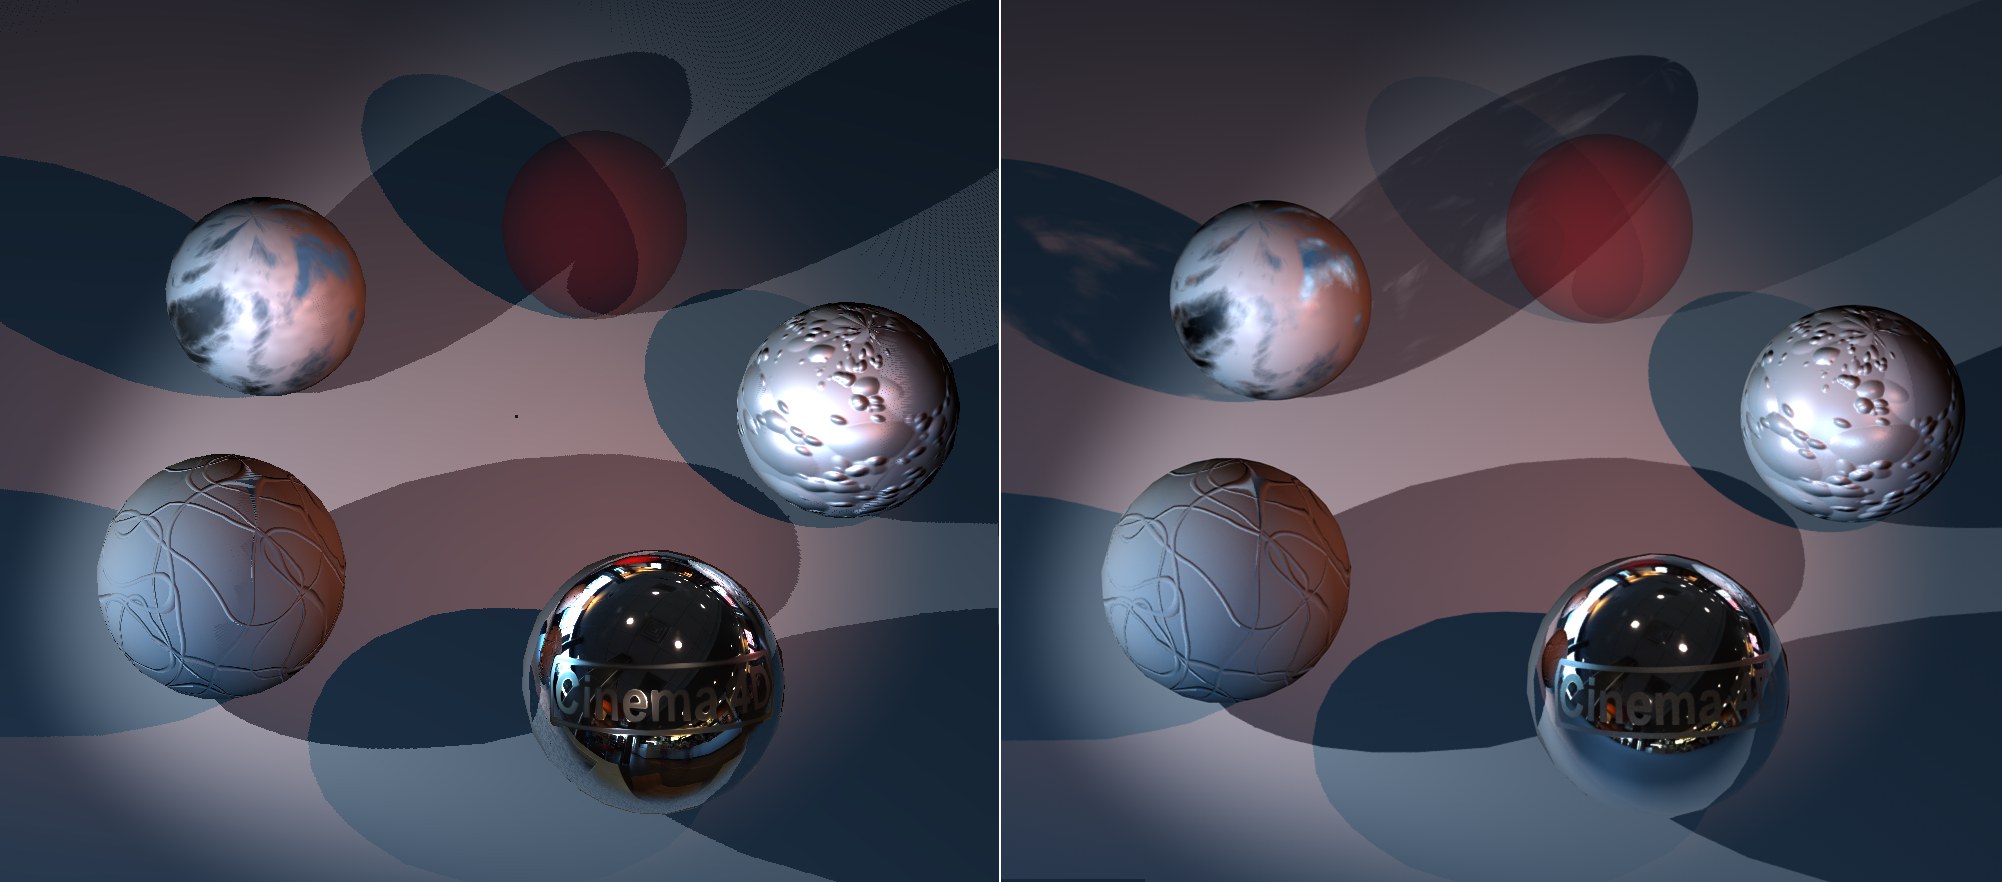 Left: Editor view with Enhanced OpenGL. Right: Rendered. Notice the shadow casting, translucency, bump maps, reflections and normal mapping for the sphere on the right!
Enhanced OpenGL offers the most important material channels and lighting properties that can be displayed fluidly in the editor view without having to render the image.
Enhanced OpenGL can be activated separately in each view (Options menu) also with regard to effects such as shadow, transparency, etc.
Enhanced OpenGL, including corresponding options such as transparency, shadow and post effect, etc., must be activated in the respective view (Options menu). Cinema 4D supports OpenGL post effects (e.g., the Cartoon Renderer post effect) only to a limited degree.
Don’t expect miracles, though. It is impossible for any OpenGL to display all Cinema 4D lighting or material properties and there is no guarantee that the OpenGL display in the editor view will reflect the actual rendered result (OpenGL and Cinema 4D renderers simply differ too greatly from one another). Enhanced OpenGL serves primarily to offer instant visual feedback for everyday situations without having to constantly test-render your scene, in particular with regard to the depiction of shadows.
With regard to OpenGL, Make sure you always use the most current driver for your graphics card.
Also make sure that the graphics card driver lets you enable and disable certain graphics card options. For example, antialiasing for transparent objects can be disabled, which, of course, would result in making it impossible to render smoothed, transparent objects in Cinema 4D.
The following properties are, for the most part, supported and can therefore be seen directly in the editor view:
- Material channels: Color, diffusion, luminance, transparency, environment, bump, normal, alpha, specular, Reflectance (Sky reflections are mirrored correctly; objects are reflected using a reflection approximation; see also Objektreflexion), Displacement (in conjunction with viewport tessellation) (most of these can be activated / deactivated in the Editor channel, exclusively for Enhanced OpenGL display.
- Light sources: The most important options will be implemented (e.g., type, inner angle, outer angle (Spot Light), a Spot Light’s color gradient (Details tab: Use Gradient). Shadows: No Area shadows. Inaccurate shadow depiction can result when working with larger scenes.
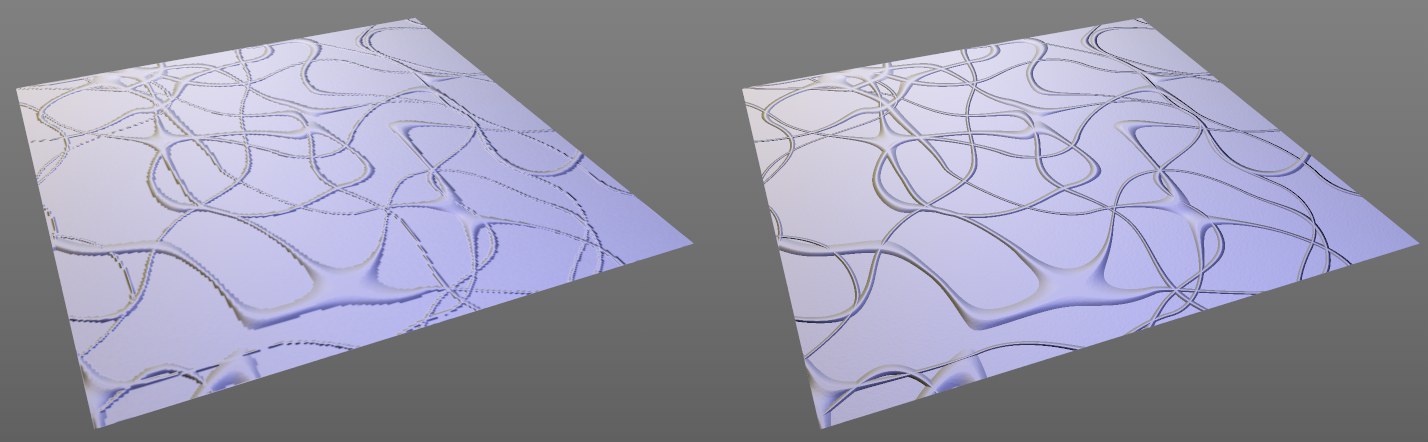 A Noise shader (Sema) in the Normalizer unrendered in the Viewport, left non-native, right native rendering.
Shaders rendered non-natively in the graphics card (e.g., Tiles, Bricks, etc.) will be emulated. This is done using a relatively small shader preview (bitmap) internally that is projected onto the object via UVW projection. These bitmaps will be saved with the scene, which can result in vastly larger (scene) file sizes!
Since this functionality emulates shaders, opening a scene that contains many shaders can require a lot of memory.
RELEASE 21
This and the following button will only be displayed if Cinema 4D is started with minimum OpenGL settings (shift+cmd/ctrl when started).
Here you can, if changes were made, again load the OpenGL settings defined as the start settings. You can define these yourself by clicking on the right button Save Current Settings as Startup.
Save Current Settings as Startup
Saves the current OpenGL settings as the startup settings, i.e., these will be applied each time Cinema 4D is started.