Shader Properties
![]() Seed Mode
Seed Mode
The settings in this menu can be used to define the elements (objects, polygons) for which the texture should be varied.
This setting is common when defining random values. If you don’t like the results of one Seed value then simply enter a different value to get a different result. Equal values will produce an equal disbursement in an otherwise unmodified scene.
Use this setting to define the element on which the variation should be based:
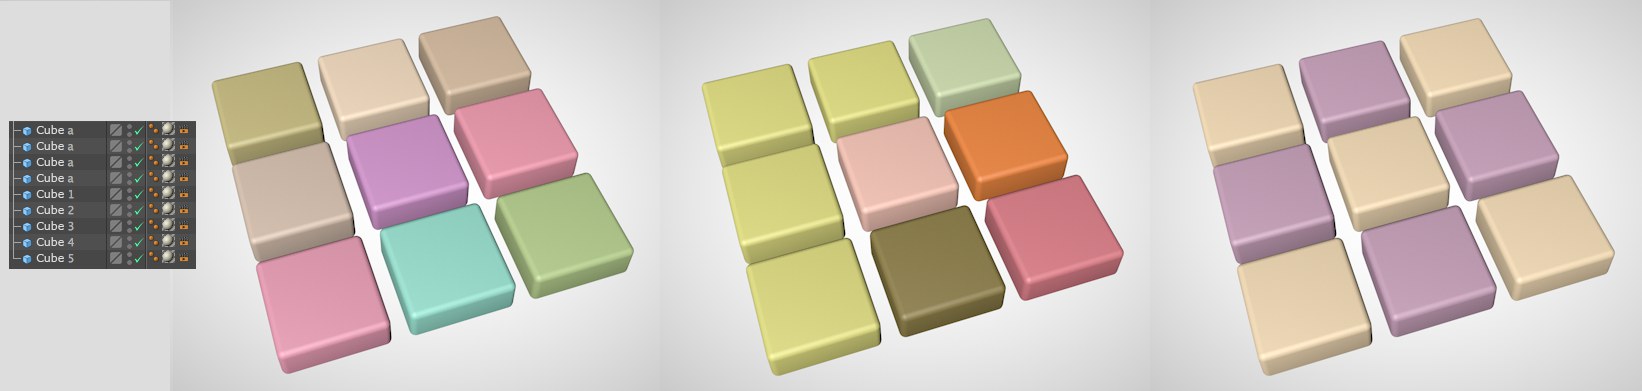 The scene at the left (note the Compositing tags that give the objects 2 different Buffer IDs) with 3 object variations: Objects, Object Name and Object Buffer IDs.
Note that the varied colors can change if objects are added to the Project or if hierarchies are modified.
No variations will take place for different objects with the same Variation shader applied to them.
Objects with the same Variation shader and the same name will be given the same variation. If the objects have different names, the variations will also differ. Note that this option does not work in conjunction with the Cloner object because the clones all carry different names internally. This can be seen by making the Cloner object editable using the
Assuming the Variations shader is applied to an object that is part of a hierarchy: In this mode, the same color will be applied to all Child objects, i.e., it will not be varied. It will only be varied per hierarchy.
This also applies to objects that generate clones, e.g., the Cloner object.
No variation will be applied to objects that lie on the same hierarchical level with the same Variations shader if they share a Parent object. Child objects of the object to which the material is applied will also not be varied.
Each object to which a shader is assigned (incl. objects in subordinate hierarchies) will be varied (as long as this is not prevented by one of the following settings).
This option can be used in conjunction with Compositing tags, which can assign object buffers. Objects with identical object buffers will be given the same variations, i.e., they will look alike. In the image above at the right the objects were placed into 2 object buffers, which generated precisely two variations.
RELEASE 21
Imagine having the same Variation shader in different materials. Use this option of a Variation shader should produce identical random colors for objects with the same material.
This is useful, for example, if you want to create material buffer IDs. The Variation shader can, for example, be used in the material’s Luminance channel and output the respective multi-pass in order to receive a pass with identical colors for identical materials. This way you can, for example, make color corrections at the material level.
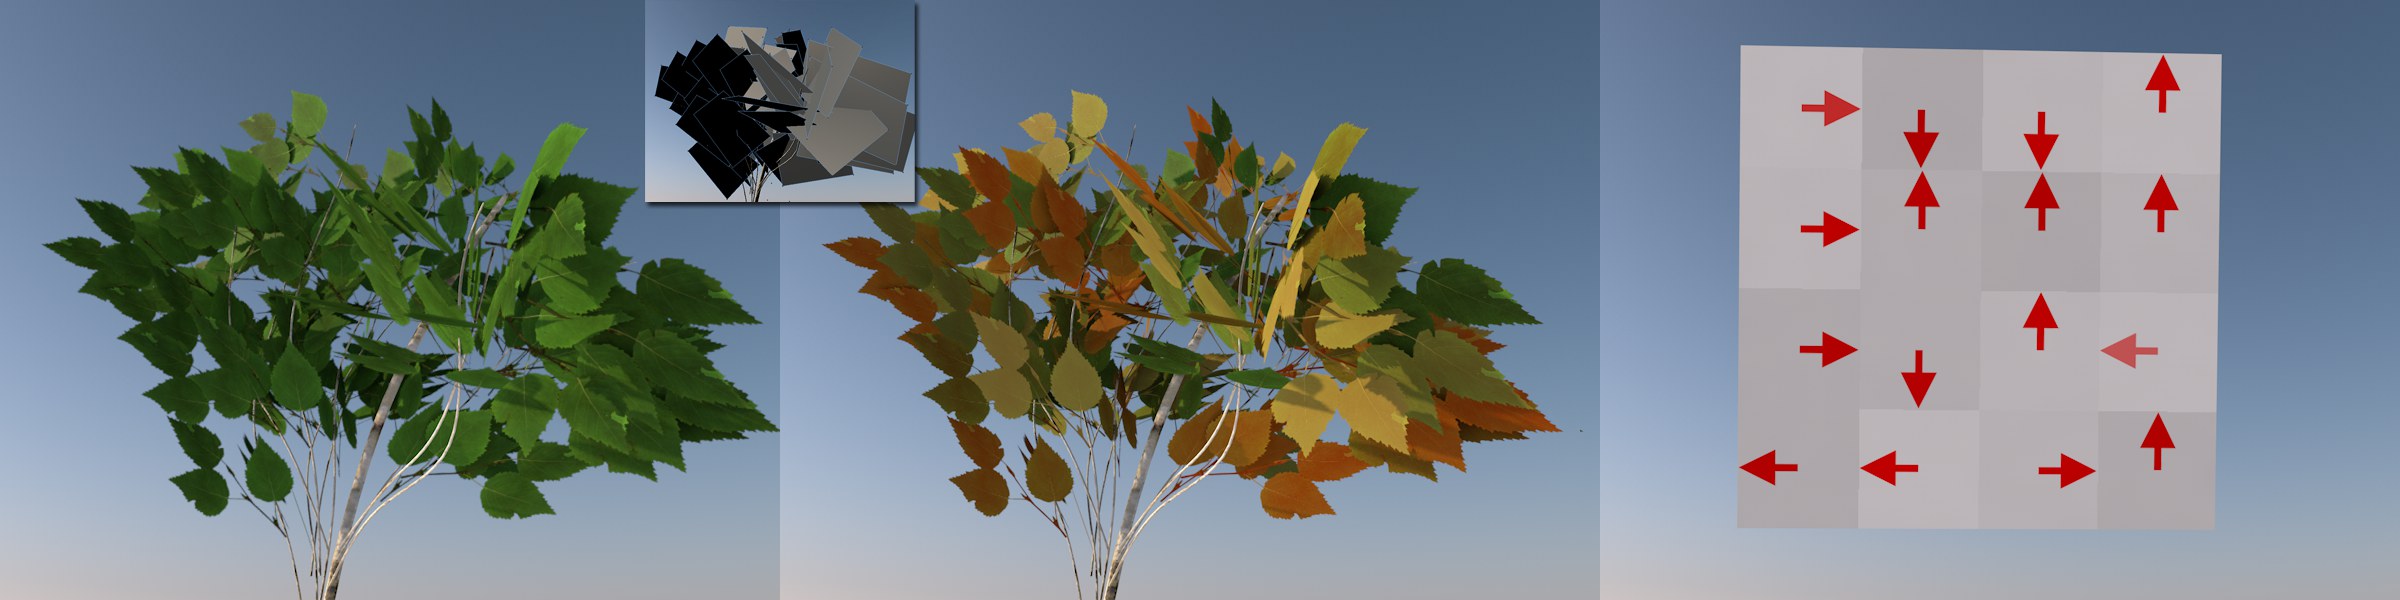 Left/center: Leaf textures lie on individual polygons. If more polygons are used per leaf the Polygon Variation option can be applied. Right: A texture tiled in 4 directions on a one-poly plane in the Polagon Variation UV Tiles.
Textures cannot only be varied per object but also per:
- Polygons: the texture is varied for each polygon
- Polygon Selection tag: the texture is varied per Selection tag. Polygons that belong to the same Selection tag will be given the same, unmodified variation
- UV Tiles: if the texture is tiled, this option can be used to also vary the texture per tile (see image above)
- Disabled: different polygons will not be given different variations
If often occurs that, for example, a tree’s leaves are created using a huge amount of coherent polygon groups. For example, a leaf can consist of 6 polygons (to allow it to bend), which is in turn duplicated hundreds of times for a single tree. If the variation should be constant within one 6-polygon group but varied for other 6-polygon groups, define number of polygons for the leaf (in this case 6) and the variation will occur in steps of 6 polygons. However, if only a single leaf has a different polygon count, this function will not work correctly!
Set this value to 1 to create variations for each polygon.
Use this value to define the degree to which objects, polygons, object buffer IDs should be varied. Note that the value defined here is only an approximation and that the actual number of variations can, well, vary.
If you want to have spatial control over the elements you want to vary, use the Global Mask function described below.
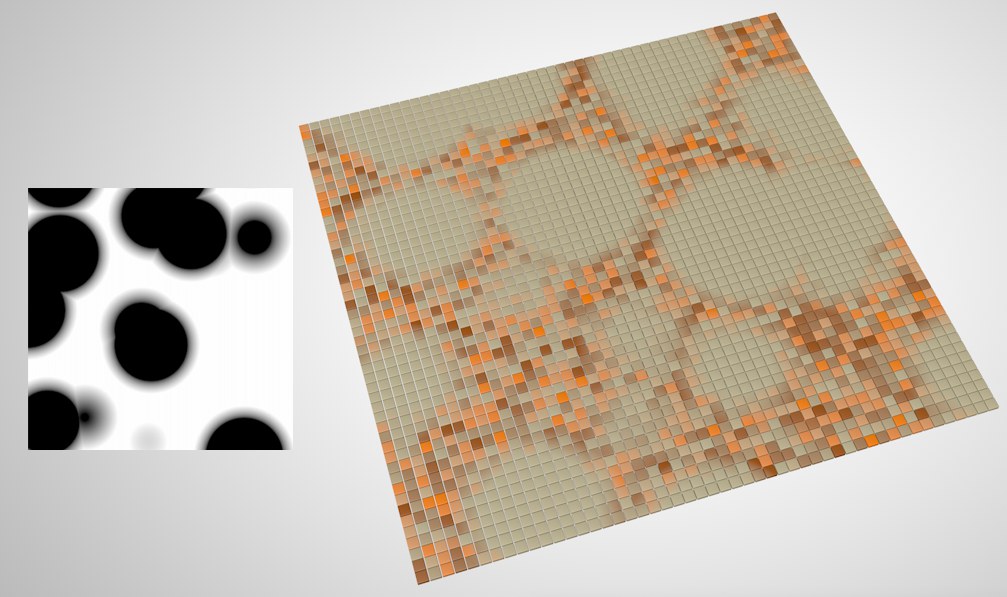 A Voronoi noise with Space set to World.
Use shaders that work in the world coordinate system such as Noise (Space set to World) or Gradient Type set to 3D Linear and Space set to World) in order to determine via gray scale the degree to which the variations are in fact depicted. White represents 100%, black represents 0% and gray tones represent the values in-between.
![]() Color Variation
Color Variation
The Color Variation menu’s settings are used to define which textures (whereby these can also be projected randomly) should be used and which colors should randomly be mixed with them.
Click on this button to add any number of texture selection possibilities, which will then be listed in the Shaders menu and to which shaders can be assigned. These shaders will first be distributed ransomly across all respective objects. The color and UVW variations described below can be used on these textures.
If no texture is assigned, white will be used.
Click on this button to delete all texture selection possibilities that were created, including all assigned textures. You should therefore use this button carefully (each texture selection possibility can be deleted individually).
Click on this button to select a folder from which bitmaps should be imported. Cinema 4D will then import all bitmaps in the folder (files in sub-folders will not be included).
Since you can change the Probability value for each texture and the other probability values cannot, for internal reasons, be adjusted directly in the parameter field (which is done internally), clicking on this button will enter the values in the respective fields (the sum of all probability values is always 100%).
To reiterate: Nothing changes with the distribution, only the correct values will be entered.
Click on this button if you want to assign a uniform probability (see also Probability) to each of the textures listed in the Shaders menu. All shaders listed will then have the same probability, which together will equal 100%.
Deviations within uniform distributions can occur if the probability for individual textures is changed or new textures are added. Clicking on this button will again generate a homogenous probability distribution.
Use this option to activate or deactivate the texture. For random distribution, only active textures will be taken into consideration.
Use this setting to assign a probability to each texture that defines how it will appear on the objects. Probabilities are not complicated: Probabilities are not absolute values. If you have 2 objects and 2 textures, each with 50% probability, one of the textures can be projected double. It’s a little different if you are working with 100 objects. With a certain (other) probability, 50 objects will not have one and 50 the other texture. Rather a ratio of 47:53, 51:49, etc. will occur. The defined Probability will first take effect if you have an innumerable number of objects.
If you are not happy with a given random distribution, e.g., because a green texture simply appears too often, then you can simply reduce the defined value. Since the probability values of the remaining textures cannot be adjusted directly for internal reasons, which can produce an irritating result, the Normalize Distribution button should be clicked, which will adjust all other values to the sum of the probability equals 100%
Click on this button to delete the respective texture field from the list.
Load a texture into this field.
Use this option if you want to randomly mix the Second Texture with the textures (Shader menu) (set Secondary Texture Mode to Replace if you want to replace the texture instead of mixing it; the degree to which the random replacement takes place is defined using the Probability slider).
Secondary Texture Blend [0..+∞%]
Secondary Texture Mode
Use these settings to define how the Secondary Texture should be mixed with the other textures. The Secondary Texture Mode is used to define the mix mode (see also Blend Modes). The Secondary Texture Blend value defines the degree with which the Secondary Texture will be mixed.
The Replace mode is a special mode that will replace the textures with the Secondary Texture regardless of the Secondary Texture Blend setting’s value.
Use this option if you want to randomly mix selected colors or gradients with the other textures. Colors will be selected randomly from this gradient. Click on the small arrow next to the setting’s name to make additional settings visible and set Interpolation to None if you want to use only specific colors.
Gradient Blend [0..+∞%]
Gradient Mode
Use these settings to define how the random colors from the Gradient setting should be mixed with the other textures. The Gradient Mode setting defines the method with which the colors will be mixed (see also Blend Modes) and the Gradient Blend value defines the degree to which the colors will be mixed.
The Replace mode is a special mode that will replace the other textures with the random color regardless of the Gradient Blend setting’s value.
Random Color [0..+∞%]
Random Color Mode
Use these options if you really want to mix completely random colors with the other textures. Use these settings to define how random colors should be mixed with the other textures. The Random Color Mode defines the method with which the colors will be mixed (see also Blend Modes) and the Random Color value defines the degree with which the random colors will be mixed with the other textures.
The Replace mode is a special mode that will replace the textures with the random color regardless of the Random Color setting’s value.
![]() Grading Variation
Grading Variation
These settings are used to define which color properties should be varied for the textures.
Contrast [0..+∞%]
Gamma [0..+∞%]
Invert [0..+∞%]
Hue [0..+∞%]
Saturation [0..+∞%]
Lightness [0..+∞%]
Use these values to define the maximum degree with which each property should be randomly varied for the textures (plus any other defined variations).
These values define the range from positive to negative that will be used. For example, a Contrast setting of 50% will randomly vary the contrast between -50% and +50%.
![]() UVW Coordinate Variation
UVW Coordinate Variation
The Variation shader can not only mix colors but can also move and rotate UVW coordinates as well. This works best with tileable textures.
These settings define the maximum random movement of UVW coordinates left/right or up/down. For the 3D Channel shader (e.g., Noise with Space set to World), the W direction can also be modified.
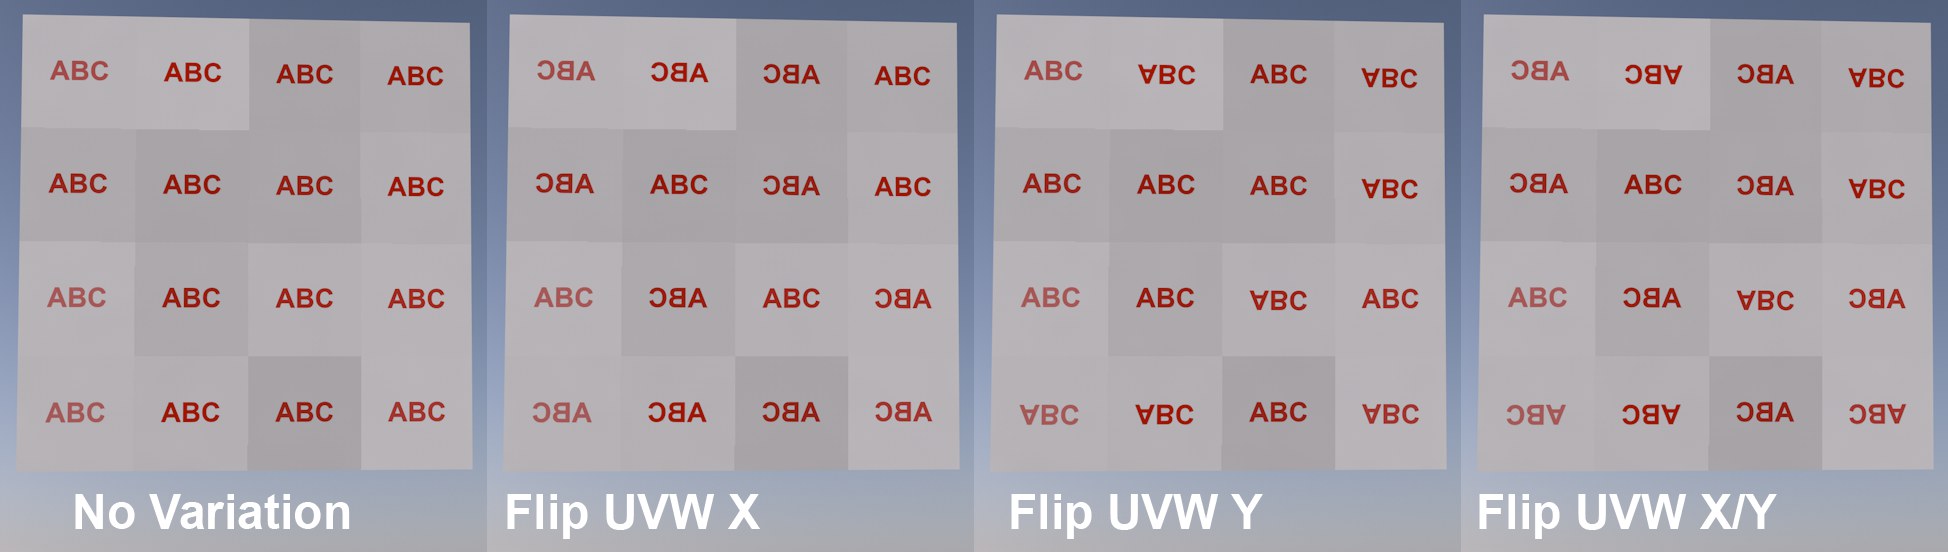 A texture tiled in 4 directions with randomly flipped UVW polygons.
These options can be used to randomly mirror UVW coordinates vertically and/or horizontally.
The random mirroring takes place prior to any random rotation defined using the following two options.
UVW Tile Offset X [-∞..+∞%]
UVW Tile Offset Y [-∞..+∞%]
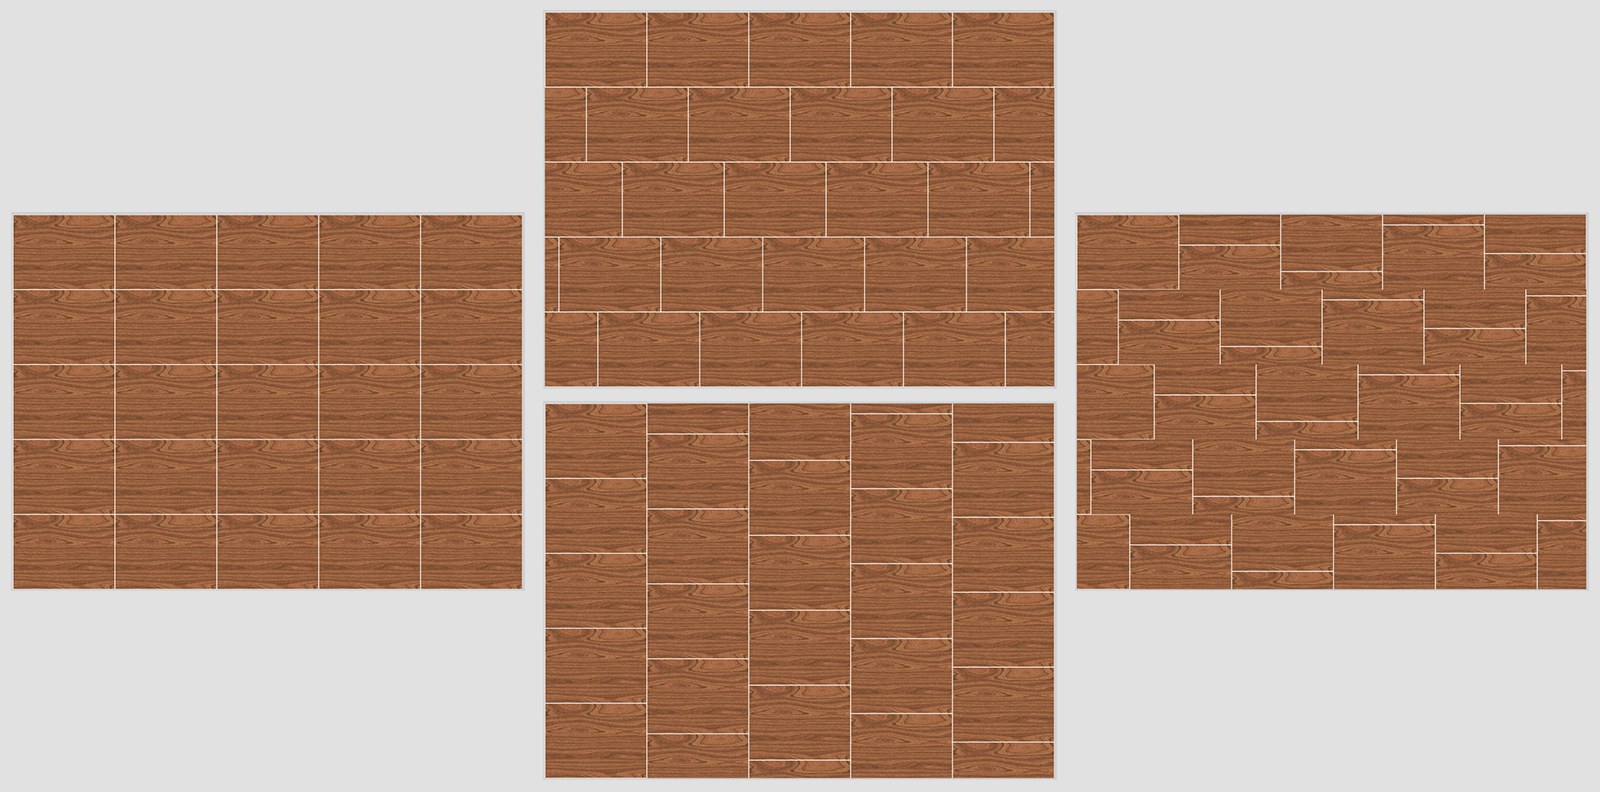 At left a wood texture that was tiled 5 times; at center UV Tile Offset X=100, UV Tile Offset Y=0 and inverted; at right both settings = 100%.
In order for these settings to have an effect, Polygon Variation has to be set to UV Tiles.
These two settings can be used to randomly offset the tiling per row of tiles. It is recommended that both values are set to greater than 0 for brick walls, parquet and similar surfaces. Otherwise the randomness will not look realistic (see image right side).
This value defines the maximum random rotation (by default: 100% = 360°) in each direction for the UV coordinates (rotation center U, V: 0.5, 0.5, i.e., center of the UV tile. Contingent on the next setting, the rotation calculated here will then be set to a fixed, quantized value.
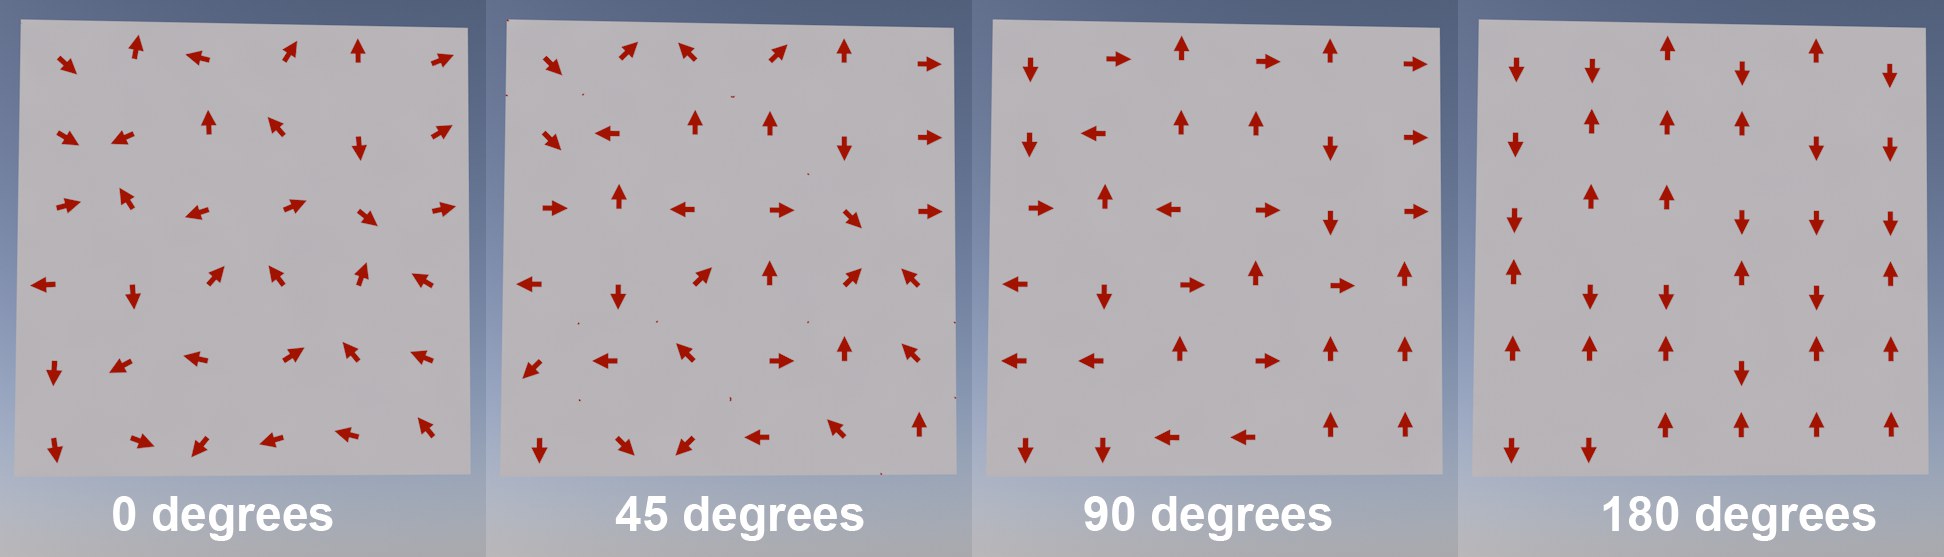 A texture tiled in 4 directions with random, quantized rotated UVW polygons.
Define here if the UVW coordinates should rotate steplessly (0 Degrees) or in steps of 45, 90 or 180 degrees.
This is dependent on the UVW Rotate value: an even disbursion of steps is only achieved at a value of 100%.
Use these values to randomly scale the UVW coordinates. The values entered here define the limits in the positive and negative directions: e.g., if the U coordinate is set to 0.5, the UV polygons will be varied between 0.5 and 1.5 times the horizontal U scale.
![]() Options
Options
When varying colors, it can happen that they turn out "too bright" (RGB values in excess of 255, 255, 255). This is often not desired and can be prevented by enabling this option.
However, if you use HDRI textures, this option should remain disabled.