Baking Sculpt Objects
![]()
No major changes were made in how its used except for the fact that it is no longer necessary to bake a Displacement map together with a Normal map to compensate for artefacting.
General
 The original cube, which was subdivided for sculpting, reappears when textures are baked. Once the textures have been completed, the cube again turns into a Sculpting object for rendering.
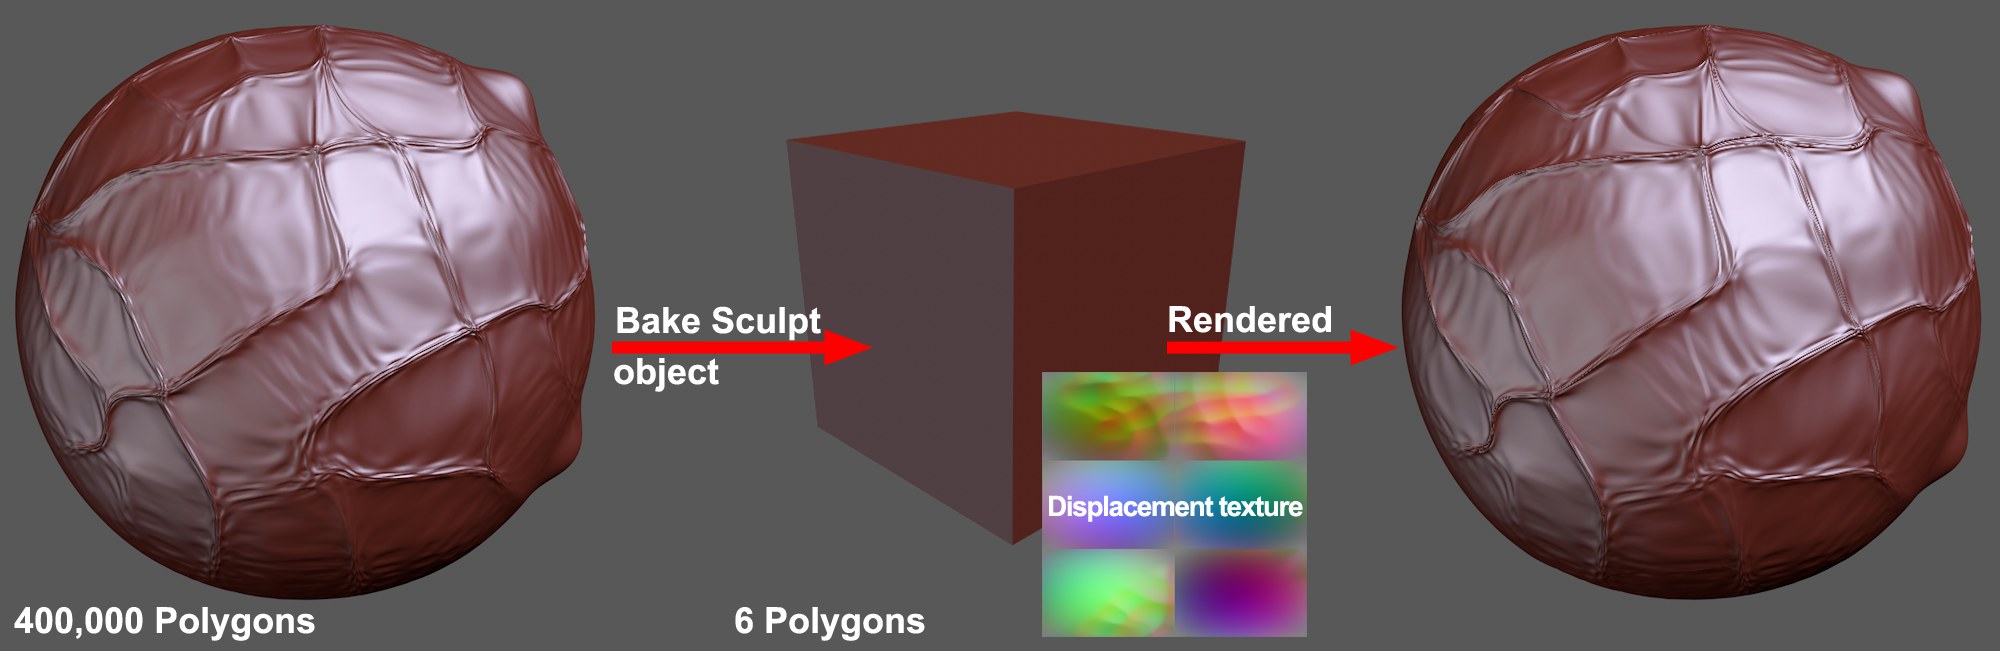
A major disadvantage of sculpting are the high-resolution objects, which cannot be integrated so easily into a normal 3D workflow (painting, animating, etc.) with the average available hardware. How can these highly detailed objects (often consisting of millions of polygons) be integrated into a normal production pipeline?
Simple: The details are baked into the textures and projected onto low-res objects (from which Sculpting, also using internal calculations, created the high-res objects). The objects will be rendered in full detail.
Follow these steps to bake a Sculpt object:
-
Select the Sculpt object
-
Call up the Bake Sculpt command
-
In the dialog window that opens, enter a file path in the Filename field to which the textures should be saved
-
In the Options tab, select the texture to be created for the corresponding material channel (recommended: Displacement for strong deformations, Normals for details)
-
If you haven’t yet edited your object’s UV mesh, select Cubic or Angle from the Optimal Mapping menu; if a modified UV mesh is already present, select Off
-
In the Source Object list, define a subdivision level at whose level of detail the textures should be baked (this is most commonly the highest level)
-
In the Target Object list, define the subdivision level at which the new object should be created polygonally (this should be a low subdivision level - even 0; a simple cube can be used if collisions with Dynamics or other events do not take place)
- Click on the Bake button. After a brief - or long - moment, a new object with corresponding materials and Material tags will be created.
Make sure that the textures are large enough to bake, otherwise flawed renderings can result.
Tips for good baking …:
- The better the UV mesh is, the better the baked result will be. The UV mesh should closely emulate the geometry. Large polygons should have correspondingly large UV polygons.
- Four-sided polygons should all be flat (all points on a single plane).
- See also Displacement Settings.
- If artifacts are produced during rendering, modifying the texture interpolation (Normal/Displacement channel: Texture / Shader / Sampling) can help (None should be avoided; Cubic is recommended).
Bake Sculpt Objects dialog window
At the top left is a preview of the texture to be baked or of the already baked texture. Right-clicking on the window will make the following options available:
- Open Window: Opens a scalable window in which the baked texture is displayed.
- Layer: Since up to 3 different textures can be baked simultaneously, one of the three textures can be selected for preview here (this setting can also be found by right-clicking on the opened window (see previous point)).
Preview
Click on this button to quickly display a low-res preview of the texture to be baked.
Bake
Click on this button to bake the texture. Make sure that the file path in the Filename field is defined correctly - this is where the bitmaps will be saved.
Stop
Click on this button to stop the baking process (how quickly this happens depends on the size and complexity of the texture).
Bake tab
Filename
This is the location to which the textures will be saved. Type in a path or click on the button at the right to select a path. This (absolute) path will also be used in the object’s newly-created material.
Format / Options / Color Depth
Select the format and color depth for the baked textures. If additional options are available for certain formats, click on the Options button to define these (see also Save). When working with displacements you should use 16 or 32-bit color depth to avoid stepping.
Lock Ratio
If enabled, the Width and Height values will be locked in relation to one another. If one value is modified, the other will change accordingly.
Width / Height
Use these values to manually define the baked texture’s width and height.
Preset
Here you can select from several square texture sizes.
Pixel Border
Here you can define an edge (in pixels) beyond the UV polygons (see also the Bake Material tag’s Pixel Border option). This can be necessary to prevent visible seams from appearing during rendering. Values that are too small can result in unwanted peaks being generated for displacements.
Tab settings
Displacement
Method
See Type.
The preset Type, RGB (XYZ Object) will produce the best result in most cases. If you plan on changing the object’s shape at a later point (e.g., via Deformer), use the RGB (XYZ Tangent) setting. Only in this mode will the texture "work" with deformed geometry.
Note that when in RGB (XYZ Tangent) mode, baking of Normal tags should actually be done in 2 steps. If, for example, you have deformed an object with a Subdivision level of 7. If you want to achieve optimal results, you should bake in a two-step process.
First, only bake the displacement texture with a Target object level of 0 from the Source object (with a level that shows the rough details) level 5 (Options tab). In the second step, bake the Normal texture with Target object level 5 from Source object level 7. Next, both textures have to be combined in one material. Why should it be done like this? Because the Sculpt-bake dialog promises more than it delivers. If you bake both textures (as stated only in RGB (XYZ Tangent) mode) at the same time with the same Target and Source object levels, the Normal texture will falsely simulate additional geometry to that of the displacement, thereby resulting in less optimal shading.
Round Geometry
 At left, Round Geometry option disabled, at right enabled for 2 objects with Formula Effectors assigned to them (which were previously baked using displacement).
When deforming a baked (displacement texure) object using a Deformer, effects such as those at the top of the image above can result. In such an event, this option should be enabled. The displacement texture will then be baked minimally and the Round Geometry option will be enabled later with the corresponding effect in the Displacement channel.
However, this option can also produce better results if the aforementioned effect is not used.
Normals
Method/Options
See Method and the following. Here the same applies as in the description above: Use the RGB (XYZ Tangent setting if you plan on changing the object’s shape. Otherwise use the RGB XYZ (Object) setting.
Continue UVs
If you have defined a Pixel Border, this option defines how the pixels should appear within this border. If enabled, pixels will simply be repeated up to the edge. Otherwise they will be calculated correctly (see also the Bake Material tag’s Continue UVs option).
Ray Casting
Don’t be irritated by the term ,Sculpt Mesh’ in the following. The same function can be found when baking sculpted objects. Simply imagine the source object instead of a ,sculpt mesh’.
If you want to bake a displacement (only 3 types: Intensity, Intensity (centered) and Red/Green), a ,ray cast’ technique will be used. Simply put, it works as follows for displacements: Imagine an initial mesh that is placed over a Sculpt mesh. Position and Normal orientation will be ascertained for each position on the initial mesh. Now a ray is emitted in the direction of the Normals and back and the distance in which it intersects with the Sculpt mesh and which Normals lie at that location will be ascertained. The distance of the first Sculpt mesh surface found will be calculated into the Displacement map.
In most cases, this works very well but can also fail in certain areas. This can, for example, occur at geometry edges where the ray can easily shoot into empty space. It can also occur that the ray hits false geometry. The texture will then be calculated incorrectly and high spikes will appear at these locations when the scene is rendered. The following settings are designed to reduce errors as much as possible. Therefore, if high spikes appear, it can help to disable the Use Auto Spike Filter Threshold and use a smaller Custom Spike Filter Threshold value.
Use Max Ray Cast Distance
Custom Ray Cast Distance
If the Use Max Ray Cast Distance option is disabled, the ray will basically not be restricted. If the option is enabled, the ray will end at the distance defined by the Custom Ray Cast Distance setting and a displacement (Height = 0) will be calculated at that distance.
Use Auto Spike Filter Threshold
Custom Auto Spike Filter Threshold
The spike filter examines the baked texture and uses a statistical method for ascertaining which displacement region is the most prevalent and identifies extreme spikes. These spikes are then removed. If you want to influence this process yourself, disable this option. The smaller the Use Custom Spike Filter Threshold value, the greater the suppression of spikes will be. However, if the values are extremely small, little or none of the displacement will remain.
Ambient Occlusion
Supersampling
Supersampling defines the AO texture for baking (textures are not affected for baking by the antialiasing settings in the Render Settings).
Single File
If enabled, individual channels (Displacement, Normal, Ambient Occlusion) will be saved as separate image layers in a single bitmap (instead of saving a separate file for each channel).
Create Result Copy
If enabled, a new object, including corresponding material and Material tags, will be created. If disabled, only the textures will be rendered.
Options tab
Displacement / Normal / Ambient Occlusion
Use these options to define which textures should be baked. A brief reminder of what these material channels will do:
- Displacement: When rendered, the geometry will be raised or displaced in accordance to the texture’s properties. Even a simple cube can be rendered to look like a face.
- Normal: The Normal texture can be used to realistically depict fine details on low-poly surfaces.
- Ambient Occlusion: This texture darkens concave and inner regions.
In most cases, Displacement and/or Normal should be baked. Otherwise, experiment which textures are best for your individual workflow.
Optimal Mapping
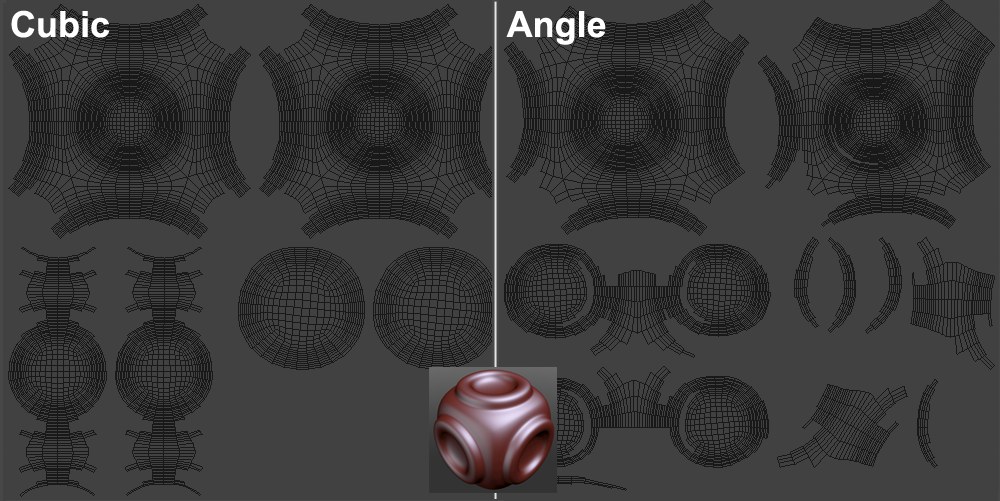 The UV layout of the object in the center in both modes.
When textures are baked, you have to be sure that no UV polygons overlap.
If you have already made sure that none overlap, select the Off option. The UV coordinates will then remain unchanged (and will at the most be subdivided further, depending on the target object).
This setting can be used for the Sculpt objects included with the application. The UV meshes of these objects have already been optimized.
If you shape your own object and have not optimized the UV coordinates, select either the Cubic or Angle option.
- Off: UV coordinates will not be rearranged. Only relevant for baking if you already have an optimized UV mesh.
- Angle: Wherever possible, coherent UV mesh groups will be created.
- Cubic: The UV mesh will be broken down into very many individual sections.
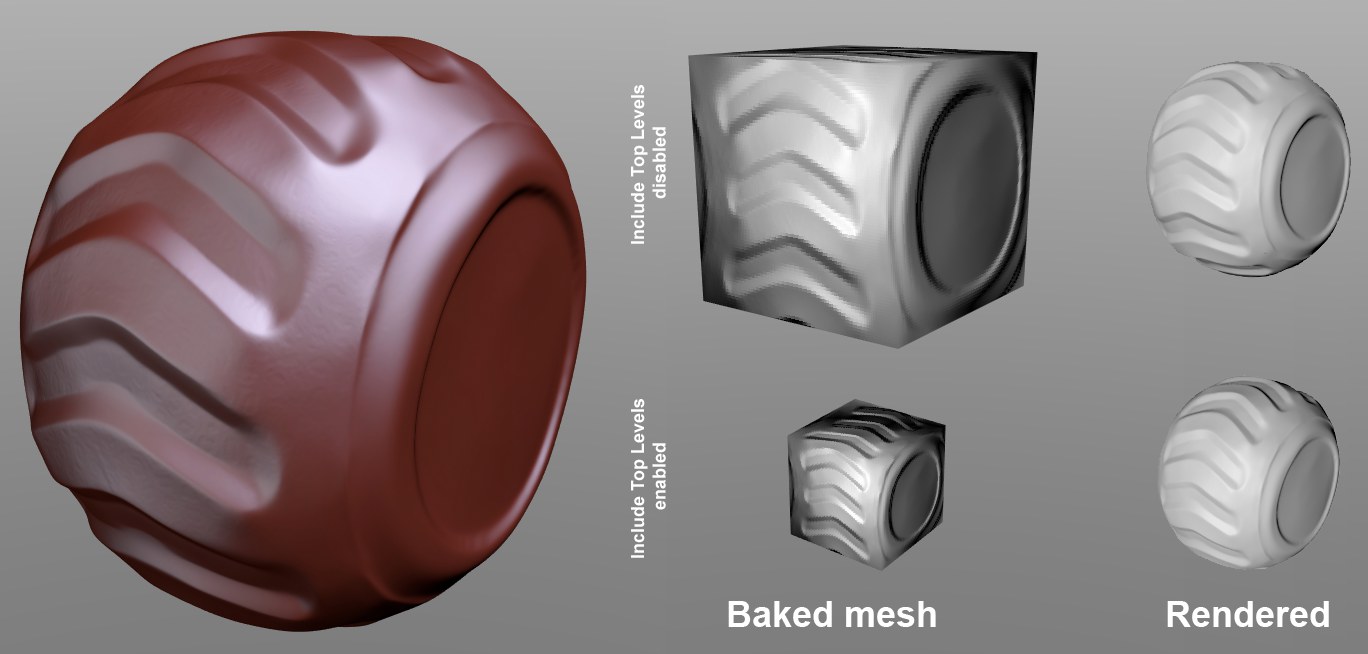
Include Top Levels
This option only has a minimal effect on the rendered (and previously baked) result. Moreover, this option ascertains if the mesh created during baking strictly represents a subdivided mesh (option disabled) or if this mesh has been sculpted and thus effects higher subdivision levels (option enabled).
Example:
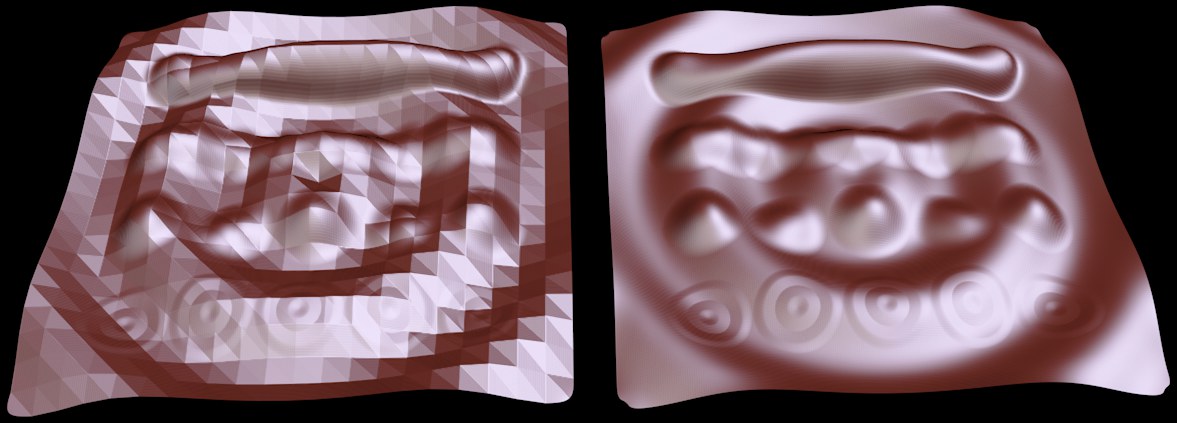
 The sculpted object (created from a subdivided cube) at the left is baked.
Sometimes, enabling this option can prevent artifacts from being generated (especially if Type is set to RGB XYZ Tangent) since the shape of the initial mesh is adapted to that of the subsequent shape.
The tire pictured above (created using a cube subdivided to a level of 9) is baked. If the option is enabled (bottom), the cube will not be cube-shaped but will be deformed slightly (exactly what the Sculpt object would look like if the subdivision level were set to 0). If this option is disabled, a perfect cube will be created. When rendered you will barely notice the difference.
To put it briefly: If this option is disabled, the mesh created by baking will look more like the rendered (=sculpted) result than if the option were enabled because very little (or no) reference information will be available.
Source / Target Object List
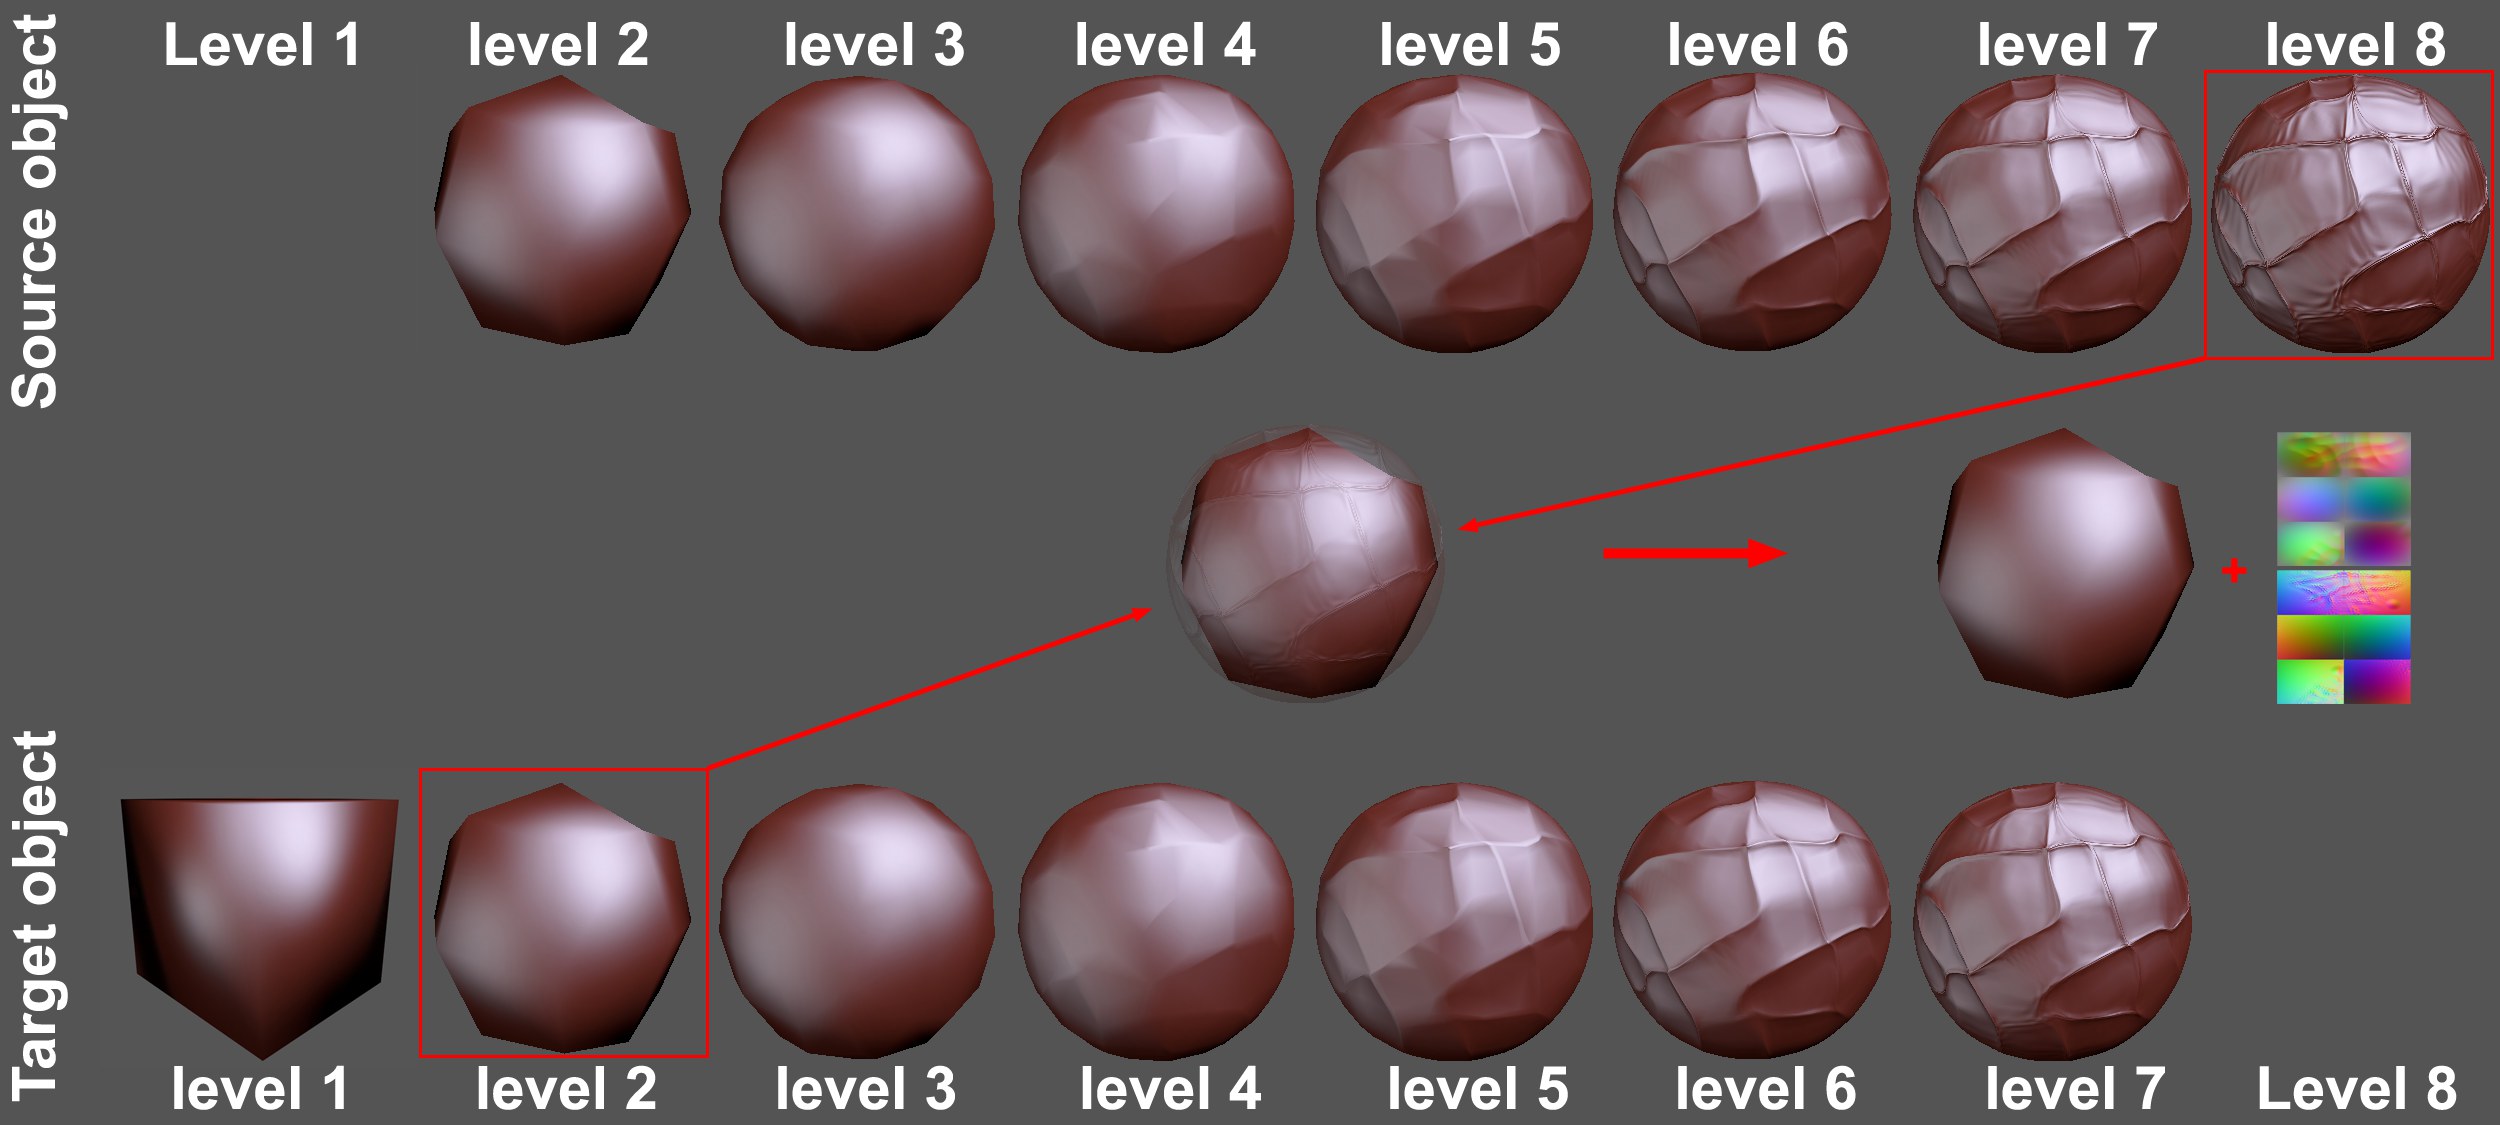
What exactly happens when a Sculpt object is baked?
The details of high-res objects (Source objects) are transferred via texture onto a low-res object (Target object).
Cinema 4D must now be told which of the Sculpt object’s subdivision levels should be used for baking. For the Target object, select the subdivision level that should be used to create the new object, and for the Source object, select the object whose details should be baked. Imagine these objects placed over one another: For the Target object, the distance to the Source object will be ascertained for each surface position and a corresponding displacement will be calculated. The Normal calculation works in a similar fashion.
The Target object’s subdivision level must always be smaller than that of the Source object for baking to work.