Spline
In this menu you will fine a series of parametric spline Primitives (that can be made editable by pressing the C key) with various shapes as well as tools (such as the Spline Pen or the Sketch tool) that can be used to freely create or edit splines.
Spline Basics
Curves
Splines are primarily a sequence of vertices, connected by lines, lying in 3D space. The shape of these connecting lines (straight or curved) defines the interpolation. Apart from the direct connection of the vertices with straight, rigid lines, there are other kinds of splines that use an interpolation method where the lines between the vertices are curved instead of straight. These splines have a soft leading edge without sharp corners.
The spline itself is infinitely thin. A spline is not visible when rendered. The spline’s line has no three-dimensional depth, even though it occupies the 3D space. There are steps you need to take in order to make a Spline visible for rendering (You can render Splines using HAIR and Sketch and Toon functions). However, many complex 3D objects, among other things, can be constructed in seconds out of these curves by using them with Generator objects.
After the spline is created it can be pulled along its depth in order to make tube-like objects. You can also rotate a spline around an axis to create objects that have rotational symmetry, such as wineglasses. Or you can construct a skin over several splines, with the finished object simulating the contours on a map. More of these spline-modeling capabilities are discussed in the Generator section.
Segments
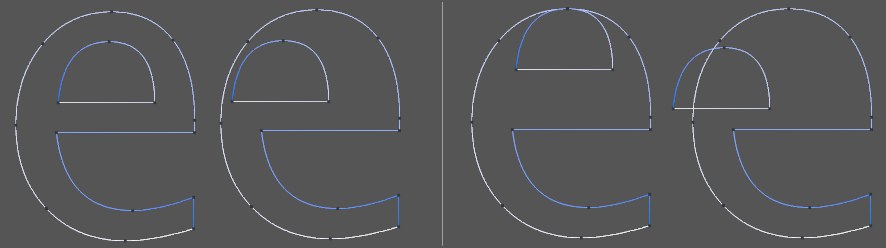
A spline is made from several partial curves, or segments. For example, if you create some Text, you will see that only one object is created, even though you typed in several letters. The text object now consists of several outlines — one outline or more per letter.
For example, the word Test consists of four letters; that makes four separate segments. However, another, fifth, segment is also present — the inside of the e is a further spline segment. If this type of element is later extruded to form a 3D object, Cinema 4D will automatically punch out a hole that is the same size and shape of the internal segment of the e.
 A spline converted to a 3D object with holes automatically created.
Holes are formed only if a spline lies completely inside another spline and both form closed curves. If two segments overlap in any way, no 3D object can be formed. If you nonetheless try, strange results are likely.
 On the left is a correct arrangement of splines and on the right we see spline segments arranged in an incorrect order.
A spline object can be composed of any number of segments. However, all segments of a spline must have the same settings, e.g., they should be either all open or all closed and all have the same kind of interpolation. So, what is the advantage of a spline with many segments and many separate spline objects? Well, as long as the element is present as a complete, individual object, then all of its points can be modified and edited at the same time.
Let’s return to the text example above. Before you convert the spline to a 3D object, you can bend it e.g., using deformer objects. The tool affects all vertices of all segments equally. Therefore the spline is deformed evenly, as a whole.
 The spline was modified before extrusion.
If we have nothing but individual, separate spline objects, then even simple deforming becomes very difficult, if not impossible. As you can see, splines are an extremely important part of Cinema 4D.
For some operations, such as the aligning of objects along a spline (Arrange command) or the movement of objects along a given curve (Align To Spline tag), the direction of the spline (where it begins and ends) is important. For this reason, the spline is color-coded.
By default, from the first vertex, the starting point, and moving outwards, the curve is colored from white to blue (the end point). The colors of the start and end points can be changed within the preferences. The colors chosen are then changed, in a graduated fashion, between the two points. This colored display is visible only when the Points tool is active.
Spline Pimitives
Cinema 4D gives you a generous number of predefined curves. Add to this the possibility to convert vector based artwork files from other programs (see Vectorizer) and to add graphic characters (see Text) and you have a large number of spline primitives at your fingertips.
All of these spline primitives are parameterized. This means that a spline is created via mathematical formulas consisting of defined values. As a result, this mathematical formula initially has no properties to edit within the 3D viewport - only the formulas (that exist internally). It has no vertices to manipulate.
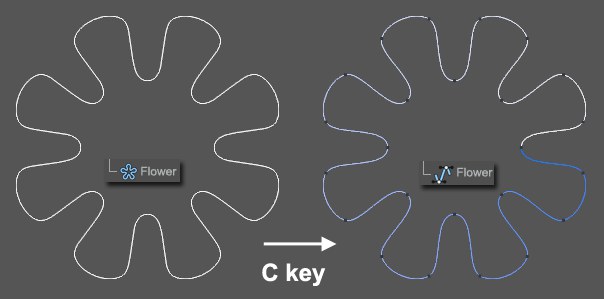 From a parametric Primitive to an editable spline.
To adjust the vertices with the Spline Pen, for example, you must first make the spline editable (Mesh / Conversion / Make Editable or by pressing the C). You can, however, apply Deformation objects to the spline even if the spline has not been made editable.
You may change all the preset parameters of such an object — such as height and radius — at any time. Test the object’s various parameters in the Attribute Manager for a better understanding of what can be achieved. Start by changing the values one-by-one so that you can see what all is possible. Enter large values, then try smaller ones.
Some of the spline settings are present for each type of primitive. These common properties are described in this section. Properties that are specific to certain types of spline primitive are described later in this chapter, in the individual entries for the primitives.