Render Setting
![]()
General
 The Render Presets options are used to define image or movie output formats.
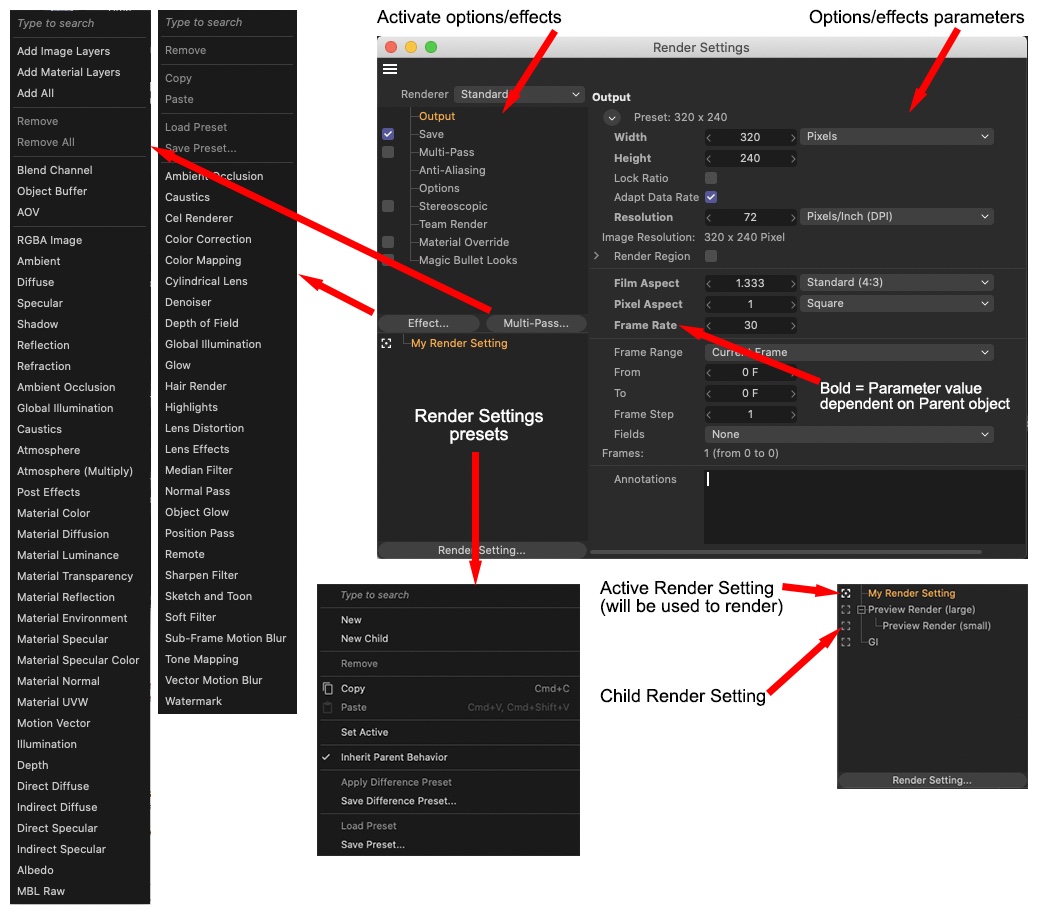
This command opens the Render Settings dialog window. Alternatively, this can be done by activating the Render Settings option in the Attribute Manager’s Mode menu.
Next to the list of available renderers (see Renderer) you will find a list of render options, sorted by topic, is located in the top left corner of the Render Settings dialog window. Post effects or Multi-Pass effects can be added by clicking on the corresponding Effects or Multi-Pass buttons. Multiple post effects or Multi-Passes can be selected and moved via drag & drop to change their order (changing the order of the post effects can change the combined result of these effects). If multiple post effects or Multi-Passes are selected, all corresponding settings will be displayed in the field at the right. Post effect presets can be loaded or saved.
To the left of most render options or post effects you will find a check box that lets you activate or deactivate the corresponding option. These check boxes can, for example, be used to define that basically nothing should be saved during rendering (no rendered image or video, no Multi-Pass, no compositing file, no Irradiance cache, etc.).
All of the Render Settings for the current scene are displayed in the lower left corner of the Render Settings dialog window. If a setting is selected, its name and its corresponding icon will be highlighted white. To rename a Render Setting, double-click on its name - just as you would do to rename an object in the Object Manager. A Render Setting can be moved via drag & drop(or duplicated via Ctrl+drag & drop) to a new location in the list, and even be made a Child of another render setting (see next section). Render settings can also be copied and pasted between different scenes. Furthermore, render setting presets can be loaded or saved.
The right half of the Render Settings dialog window contains all render settings that can be modified. These setting are compatible with the Attribute Manager, which gives you access to all relevant Attribute Manager context menu commands (right-click) as well as these two additional parameters:
- Inherit Parent Settings: Selecting this command will reset any parameters that have no values to be inherited (bold text).
- Overwrite Parent Settings: Selecting this command will prevent any parent values from being assumed (parameter name will be made bold).
Render Settings can also be displayed as HUD elements in the Viewport:

Inheriting Render Settings
You can also create hierarchical render settings.
-
You can either use drag & drop to relocate a Render Setting
or - You can right-click on a Render Setting and select New Child
If nothing else is defined, the Child Render Settings will inherit all Parent object’s render settings, i.e., if a Parent object’s Render Settings are modified, the Child object’s Render Settings will be modified accordingly. "Exception": If a Child object’s parameter is defined differently from that of the Parent object.
Example
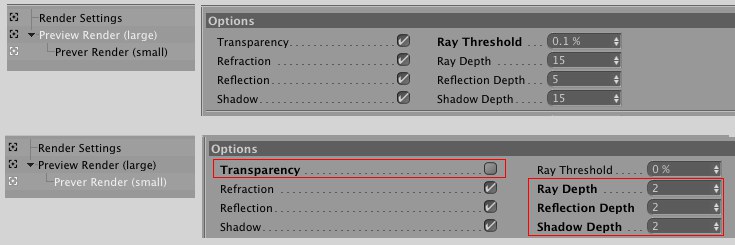 Child render settings assume all Parent object settings not in bold type. The bold settings in red will not be assumed.
In the example above a render setting with the name Preview Render (big) was created. A Child Render Setting was created by right-clicking on the Preview Render (big) render setting and selecting New Child. This new Child Render Setting was then renamed to Preview Render (small). In the Option tab the Transparency, Ray Depth, Reflection Depth and Shadow Depth values were subsequently defined. These parameters will henceforth be in bold type (this means that these values are different from the Parent Render Setting’s values for these parameters, and will not inherit these values from the Parent Render Setting).
So, what is this good for? This lets you quickly create render presets that only differ in a single parameter, thereby maintaining all other Parent parameter values. Alternatively, a single parameter value can be changed in render setting at the very top of the hierarchy, thereby affecting this parameter for all other render settings as well (keeping in mind the aforementioned exception).
Don’t be surprised if the names of the parameter values you changed at the top of the hierarchy subsequently appear on bold type. This is due to the fact that these values differ from the default values. The "bold" state can be removed by selecting the Reset to Default context menu command.
Render Settings Button and context menu
Use this context menu command to create a new render setting at the top of the hierarchy.
This context menu command duplicates the currently selected Render Setting as a Child of that Render Setting. All parameters inherit their values from the Parent Render Setting by default.
Use these commands to copy and paste Render Settings. Render Settings can also be pasted into different scenes.
This activates the Render Settings to be used for rendering. Alternatively you can simply click on the icon next to the respective Render Setting.
Instead of modifying render settings in the Take Manager (via icon), you can make the modifications here by selecting the respective Take from the list.
Unless you have made changes to the contrary, this mode will be applied by default. If a parameter was modified, its name will appear "bold". Selecting this command will reset the name to "regular" type.
A Difference preset is a preset that contains only modified ("bold") parameters. Selecting the Save Difference Preset command will save that preset . If you select a different Render Setting after having saved the first, and subsequently select the Apply Difference Preset command, only those parameters contained in the saved preset will be modified accordingly in the active Render Setting.
All Render Setting parameters, including any post effects or Multi-Passes will be included in a saved preset. Presets are saved. Selecting the Load Presets command lets you select from all available render presets.
This lets you quickly and easily save and load Render Presets for such tasks as:
- Test rendering without antialiasing, transparency, shadow, etc.
- Final rendering, including the one or other Multi-Pass
- Rendering a specific range of an animation
- Much, much more.