Interface
Choose a language for Cinema 4D’s interface from the installed language sets. After quitting and re-launching Cinema 4D, all messages, menus and dialogs will change to the new language.
Here you will find all languages available for installation that can be downloaded and/or updated.
The Cinema 4D version for which the language is designed is noted next to the respective language.
Choose one of the installed schemes from this drop-down list. This setting is only available if you have also installed a scheme (by default, Cinema 4D only provides a dark scheme).
This function helps you discover new features in Cinema 4D. Menu items, icons and Attribute Manager settings will be colored differently for easy recognition. After the element is called up for the first time its color will be dimmed slightly and after you’ve selected it 5 times its color will return to the normal interface color.
This menu offers the following selection options:
- Off: No items will be highlighted
- Load Custom Files: Load special marker files (.*res) to arbitrarily mark menu items, icons, settings
- R18: New features added to R18 that were not in R17 will be highlighted
- R19: New features added to R19 that were not in R18 will be highlighted
Creating marker files
In short: a marker file (*.res) is a text file that lists command and parameter IDs, which are then marked.

- In the first line of the text file, a name can be given for the marker file with which the file will be displayed.
-
In the second line a command is highlighted (in this example the command for creating a cube).
To find out which number lies between the brackets (each command has a unique number), you can either refer to the Script Log or the Command Manager. Don’t forget to add the semicolon at the end of the command. -
In the third line a setting is highlighted (Fillet for a cube).
Ctrl/Cmd+Alt+right-click on a setting and select ID to Clipboard (Feature Highlight). This will load the following text into the cache: OCUBE-OCUBE-ID_OBJECTPROPERTIES-PRIM_CUBE_DOFILLET, // Fillet.
Disable this option if the above-mentioned fading should not take place. The features will then remain highlighted.
Since the highlighting will be removed completely after you’ve used the feature 5 times you can click on this button to reset the highlight function. This cannot be undone and all highlighted features will remain so until they have been used 5 times.
Defines the character set that Cinema 4D will use (menus, dialog windows, etc.).
Important for you: the GUI Font. This is used throughout Cinema 4D. Monospaced Font is mostly used in dialog windows for displaying scripts.

Cinema 4D can now display its main menu bar as a Mac menu bar under macOS (option enabled: top of example image) or as the older version (option disabled: bottom of example image).
The Apple-compliant main menu bar differs slightly from the Cinema 4D main menu bar in its functionality:
- Some commands that have their own settings in the Cinema 4D menu (black cog wheel at the right of the command) will always be called up with the command options window when opened. This window can be prevented from opening if you simultaneously press the Alt key. The command will then be executed with the default settings.
- Mac-specific functions such as Cmd/Ctrl + for opening the preferences menu or the macOS command search (Help menu) now work.
- Calling up the Help from individual commands and Highlight Features does not currently work.
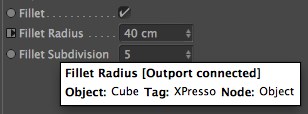
If the Bubble Help option is enabled, help information appears next to the pointer when the pointer is over an icon.
A bubble help will be displayed for parameters that are controlled by XPresso that contain information about XPresso tags, Nodes and Ports:
Here you choose whether, in addition to the normal command descriptions for menu items, Cinema 4D displays icons (Show Icons enabled) and/or keyboard short-cuts (Show Short-cuts option enabled).
This option can be enabled or disabled to defeine if the Help (see Interactive Help function) should be called up from the Maxon servers or from your local computer. For the latter you will have to download the Help at www.maxon.net/de/support/downloads. This will let you use the Cinema 4D help offline.
This and the next option can auslo be defined via the Environment Variables.
A path to the downloaded Help can also be defined per environment variables in as far as these were not archived in the program directory ,help’ folder (note that under Windows, if you use a Windows unpacking/unzipping app, that the Internet Explorer will can difficulties opening/displaying these pages. You should then either use a different unpacking/unzipping application or a different browser alltogether.
The Fields’ Remapping tab contains a function preview of the Remapping settings. Since these take up a lot of space, they can be hidden using this setting’s options.
You can choose from the following options:
- Hide: The preview remains hidden at all times
- Show: The preview will not be hidden
- Hide in Field Lists: If a Field is selected in a Field list, a reduced parameter set compared to that of the Object Manager will be displayed. Only the preview for the Field list selection will be hidden.
Create New Object at View Center
By default, Cinema 4D creates objects at the origin of the world coordinate system. However, If the origin is off-screen, a new object may be created out of sight.
If this option is enabled, new objects are created in the center of the active view instead, i.e., always within view.
Use these settings to define where new or pasted objects should be inserted into the Object Manager’s hierarchy. A deciding factor for placement is the currently selected object itself. If multiple objects are selected, the new or pasted object will be inserted at the top of the hierarchy.
New or pasted objects will be inserted as follows:
- Top: At the top in the Object Manager.
- Bottom: At the very bottom of the Object Manager
- Previous: Prior to the active object in the same hierarchy.
- Next: After the active object in the same hierarchy.
- Parent: As a parent object of the active object.
- Child: As a child object of the parent object.
- Root: As a parent object of the active hierarchical tree.
Attribute Manager Selection Limit[10..100000]
Defines the maximum number of elements such as objects or keys that can be edited simultaneously in the Attribute Manager. For example, if the value is set to 10 and 477 objects are selected, only the first ten elements will be taken into account. The value of 10 used in this example has little practical use; use a much higher value.
Attribute Manager Selection Limit (Nodes)[1..100000]
This value defines the number of Nodes whose properties can be displayed simultaneously in the Attribute Manater. If working with a certain number of Nodes seems to be too slow you can reduce this value accordingly.
If the limit is reached and you select more Nodes, the following warning will be displayed in the Attribute Manager:
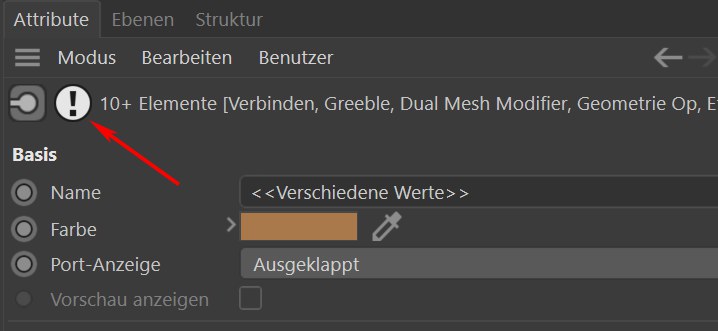
You can click on this warning in order to temporarily remove the limit for the current selection (this function also applies to the Attribute Manager Selection Limit setting).
Wherever scripts can be displayed (e.g., in the Script Manager), this option determines whether or not lines of script should automatically be given line breaks when they reach the right edge of the text field. The line with the break will be highlighted with >> at the right.