F-Curves
 You can switch between the Snapshot curve and the F-Curve at any time.
Wouldn’t it be nice to be able to:
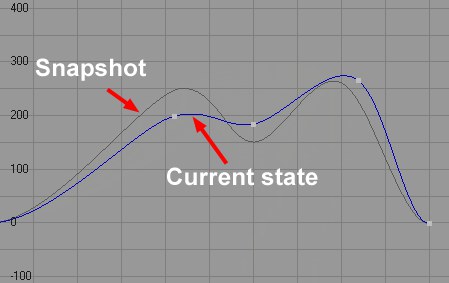
- Temporarily save the state of a given F-Curve (Snapshot)
- Make this state visible and Simultaneously compare it to the curve’s current edited state and
- Switch between current and Snapshot state at any time?
Well, this is exactly what the Snapshot functionality lets you do!
The Snapshot curves will be displayed in dark gray and will not affect the animation unless you activate one of them via Swap Snapshot (will, in turn, deactivate the currently active curve).
Snapshots (up to 5 are possible) are saved along with the respective scene file.
This temporary snapshot is only valid while a track is still selected. As soon as a different track is selected the snapshot for the previously selected curve will no longer exist. This cannot be used in conjunction with the Show All Tracks mode!
Use this option to hide or display the snapshots (up to 5).
Use this setting to create snapshot of the F-Curves of selected Tracks. Since Snapshot curves are exact duplicates of the original curves, they will not be visible until changes have been made to the original curve. Selecting Create Snapshot again will overwrite the previous Snapshot curves with new ones.
Snapshot 1: A Snapshot 1 will automatically be created if you switch to a different track, create an animation, etc.
Depending on the command chosen, set the current F-Curve on the corresponding snapshot. Subsequently executing the command anew will set the Curve back to the previous state. This lets you switch back and forth quickly for testing.
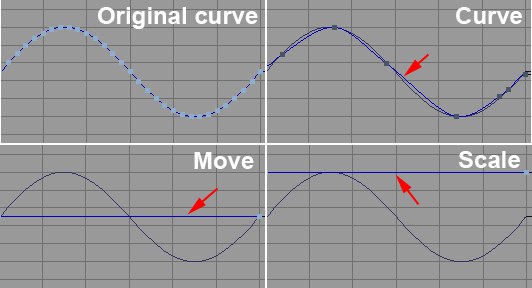
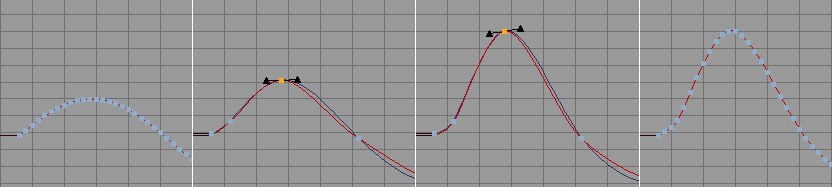 From left to right: Original curve; RM Curve active, changed, affect on original curve.
RM Curves are simplified (consist of fewer Keys) control curves with which you can control complex F-Curves.
When importing motion capture files or those created by baking animations you normally get an animation that contains on Key for every Frame of the animation (hence, no interpolation necessary). However, the great number of Frames makes it very difficult to subsequently edit the animation. This is where the RM Curves can help.
Depending on the RM Curve selected, more-or-less complex substitute or control curves will be created, which can be more easily controlled since they contain fewer control Keys and simultaneously transform the original F-Curve, including all of its Keys.
It’s advisable to make a snapshot of the Curves before editing in order to more easily be able to return to the original state, if necessary.
Proceed as follows when editing an F-Curve using RM Curves:
- Select a Track in F-Curve mode
- Activate the Reduced Modification Mode. An RM Curve will be created that itself cannot be edited until you switch to another mode. The animation can still be played while in active RM Curve mode.
- Select one of the three Reduced Modification Types from the Reduced Modification Type menu.
- Edit the RM Curve as desired: Move its Keys; edit their tangents; delete or add Keys. If the Interactive Updateoption is enabled in the
menu the original Curve will be reshaped simultaneously.
The RM Curve Keys are normal Keys with the same properties as normal Keys in the Attributes Manager. - The Modification mode can now be disabled (which again gives you access to the original individual keys) or remain enabled: The animation will not be affected. The RM Curves will be saved with the scene file.
Use this command to enable or disable the Modification mode. When using the default Curve mode a reduced RM Curve will be created. This RM Curve can be adjusted to reflect the shape of the original Curve to varying degrees:
- When initially called up: (Reduced Modification Value setting).
- At a later stage: Reduction setting (Reset RM Curve command).
If this mode is disabled the RM Curves will be hidden and you again will be able to access the original Curve’s individual Keys.
The animation will not be affected, regardless of whether or not this mode is enabled.
 This command temporarily removes control of the RM Curve in order to, for example, move the Curve
If this option is enabled, the RM Curves can be edited without affecting the original Curve. Once this option is disabled a link will again exist between the RM Curve and the original Curve.
So, what is this good for?
Well, there are several reasons for this:
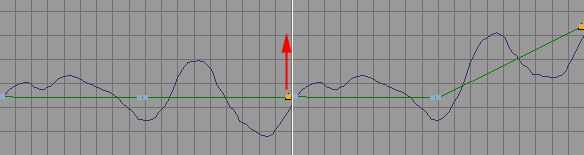
- Let’s say you want to move only part of a Curve in Move mode. With No Curve Edit enabled, add a couple of extra points to the RM Curve in the area you want to move. Disable No Curve Edit and voilà - only that part of the curve will be moved.
- If the RM Curves are in the way you can easily move them out of the way and move them to an empty area of the Timeline for easy editing using this option.
RM Curves must not necessarily have:
- exactly the same shape as the original Curve or
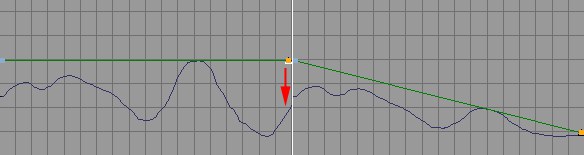
- a similar shape/form as the original Curve in order to be able to control the original Curve. This is particularly apparent when in Move or Scale mode.
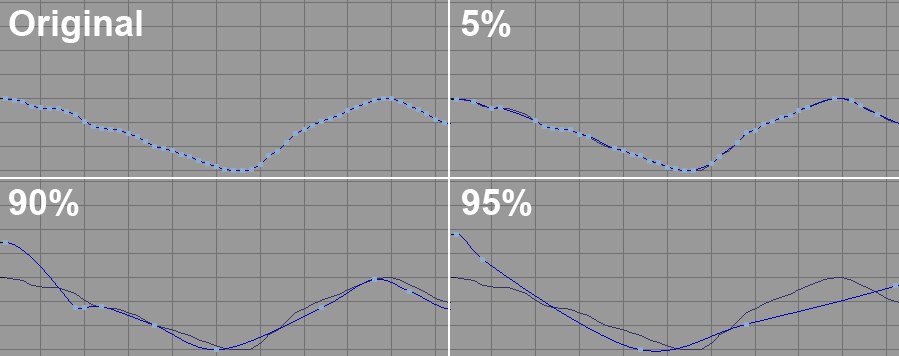 Curve mode. Clockwise from top left: The original Curve and the effects of the respective reduction values. Notice how the number of Keys is reduced as the Reduction value is increased.
This command affects a selected F-Curve and results in the following, depending on the mode selected:
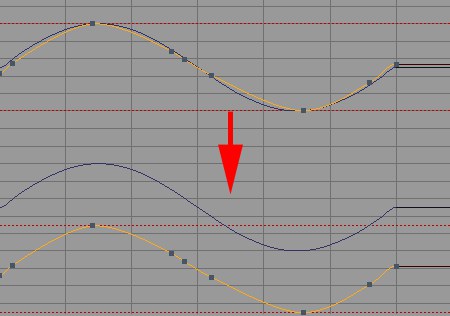
- Curve mode: A dialog window will appear, with which a simplified RM Curve can be created using the Reduction setting (see image).
- Move / Scale mode: A straight line parallel to the time axis will be created through the first Key (Move) or the maximum (Scale) of the original Curve.
The Reduced Modification Value, located in the
Normally, only F-Curves of tracks selected in the Objects Area will be displayed. Activate this setting if you want to display all F-Curves, independent of all selections.
Use this option to define whether or not the Curves before and after (e.g., see Before) should be displayed.
Sometimes you don’t want to change F-Curves’ proportions when you zoom in to them. Enable this option if you want to scale proportionally (equally in the X and Y directions). Alternatively you can press the
Scaling will take place around the cursor, which will be used as the center point.
Let’s say you have several F-Curves with vastly differing Key values. The Key values of one group range from 10-100 and those of the other group from 10000-12000. You can imagine that the curves probably will not be displayed together on the Timeline.
Activating the Auto Relative setting will place all selected F-Curves within a value range between 0-100, regardless of their actual Key values. Each of these F-Curves that were detached from the normal Timeline display will be marked with an R (Relative) next to their respective track names. Activating this setting will give you a good overview of all F-Curves involved.
We suggest you activate Navigation / Show All in conjunction with Auto Relativewhich will display the F-Curves to their maximum vertical height.
If you used Auto Relative (automatic) or the track settings’ F-Curve Offset and F-Curve Scale properties (manual) to quasi detach the keys from the Timeline’s Y axis naming convention, select Reset Relative to revert the selected F-Curves’ keys to the appropriate naming convention.
 The various modification types.
Use this setting to define which type of RM Curve should be created from the original curve.
An RM Curve similar to the original curve will be created.
When this mode is initially called up, a line (with a start and end Key) that runs through the first key of the original curve and parallel to the temporal axis will be created. The distance between the RM Curve’s Key and the original curve will be maintained.
When this mode is initially called up, a line (with a start and end Key) that runs through the original curve’s maximum will be created. The original curve (and its Key values) will be scaled in accordance with the movement of the RM Curves.
If, for example, one of the two RM Curve Keys is deleted, the entire original curve can be scaled equally.
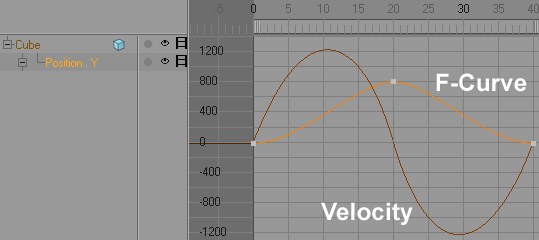
Activate this setting to display the change in value for all F-Curves. Pictured above is a Y-position curve and its velocity curve that displays the F-Curve’s mathematical derivation. Velocity curves will always be displayed in a dark tone of the corresponding F-Curve’s color.
This functionality lets you easily recognize at which time in the animation a lot of action takes place – the greater the velocity, the higher the curve will rise (positive velocity) or sink (negative velocity).