Layer Manager and Layer Concept
![]()
The layer concept helps you to easily manage complex scenes, such as imported CAD files which often contain thousands of polygon objects.
So what are layers? Layers are nothing other than groups of scene items that can be controlled together.
For example, with a single mouse click you can make all objects in a layer:
- hidden in the view.
- hidden from rendering.
- hidden in the Object Manager, Material Manager and timeline.
- locked, i.e., protected from unintentional changes.
- have their deformers switched on or off.
- have their Subdivision Surfaces switched on or off. and much more.
You can quickly and easily tell layers apart by assigning a custom color to each layer. The layer colors also appear in the Object Manager, timeline and Material Manager to indicate which scene items are on which layers.
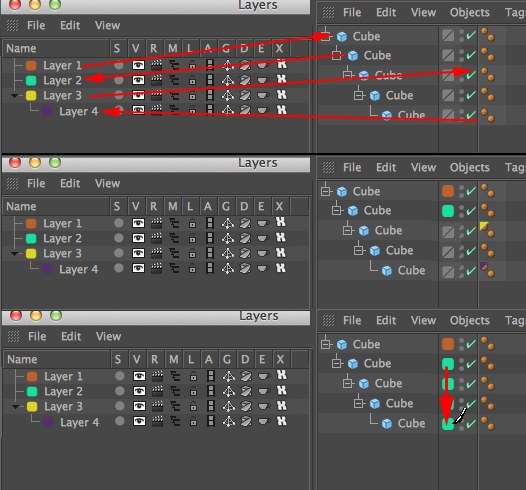
You can assign layers to items via Drag & drop. The most popular way is to open the Layer Manager (main menu:
You can also drag layers directly onto objects in the viewport.

If you hold down the
You can also assign an item's layer color to child items or surrounding items by painting with the mouse button held down.
There are various other ways in which you can assign layers. These mostly make sense when you want to assign many items to a layer:
- Right-click on the selected items and choose Add To Layer.
- Select the items and in the Layer Manager choose File / New Layer From Object Selection.
- Almost all items have a Layer field in the Attribute Manager on their Basic Properties tab. To assign a layer, Drag & drop the layer into this field or choose the desired layer from the drop-down list.
You can make layers children of other layers via Drag & drop in the Layer Manager. This allows you to arrange layers into tree structures.
Ctrl-clicking on a property (switch) for a parent layer sets the property for the parent and its child layers. This means that with a single mouse click you can set a switch to the same status for the entire branch. Following this you can then go about adjusting the switch status individually for child layers as desired.
Now that you know how to create and assign layers, what can you do with them? This is the topic of the next section.
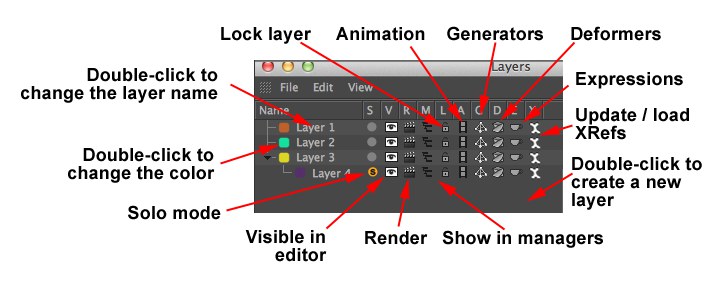
 The Layer Manager with all switches present.
The Layer Manager allows you to:
- Create and delete layers and arrange them into hierarchies. As with arranging objects in the Object Manager, simply Drag & drop one layer onto another. You can also drag child layers out of the hierarchy or into other hierarchies.
- Use various switches to manage the items on the layer, such as whether they are shown in the editor, managers and renderer.
To select a layer, click on its name. If you then Shift-click on another layer’s name, this will select both layers and the ones between them. You can also invert the selection status using the
Layer settings of selected (or multiple) layers can also be displayed and modified in the Attribute Manager (which also has a special Layer mode). In conjunction with the Take function, Takes can be assigned to Cinema 4D elements on different layers.

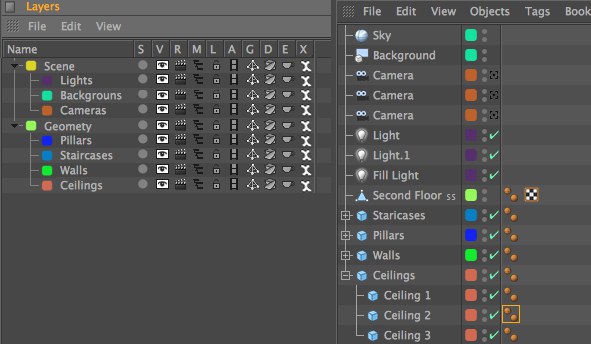
In this example, all items that are not geometry (such as lights, cameras and backgrounds) have been assigned their own layers, which in turn have been placed inside a Scene layer. Likewise, the geometry has been split up into various layers, which in turn are inside a Geometry layer. Here, all geometry is hidden in the view except the walls. You can hide or show various parts of the scene in seconds using a just few mouse clicks.
The benefit of using layers becomes even greater when you are working with very complex scenes, such as an architecture scene with the building imported from CAD and containing 20,000 different polygon objects together with 100 lights and 20 cameras added in Cinema 4D. Layers offer an elegant solution to working quickly with these complex scenes. Suppose you want to texture the walls. Simply hide everything else in the Object Manager so that you can focus on the walls without other objects getting in the way.
Keep in mind that as well as using layers you can hide items using various