Assets
Assets are currently restricted to Material Nodes.
Assets are a new concept within Cinema 4D. These are material node constellations that can be referenced, which you can use yourself or pass on to other users. Assets provided by (e.g., materials in the Material Manager’s Node Material Presets section), your custom assets or third-party assets can be used. Material Nodes are very powerful and can be used to create some really fantastic assets.
Assets - wherever they may come from - barely differ from "normal" Cinema 4D functionality. They can be integrated seamlessly into the application. Assets can be found in the Asset list or in the Material Manager in the Create menu under Node Material Presets. Assets can contain a single Node or a group of, for example, 400 Nodes, which can make up extremely complex materials.
Assets and external computers/render farms
Assets are saved in databases (a directory with several files or this directory compressed as a ZIP file) and can be exchanged amongst users.
Such a directory can look like this:
 In the Preferences menu under userrepository, Assets saved, for example, under "Preferences" (the mix of numbers and letters server to identify the assets).
Such a directory can be copied in its entirety and passed on to other users. This can be done easier using the asset export commands described below.
Scenes that contain Asset Nodes/Materials, must have access to the assets on external computers (e.g., Team Render machines) - similar to bitmaps linked in materials. This can be done in one of 2 ways:
- The Assets are contained in the scene (if you save using the Save Project with Assets command, copies of the Assets will be integrated into the scene file).
- The external computer has access to the Assets. Define the database path in the Preferences menu (Path menu).
The interface of assets can be defined in a special editor (Resource-Editor), albeit a somewhat complicated procedure.
Commands in the context menu’s Asset list
Note that for the following commands, the Assets included in the application (e.g., Utilities or Imbedded for databases) have restricted command sets: not all of the commands described below are available. For example, not all can be edited, exported, moved, renamed, etc.
Custom Assets and databases have complete command sets.
The Asset list contains all special Asset categories (e.g., color, shape, generator, etc.). You can create custom categories for custom Assets. Calling up the command will open the following dialog window:
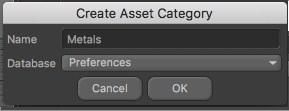
In the Name field you can enter the name of the new category. Since category names are also saved as an Asset, you have to define where they should be saved using the Database setting.
The selected Assets will be created as a Node in the Node Editor. You can double-click on it or drag it into the Node Editor (the latter works with multiple selections as well).
Here you can open and load the selected Asset in the Node Editor. You will then be in Asset Editing mode - which can be exited by closing the Node Editor instance that opened for editing. A prompt will appear that lets you determine if you want to save the changes made to the Asset. Otherwise the Asset can be saved using the following commands: Save New Version or Save as New Asset (Copy). Once changes have saved in the scene you’re set!
Only Assets located in the database where they can be saved can be edited (this does not include the Cinema 4D databases or the ZIP file databases!).
Use this function to rename the selected Asset.
Use this command to move the selected Asset to an existing database. A dialog window will open in which you can select the database.
This command copies the selected Asset to an existing database. A dialog window will open in which you can select the database.
Temporarily deletes the Asset from the list.
This command deletes the selected Asset. This is irreversible.
This command exports the selected Assets in their latest version to a ZIP file. This ZIP file’s Assets can be imported on other computers using the Import Assets command.
This command exports the selected Assets with all their versions to a ZIP file (see also previous command).
Use this option if you don’t want Assets that were passed on are again converted to a group. Note however, that these cannot be decrypted again so make sure you use this option carefully!
This command can be used to import the Assets zipped using the previous commands. A dialog window will open in which you can define the database to which the imported files should be saved.
Alternatively, the ZIP file can be selected in the Path menu in the main Preferences menu.
This command can be used to create a new database to which Assets can be saved (a number of database-specific files will be displayed in the selected directory). A dialog window will open in which you can select a path. The directory namy will also be used as the database name and will appear wherever Assets, for example, can be saved.
These database paths will be displayed in the Preference menu under Files/Paths/Databases.
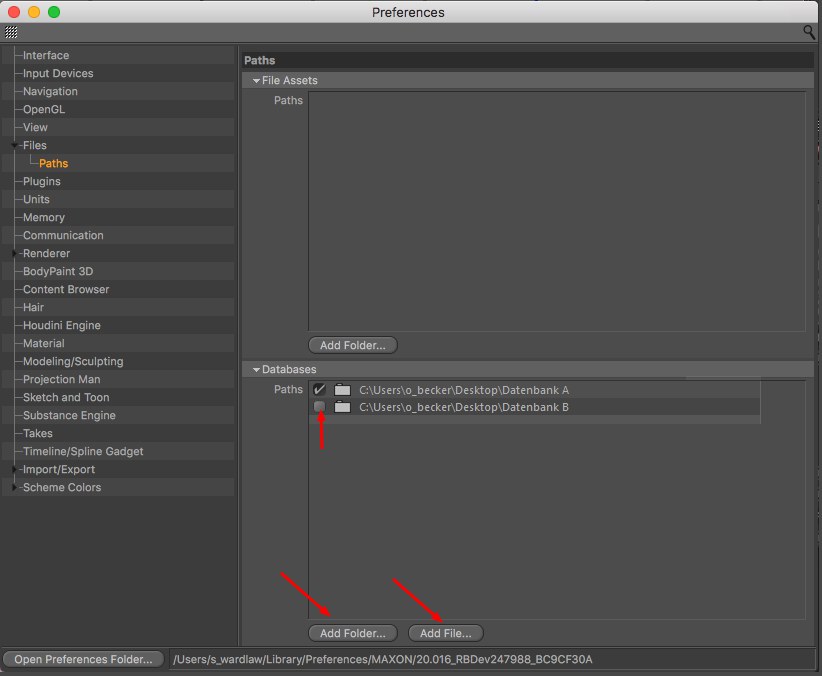
These commands have the same function as the buttons Add Folder and Add File in the Preferences menu under Files/Paths/Databases.
You can use them to make Asset databases accessible for Cinema 4D (unzipped in a folder or zipped in a ZIP file).
Calling up this command opens a dialog window in which you can select the database to be unmounted. Its Assets will then be removed from the Asset list.
This has the same effect as if you disable a path in the Preferences menu (see image above, top arrow). Previously mounted but now unmounted Asset databases can also be remounted here.
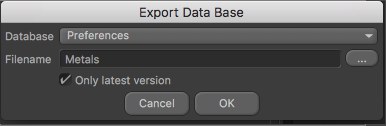
Use this command to export entire databases including all of their Assets as a ZIP file. This is, for example, very useful if you want to save and pass on all Assets in the Preferences directory to another user (or use them in a new Cinema 4D version).
The dialog window that opens has the following options:
Select the database to be exported here.
Click on the botton on the right to define a directory and filename.
If this option is enabled, the database will be saved without versioning. If multiple Asset versions were saved, only the latest version will be exported. If this option is disabled, all Asset versions will be exported.