Material Manager when used with BodyPaint 3D
 Keep in mind that the Material Manager offers several display modes and may look different to the picture above.
Good materials are every bit as important to photorealism as good modeling. Using the Material Manager, you can accurately recreate any type of material.
The Material Manager is where all the materials in the scene are stored. A thumbnail and name is shown for each material.
The Material Manager can also display the textures (including layers) for each material. In addition, here you can choose which materials and material channels should be painted.

The top part of the Material Manager works in the same way as the top part of the Color manager (see Color). They both control the same settings; changes you make in one manager are applied automatically to the other manager.
You can also choose which channels are active for painting or editing. For example, the move layer tool will only move layers with a colored pencil icon.
The slider controls the opacity of the active layer, the drop-down list defines the blending mode.
Below these controls, you will find a row of material channels. These represent all the material channels you have defined.
The button on the left lets you switch multi channel mode on or off. The pencils indicate which material channels are active for painting.
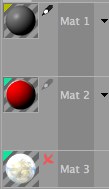
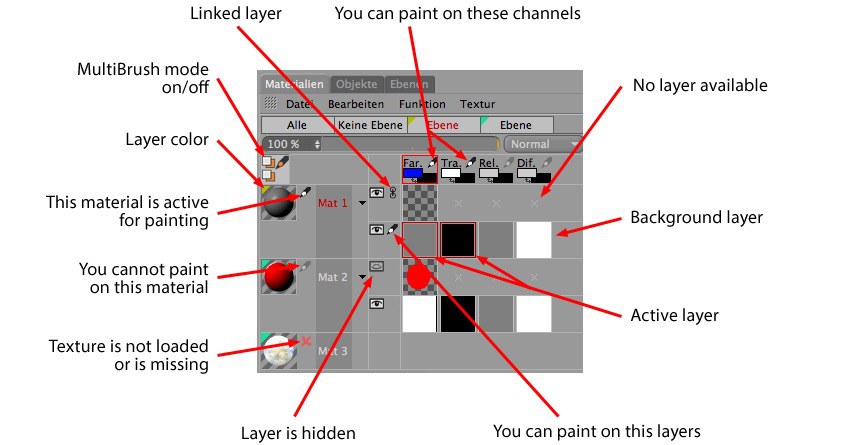
On the left you will see thumbnail previews for your materials (incl. any assigned layer colors). To the right of each thumbnail, a colored pencil icon means the material is active for painting, a grayed out pencil means the material is loaded in RAM but not active for painting, and a cross means the material is not loaded in RAM.
To choose which material is active for painting, click the grayed out pencil icon or cross icon (clicking on the cross icon loads the material into RAM). you will see a colored pencil icon appear. To activate multiple materials for painting, shift-click each material that you want to paint on.
To the right of the material names, you will see a triangle for each material that has layers. Click a triangle to display the material’s layers. Click the triangle again to hide the layers once more. When the layers are hidden, they are internally flattened and displayed as a single, combined preview.
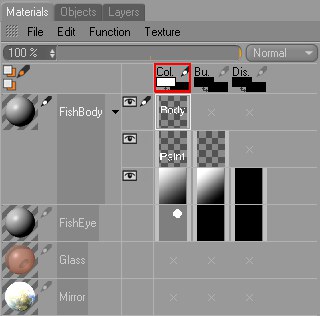
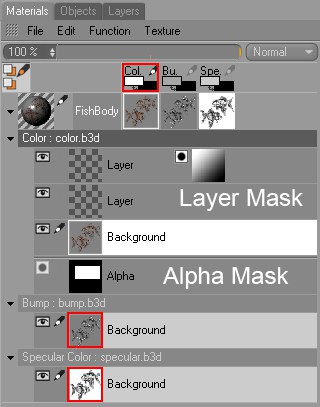
The right part of the Material Manager is used for displaying the material channels and layers. If these are not displayed, you must first create a texture from the Texture menu (or load a texture - see Load/Unload Texture).
Non-existent textures or layers, symbolized by a small plus, can be created by double-clicking this cross.
The bhodiNUT Fusion shader (described later in this chapter) lets you combine multiple textures. You can access these textures here also, as well as any textures you have created using the Add User Data command.
The eye icons enable you to hide the layers to the right. Click an eye icon to hide or display the layers. Note that you cannot paint on hidden layers.
Alt+click on an Eye icon will make that layer visible and hide all others. Alt+click again will reset the previous state.
You can also click and drag over multiple Eye icons to change their respective states.
.
The pencil icon tells you whether any of the layers to its right are active for painting. A red frame around a layer means the layer is active for painting.
You can move or transform linked layers as one. You can only link layers if they belong to the same material. To link a layer, click on the area where the pencil icon is usually displayed. you will see a link icon appear.

To unlink the layer, click the link icon once more.
You can import Photoshop files with linked layers intact.
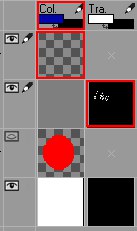
Each active layer and channel is indicated by a red frame.
- Frame around the material channel (here, around the Color channel). Indicates which material channel is active.
- Bright red frame around a layer.
Active layer of the active material channel. This means:- The layer is active for painting.
- The layer’s texture is displayed in the Texture view.
- The settings for the layer/texture are displayed in the Attribute Manager.
- This color is displayed in the Color manager and in the active channel preview in the left toolbar.
- The layer is active for painting.
- Dark red frame around a layer. Layer is active for painting.
Suppose you want to paint on seven material channels at the same time. Each of these channels has several layers. You can activate a layer for painting by clicking on the layer. This layer’s frame will only turn bright red when you select the next layer that has a dark red frame. Thus you can quickly tell which layers are being manipulated.
To open a layer’s context menu, right-click (Windows) or Command-click (macOS) on the layer.
Layer Manager (expanded/compact) mode
This mode works in the same way as the compact mode (see above) except that:
- The layers and channels are arranged differently. In particular, there is more emphasis on vertical arrangement, to allow space for layer masks. This is the mode for you if you often work with layer masks or alpha channels.
- Alpha channels and layer masks are displayed.
- You can Drag & drop layers (provided they belong to the same material).
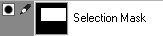
Select some pixels and in the Material Manager, choose Texture / New Alpha Channel. you will see an alpha channel named Selection Mask appear in the active material channel of the active material, right at the bottom.
To switch the alpha channel on or off, click the black circle icon. If the icon is active, all black parts are cut out, white parts remain visible and gray parts are semi-transparent (the darker the gray, the more transparent it is). Drag & drop the alpha channel from the preview icon into the texture view in order to edit it. Colors you paint on the alpha channel are converted to grayscale.
To create a selection from the alpha channel, choose Selection From Layer from the context menu or from the Material Manager’s Texture menu.
You can convert alpha channels to normal channels via drag-and-drop.
When an alpha channel (or layer mask) is active, the layer modes change and only two options are available:
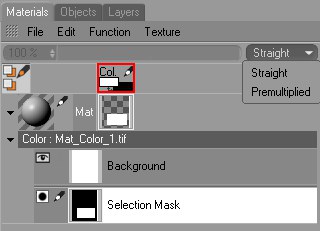
Straight, Premultiplied
When you render a picture with an alpha channel, both the bitmap and the alpha channel are antialiased. If you load this bitmap and its alpha channel into BodyPaint 3D and you are using the Straight mode, the bitmap and alpha channel are multiplied. This causes the transition from the object’s color to the background color to be calculated twice and this may cause an unwanted seam at the edge. Use premultiplied mode instead to avoid the seam.
To create a layer mask, do one of the following:
- In the Material Manager, choose Texture / Add Layer Mask. If pixels are selected when you call the command, the unselected pixels will be masked.
- Drag a layer that belongs to the same material and drop it to the right of another layer. As soon as you drop the layer, it is converted to a layer mask.

As with alpha channels, you can switch the layer mask on or off by clicking the black circle icon.
Also, you can convert the layer mask to a normal layer via drag-and-drop.
To delete a layer mask, click it to select it and in the Material Manager, choose Texture > Delete Layer.
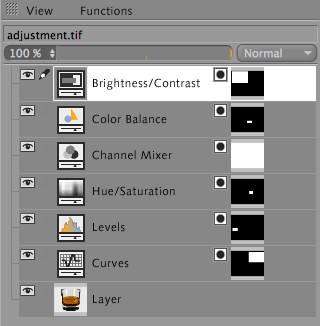 Layers will be displayed only.
Currently, BodyPaint 3D does not utilize Photoshop layers but they are displayed in the Layer Manager. These layers will remain unaltered when saved so they can be used again in Photoshop.