UV Transformation
This tool replaces most functions of the old, separate UV tool such as Move, Scale, Rotate and horizontal/vertical distortion (however, it only works in the texture view) and also supports snapping and quantizing.
The UV transformation is a type of universal tool with powerful functions.
 At left the state after the UV Transformation tool was called up, at right with various transformations.
Before the UV Transformation tool can be called up, a UV component selection has to be made. A rectangular interactive frame with several transformation Transform Controls will be displayed around the selection, with which you can use to transform the selected UV elements.
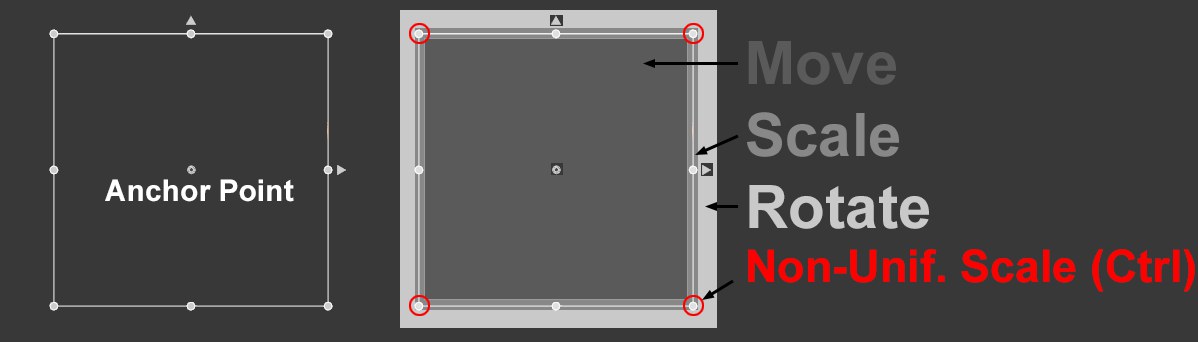 The regions that you can grab with the mouse to initiate certain operations.
In the image you can see the various regions of the frame marked with gray scales, which can be manipulated with the mouse (the cursor will change correspondingly):
- Move (dark gray): The entire frame can be moved within the frame
- Scale (medium gray): Grabbing the edges and Transform Controls will scale the frame proportionally around the opposite Transform Control as an anchor point.
- Shear (medium gray): Cmd/Ctrl + clicking + dragging from the center point along the Transform Control edge (relative to the opposite edge).
- Rotate (light gray): Grabbing the regions just outside of the frame will rotate around the anchor point.
- Non-Uniform Scale (red): Cmd/Ctrl + clicking a corner point of the frame will distort it horizontally or vertically.
The following keyboard shortcuts apply:
- Move
Shift: Restricts the movement to horizontal or vertical movement - Scale
Shift: If the corner Transform Control is grabbed: scale freely. If a Transform Control at the center or an edge is grabbed: horizontal or vertical scaling. - Alt: If a corner Transform Control, center Transform Control or edge Transform Control are grabbed: proportional scaling around the anchor point. Both keys can also be pressed simultaneously, which will combine the above-described functions.
- Shear
Ctrl + Shift: Scale freely relative to the opposite edge.
Ctrl + Alt: Shears along the edge relative to the anchor point.
Ctrl + Shift + Alt: Shear freely relative to the anchor point. - Non-Uniform Scale
- Ctrl + Shift: Scale freely.
- Ctrl + Alt: Horizonal or vertical scaling with mirrored effect on the opposite edge.
- Ctrl + Shift + Alt: Trapezoid-shaped distortion.
- Ctrl + Shift: Scale freely.
The anchor point (center point for scaling, shearing or rotating) can be positioned freely and it will snap to the Transform Controls. Alternatively, you can press the alt key when positioning the anchor point.
Both arrows at the center top and right restrict the movement to the respective axis (mostly X or Y; corresponding axis for a sheared frame). The same happens with the Move function if the
If you’ve selected a single UV point, only 2 arrows will be displayed with which you can move it horizontally/vertically or freely if the Transform Control is grabbed directly. For a series of points that lie in a straight horizontal/vertical row, a Transform Control will be displayed at the ends with which you can scale the row.
UV Transformation works with the known Snap function. Enable the ![]() Vertex Snap
Vertex Snap![]() Edge Snap
Edge Snap![]() Enable Snap
Enable Snap
The anchor point that needs to be adjusted can also be snapped to the Transform Controls (corner or center points) of the UV Transformation (note that you can set the anchor point to the cursor position using alt + click).
When manipulating the UV Transformation within the texture view, this anchor point, or the Transform Control moved with the mouse - depending on the operation - will snap to other UV points or edges together with the transformed UV elements.
The Quantizing settings can be enabled and will then affect the manipulation accordingly.
The
If the Transform Controls are in the way and cover UV elements, the frame and Transform Controls can be hidden using this option. The previously selected UV elements can then only be moved and no longer scaled, rotated, etc.
If Mode is set to UV Polygons, the transformed UV polygons will remain connected to their neighbors if this option is enabled (see image 3 on the left); if this option is disabled, the behavior will be as in image 2 on the left: the connection to neighboring polygons will be removed and a UV island will ensue.
 From left to right: Original Soft Selection disabled, enabled with small radius, enabled with large radius.
Here you can activate a soft selection with a definable radius. What does this soft selection include? A soft selection also includes UV elements outside of the selection, the strength of which abates the farther the cursor is from the selection. Larger values expand the effect (at the right of the image). Note that a Radius of 0 for UV polygons has the same effect as a disabled soft selection.