Maxon License Server
General – what is a License Server?
Starting the License Server
Starting the Clients
The License Server web GUI
Licenses
Users
Manage licenses
Settings
Log
Info
The Maxon License Server was adapted to work with the new Maxon license system (see ![]() License Manager...
License Manager...
The Maxon License Server now runs as a service (or daemon under macOSX / Linux), i.e., it always runs in the background as long as the computer is running.
General – what is a License Server?
The Maxon License Server (in the following referred to as License Server) makes it possible to distribute, manage and control licenses from a main computer within a local network. This is especially useful in networks in which numerous Cinema 4D versions are used such as at schools, government offices, companies, etc.
Licensing is then no longer done for an individual work place - referred to as Clients in the following - but is done from a central location. Individual Clients then do not require a Maxon user account (with internet access) but must only login to the License Server running on the local network, which will assign the license.
For example, if the user is finished with their work, the license can be freed up again and used by someone else.
Note that the License Server does not assign offline licenses (with which you can, for example, work offline for 3 weeks without contacting the License Server). You need to be in constant contact with the Clients. If the License Server is not running, the Clients will also not run.
Generally speaking, the following applies:
- The License Server must always be running so the Clients have access to it
- The License Server needs to access the internet from time to time (max every 90 days)
- The Clients do not need to access the internet.
After the License Server has been installed - make sure you select the correct port because it cannot be changed that easily - you first have to purchase one (or more) License Server licenses under Buy License in your Maxon user account. These will then appear immediately in your user account - if the License Server is connected to the Maxon user account (Maxon Account Sign-In in the Settings menu) - and will also be avialble to the License Server (these Lizenzen are available).
The Maxon License Server can also be installed under Linux. The installation instructions can be found here.
Normal licenses (=licenses that can be assigned without the Maxon License Server) do not work in conjunction with the License Server but License Server licenses can in turn be used as normal licenses.
In a second step, License Server licenses must be assigned for distribution in the License Server’s Manage Licenses menu (see Manage Licenses).
Call up the GUI in your browser via the License Server computer’s IP Port (i.e., 192.168.139:5264 or localhost:5264, for example, if the License Server is running on the same computer as the browser). The port is identical to the one you used when installing the Licnese Server.
Note that you can only change this port by uninstalling the License Server and re-installing it again (any licenses assigned in the meantime will be linked to this port; when in use, these will first be freed up once the Client lease has expired).
The sign-in information is initially always:
- user name: admin
- Password: admin This should be changed in the Users tab as quickly as possible.
As soon as you have completed the Starting the License Server steps above, Clients will be able to access the licenses.
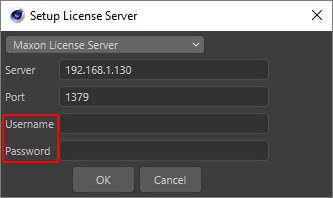
If the Client does not have any licenses, the license dialog window will open when Cinema 4D is started. Click on the License Server tab:
 This is what the dialog window looks like after clicking on License Server.
This dialog window contains the following settings:
- Selection Menu: Here you can define if the communication between the Client and the License Server should be encrypted. For encryption, select Maxon License Server (secure SSL). This ist the secure option since passwords will otherwise not be encrypted.
- Server: Here you can enter the IP address of the computer on which the License Server is running. Domain addresses in simple text can also be used.
- Port: Here you can enter the port number that you used when you installed the License Server.
- user name/ Password: These fields must only be filled out if your License Server administrator has determined that this needs to be done. Otherwise, these fields can remain empty.
If these fields have been filled out correctly, click on OK. If you see a green bar under Validate License Status, a license was assigned. If you are using multiple License Server license types, you might have to find the fitting ones. Otherwise the License Server will not know which one to use.
Now click on OK in the license dialog window and Cinema 4D will start.
The License Server web GUI looks like this once started:
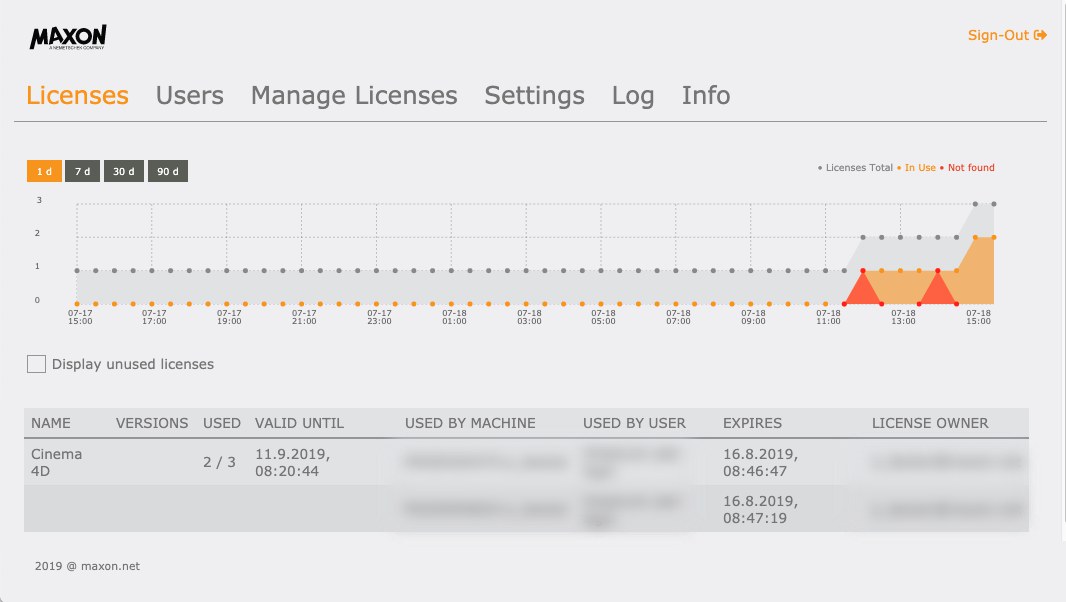 The license page will look similar to this (any last-minute changes are not reflected in the screenshots). On this page you will find an overview of the licenses used by Clients as well as those not in use.
Occasionally, messages will appear at the top right. These can be hidden by clicking on them.
In the graphic display you will find the number of License Server licenses that can be used for this particular License Server displayed as a timeline. The timeline can be scaled using the buttons at the top left from 1 to 90 days. The utilization rate of your License Server licenses is displayed.
The following colors are used:
- Gray: The number of existing and distributable License Server licenses.
- Orange: The number of assigned License Server licenses.
- Red: The number of requested License Server licenses but not assigned due to too few licenses being available.
At the bottom, the current distribution of License Server licenses is displayed as a table. If you activate Show Unused Licenses, the License Server licenses currently not assigned will be displayed. The informaton is self-explanatory except for the following:
- Versions: Permanent licenses are available only for a specific Cinema 4D version, e.g, for R21. Then 21.000-21.999 would stand here. If the column is empty, this is a subscription license (with which you can, for example also run an R21 if S22 is also available).
- Valid until: The License Server retrieves the licenses from the Maxon user account (by default for a period of 28 days which, also by default, is renewed daily) and leases them to Clients. This means that the License Server can run for 28 days without connecting to the Maxon user account. The Valid until column displays the date until which the License Server can run without connecting with the internet and still lease licenses. After this date, the license will return to the Maxon user account and can no longer be used by the License Server (without being assigned in the Manage Licenses menu).
- Expires: The License Server leases the license to the Client. The Client must from time to time contact the License Server in order to renew your claim for this license. Expires shows how long the Client can work without connecting to the License Server without the license expiring and to pass it to other Clients.
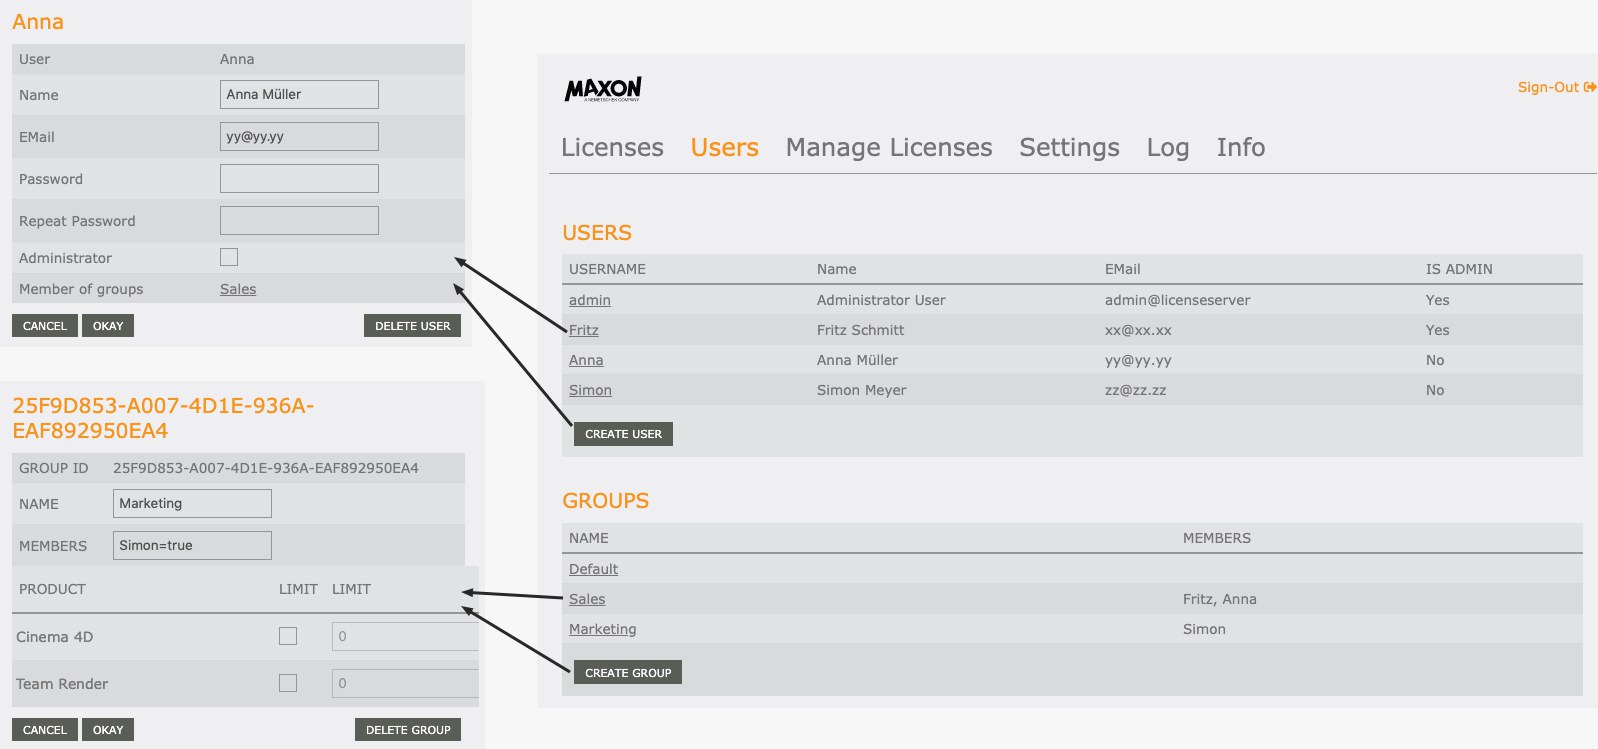
On this page, users and groups can be created. Users can be assigned to groups. What can this be used for? Imagine you have 3 License Server licenses. Your company has a marketing and a sales department, each with 5 employees who all use Cinema 4D from time to time. You might have an issue if the marketing department uses all 3 licenses simultaneously and the sales department is stuck with nothing. To get around this issue, you can create 2 groups: marketing and sales. Each group can be allotted a maximum of 2 licenses. Problem solved.
As soon as you have created a new user or have clicked on an existing user, the dialog window at the left on the image above will open. Here you can define details for the user. The same applies to new or existing groups.
If you click on Create User, a dialog window will open in which you can define the new user’s user name. Click on OK to confirm.
The following settings can be defined, which will be shown when you click on the user:
This is the user name with which the user registered with the License Server (for both the Client as well as the License Server GUI). Note that this user name and the password have nothing to do with the Maxon user account! Each has its own user name and password.
Enter the user’s real name here.
Here you can enter the user’s email address. This is only for quick reference and serves no other purpose than being able to contact the user for whatever reason.
When a new user is added, a password can be assigned here. This will not be displayed later when the user’s details are called up.
Here you can define if the user should have admin rights. An admin can do the following:
- Manage users: add new users, delete existing users or add them to groups
- Assign admin rights to others
- Link the Maxon user account with the License Server and assign purchases License Server licenses to this License Server.
- Define a range of technical details (Settings menu).
Users who do not have admin rights will only see the menu items Licenses, Users and Info, and can only change their own real name, email and password.
Here, the group (or groups) will be shown in which the current user is a member. Each newly-created user is initially a member of the ,Default’ group and will be returned to this group if removed from other groups.
Click on the group to display its settings.
All changes made will be saved when you click on Okay. Click on Cancel if you don’t want the changes made to be saved.
Click here to delete the current user, including all related information.
A group consists of one or more users to which a maximum number of License Server licenses can be assigned.
Clicking on Create Group will open a dialog window in which you can define the name of the group. Click on OK to confirm. Here you will find the following settings, which will be shown when you click on the group’s name:
This is a unique group ID made up of a unique series of characters generated by the system.
This is the name you can define freely, which will appear in the group list.
Here you can enter the names of the group’s members (as defined in Users), separated by a comma. If you later see ,=true’ after each name, this can be ignored. If you want to remove a user from the group, simply delete the name (or change ,=true’ to ,=false’).
A user can be a member of multiple groups. However, this bears the following disadvantage: assuming A is a member of group A and group B, and currently uses a license from group A. Group B only has 1 license assigned to it and C wants to have a license from group B. The License Server will register that A is already using a license (from group A) and will categorize group B as being at full capacity. C will therefore not be given a license.
Here you will find settings for the group itself: If you check the box next to the left Limit column you can define the maximum number of License Server licenses for this group on the right Limit column.
In the Product column you will find a list of the product licenses that are assigned to the License Server. These can be defined separately with the Limit column.
The Available Licenses column you will find a list of the total number of licenses assigned to the current License Server (regardless if these were already distributed to Clients).
All changes made will be saved when you click on Okay. Click on Cancel if you don’t want the changes made to be saved.
Delets the selected group. All members will be returned to the ,Default’ group.
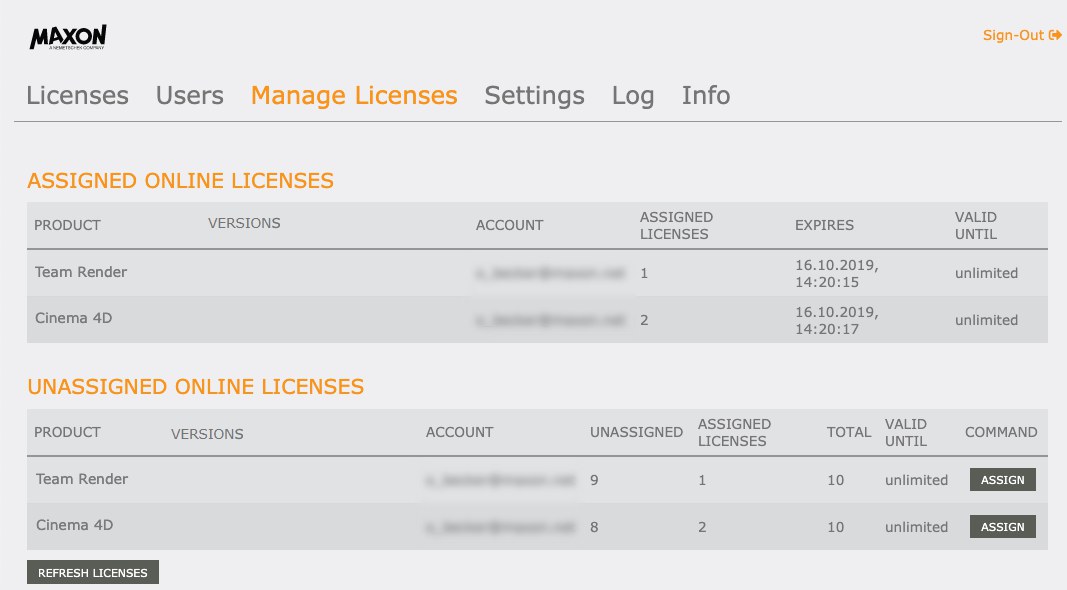
The Assigned and Unassigned columns refer only to the licenses assigned from the Maxon user account to the License Server and not to the Client licenses assigned from the License Server (this information can be found in the Licenses menu). "Assigned" means that the License Server can distribute this license.
On this page, all purchased License Server licenses - displayed as Online License - are listed. You will find two tables:
- Assigned Online Licenses: These are licenses assigned to the current License Server (licenses will be assigned via the Assign button in the Unassigned Online Licenses section).
- Unassigned Online Licenses: This is a list of purchased License Server licenses that have not been assigned to a License Server.
The most important element on this page is the Assign button. As soon as a License Server license has been purchased (see Starting the License Server above), it must be assigned to the current License Server using this button.
- Product: Displays the product licenses.
- Versions: As already described above, the Cinema 4D licenses for permanent licenses will be displayed here. This will remain empty for subscription licenses.
- Account: No License Server without a Maxon user account. The linked user account will be displayed here.
- Assigned Licenses: Displays the number of licenses that are assigned to the current License Server.
- Expires: The date before which the License Server must contact the Maxon user account in order to extend the lease period (see also Valid Until). Don’t mix this expiration up with the Valid Until function in the Licenses menu where Valid Until has the same function as Expires.
- Valid Until: If a license is time-limited by Maxon, the end of the usage time will be displayed here. Don’t mix this date up with that of the Licenses menu. These are completely separate.
- Product: Displays the product licenses.
- Versions: As already described above, the Cinema 4D licenses for permanent licenses will be displayed here. This will remain empty for subscription licenses.
- Account: No License Server without a Maxon user account. The linked user account will be displayed here.
- Unassigned: The number of unassigned licenses, which also cannot be assigned by the License Server.
- Assigned Licenses: Displays the number of licenses that are assigned to the current License Server.
- Total: The total number of assigned and unassigned licenses.
- Valid Until: Valid Until: If a license is time-limited by Maxon, the end of the usage time will be displayed here.
- Command: With Assign you can define how many of the free License Server licenses should be assigned to the current License Server. These licenses will then be moved to the upper table. Simultaneously, the license will be taken from the Maxon user account and placed in the hands of the License Server, which can in turn pass these on to Clients. This process cannot be undone.
Clicking on this button will connect the License Server with the Maxon user account and will refresh the lease duration (of the License Server from the Maxon user account). The same happens periodically via the Server License - refresh all in the Settings menu.
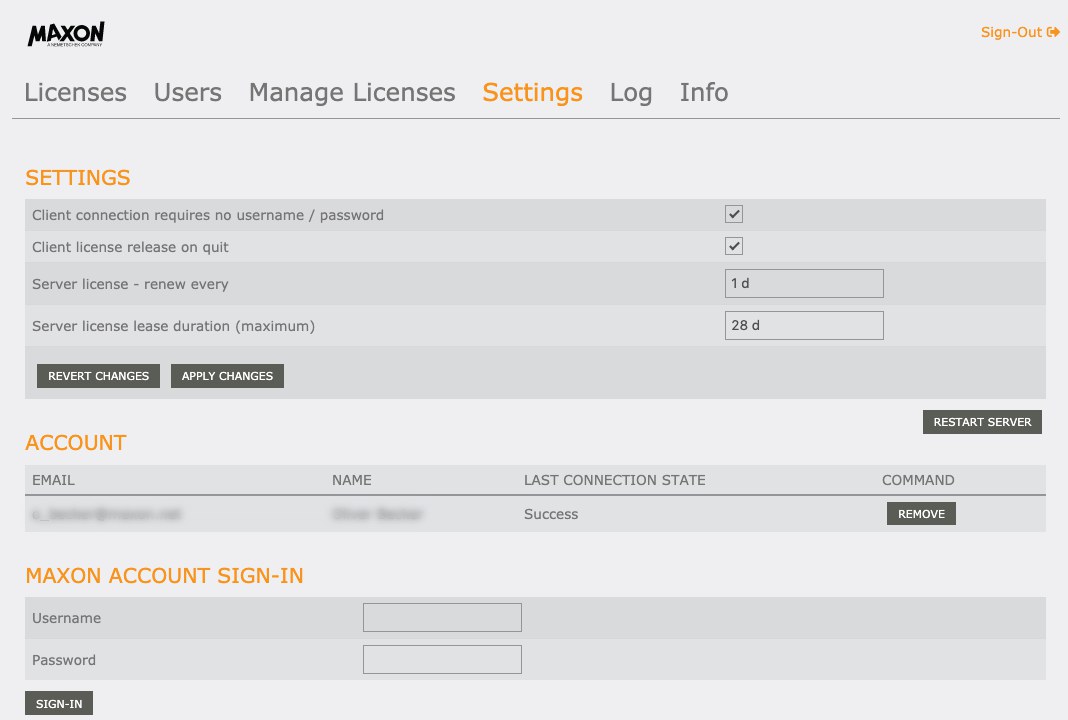
In addition to several detail settings, you can also link the Maxon user account with the License Server on this page.
Client connection requires no user name/ password
When a Client registers with the License Server you can define here if a user name and password must be entered.
The unsername and password are defined in the Users menu (this has nothing to do with the Maxon user account login!). If this option is disabled, any user can sign in to the License Server if they have the correct IP and port.
Client license release on quit
If its option is enabled, the license will be returned from the Client to the License Server when Cinema 4D is quit and the license can be assigned to another Client. This is the normal behavior since this ensures a continuous distribution of licenses.
If this option is disabled, the license will remain with the Client when Cinema 4D is quit and will NOT be available for other users. Only when the Client Lease Time (without contact with the License Server, which would extend this periodically) has expired will the License Server be able to access this license.
Note that the Client can free up its license at any time independently of this setting via the ![]() Quit and Free License
Quit and Free License
Server license lease duration (Maximum)
For this and the following numeric field, enter min for minutes, h for hours and d for days.
This is the length of time that the License Server can use the license from the Maxon user account. During this time, no other License Server can assign this license to other Clients. If this time expires without the License Server synchronizing with the Maxon user account (either via clicking on Refresh License (Manage Licenses tab) or periodic actualization (Server License - refresh all), this license will be returned to the Maxon user account and will no longer be available for the License Server. You can, of course assign the free license to the License Server again (Manage License menu).
You can use this setting to control how often the License Server should attempt to renew the license from the Maxon user account. The default setting of 1 day ensures that the License Server will contact the Maxon user account on a daily basis to extend the duration of the lease for the period defined.
Make sure that this timespan is shorter than the Server License Lease Duration (Maximum) span because the lease duration can otherwise expire for the Client without the License Server having automatically extended this license.
Use these buttons to undo or apply changes, respectively. Changes will first apply when the Apply Changes button is pressed.
If, as an administrator, you want to quit and restart the License Server you can click on this button. This should, however, never be necessary.
Here the account that is linked to the License Server is displayed.
The Remove button can be used to remove the link. Licenses leased by the Maxon user account will remain for the defined Server License Leas Duration (Maximum) timespan and will first be returned to the Maxon user account when this timespan expires.
Here you can link your Maxon user account with the License Server. Multiple accounts can be linked with the License server and all corresponding licenses can be made available for distribution by the current License Server.
Enter your user name and password and click on Sign-In to access your Maxon user account. If successful, your account will be added to the list. Corresponding licenses will be displayed on the Manage Licenses page.
The Log page displays a wide range of information about the License Server such as if licenses have been assigned, if new users or groups have been added or removed, if something is not working correctly, etc.
In the Filter text field you can enter a series of characters to list all items that contain this series of characters. After entering the characters you can either press the Return key on your keyboard or click on the Filter button to activate the filter. If this field is empty you can click on the Filter button to refresh the list.
These buttons can be enabled or disabled accordingly to display the desired filter(s). Orange = enabled. In the image above, the Info (i) and Warnings (warning icon) are shown. Errors can, for example, be file errors or sign-in errors, etc.
Clicking on this button will download the log list as a text file. It will be saved to the browser’s download directory as a log.txt file. Successively downloaded files will be numbered in corresponding order.
Note that the log file will contain time coordinates in global time (UTC), i.e., it will differ from the time that is displayed in the GUI (here: local License Server time).
Clears the entire log list, including the server statistic (the graphic on the Licenses page).
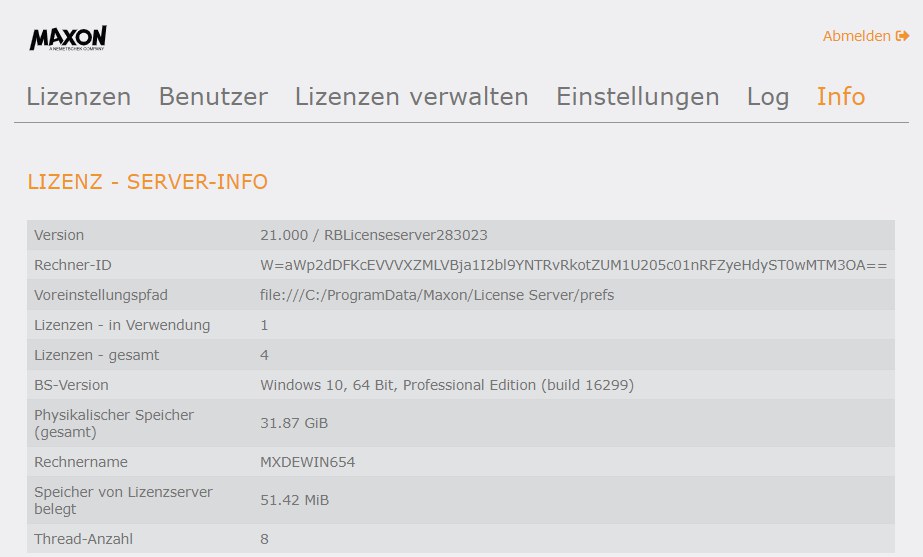
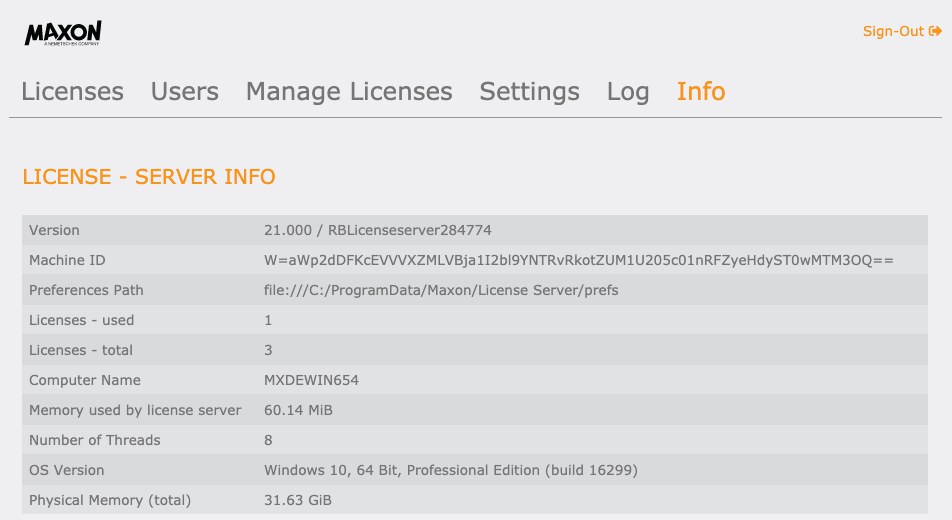
On the Info page you cannot add or remove any elements. It only displays information from the License Server. All very self-explanatory.