![]() Morph Track
Morph Track
Morph Track
You can use this track to let one object morph smoothly into another. This can be done using polygonal objects, spline objects as well as with primitives and spline primitives. You only have to make sure that both respective objects contain an equal number of points. For example, a sphere cannot be morphed into a cube since a sphere contains many more points.
Morphing is meant to morph modified duplicates of an object together. This morphing can, for example, be applied to a sphere that was forced into the shape of a cube using the Magnet Tool.
In order to morph an object a target object is required (duplicate of the original object).
We would like to stress again, that target objects are duplicates of the original objects. The original state of the object to be morphed must exist.
If, when creating target objects, you want to align the copies of the original object along a specific axis, use the Use Model Tool and not the Use Object Tool!
The following example will shed some light on this:

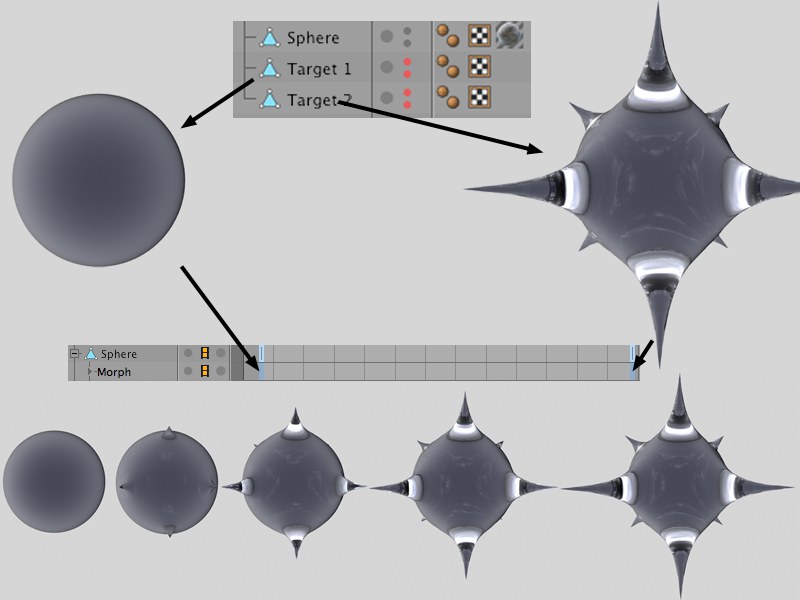
In this example, a morph animation is used to make spikes emerge from a sphere. This is how it’s done:
- Create a sphere, increase its subdivision and make it editable. Make two copies of the sphere and name them Target1 and Target2, respectively. These spheres will serve as morph targets for the sphere that will actually be morphed.
- Edit Target2 using the Magnet Tool in Needle mode. Hide Target1 and Target2 (if you haven’t done so already) so they will not be seen when the scene is rendered.
- Add a morph track to the Sphere in the Timeline and create 2 keys.
- Drag the Target1 object into the first key’s Morph Target field. Drag the Target2 object into the second key’s Morph Target field. Drag the Target2 object into the second key’s Morph Target field.
That’s it. If you drag the Timeslider you will see how the sphere morphs between the Target1 to Target2 shapes.
The Pose Morph tag lets you create morphs much more smoothly.