glTF Export Settings
You can select from 2 options:
- glTF: A glTF file is a text format that can be opened in any text editor. This is the common format and is therefore the default setting.
- GLB (Binary): The glTF export also offers the option of exporting the scene as a binary format (*.glb). These files are smaller (at least 33%) and are loaded faster.
This factor can be found at numerous locations throughout Cinema 4D when importing or exporting foreign formats. Therefore, don’t be surprised if the term ,export’ is used if this factor is seen in an import function (this factor is explained as a whole here).
This factor lets you scale files upon import/export, i.e., practically all relevant numerical values saved in the file or those to be saved will be multiplied by this factor and then saved - or interpreted when loaded.
The unit at the right in turn defines how upon
- Import the numerical value saved in the file is converted to the current Cinema 4D unit. Example: if an X value of 1 is saved in the file and you define Feet, the X value will be converted to 30.48 cm in Cinema 4D (if centimeters are defined by default in Cinema 4D).
- Export numerical values are saved in the file. Example: an X value is set to 100 cm in Cinema 4D. If you define Feet for export, the exported file will save a numerical value of 3.281 (1 meter = 3.281 feet).
More information about units and scaling can be found in the Project Scale section.
Current Frame
Custom Frame [-2147483648..2147483647]
Here the frame can be defined for the current time (Timeslider) or a custom frame can be defined manually.
This will then be the point at which the scene is output if you don’t export the animation.
For Pose Morph animations, you should always define the animation’s Start frame.
The glTF export exports PSR, Pose Morph, PLA and joint animations. The Bake Animation option can be used, for example, to export dynamic simulations.
Enable this option if you want to export animations that were made using position, scale or rotation tracks. Note that if you want to export Step keyframe interpolations, all X, Y and Z keys for this type must be included. Otherwise it will be interpolated as a spline (this also applies to the Pose Morph keyframes).
These are morph animations, i.e., shape animations that are created using Pose Morph or PLA.
The following options are available:
- None: Neither Pose Morph nor PLA animations will be exported.
- Pose Morph: Only Pose Morph animations will be exported.
- PLA: Only PLA animations will be exported.
For Pose Morphs: only Points Pose Morphs are supported.
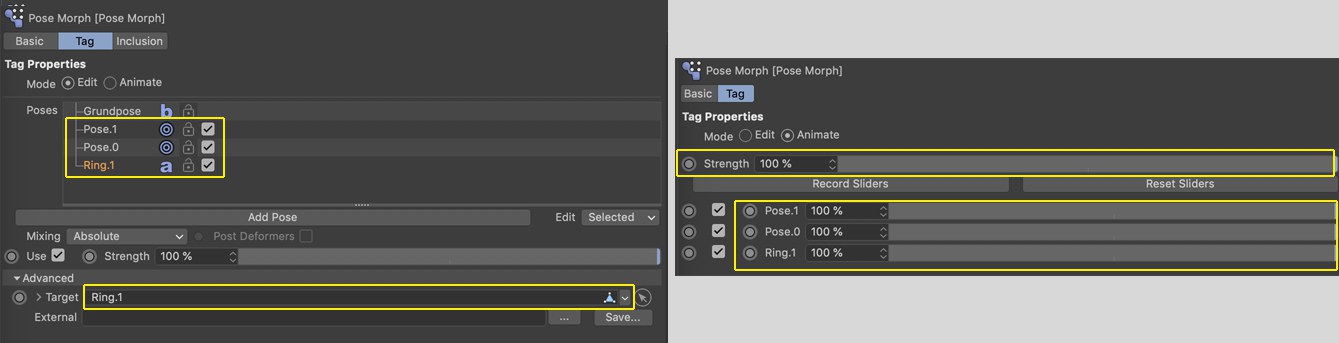 Elements supported for export are marked yellow (incl. the Strength slider for animations on the right).
Use this option to export animations based on PSR joint animations, i.e., character animations.
Note that glTF can process a maximum of 4 joint weightings per point. If the Cinema 4D scene contains more, only the 4 strongest weightings will be used.
Note also that the joint hierarchy is not a Child object of the object to be deformed and only joints in the joint list of the respective Weighting tag are included.
If this option is enabled, object movements in a scene that, for example, are created using Dynamics or Expressions (e.g., Vibrations-Tag), i.e., have no PSR tracks in the Timeline, can be baked so that these movements can also be exported. Internally, tracks and keyframes will be generated for each frame.
Generally speaking, you should also bake animations if they look differently from the way they look in Cinema 4D.
Enable this option if you want to export textures (videos and image sequences are not supported). glTF only recognizes UVW projection. If you use a different projection within Cinema 4D you will have to fixate this with a UVW tag.
Shaders are not supported. These must be baked.
 Depending on the orientation of the polygons (option disabled), these will either be visible or not (these are textures masked by an alpha channel).
Use this option to enable or disable backface culling. If this option is disabled, polygons facing away from the camera - the polygon Normals are the key - will not be displayed. Otherwise they will always be visible.
Enable this option if you want to export cameras in the scene. Only Perspective and Parallel cameras will be exported.
Of the numerous other camera settings in Cinema 4D, only the Field of View (Vertical) as well as Zoom and the Enable Near Clipping clipping setting will be exported.
Select here if the exported objects should be smoothed (option enabled). This reflects the display in Cinema 4D with and without a Phong tag.
Enable this option if you want to export UV coordinates (only one UV map will be exported per object; if several are present only the first). Otherwise no textures will be shown.
This option should be enabled if you only work with the default coordinate system in Cinema 4D. The glTF export will then look exactly as in Cinema 4D.
The following applies for the various coordinate systems: glTF uses the right-hand rule (Z axis points to the front), while Cinema 4D uses the left-hand rule (Z axis points to the rear).
The difference is in the way scene objects are mirrored along the Z axis.