Basic Properties
![]() Icon Settings
Icon Settings
Sometimes, when working with numerous icons that look the same, you want to have a better overview of it all. This is what this function does. Objects and tags can be assigned their own icons or existing icons can be re-assigned or colored:
 Examples for tags that were colored, replaced by existing ones and custom tags.
Note the Show Custom Icons command in the Object Manager’s View menu, which lets you switch to the Cinema 4D icons.
There are a few objects (e.g., Houdini generator) and tags (e.g., Material tags) that can’t be colored because they are controlled by Cinema 4D directly.
Here, you can either
- load a bitmap - whereby an alpha channel will be evaluated, if present. Internally, this bitmap will be scaled and distorted accordingly if it has a different size than 64*64 pixels (which is used internally by Cinema 4D). or
- enter an existing command ID for corresponding icons. These IDs can be found in the Customize Commands Manager.
This function can be used to color an existing or a custom icon. You can select from the following options:
- None: No coloring will take place
- Display Color: Each object can be assigned a Display Color in the Basic tab. This will be used here. Since the Display Color can also assume a layer color objects can also be colored according to the layer to which they are assigned.
- Custom: Lets you select a custom color.
Tags have no Display Color and can therefore only be colored using a custom color. Do do so, activate the Icon Color option.
These commands can be used to save icons as a preset or to load an icon. Custom icons are saved to and managed with the Content Browser under Presets/User (in the corresponding folder).
Here you can enter a name for the object.
If an element was assigned to a layer its layer color will be displayed here. This field reflects the layer color in the Layer Palette. You can drag & drop layers from the Layer Manager or similar layer fields onto this field. You can also assign layers or remove elements from current layers using the menus located behind the small triangle.
You can assign a priority to each expression. This is especially useful when working with Python or XPresso Expressions that you have created yourself. Sometimes the priority is crucial for determining exactly when the expression is evaluated. The same expression can produce different results depending on whether it is executed before or after other expressions in the scene.
Don’t forget that this calculation sequence will be run through for each rendered image!
Possible priority values range from -499 to 499 and apply to the chosen category on the left: Initial, Animation, Expressions, Dynamics or Generators.
When using expressions with the same priority (on the same object) the order in which they will be calculated will be in accordance with their sequence (position) in the Object Manager.
For a Project with four expressions with the following priorities:
- Expression A: Animation, 10
- Expression B: Animation, 0
- Expression C: Animation, -1
- Expression D: Expression, 5
This results in the following order of execution:
- Expression C (-1 being the lowest priority value of the four expressions).
- All animated objects in the scene (all animated objects in Cinema 4D have a priority of Animation, 0).
- Expression B (although this has the same priority as all animated objects, animated objects are still preferred over expressions with the same priority).
- Expression A
- Expression D
Cinema 4D contains certain Expressions that don’t necessarily follow these simple rules. These include IK, which uses values taken from different temporal locations of the calculation sequence. Dynamics also have their own priority (please ignore the priority Dynamics R11.5 - this is the first and no longer available R11.5 functionality).
 The calculation sequence of various functions. Internal priorities of several functions are also displayed.
Dynamics (e.g., Priority Generator +400) defines these priorities internally and these cannot be changed. For example, Expressions that point to an object deformed by Dynamics require a priority of at least Generator +401.
This option defines whether the object or tag should be carried out even if only the Viewport view has changed (e.g., when navigating the scene via the Viewport).
Turns the corresponding expression on or off.
Almost all tag or Expression parameters can be animated via the right mouse button.
Pose Morph has two states that need to be calculated when calculating priorities: The Base Pose priority and the, morphed’ pose priority. The second priority setting defines when the Expression, Deformer, etc. should affect the given object. For example, an Expression can be made to affect a Base Pose before it’s morphed. The order of calculation would then be:
- Base Pose
- Expression/Deformer/Generator
- Morphed pose
This makes it easier to avoid conflicts and the resulting delayed/flickering morphs.
If the new Base Pose is identical to the normal priority, the Pose Morph will only make a change (set the Base Pose, then the morphed pose) when a morph actually takes place. Generators must then not be recalculated if no morphing takes place, which speeds up calculation.
Remember this rule of thumb: Leave both priorities at the same value (=faster calculation) as long as no problems with Generators, Expressions or Deformers arise - at which point you can assign a later priority to the morphed state.
Note that the Base Priority can only be lower or equal to the regular priority. If you place the Base Priority higher, the regular priority will automatically be increased accordingly. The regular priority must then be increased again if you want an Expression or a Deformer to have an effect between Base Priority and the morphed state.
This option defines whether the object or tag should be carried out even if only the Viewport view has changed (e.g., when navigating the scene via the Viewport).
![]() Mixing
Mixing
The Basic tab has been modified to accommodate the new options available to the Pose Morph tag. Much like the Constraint tags, you can enable or disable parameters, and new tabs will appear to reflect the change. Here are the various types of morphs available now.
Enables morphing of the axis position of the object.
Allows parameters on the Object Properties tab to be morphed.
Enables morphing of the axis scale of the object. Note that you need to use the Object tool, the model tool will only scale the mesh, not the axis.
Allows User Data to be morphed. For example, if you set up two sliders with User Data on your object, each controlling one parameter, you could add a Pose Morph tag to that object to quickly create morphs off of the sliders.
Enables morphing of the axis rotation of the object.
Pose Morph will morph all objects placed as a child of the object containing the Pose Morph tag. Very useful to morph a whole Joint hierarchy, for example. And yes, it also works with point-based morphs.
The handling of hierarchies is extremely flexible, allowing you to move or duplicate a Pose Morph tag onto other hierarchies. Hierarchies can also be reorganized or have a different composition of objects (of course, only similar objects will inherit the morphs from the duplicated tag - points morphs can only be applied to points-based objects, for example). You can also add or remove objects on the fly, and edit your morphs further.
Enables morphing of the object's points. The object must be point-based (polygonal, spline, FFD, Correction Deformer, Camera Deformer and so on). Yes, FFDs are recognized as well! In addition, you can also morph Hair guides.
Enables morphing of Vertex Maps and Weights maps.
Enables morphing of the UV mesh. Very useful if you need your texture to move precisely on your mesh, or need to move your texture over time on the object. Note that the material applied to the object being morphed must be set to UVW mapping, and the object must have a UVW coordinate tag (in the case of parametric objects, the UVW coordinates are stored internally and not accessible, so you must edit the object before morphing its UVs).
Displays the required memory. Since copies of the objects are made in the course of a day, the scene file can become quite large depending on the number of morph targets used.
Disabling a morph type after enabling it and creating some morph targets will cause the loss of all morph targets of that data type. For example, if you have made some morphs using Points mode, make sure you don't disable Points mode, otherwise all points morph data (all morph targets) created previously will be lost. In addition, it could also affect the Base object, so it is highly advised that you stick with whatever mode you chose initially and do not deactivate it. Of course, you can add other modes at will, since as long as a mode is enabled, it will keep its data.
Clearing up data is necessary to prevent significant memory build up.
![]() Points Option
Points Option
This group of options will be displayed once the Points Mixing mode is selected. These options only apply to Correctional PSD morphs.
In Edit Mode, selecting a Correctional PSD Morph will highlight the joint driving (or linked to) that morph in the viewport. It makes identifying driver joints much easier, when creating and tweaking Correctional PSD morphs.
This sets the color to be used on the highlighted driver joints of selected Correctional PSD morphs.
Position Threshold [0..100000m]
Driver joints and morphed points are linked automatically when creating a Correctional PSD morph.
The Pose Morph tag will read the first Weight tag of the mesh (by default) to determine the weights of the morphed points, as well as which joints are weighted to these points and the Bind Pose of said joints. Joints that are posed differently than their Bind pose and influence the points for any given morph will be assigned as drivers of the morphed points. In short, if a morphed point is influenced by a joint, and the joint’s Matrix is changed compared to its bind pose, it will be assigned as a driver of these points, automatically.
The Position Threshold parameter allows for some fine-tuning for selecting the driver joints. It will be based on the variation of position between bound and posed joints. The higher the value, the more variance needed between bound and posed position for the joint to be included as a Driver.
This parameter is similar to the Position Threshold option, except that the variance being looked at is the difference in orientation between bound and posed joints. In short, where the joint axis is aiming at. Higher values will require higher variation between both states for the joint to be included as a driver.
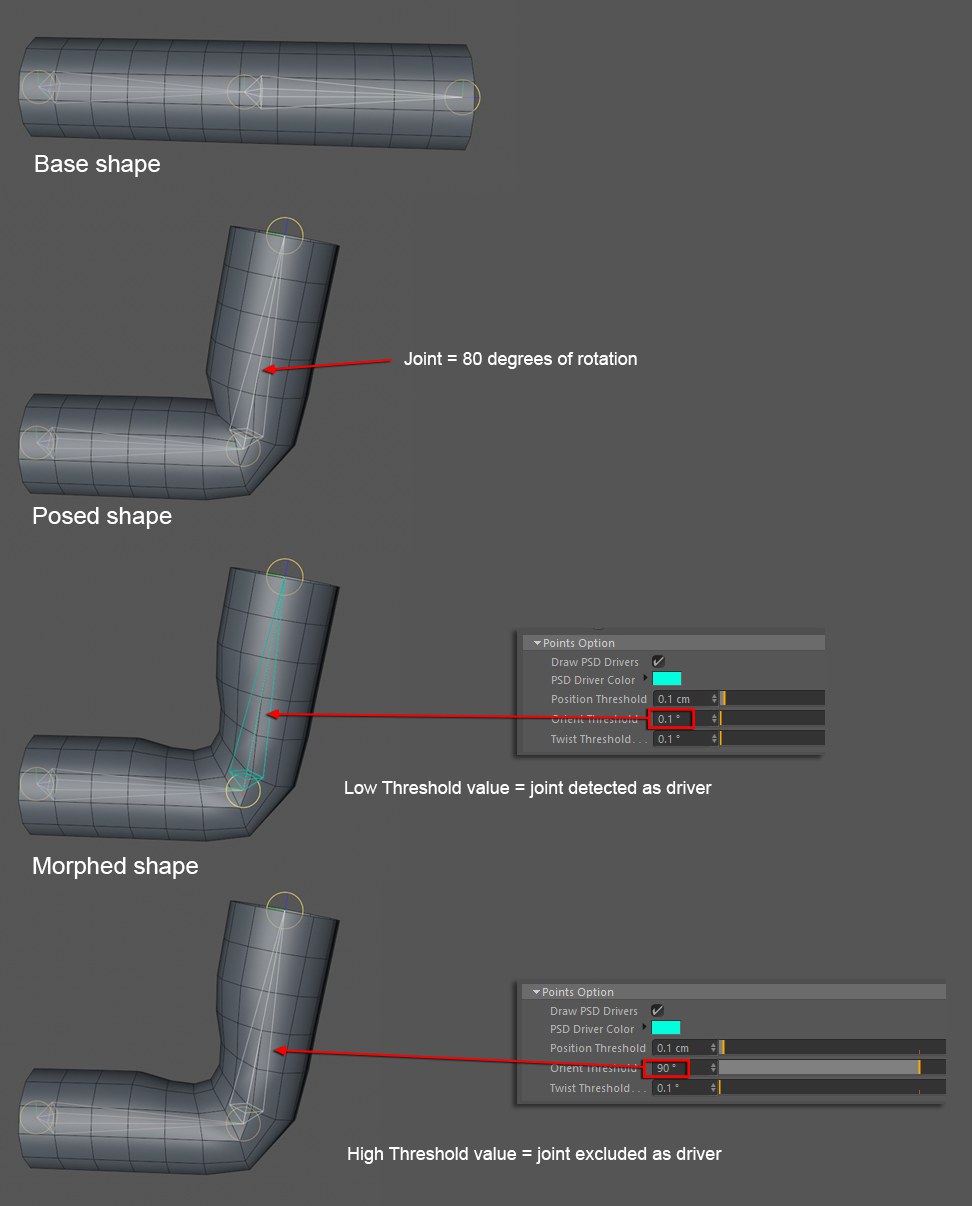 The Threshold options allow for a bit more control over the automatic driver assignment.
Similar to the Position and Orient Threshold options, except this defines the tolerance between bound and posed joints based on their twist, or banking (Joint length axis), values. Higher threshold values will require higher variation between bound and posed joints for them to be included as drivers.