![]() Light Object
Light Object
Light Object
When building a new scene in Cinema 4D, a default light is used called the auto light. To change the default lighting setup for all future scenes, build a new scene that contains only the lights that you require for your default lighting and save this scene within the Cinema 4D folder under the name new.c4d in your Cinema 4D directory. This setup will be opened automatically each time you start a new Cinema 4D scene.
You can also save other environment attributes (Sky, Floor, Environment and so on) as a ![]() Save as Default Scene
Save as Default Scene
Cinema 4D’s auto light will switch on automatically when you switch off lights during an animation unless you disable Auto Light in the render settings (Options page).
The light settings described below don’t work with all renderers. ProRender in particular does not properly support many of the physical settings. These settings will be grayed out.
Displaying lights in a viewport
The lighting within a scene can be easily previewed by turning on the Gouraud shading option. This option will update your lighting in real-time, even adjusting the lighting and updating your scene as you move the lights around.
To change the name of a light, double-click the light’s name in the Object Manager and enter the new name into the dialog that opens.
To create a light, choose the desired light from the
![]()
When you choose Objects / Scene / Target Light, a light source and a Null object are created. The null acts as a target for the light. The light source can be any light type of your choosing and you simply move the null into the hierarchy of the object towards which the light should point. Now, when you move this object, the light automatically remains pointing at it.
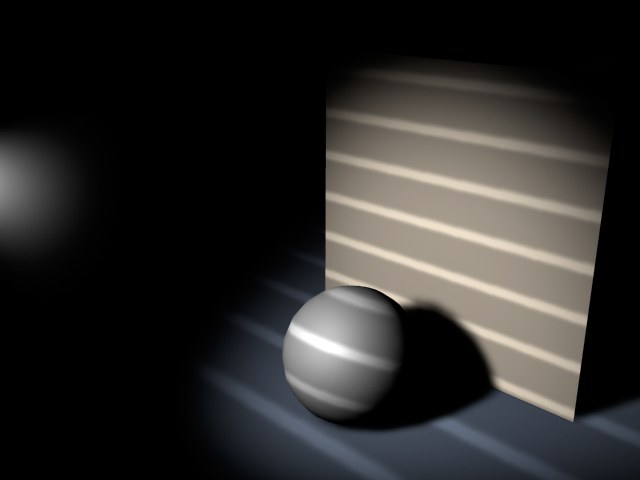
A gel (also known as a lightmap) is produced by assigning a material with a transparency map texture to a light source.
The light’s colored areas are then filtered by this texture and colored in exactly the same way that a slide projector projects a still picture. For example, the striped-shadow effect of a Venetian blind can be simulated by assigning a black-and-white striped gel to a light object.
You can assign as many gels as you wish to each light object.
Physically correct lighting has several known properties that are enabled automatically when this light is selected:
- Area shadow type
- Inverse Square falloff
In principle it behaves similar to a polygon object (object with luminous material).
Note also the ![]() New PBR Material
New PBR Material