Options
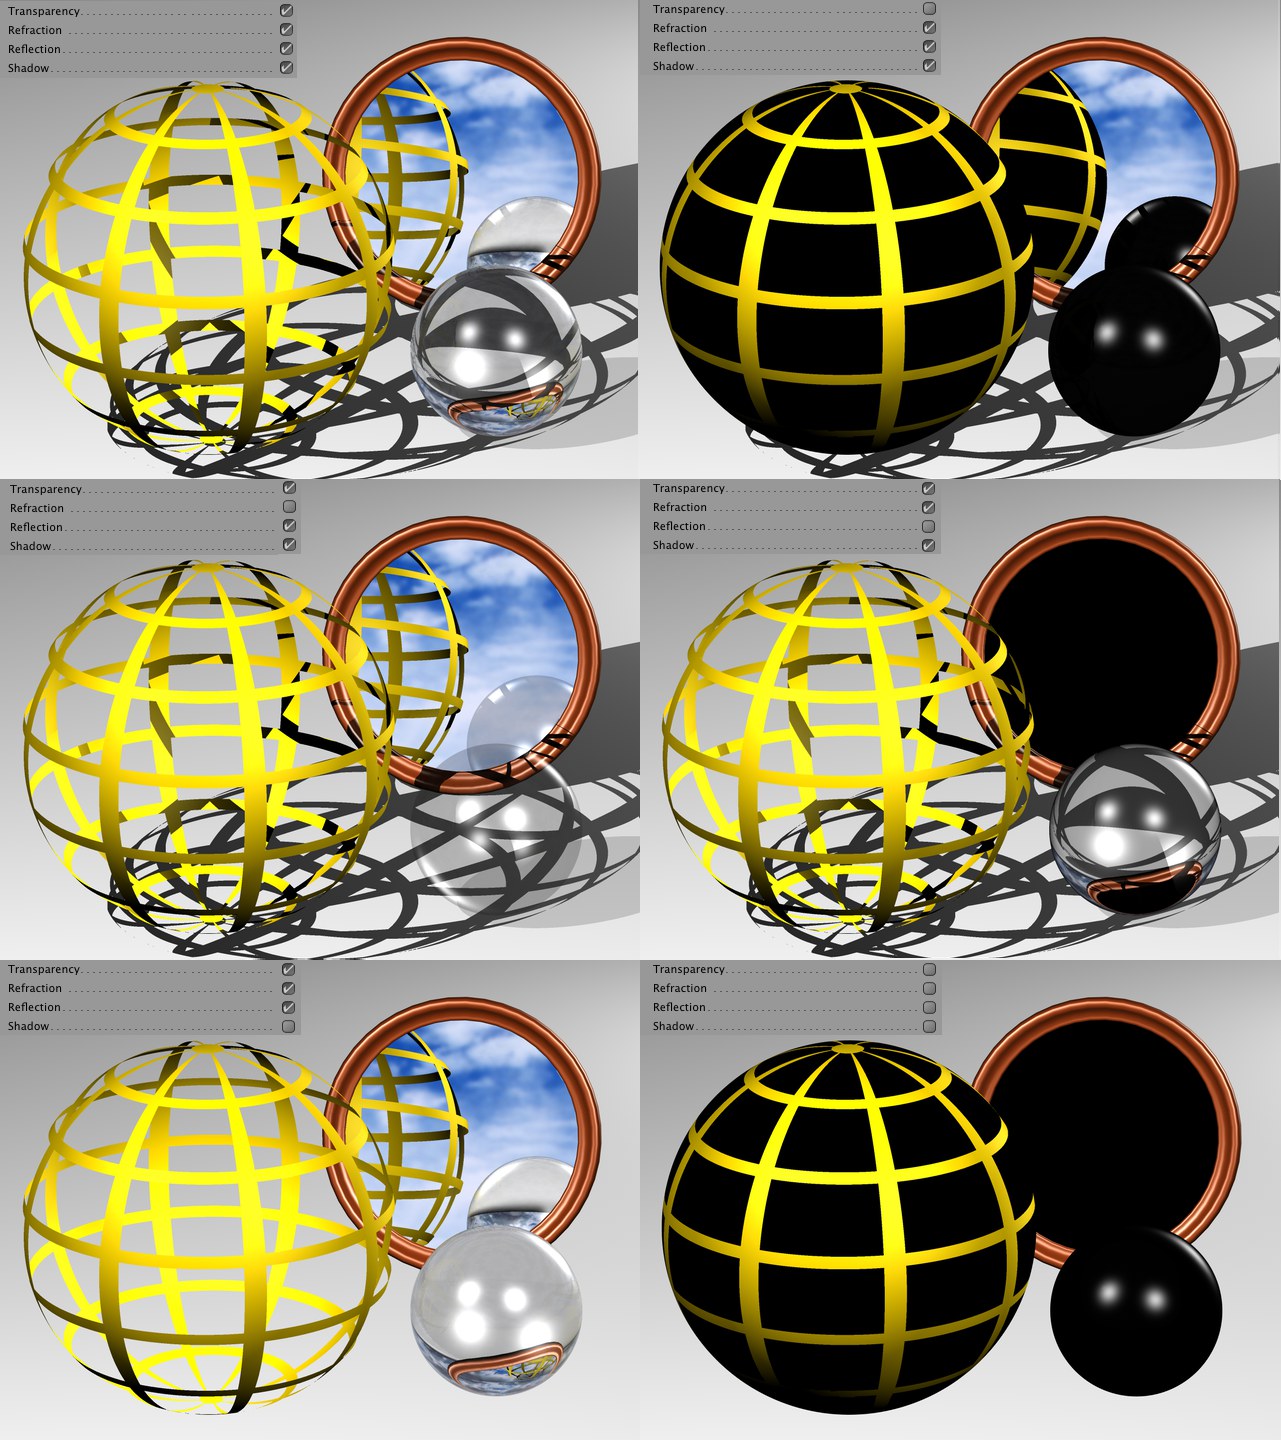 Various states of activation for transparency, refraction, reflection and shadow options. If all four options are deactivated you will get a very fast calculation albeit very unrealistic result.
This option defines whether or not Transparency or Alpha channels should be included in the calculation.
Defines whether or not refraction index values should be included when rendering transparent materials. Materials such as glass or water only look realistic if rendered using a refraction index, but the render time will increase accordingly. However, no additional render time will be added if a scene does not contain materials that refract light.
It can happen that transparent objects that lie behind other transparent objects are rendered black. If this should occur, increase the Ray Depth value.
Defines whether or not reflections should be calculated. If this option is deactivated, objects will only be rendered in their base color. This option can also be used in conjunction with the Limit Reflections to Floor/Sky option.
Lets you define globally whether or not the renderer should include shadows in its calculations. Don’t forget that shadows are one of the most important elements of any scene. If a scene is rendered without shadows it will lack contrast and look flat. Activating the Limit Shadows to Soft option will result in only soft shadows (which render faster) being rendered.
Enabling this option will cause only soft shadows to be rendered. Rendering hard or area shadows is much more computationally intensive. In addition, soft shadows often appear more realistic than hard shadows.
This value helps to optimize render time. With complex scenes, particularly those containing many reflective and transparent surfaces, 90% of the processed rays contribute less than 10% to the general picture brightness and color. With a threshold value of, for instance, 15%, the rays stop their movement from the camera into the scene as soon as their brightness falls below this value.
For reflections/transparencies, this generally means that the higher the value, the greater the degree to which very small reflections/transparencies will be taken into consideration - with correspondingly longer render times.
The Ray Depth determines how many transparent objects (or areas made invisible using the alpha channel) can be penetrated by the renderer. The lower you set the Ray Depth, the fewer the number of objects that can be seen through. Those areas that cannot be penetrated are rendered black.
A Ray Depth of 1 means that calculations are finished for a pixel once its ray hits something in the scene. Transparencies and alphas therefore will not be visible.
A value of 2 means that after a ray has hit a surface a second ray is calculated for the transparency. The higher the Ray Depth, the further rays are followed into the scene and the results rendered.
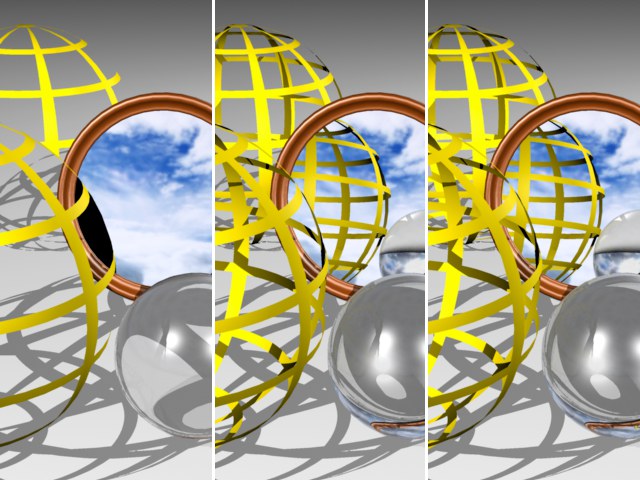 The results contain transparencies and alphas and have been rendered with ray depths of 2, 4 and 8. You can enter values up to 500.
When a ray is sent into the scene, it can be reflected by reflective surfaces. With certain arrangements, e.g., two mirrors opposite each other, it is possible that a ray will be reflected forever, trapped between the mirrors, and the raytracer would never finish rendering the picture. In order to prevent this, you can set the maximum number of reflected rays.
You can also use Reflection Depth to limit the render time for the picture. Often, only the first generation of reflections is important. Further rays tend to add little to the image quality, but increase the render time considerably.
A Reflection Depth of 1 means that calculations for a pixel are finished once a ray hits something in the scene. Reflections therefore will not be visible.
A value of 2 means that after a ray has hit a surface a second ray is calculated for the reflection. The higher the Reflection Depth, the further rays are followed into the scene and the results rendered.
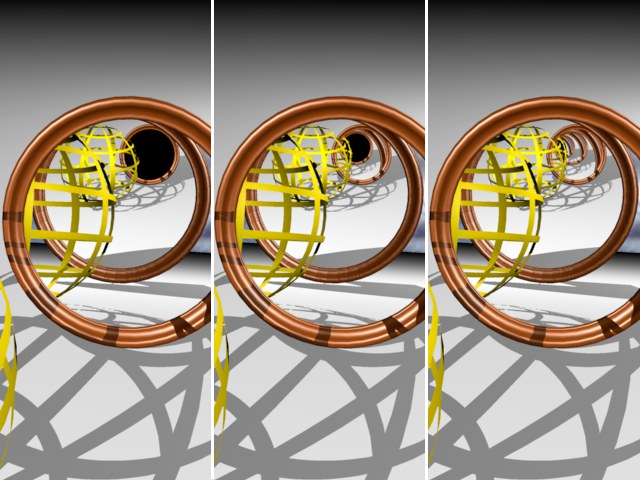 The results contain reflective objects and have been rendered with reflection depths of 2, 4 and 8.
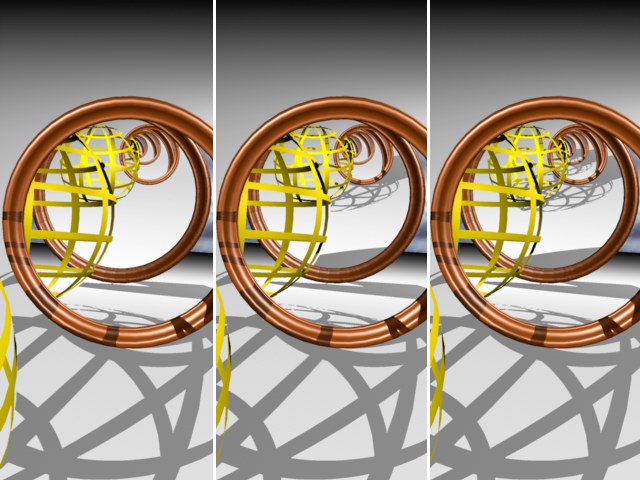
Shadow Depth behaves analogous to the Reflection Depth. If a surface point lies in the shadow of another object this option will use additional shadow rays to check which shadows should be sent from the object surface in the direction of the light source.
The Shadow Depth setting defines the shadow depth with which visible shadow rays will be calculated. For example, if this value is reduced to 2 no shadows will be calculated for reflective, transparent or refractive rays.
The examples below were rendered with Shadow Depth values of 2, 4 and 8, respectively.
Limit Reflections to Floor/Sky
Enabling this option will cause the raytracer to only calculate the reflection of the floor and sky onto reflective surfaces (and not onto other objects!). This method is not computationally intensive and is therefore recommended for use in time critical situations.
This value influences the display of objects that support a reduction in detail. These include Metaballs all Primitives and all Spline Generators.
However, any objects that have their own level of detail setting defined in a Display tag will continue to use their setting.
If the value is set to 100%, the objects will be displayed in full detail.
If the value is set to 50%, the objects will be displayed with only half of their usual detail (subdivision).
You can also enter values greater than 100% to increase the number of subdivisions.
Use this option to enable/disable the blur effect for the Reflectance (blurry reflections resulting from Roughness) and Transparency material channels.
Global Brightness [0..100000%]
This setting lets you simultaneously set the global brightness for all light sources present in your scene. A setting of 100% will utilize the intensity set in each light, 50% will decrease the intensity of each light proportionally by half, while a setting of 200% will double the intensity of each light.
Enabling this option will cause only soft shadows to be rendered. Rendering hard or area shadows is much more computationally intensive. In addition, soft shadows often appear more realistic than hard shadows.
Cinema 4D must calculate a shadow map for each light in the scene that casts a soft shadow. A shadow map determines where shadows will be rendered. The shadow map calculations can add to the render time considerably depending on the complexity of the scene. In many cases, you can speed up rendering by enabling the Cache Shadow Maps option.
If the Cache Shadow Maps option is enabled, the shadow maps will be saved the first time when you render. The shadow maps will be saved in an Illum folder under the name **.c4d.smap. You will find the Illum folder in the scene’s folder. The Illum folder will be created automatically if there is not one already.
If the option is still enabled and you then render the scene from another angle or render a camera animation, Cinema 4D will reuse the saved shadow maps. This saves rendering time. If the option is disabled, Cinema 4D will recalculate the shadow maps each time you render.
The Cache Shadow Maps option works intelligently. For example, suppose there are three lights in your scene that are casting soft shadows. You then change the parameters for one of these lights. Cinema 4D will recalculate the shadow map for that light to ensure a correct result and will reuse the cached shadow maps for the two other lights to save rendering time.
The Cache Shadow Maps option is mostly useful when the shadow maps take a long time to calculate. You can tell how long the shadow maps take to calculate by looking at the status bar while Cinema 4D renders the scene — the text Rendering Shadow Maps will appear in the status bar while Cinema 4D is calculating the shadow maps.
To delete cached shadow maps from the hard drive, choose Render / Flush Illumination Caches. However, note that this command will also delete any saved global illumination or caustics solutions (Advanced Render module).
Use this setting to define the maximum vector length when rendering a Multi-Pass motion vector (see below). If the setting made is too small, clipping will occur; if this setting is too large, the result will be inaccurate.
If this option is enabled, only the selected objects will be included when you render the scene.
If you do not yet have a light source defined Cinema 4D will us a default light source to render the scene. This default light has an angle of H=15° to the camera’s Z axis (i.e. 15° to the left of the camera). The presence of the default light lets you view objects you are working on without having to set a light. As soon as a light source (this does NOT include Sky objects with a HDRI texture) is created in the scene the default light will automatically be disabled.
Note that the Auto Light will be disabled automatically when you render with GI.
Using this option, you can enable or disable textures (only bitmaps and shaders remain unaffected) when rendering. For example, you can disable the textures for a test render or when using the cell renderer.
If this option is enabled, bitmap textures will be rendered (scanline, raytracing, cartoon color).
If Textures is disabled, bitmaps will be replaced by the color black.
If Cinema 4D cannot find a texture when rendering the scene, an alert dialog will appear. If this option is disabled and you confirm the alert, the rendering continues without the missing texture.
If you enable this option, rendering will be cancelled after the alert. If you are rendering several scenes (batch rendering), the next render task will then be started.
Enable this option if you want shadows to be cast in visible light. Since the effect is processor-intensive, you may want to speed up test-renders by disabling the option.
If this option is enabled, the renderer will use the level of detail specified in Display tags.
Enable this option to include the HUD in the rendered picture or animation. This can be useful for including information in the rendering such as the frame time. To learn how to use the HUD, look up HUD.
Define whether or not the Doodle function should be included in the render output.
You can use this option to deactivate SPD globally for the entire scene, without having to do it separately for each SPD material. This option can be turned on and off quickly for test renders.
Enable or disable Post Effects globally.
The Cinema 4D renderers have numerous effects that (if low values are used) produce grainy results, which are often referred to as ,noise’. Some examples are:
- Area shadows
- Subsurface Scattering (in Direct mode)
- Depth of field
- Motion blur
- General sampling in the Physical Renderer
- GI and Ambient Occlusion, etc.
If this option is disabled, the noise distribution will be random for each rendered image, which means that successively rendered images, even if no settings are animated, will all have a random noise distribution. This reflects the real-world behavior of film or image sensor sampling in digital cameras, which also contain a certain amount of ,noise’. This option should be disabled for animations because it will produce unnatural-looking effects.
However, if you want to render stills as identically to one another as possible, this option should be enabled. However, note that other effects (e.g., multi-threading) can still produce randomness. This can, for example, be seen in GI renderings in which slightly differing results are produced despite identical noise distribution.
Enables or disables Subsurface Scattering for the entire Project.
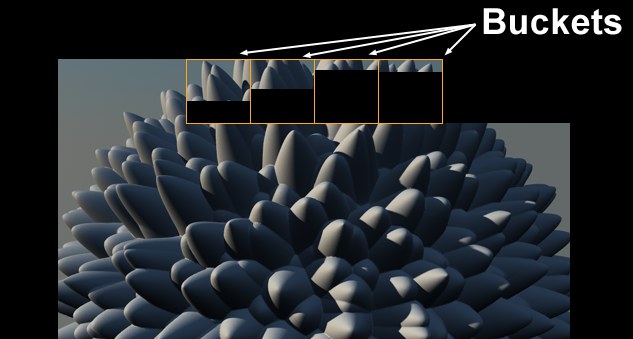 Each processor core renders a "bucket". In the example above, a 4-core processor is at work.
With the introduction of Cinema 4D R11.5 rendering is done using "buckets" - square regions that are each calculated using a single processor or processor core. This results in optimized rendering, in particular when rendering Render Instances, as compared to the previous "renderline" method when multiple processors or processor cores are used. Furthermore, the use of RAM is also optimized, especially when rendering images in larger resolution.
Define here how the Buckets should process the image to be rendered. Which sequence you use is entirely up to you - no sequence bears a particular advantage over the others.
Automatic Size
Bucket Width [8..256]
Bucket Height [8..256]
Use these settings to define the size of the Bucket. Enabling the Automatic Size option is the suggested route to go. An automatic Bucket size (depending on number of CPUs used and image size) will be used, which will range between 8*8 and 64*64.
Buckets that are too small or too large will render slower than Buckets of an optimized size.
Generally speaking, smaller Buckets require less memory than larger Buckets. This will basically have no effect on render speed.