Object Properties
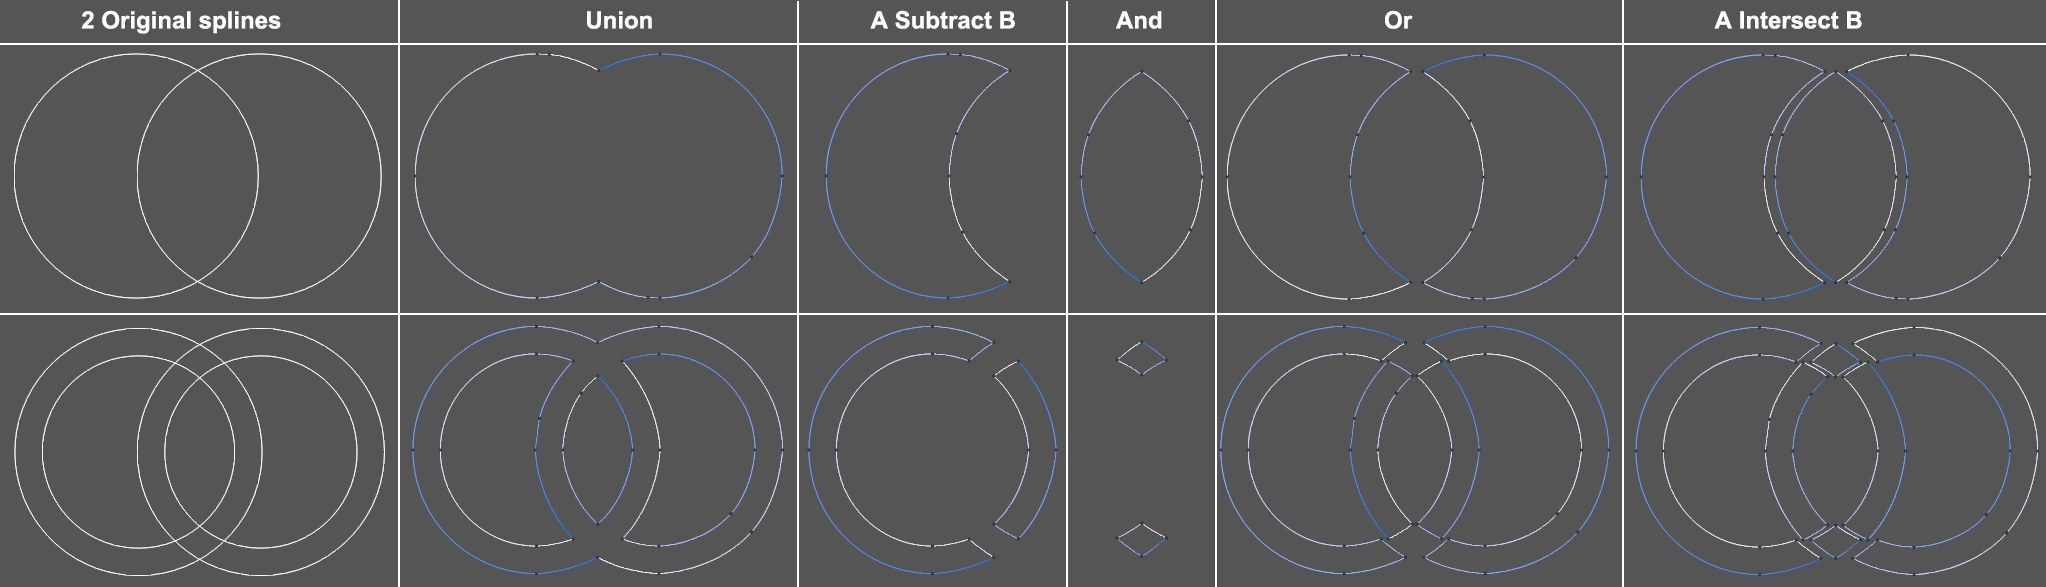 Various modes and their results based on the original splines at the far left (the spline mask was made editable each time). In the last two columns, the spline segments were subsequently moved slightly to make the underlying segments visible.
Use this setting to define how splines, which should, if possible, lie on the same plane, should be combined:
The splines will be joined, overlapping surfaces will be assimilated.
All splines that overlap the target spline (top in the hierarchy) will be cut away.
The top-most spline in the hierarchy will be subtracted from the splines below it in the hierarchy. This mode is a compatibility mode for versions of Cinema 4D prior to R17.
This mode will create new spline segments encompassing the intersecting spline A and spline B segments.
The opposite of And: the intersections of spline A and B will be cut away and the remaining segments will be kept.
This command is more or less a combination of the And and Or modes. Simply put, a separate segment will be created from each visually closed contour resulting from an overlap with another spline (see also Boole Command for differences between these modes).
Set this setting to reflect the same axis of the plane on which splines lie. For example: Both splines lie on the XY-plane, so Axis should be set to XY (along Z) (this only applies if the Spline Mask Object is still in the unmodified state in which it was created since its coordinate system will be used) in order to guarantee a flawless boole of the splines.
Viewport (Render View) projects the splines from the render view (the Perspective Viewport by default) onto each other. This only differs from the Axis mode if the splines do not lie congruently to one another.
If this setting is active, a polygon layer will be created within the closed spline (another reason both splines should lie on the same plane). This is how the results in the image above were achieved. Depending on how many spline vertices are used, the resulting polygon can contain very many surfaces.
Note that, with regard to the caps subdivision, a regular (i.e., made up of triangles) surface will be created if the first spline beneath the Spline Mask has its Intermediate Points setting set to Subdivided. The subdivision will then be defined quantitatively via the Maximum Length value. Put differently: the resulting spline uses the interpolation of the first spline beneath the Spline Mask.
The algorithm has limits when dealing with segment vertices of both splines that lie exactly on top of each other (try using a Circle spline and a Cogwheel spline in the states in which they were created in conjunction with the Spline Mask). Rotating, scaling or moving the splines slightly can help.
A Spline Mask can contain several nested Spline Mask children. This method can be used to easily create complex shapes using simple primitive splines:
 Numerous Spline Masks in an Extrude object