Object Properties
This is the main CMotion tab, where you can define the type of walk you want to use, the speed, which objects to animate and their specific characteristics.
This option determines what type of walk cycle you want to generate.
The generated cycle will be done in place. The objects won't move forward, if you prefer. This is the default mode and is ideal for setting up all your animations and previewing the behavior of your character without losing sight of it.
The character will walk continuously in a straight line (or for the range of frames you defined in the Basic tab).
The generated walk cycle will follow the path of a specified spline object.
Defines the way it will interpolate animated stride and speed of the walk.
This mode calculates the same result for any given frame, which mean you can scrub the timeline and the state of the character will always be similar if you come back to the same frame. This mode can't be animated properly (such as the walk becoming slower or faster over time), though.
This is the mode to use if your walk changes speed or stride length over time. It will calculate the motion based on the change of steps due to changes in walk speed and stride length. Scrubbing the Timeline will affect the result of the motion since it is based on the last step calculated, so do not expect to get the same result for any given frame if you scrub the Timeline using this mode.
This option is used to set a stride length. The length of each step generated by Cmotion.
Defines the length of each loop cycle. Smaller times will produce faster animation.
Here you can set and animate a specific forward orientation for your walk cycle, without reorienting or animating the CMotion object itself. Only available with Line mode.
This option controls the vertical motion of the whole walk cycle. Good option to use if you wish your character to climb a hill, for example.
A Spline can be stored here along which the character can move. Once the character reaches the end of the Spline it will walk in place.
![]() Objects
Objects
You will find here all possible actions to apply to a character. This ranges from basic motions (position/rotations, etc.) to more advanced settings such as access to object parameters or User Data.
If you created a CMotion object using the Character object (Add Walk button), the language used for the template file (in this case English) will be used for most actions/terms farther below in the list. Don’t let this confuse you - the functions remain unaffected.
Position actions are based on World coordinates, but rotation actions are based on the local coordinates of each object it affects. So make sure you are applying the correct behavior to an object, since its default orientation can differ from other objects.
This action will influence the speed at which a step is taken, which will in turn determine the length of a stride. This is a great option to animate uneven steps.
This action will animate the position of the object it is affecting, along the width (X) axis defined in the Pose tab.
This action will animate the position of the object it is affecting, along the vertical (Y) axis defined in the Pose tab.
This action will animate the position of the object it is affecting, along the forward (Z) axis defined in the Pose tab.
This action will animate the rotation of the object it is affecting, along the Local X axis.
This action will animate the rotation of the object it is affecting, along the Local Y axis.
This action will animate the rotation of the object it is affecting, along the Local Z axis.
This action will move the origin of the Roll action along the local X axis of the object.
This action will move the origin of the Roll action along the local Y axis of the object.
This action will define the amount of pull a target will have on its Hub, when the Bias mode (found in the Pose tab) is set to Weighted. This action is to be used on the steps targets.
This action will use the animation baked into a Motion source to drive the motion of the object it is attached to. Just drag the desired Motion source into the Motion link.
If you wish to convert an object driven by CMotion to a motion clip, make sure the Bake Expressions option is enabled when you convert it, in the motion clip creation dialog.
This action will drive the motion of the affected object using a Spline path. For example, dragging a circle Spline into the Spline link will make the hub or target follow that spline path continuously (so, it will move in circles indefinitely). Note that the best results can only be achieved with closed splines.
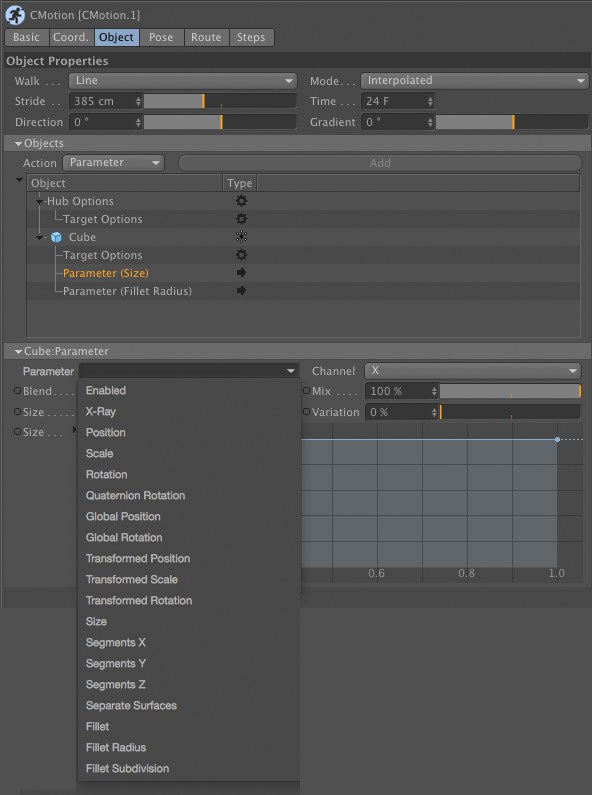
This action can control most object paramaters (Real, Integer, Vector and Boole (values greater than 0.5=activated)) For example, you can drive the Size and Fillet Radius parameters of a cube object. If an object has User Data attached to it, then you will also find them in the "Parameter" dropdown menu.
This action allows you to add a Python script to drive the behavior of the affected object.
This action is used to reference an action already in use by another object. In essence, it creates an instance of the action your are referencing, so that editing the referenced action will impact both objects at the same time. The list of available actions for referencing will display the name of the action, followed by the name of the Hub and its target. So, actions to reference will appear as such: action <Hub name/Target name>.
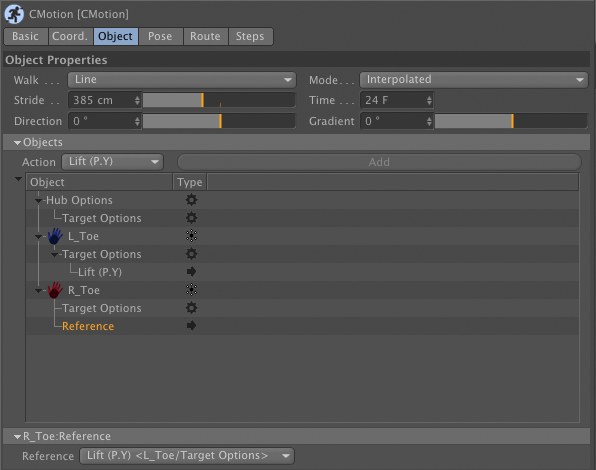 In this example, we reference the Lift action from the left foot, and apply it to the right foot object. Changing the left foot lift parameters will result in changes on the right foot as well (pretty much like instancing an object).
Note that the data Type must be set to Float Comma.
Select a Hub or a Target first, then click on the Add button to attach the specified action to the selected Hub or Target.
The objects list references all Hubs, Targets, options and actions used in the CMotion object. You can Drag & drop objects from the Object Manager, rearrange them in the list hierarchy, rename them, copy and paste actions and so on.
Objects that are dropped at the root level become automatically Hub objects. A Hub is an object that controls the main body (the hips, in most cases). A Target is an object that is dropped as a child of a Hub object. Their motion will be driven relative to the Hub motion. For example, feet targets will take their cue from the hips, their Hub object.
The Hub Options and Target Options at the top of the Objects list do not have any options. They are used to apply actions globally. For example, applying a Lift action to the global Target Options, will drive all targets objects with this Lift action.
 Usually, you will want all objects to be targets of the main Hub object, so that their motion can be set based on this Hub.
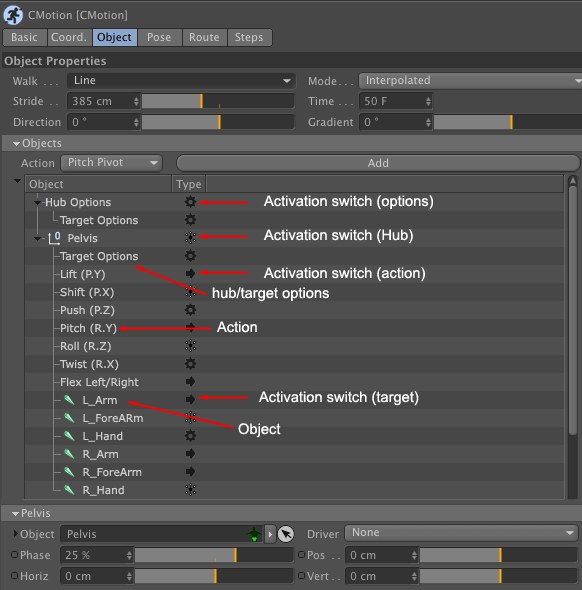
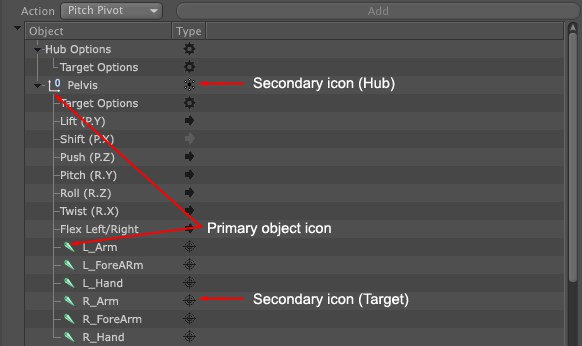
In the image above, you can see how things are laid out. You have activation switches, which allow you to enable/disable actions and options. Clicking on a Hub or Target icon will affect all actions and options applied to that object.
When first dragging objects in the list, CMotion will automatically store their PSR values to define a rest pose. You can return to the rest pose any time you want by deactivating the CMotion object (in case you need to make touch-ups to your weights, tweak your rig or else).
If you would like to modify the rest pose, simply deactivate the CMotion& object, reposition your objects or change your parameters (such as User Data, for example), then enable the CMotion object again to store a new rest state.
Right-clicking in the Objects list will bring up a contextual menu.
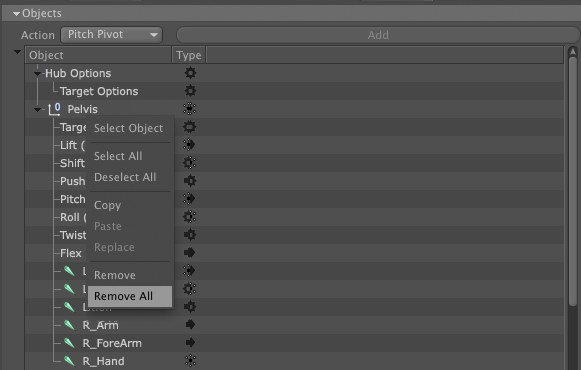
Select the highlighted object in the Object Manager.
Selects all Hubs, Targets, options and actions in the list.
Deselects all selected Hubs, Targets, options and actions from the list.
Copies the parameters of the selected object, action or option.
Pastes the previously copied parameters of an object, action or option. It will only paste relevant parameters. For example, objects can't be duplicated in the list, but actions can. Pasting objects will only replace the parameters of the selected objects, whereas pasting an action will create a copy of that action on the selected object (since you can have multiple similar actions on the same object).
Wherever relevant, will replace completely the parameters of the selected action, object or options instead of creating a copy. Only really useful on actions, since they are the only ones that can have duplicates in the list.
Removes the selected object or action from the list. Options cannot be removed.
Removes anything that can be removed from the list (except Hub and Target options.
- You can rename actions and objects by double-clicking on their name. Renamed objects won't see their named changed in the Object Manager. Keep in mind that changing the objects names in the Object Manager won't change them in the Objects list, either.
- You can reorder objects and action by dragging them in the list.
- You can select multiple elements to display all of their parameters at once using the
Shift key to select a range of objects / actions, or theCtrl/Cmd key to add or remove objects / actions from the selection. This is a great way to tweak motions that rely on several objects or actions at once.
The options available in this section will change based on what type of object, action or option you are selecting from the Objects list. The name of the section will reflect your current selection.
These parameters are displayed when a hub Target Options entry is selected in the Objects list. Note that each Hub has a Target Options entry, to define the behavior of its targets independently from the other Hubs.
This option defines where the steps will be placed (sideward) in relation to their Hub.
Pose: Will keep the initial Step objects' PSR values as they were at the moment they were added to the CMotion object. It will animate them relative to their rest pose, if you prefer.
Line: Will place each Step target on a line by default.
Spaced: Will place steps on a line by default, but you can set the spacing manually using the Spacing parameter.
Allows you to defines the spacing between each step. This controls the horizontal spacing, how spread apart the feet of a character are.
These parameters are displayed when a Hub or Target is selected in the Objects list. A Hub or Target can easily be recognized by their main object icon. Hubs and Targets can further be differentiated by their secondary icons.
If a Hub or Target has no icon in the list, that means it is not linked to any object from the Object Manager. This can happen if you load a preset and the hierarchies don't match (CMotion will still load a placeholder and the associated actions, but they will not impact any object). Simply relink the desired object and it will apply all actions to it automatically, or remove the placeholder and its actions if you don't need them.
Drag & drop the object you would like to apply actions to. This link will be automatically filled if you drag the object from the Object Manager to the Object list.
Defines how forward motion is handled for each object.
None: The Hub or Target will stay put and not move forward or change its orientation (will not follow a Spline Path or Straight line). This is useful if you which to animate your Hubs or Targets using other methods than CMotion.
Hub (Targets only): The selected Target will follow the position and orientation of its parent Hub. Usually not a good option for targets set to steps, since they will subsequently slide on the floor.
Path: Use this option to calculate each step based on the Stride and Time parameters. This option is similar to Steps mode, except the steps won't be placed on the floor automatically and will instead remain at their initial height. This is a good way to animate hands IK controllers, for example.
Steps (Targets only): Will calculate the steps positions based on the Stride and Time parameters, and place the affected objects on the floor, as defined in the Pose tab.
This option will offset the timing of the actions attached to that Hub or Target. This is a great option to refine your animation by creating follow-through or cascading actions (head rotation of a character being delayed a bit after each step is a great way to simulate weight, for example).
This option shifts the Z position of the Hub or Target compared to their rest pose.
This option shifts the X position of the Hub or Target compared to their rest pose.
This option shifts the Y position of the Hub or Target compared to their rest pose.
(Lift (P.Y), Shift (P.X), Twist (R.X), Roll (R.Z), Roll Pivot, Pitch (R.Y), Pitch Pivot, Position (P.Z), Bias Weight)
These parameters are displayed when an action is selected in the Objects list. An action is easily recognized by its arrow icon, and is always placed as a child of an object (hub or target).
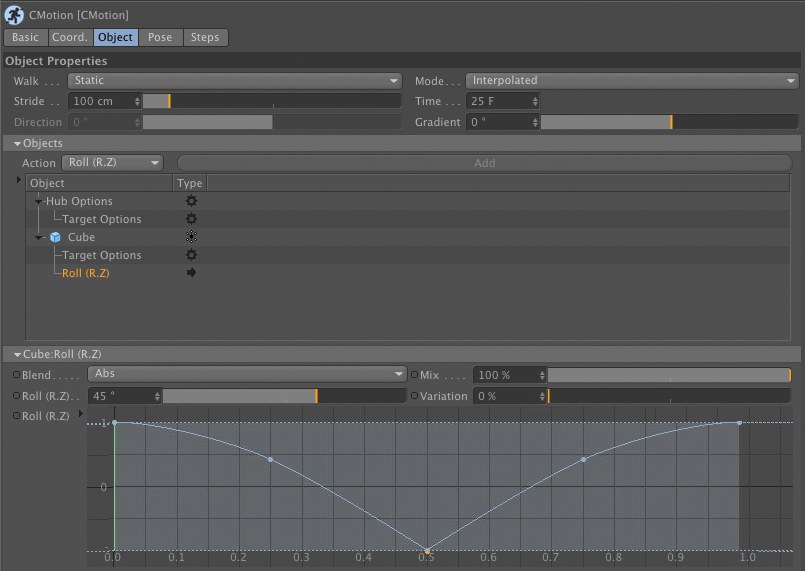 Selection the Roll (R.Z) action of the right foot object displays this action's parameters.
This sets the blending mode to use for the selected action. It is a very useful option if you wish to mix several actions of the same type. For example, you could add another Roll action on top of that one, on the same object, to experiment or tweak the motion without losing your initial action setup.
Note that you can duplicate and blend actions as much as you want/need.
Abs: Sets the action to Absolute mode. This means that the motion set by this action won't be overridden, you will get the full range of motion for this action. If you set two similar actions to Absolute, only the last one in the list will be taken into account (it will override the previous one).
Add: This option will add the motion of each action to the previous similar action. For example, two actions lifting the object 10cm, will in fact lift it a total of 20cm if their Blend mode is set to Add (10+10=20). You will get the same result if you set the first Lift action to Absolute and the second action to Add.
Sub: Similar to the Add mode, except that this blending mode will subtract from the initial motion.
Mult: Similar to the Add and Sub modes, except that this mode will multiply the result of both actions. The action using this mode needs to be below the other actions to see its impact (it can't multiply nothing, so it needs a base value first).
Actions using the Add, Sub or Mult modes need to be placed below any action using the Abs mode (Abs overrides anything placed above it). The order of execution being top to bottom in the Objects list, make sure to place your actions accordingly.
This parameter defines the amount of influence an action has over the other ones. Think of it as layers, except the bottom action is the one evaluated last, so it's the one having the most influence. For example, you could mix two identical types of actions set to Abs mode together by lowering the influence of the last one in the hierarchy. With the parameter set at 100%, the last action will override everything, but lowering that value will mix its motion with the ones above it. It can also be a nice way to animate a transition in the way objects behave, since the parameter can also be animated.
Lift (P.Y), Shift (P.X), Twist (R.X), Roll (R.Z), Roll Pivot, Pitch (R.Y), Pitch Pivot, Position (P.Z), Bias Weight
Adjust this value to set the amount of motion for the specific action it represents. The name of the action placed in front of this parameter will change based on the type of action selected in the objects list.
Will add some randomness to the defined motion. The higher the value, the more frequent and more exaggerated the randomness.
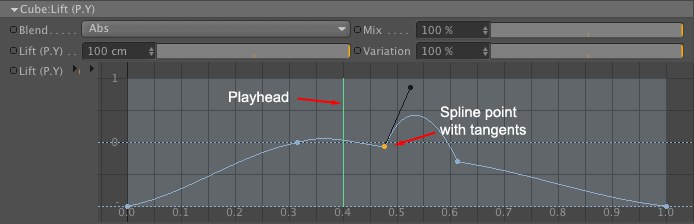
The Function graph interface is at the heart of the actions motion. This is where you will set the behavior for and refine each specific action. It has a playhead that represents the frame you are currently at on the motion loop, to allow you to visually connect the changes you make to the curve (so you know where the walk cycle starts and finishes, and know which curve point controls what part of the cycle, at any given time).
The function graph interface is very similar to f-curves editing, so it is fairly easy to refine your motions from there.
When adding an action, you will notice that it comes with a preset curve shape, which should be useful for most cases and will give you a hint of the expected motion for a given object.
Drag & drop a Motion Source (these are the elements displayed in the Timeline’s left column when in Motion mode) in the link slot, to apply its motion parameters to the object the action is attached to.
Adjust the value of this parameter to determine the influence the Motion source.
Drag & drop a spline that will be used to drive the motion of the object. This was initially designed to work with closed splines. Opened splines will work as well, but might yield unexpected results once it runs out of spline to drive the motion.
Here you can select objects parameters. Depending on the type of object, different parameters will be available. For example, a Cube object will give you its size and fillet radius parameters in addition to common parameters such as Position, Scale and Rotation.
Use this value to define the amount of influence this action has on the object it is applied to.
You can write, copy, paste, etc.. your Python scripts in this input field. They will be executed automatically by CMotion once the animation is run.
Use the dropdown menu to select which action you wish to reference. Only actions already available in the Objects list will appear in the menu, since this specific action instances the parameters of another action.