Basic Properties
![]() Icon Settings
Icon Settings
Sometimes, when working with numerous icons that look the same, you want to have a better overview of it all. This is what this function does. Objects and tags can be assigned their own icons or existing icons can be re-assigned or colored:
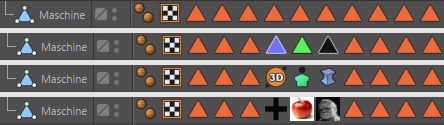 Examples for tags that were colored, replaced by existing ones and custom tags.
Note the Show Custom Icons command in the Object Manager’s View menu, which lets you switch to the Cinema 4D icons.
There are a few objects (e.g., Houdini generator) and tags (e.g., Material tags) that can’t be colored because they are controlled by Cinema 4D directly.
Here, you can either
- load a bitmap - whereby an alpha channel will be evaluated, if present. Internally, this bitmap will be scaled and distorted accordingly if it has a different size than 64*64 pixels (which is used internally by Cinema 4D). or
- enter an existing command ID for corresponding icons. These IDs can be found in the Customize Commands Manager.
This function can be used to color an existing or a custom icon. You can select from the following options:
- None: No coloring will take place
- Display Color: Each object can be assigned a Display Color in the Basic tab. This will be used here. Since the Display Color can also assume a layer color objects can also be colored according to the layer to which they are assigned.
- Custom: Lets you select a custom color.
Tags have no Display Color and can therefore only be colored using a custom color. Do do so, activate the Icon Color option.
These commands can be used to save icons as a preset or to load an icon. Custom icons are saved to and managed with the Content Browser under Presets/User (in the corresponding folder).
Here you can enter a name for the object.
If an element was assigned to a layer its layer color will be displayed here. This field reflects the layer color in the Layer Palette. You can drag & drop layers from the Layer Manager or similar layer fields onto this field. You can also assign layers or remove elements from current layers using the menus located behind the small triangle.
Controls whether the selected objects are visible or invisible in the viewport.
Controls whether the selected objects are visible or invisible in the renderer.
Determines whether the selected objects use their display color. Off switches off the display color so that material colors are used instead. Automatic means the display color is only used if the object has no materials. On means the display color is always used, even if the object has materials.
If an object is assigned to a layer, selecting Layer will color the primitive using the color of that layer (see Layer Manager).
Defines the display color. Click the color box to access the system color chooser or click the small triangle to access Cinema 4D’s color chooser. Choose the desired color.
Switches generators, deformers and primitives on or off. Disabled objects are not visible in the viewport.
If this option is enabled, the selected objects will be semi-transparent. All points and edges can then still be seen when using a shaded display mode, such as Gouraud shading.
See Priority.
This option defines whether the object or tag should be carried out even if only the Viewport view has changed (e.g., when navigating the scene via the Viewport).
![]() Animation
Animation
When this option is enabled, CMotion will run for the entire length of the Project. Disabling it allows you to restrict the animation to a specific range of frames.
Defines the frame range to playback the CMotion animation.
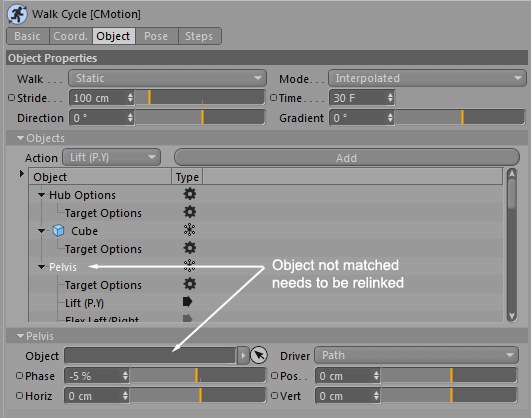
Allows you to load a previously saved animation preset. Keep in mind that if a preset contains objects that can't be matched with your current list, you will have to relink them manually from the Objects list.
Only CMotion preset source files (source files have the extension .cmo) contained in the user library / cmotion folder will persist between projects. You can load presets files from any location, of course, they just won't be available in the list automatically.
Loading a preset will overwrite existing parameters and actions! So make sure you make a backup of it first by saving these as a new preset.
Using this command, you can save a preset of the animation currently active in CMotion, to reuse later on.
Your presets will be saved in your user preferences, in the library / cmotion folder.
Right-clicking on a preset within the presets list (when you either load or save a preset) brings a menu that gives you access to additional options.
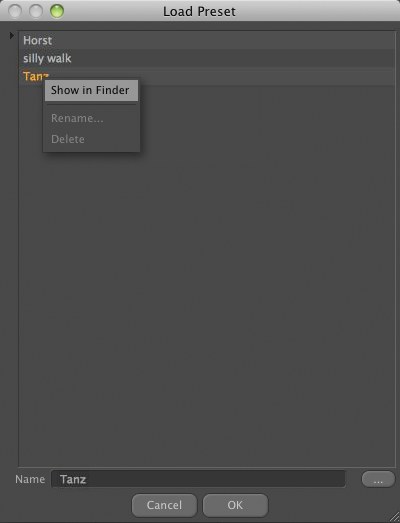
Right-clicking on a preset and selecting this option will open the folder where the source file for the selected preset is located.
Allows you to rename your preset in the presets list. The source file will also be renamed.
Removes the selected preset from the list. Be careful, this will also remove the source file, so make sure you make a copy of that file in another folder than the CMotion preset folder, if you wish to keep a backup.
Displays the name of the preset, or the absolute path of a preset which you would like to load or save.
This is the custom location button, used to load or save a preset from any location. Once the file selected, its absolute path will be displayed in the Name field.