Basic Properties
![]() Icon Settings
Icon Settings
Sometimes, when working with numerous icons that look the same, you want to have a better overview of it all. This is what this function does. Objects and tags can be assigned their own icons or existing icons can be re-assigned or colored:
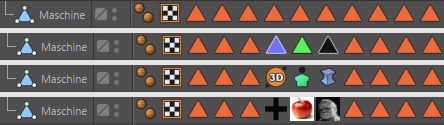 Examples for tags that were colored, replaced by existing ones and custom tags.
Note the Show Custom Icons command in the Object Manager’s View menu, which lets you switch to the Cinema 4D icons.
There are a few objects (e.g., Houdini generator) and tags (e.g., Material tags) that can’t be colored because they are controlled by Cinema 4D directly.
Here, you can either
- load a bitmap - whereby an alpha channel will be evaluated, if present. Internally, this bitmap will be scaled and distorted accordingly if it has a different size than 64*64 pixels (which is used internally by Cinema 4D). or
- enter an existing command ID for corresponding icons. These IDs can be found in the Customize Commands Manager.
This function can be used to color an existing or a custom icon. You can select from the following options:
- None: No coloring will take place
- Display Color: Each object can be assigned a Display Color in the Basic tab. This will be used here. Since the Display Color can also assume a layer color objects can also be colored according to the layer to which they are assigned.
- Custom: Lets you select a custom color.
Tags have no Display Color and can therefore only be colored using a custom color. Do do so, activate the Icon Color option.
These commands can be used to save icons as a preset or to load an icon. Custom icons are saved to and managed with the Content Browser under Presets/User (in the corresponding folder).
Here you can enter a name for the object.
If an element was assigned to a layer its layer color will be displayed here. This field reflects the layer color in the Layer Palette. You can drag & drop layers from the Layer Manager or similar layer fields onto this field. You can also assign layers or remove elements from current layers using the menus located behind the small triangle.
You can assign a priority to each expression. This is especially useful when working with Python or XPresso Expressions that you have created yourself. Sometimes the priority is crucial for determining exactly when the expression is evaluated. The same expression can produce different results depending on whether it is executed before or after other expressions in the scene.
Don’t forget that this calculation sequence will be run through for each rendered image!
Possible priority values range from -499 to 499 and apply to the chosen category on the left: Initial, Animation, Expressions, Dynamics or Generators.
When using expressions with the same priority (on the same object) the order in which they will be calculated will be in accordance with their sequence (position) in the Object Manager.
For a Project with four expressions with the following priorities:
- Expression A: Animation, 10
- Expression B: Animation, 0
- Expression C: Animation, -1
- Expression D: Expression, 5
This results in the following order of execution:
- Expression C (-1 being the lowest priority value of the four expressions).
- All animated objects in the scene (all animated objects in Cinema 4D have a priority of Animation, 0).
- Expression B (although this has the same priority as all animated objects, animated objects are still preferred over expressions with the same priority).
- Expression A
- Expression D
Cinema 4D contains certain Expressions that don’t necessarily follow these simple rules. These include IK, which uses values taken from different temporal locations of the calculation sequence. Dynamics also have their own priority (please ignore the priority Dynamics R11.5 - this is the first and no longer available R11.5 functionality).
 The calculation sequence of various functions. Internal priorities of several functions are also displayed.
Dynamics (e.g., Priority Generator +400) defines these priorities internally and these cannot be changed. For example, Expressions that point to an object deformed by Dynamics require a priority of at least Generator +401.
Turns the corresponding expression on or off.
Almost all tag or Expression parameters can be animated via the right mouse button.
![]() Visualization
Visualization
Enable this option if the animation path (the position of each camera will be displayed as a point) of the Morph Camera should be displayed as a red Spline in the Viewport.
Enabling this option will display 2 Splines for the Morph Camera in the Viewport:
- Blue: Camera’s angle of view
- Green: Camera’s Up Vector (Y axis)
Displays the name of each camera next to it in the Viewport.
Here you can define a custom color with which the Morph Camera will be displayed in the Viewport.