Description of the Direct Link Functions
Overview
- Use of Direct Link in Cinema 4D
- Data Exchange via the Datasmith Data Format
The explanations on this page concern the direct exchange of data, whereby projects opened in Cinema 4D can be sent directly to the Unreal Engine. Changes in Cinema 4D can be synchronized and thus immediately made visible in Unreal. Information on the classic import of saved .c4d scenes into Unreal is described on this page.
Use of Direct Link in Cinema 4D
If the plug-in components described here for the Direct Link function are installed in Cinema 4D and the Unreal Editor, projects opened in Cinema 4D can be sent directly to Unreal. Changes made in Cinema 4D can then be synchronized and thus also made visible in the Unreal Editor without having to manually save the Cinema 4D scene each time. Proceed as follows:
- Create or load the desired objects, materials or animations in Cinema 4D. At least Cinema 4D version 2025 is required.
- If the project has not yet been saved, save it in Cinema 4D e.g. via File/Save Project with Assets... or simply via File/Save Project as... if no external assets are used.
- Call up Direct Link/Direct Link Sync in the Extensions menu. This will save the current project in the Datasmith format and mark it as a Direct Link project for Unreal. Please note that several projects can be opened simultaneously in Cinema 4D and activated for the Direct Link one after the other. You will then be given the option in the Unreal Editor to select the desired projects that are to be reloaded or synchronized there.
Please note that settings are also provided for this exchange, e.g. to include or exclude animations or to influence the intensities of the light sources or the light sensitivity on the camera. The cogwheel symbol behind Direct Link Sync described under point 4 is available for this purpose.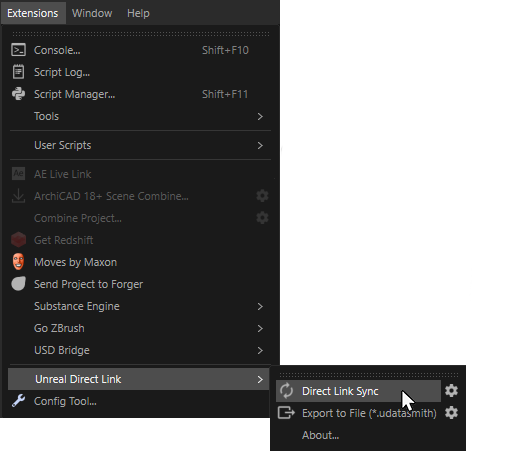
Saving a project in Cinema 4D for synchronized exchange with the Unreal Editor. -
For this data exchange, you can also make some default settings, which you can call up by clicking on the cogwheel symbol behind Direct Link Sync:
- Animation: Activate this option to transfer any existing animations. Please note that simulations must first be saved as caches or baked into keyframes.
- Light Intensity Scale: A multiplier for the intensities of all light sources. If necessary, adjust this value if you want to transfer your lights to the Unreal Engine generally brighter (values above 1.0) or darker (values below 1.0).
- Camera ISO Scale : A multiplier for the ISO value of the cameras, i.e. their light sensitivity. Higher ISO values make the captured scene appear brighter for cameras. Here, too, you can increase the image brightness in the Unreal Engine with values above 1.0 and make the scene appear darker for the cameras with values below 1.0.
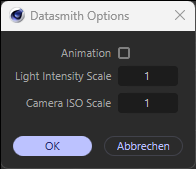
Options when opening the Direct Link connection. After confirming these settings via the OK button, the scene is also saved for exchange with the Unreal Engine.
- You can now accept the file in the Unreal Engine. To do this, call up the Datasmith/Direct Link Import ... command via the quick access icon.
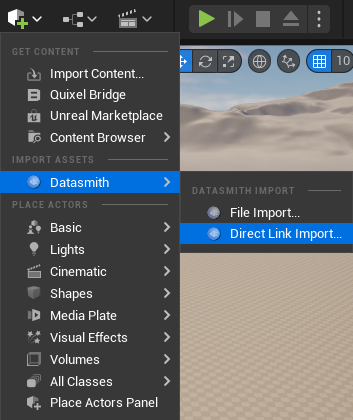
Calling the Direct Link function in Unreal. -
A selection dialog will open in which all Cinema 4D projects marked for the Direct Link are listed. In the Source column you will find the names of the Cinema 4D projects, which makes it easier to select the correct scene if there are several from which to choose. Click on the desired row and then on the Select button. If scenes are missing from the list, you can click on the Refresh icon in the bottom left-hand corner of the selection window to update the list.
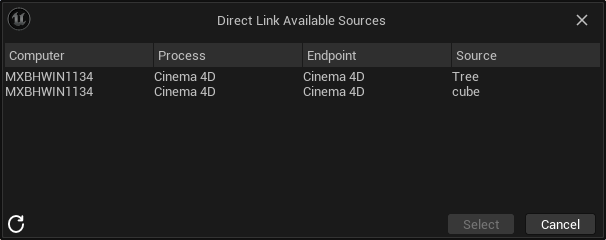
Selection option for Direct Link projects in the Unreal Engine. -
After selecting the desired Direct Link project, you will be asked for the placement of this data within your Unreal project structure and the options for the file transfer will be displayed (see figure below). After pressing the Import button, the corresponding data will be loaded. You can find out more about these import settings below.
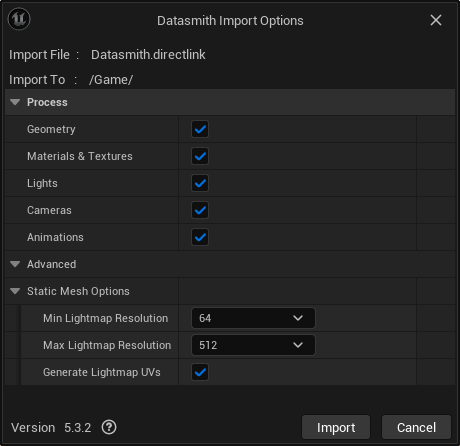
Import settings for the Direct Link exchange. -
If you want to update the data in Cinema 4D, make the desired changes there and then call up Direct Link/Direct Link Sync again in the Extensions menu. This automatically updates the data in the Unreal Editor.
Import Settings for the Direct Link Exchange
The following options and settings are available when loading a synchronized Direct Link file:
| Geometry |
Objects and their geometry will be imported as static meshes. Note that only the front side of the polygons is visible in Unreal by default. To make both polygon sides visible, the option for Material Property Overrides>Two Sided must be activated in Unreal for the material of the geometry. |
| Materials & Textures |
Materials and the textures used in them will be loaded. The resolution used for baking the material properties in bitmap textures can be selected separately in the Node Material Textures group. Please note that not all native Cinema 4D shaders and Nodes can be baked and imported as textures. You should therefore create all parametric material information as textures yourself before saving in Cinema 4D, if possible. Redshift Node Materials are also supported (no XPresso materials), although no displacement settings will currently be adopted. |
| Lights |
The light sources of the Cinema 4D scene will be imported as Light Actors. Please note that not all configuration options are also available in Unreal. For example, Area lights can only be rectangular, disc-shaped, cylindrical or spherical and are then generally imported as rectangular area lights in the Unreal Editor. The use of several infinite light sources can also be problematic with regard to shading in the Unreal Engine. |
| Cameras |
Imports the Camera objects of the Cinema 4D scene as Cine Camera Actors. Redshift cameras are also supported. You can find further information here. |
| Animation |
Animated properties will be imported. This includes, for example, the classic Position, Angle and Size keyframe sequences, but also the render visibility of objects to animate their visibility. Animations implemented using scripts or XPresso circuits, for example, must be baked as keyframes before being saved in Cinema 4D. Animations in which the number, sequence or position of surface points change can be imported as a Geometry Cache. This also applies to simulations that have been saved as a cache. The principle corresponds to the use of the Allembic storage format, in which animations are saved image by image. You will find a separate option for this in the Geometry Caches group, which can also be used to import PLA keys, for example. |
Redshift Light Sources
By activating the Lights option mentioned above, light sources from Cinema 4D projects can also be transferred to the Unreal Editor. This also applies to Redshift light sources, although only these types are supported:
- RS Point Light
- RS Spot Light
- RS Area Light: Only rectangular light shapes are supported directly in Unreal (Light Type Rect). Special shapes, such as a Redshift Dome Light or a geometry that is used in conjunction with a Redshift Area Light for illumination, must be converted manually in the Unreal Engine.
- RS Infinite Light
Since Lumen and Lux are used in the Unreal Engine as units for determining the light output and these are dependent on the size of a light source or a light cone, light brightnesses and intensities must be converted.
The following applies to Point lights (RS Point Light):
| Redshift unit | Conversion to Unreal |
|---|---|
| Image | Intensity (lm) = Intensity / pi |
| Luminous Power | Intensity (lm) = Intensity |
| Luminance | Intensity (lm) = Intensity / (pi * 1000) |
| Radiant Power | Intensity (lm) = Intensity * LuminousEfficacy |
| Radiance | Intensity (lm) = Intensity * LuminousEfficacy / (pi * 1000) |
The same applies to Spot lights (RS Spot Light) as to Point lights, except that the light intensity is also influenced by the aperture angle of the Spot light:
Intensity (lm) = Intensity * (1 - cos (angle of the light cone) * 0.5)
The following applies to Area lights (RS Area Light):
| Redshift unit | Conversion to Unreal |
|---|---|
| Image | Intensity (lm) = Intensity * Area / 2pi |
| Luminous Power | Intensity (lm) = Intensity * Area |
| Luminance | Intensity (lm) = Intensity / (pi * 1000) |
| Radiant Power | Intensity (lm) = Intensity * LuminousEfficacy * Area |
| Radiance | Intensity (lm) = Intensity * LuminousEfficacy / (pi * 1000) |
The following applies to infinite lights (RS infinite Light):
| Redshift unit | Conversion to Unreal |
|---|---|
| Image | Intensity (lux) = Intensity * 500 |
| Luminous Power | Intensity (lux) = Intensity * 200 |
| Luminance | Intensity (lux) = Intensity / 10 |
| Radiant Power | Intensity (lux) = Intensity * LuminousEfficacy / 17 |
| Radiance | Intensity (lux) = Intensity * LuminousEfficacy / 17 |
Redshift Cameras
Redshift cameras contained in Cinema 4D projects can also be transferred. The following settings will be applied:
- The value for Focal Length (mm) as found in the camera's Object settings.
- The width of the sensor size as set via the X component of the Size (mm) value in the camera's Object settings. The height of the sensor is determined by the Aspect Ratio value from the Output section of the Render Settings in Cinema 4D.
- The Focus Distance from the Optical section of the Redshift camera.
- The Shutter Speed (s) as found in the Optical section of the Redshift camera.
- Exposure (EV) or Sensitivity (ISO), depending on the selected Exposure mode in the Optical section of the camera.
- The Aperture (f/#) from the Optical section of the Redshift camera.
- An assigned Target object within an Target Expression for automatically aligning the camera to an actor. The corresponding target object will be used as an Actor to Track within the Lookat Tracking Settings in Unreal.
In order to be able to use the tracking of a Focus (assigned Object in the Depth of Field settings of the Redshift camera) in Unreal as well, you must manually switch to Focus Method Tracking in the Focus settings of the imported Redshift camera and then manually assign the corresponding object for Actor to Track.
Advanced Import Settings
| Min Lightmap Resolution |
Unreal can use existing or self-calculated UV maps on the objects to bake lighting information (so-called Light Maps). As a result, the display of static objects under static lighting can be accelerated and implemented with higher quality. This setting defines the smallest possible resolution for one of the resulting UV islands. In general, square UV-Map tiles will always be created. |
| Max Lightmap Resolution |
This is where you can define the maximum resolution for the creation of light maps. Please note that you can also adjust this value individually for each Geometry Actor at a later date. You should therefore use an average value for the import. |
| Generate Lightmap UVs |
Activate this option so that Unreal itself creates UV mappings of the geometry during import, which can be used to bake Light Maps. If the imported objects already have the appropriate UV processing that is also to be used for baking the Light Maps, this option can remain disabled. This not only shortens the time required for importing, but also saves memory, which would otherwise be required for the additional UV coordinates. Existing UV coordinates, which are used for assigning materials, for example, will be retained in any case. |
Data Exchange via the Datasmith Data Format
The Datasmith format can also be used to exchange data between Cinema 4D and Unreal. To do this, prepare your data in Cinema 4D and save the project there normally, e.g. via Save Project as... in the File menu. If external assets are used, such as textures in materials, you should use Save Project With Assets ... for the first save instead, which you can also find in the File menu. All assets used will be gathered and saved together with the project file in the same folder. This minimizes the risk of losing the links to your project if you move or delete asset files on your computer, for example.
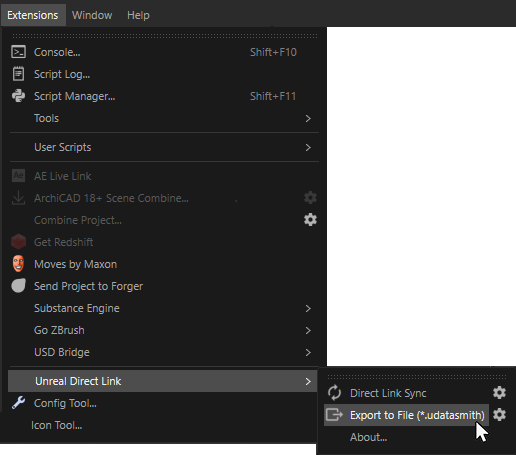
You can then call up Export to File (*.udatasmith) under Extensions/Unreal Direct Link and save a Datasmith file for the Unreal Engine (see illustration above). This file can be loaded directly in the Unreal Editor via the quick access menu by calling Datasmith/File Import.... The options for importing such a file have been described in detail here for the Datasmith format.
Here, too, there are some presets available for the export, which you can find via the cogwheel icon behind the Export to File (*.udatasmith) command. These options are identical to those of Direct Link Sync:
- Animation: Activate this option to save any existing animations. Please note that simulations must first be saved as caches or baked into keyframes.
- Light Intensity Scale: A multiplier for the intensities of all light sources. If necessary, adjust this value if you want to transfer your lights to the Unreal Engine generally brighter (values above 1.0) or darker (values below 1.0).
- Camera ISO Scale: A multiplier for the ISO value of the cameras, i.e. their light sensitivity. Higher ISO values make the captured scene appear brighter for cameras. Here, too, you can increase the image brightness in the Unreal Engine with values above 1.0 and make the scene appear darker for the cameras with values below 1.0.
Options when saving the scene in Datasmith format. After confirming these settings via the OK button, the scene is also saved in the Datasmith format of the Unreal Engine.
Alternatively, Cineware for Unreal also allows the Unreal Editor to open Cinema 4D files directly (.c4d). This type of cooperation has also already been described here.