Importing Cinema 4D assets into the Unreal Editor
Two different options are available for importing Cinema 4D files, which differ in terms of support for legacy cameras, lights and materials, for example, but also specifically in terms of support for animated characters, for example. On the introductory page to Cineware for Unreal you will find a table comparing the differences between the two importers.
-
The more modern of the two importers is Interchange, which offers almost full support for all Redshift elements and can also import character animations and Pose Morphs. There are currently only limitations in the support of some camera parameters, the use of Cinema 4D object parameters directly in the Unreal Engine and the Direct Link function.
-
The old import process based on Datasmith, on the other hand, has advantages when it comes to supporting legacy elements in Cinema 4D scenes. This refers, for example, to materials, lights and cameras that were still used by the older standard renderer of Cinema 4D. In addition, only Datasmith offers support for the Direct Link connection between Cinema 4D and the Unreal Editor. Changes to a scene on the Cinema 4D page can be synchronized even faster with the corresponding asset in the Unreal Content Browser. Finally, Cinema 4D object parameters can also be made accessible in the Unreal Editor via Datasmith in order to be able to make parametric changes to imported objects directly in the Unreal Editor.
As you can see, both options have their advantages. For this reason, you can also decide from project to project which method you prefer for exchanging data or combine both methods. It is therefore possible to import only parts of a C4D project with Datasmith and other components via Interchange.
To ensure that both options can actually be used for the import, they must of course both be installed. You can find installation instructions on this page.
Import with Interchange
Overview
- Configuration of Pipeline Stacks
- Import with Interchange
- Import via Drag & Drop to the Content Browser
- Import via 'Import into Level'
- Import of Animations
- Reimport of Assets
- Changes for Interchange since Version 2026.0
- Current Limitations
Configuration of Pipeline Stacks
To be able to use Interchange and individually configured Pipeline Stacks, the Interchange component must have been installed via the Cineware installation program (see installation instructions).
This installation automatically ensures that the required Pipeline Stacks are automatically added for the Interchange Engine in the Unreal Engine (as Cineware Pipeline Stacks). You therefore do not need to do anything else to import a C4D file via File > Import into Level or by dragging it onto the Content Browser.
The following explanations therefore only explain in general terms how you can add the Cineware Pipelines to stacks if you want to configure individual stacks.
The Unreal Engine's own documentation provides you with further information on the use and settings of Interchange to customize the import of data. You can find the corresponding website here.
As already mentioned, the Cineware Pipelines can also be added manually if you want to configure your own Pipeline Stacks. To do this, open the Project Settings via the Edit menu in the Unreal Editor and navigate to the Engine section in the left-hand column. Here you will find the entry for Interchange (see also the following illustration).
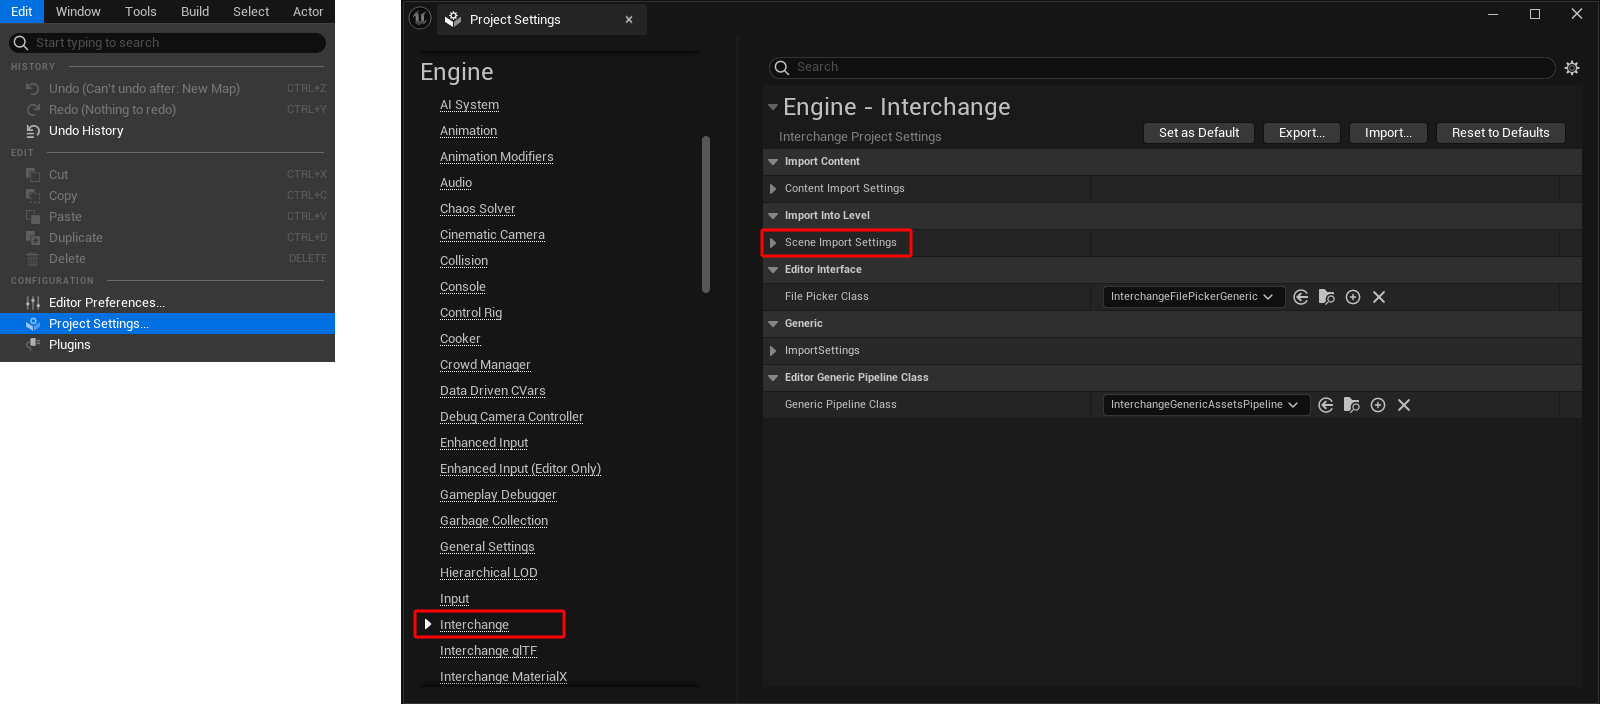
In the right-hand part of the dialog (see also the right-hand side of the figure above), you will find the group for the Scene Import Settings under Import Into Level. It contains the pipelines that are relevant to us. The Cineware for Unreal installation of the Interchange component automatically integrates all required Pipeline Stacks (see following figure).
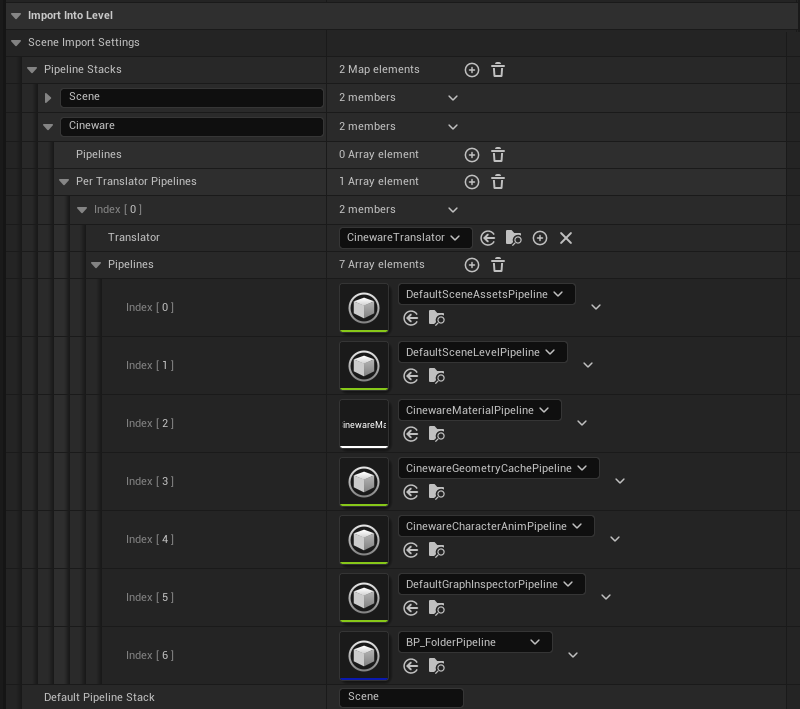
This automatic configuration of the Scene Pipeline Stack set by default ensures that a Cinema 4D scene including the assets, materials and textures used there is loaded automatically when Import into Level is used.
When using Import Content, assets, materials and textures are also loaded automatically.
You only need to add the required Cineware pipelines manually if you want to create individual pipeline stacks for your own workflows.
Proceed as follows:
Create (see + symbol at point 1 in the following figure) or open the corresponding pipeline stack under the Import Into Level group where you want to add the Cineware pipelines. In the example in the following figure, a new Pipeline Stack has been created and given the name Individual Stack (see point 2). Next to the Pipelines group you will find a + icon (see point 3), which can be used to add new entries for pipelines. Two pipelines were added here and filled with the default pipelines DefaultSceneAssetsPipeline and DefaultSceneLevelPipeline by clicking in the initially empty text fields to the right (see point 4).
The DefaultSceneAssetsPipeline is a standard feature of many pipeline stacks, as it enables the loading of complete scenes with complex hierarchies, objects, materials and textures, and can generally process animations and cameras.
The DefautlSceneLevelPipeline is also part of many pipeline stacks by default, as it places the loaded objects, materials and textures as actors in the Unreal Engine, adjusts their hierarchies there, assigns the materials and textures correctly, places lights and cameras and generally ensures asset management.
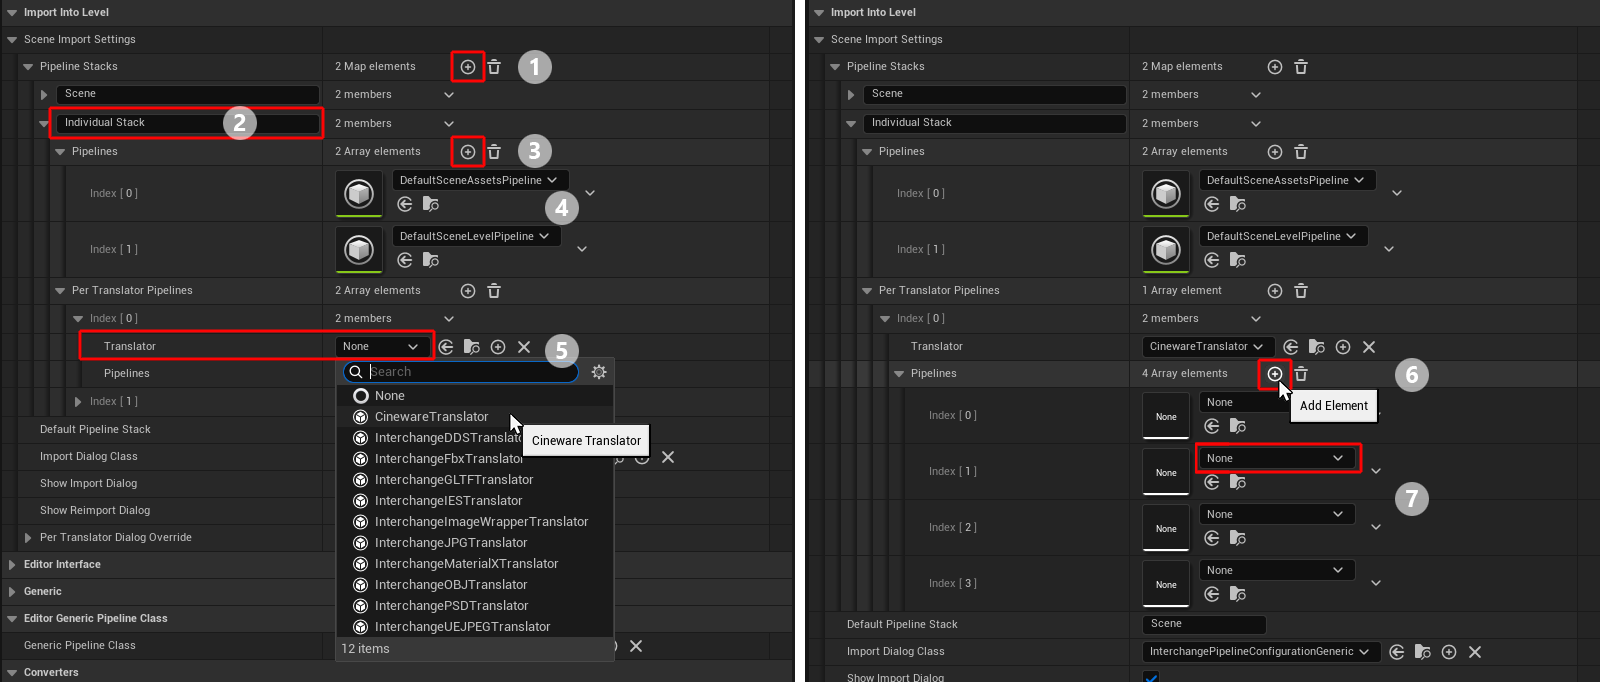
The Per Translator Pipelines category can now be used to define individual overrides for individual functions during an import. The Translator setting stands for the desired scene conversion. In our case, we select CinewareTranslator so that Cinema 4D files can be interpreted correctly directly (see point 5 in the figure above).
The following Pipeline category can now be supplemented with any number of places for loading Pipeline entries by clicking on the + symbol several times (see point 6 in the figure above). The initially empty pipeline fields can then be configured by clicking on the fields labeled None (see point 7). The sequence of the pipelines assigned from top to bottom can also play a role here, as this corresponds to the execution sequence of the assigned pipelines.
In the name field of the new, still empty Pipelines ( None by default), you will find an arrow pointing downwards (see also the following illustration). Click on it to open a selection window where you can select the Cineware Pipelines. If this list is empty, check the filter settings by clicking on the cogwheel symbol to the right of the search field (see also the following illustration). The options for Engine Content and Plugin Content must be activated in the filter settings.
Select these entries one after the other for the six newly created Pipelines:
- CinewareGenericAssetsPipeline: Is required for the import of scene assets.
- CinewareMaterialPipeline: Enables the import of native Redshift materials.
- CinewareGeometryCachePipeline: Enables the import of Geometry Caches, such as baked deformations and simulation data.
- CinewareCharacterAnimPipeline: Necessary for processing animated characters with joint rigs.
- CinewareDefaultPipeline: Process scene attributes.
- BP_FolderPipeline: Ensures the storage of assets in a separate content folder.

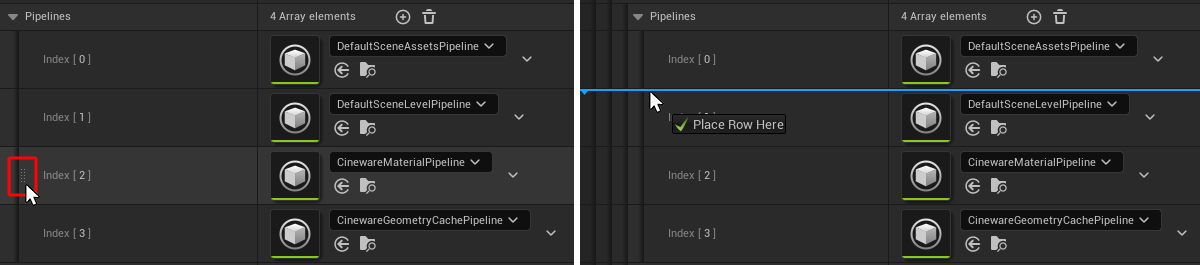
As the individual Pipelines in a stack are always processed from top to bottom, the order of the Pipelines also plays a role. The Material pipeline must be processed before the Geometry Cache pipeline. This should be followed by the CharacterAnim and BP_Folder pipelines (see also the above list of available Pipelines). Therefore, if necessary, rearrange the Pipelines accordingly by placing the mouse on the left edge of a Pipeline in the stack. A field with small dots will appear, which you can then drag with the mouse. Use it to drag the Pipeline vertically up or down in the stack to the desired position. A blue line indicates where you can drop the dragged Pipeline by releasing the mouse button (see following image).
Import with Interchange
After the Interchange Pipeline Stacks have been installed by Cineware for Unreal as described here or added manually to individually created stacks as described here, Cinema 4D files can be imported in two ways:
- Drag & Drop a Cinema 4D file (extension .c4d) from Windows Explorer or macOS Finder directly onto the Content Browser of the Unreal Editor.
In general, this is the fastest option for adding assets in Cinema 4D format. Please note that the import takes place directly into the directory currently selected in the Content Browser. Therefore, select the desired category, such as the Content folder, before dragging the file to the Content Browser.
In addition, this type of import is less suitable for importing meshes that need to access Geometry Caches, but rather for static meshes or meshes animated by joints, as well as for materials and textures. If you need Geometry Caches, e.g. to import MoGraph animations or clothing simulations, it is better to use Import into Level.
Please also note these instructions when importing animated character rigs.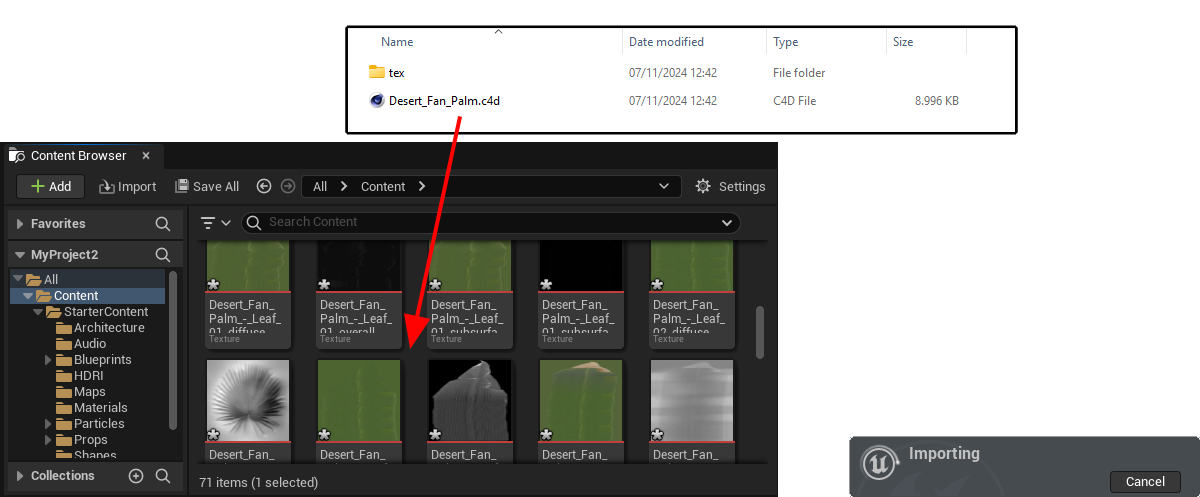
Import via Drag&Drop from the Finder or Explorer to the Content Browser in the Unreal Editor. A small status window appears while the import is being prepared (bottom right of the figure). 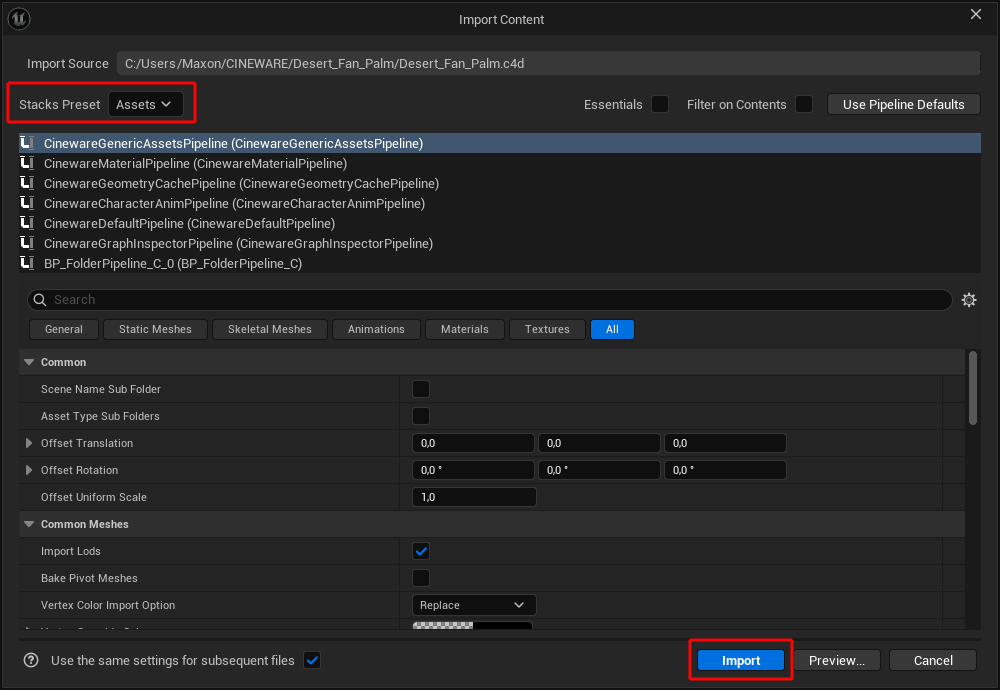
During the import, the desired pipeline stack can be selected (see red marking in the top left of the illustration). The default Assets stack is already correctly configured for loading Cinema 4D content by installing the Cineware Interchange components and can therefore be used unchanged. Otherwise, you can select your own stack here, to which you have manually added the previously discussed Cineware pipelines. Then confirm using the Import button (see marking at the bottom right of the illustration). 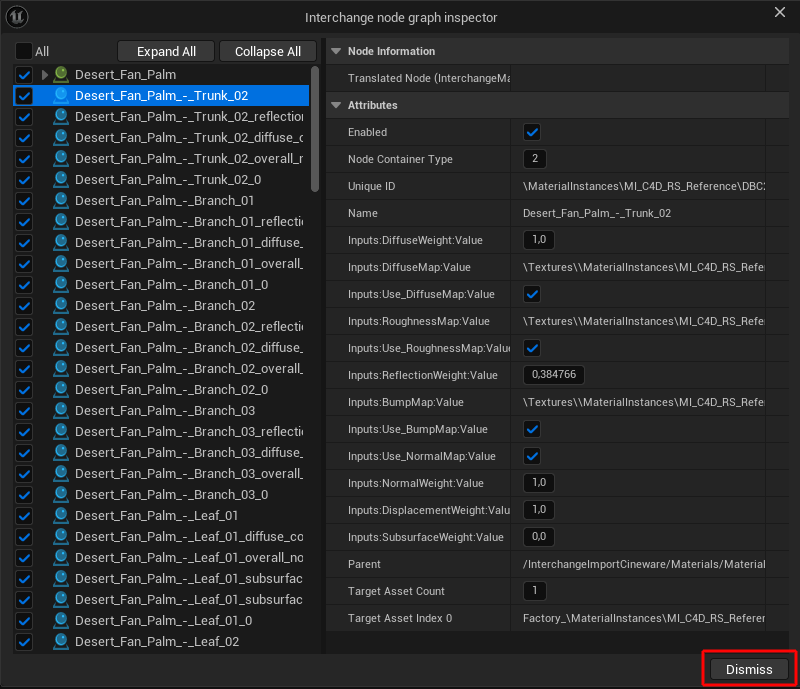
A preview of the components within the file used for the import then appears (see left-hand column in the illustration), within which individual components can also be excluded from the import by clicking away the blue checkmarks or examined with regard to their content by clicking on them. Click on the Dismiss button to continue with the import. 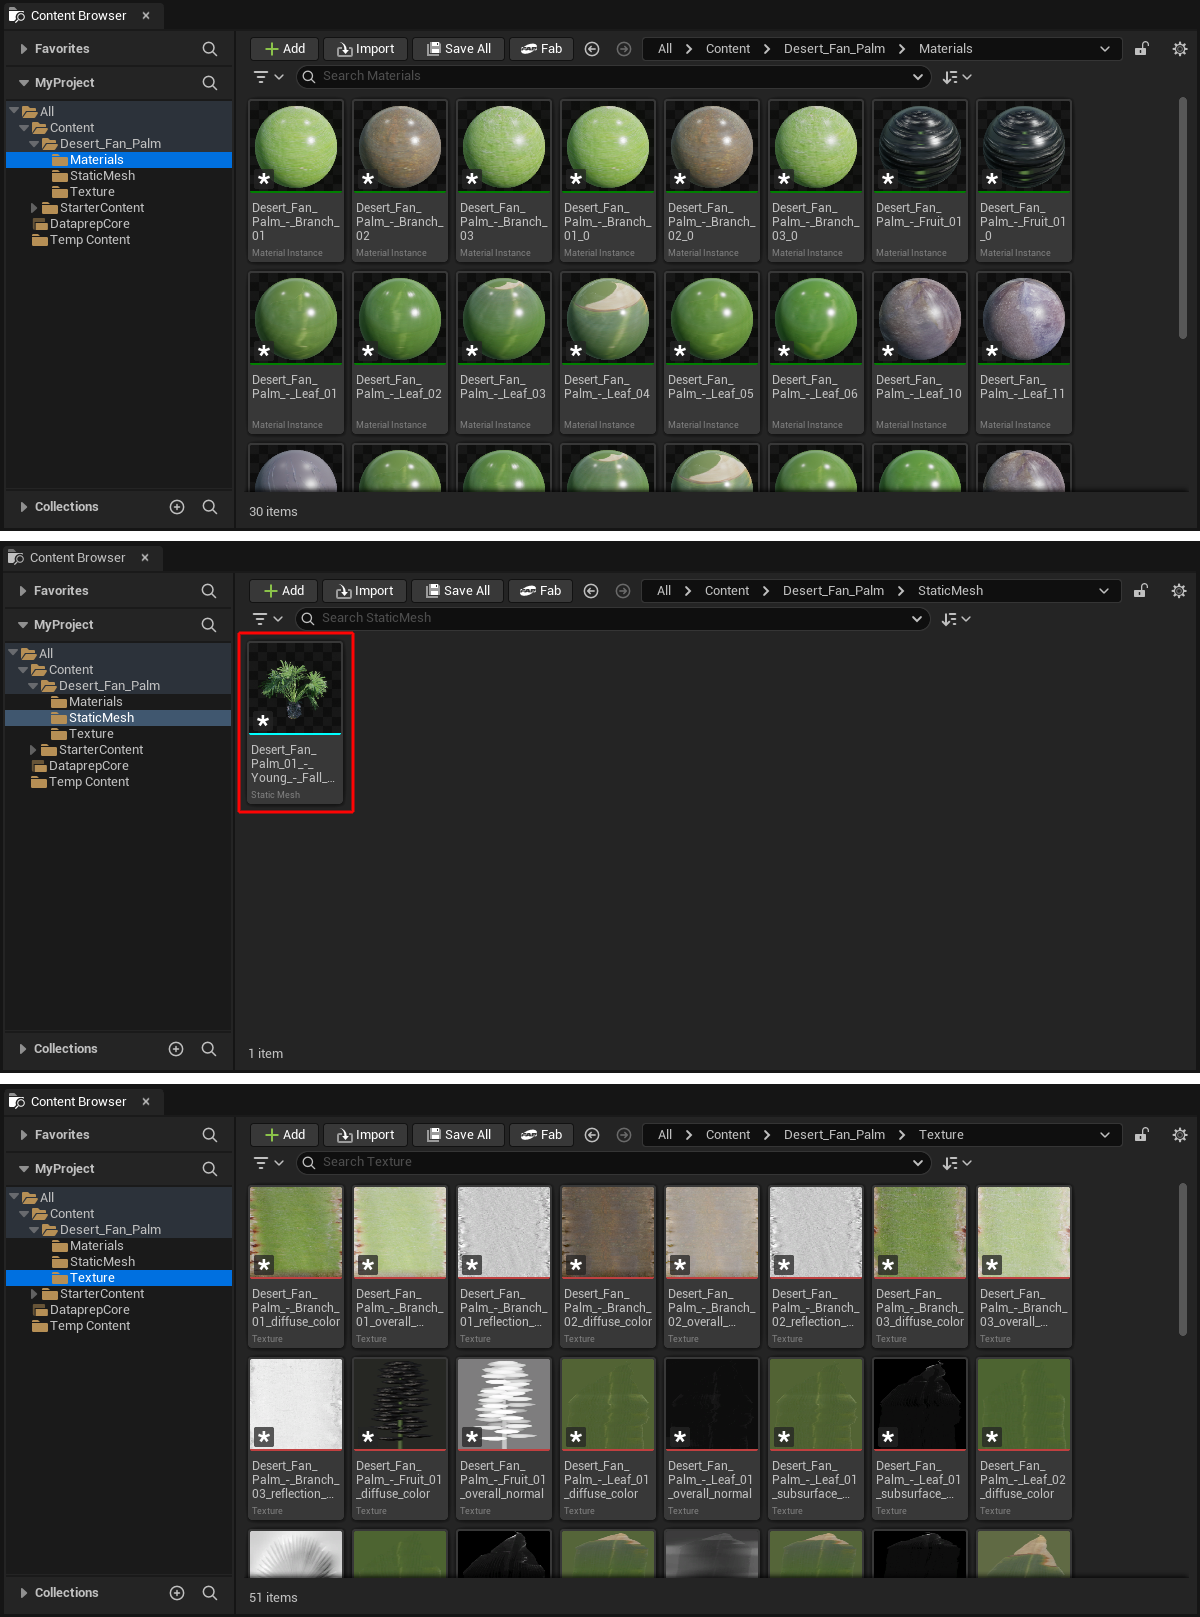
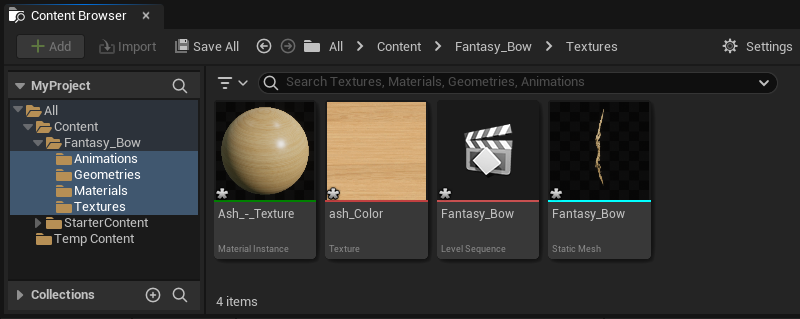
Once the import is complete, the corresponding components and assets appear in the various categories of the Content Browser (here Materials, StaticMesh and Texture). By dragging the entries from the StaticMesh category directly into the 3D Viewport, the imported models can be placed there directly. - By calling up File > Import Into Level...
After selecting the desired folder for importing the assets, you can also select the Pipeline Stack to be used (see right-hand side of the following figure). Make sure that a Pipeline Stack containing the Cineware pipelines is selected. By default, the Cineware installer ensures that you can directly select the default Scene Pipeline Stack, which automatically interprets all objects, materials and animations contained in the Cinema 4D file correctly. If you have previously configured a different pipeline stack with the required Cineware pipelines, select this under Stacks Preset.
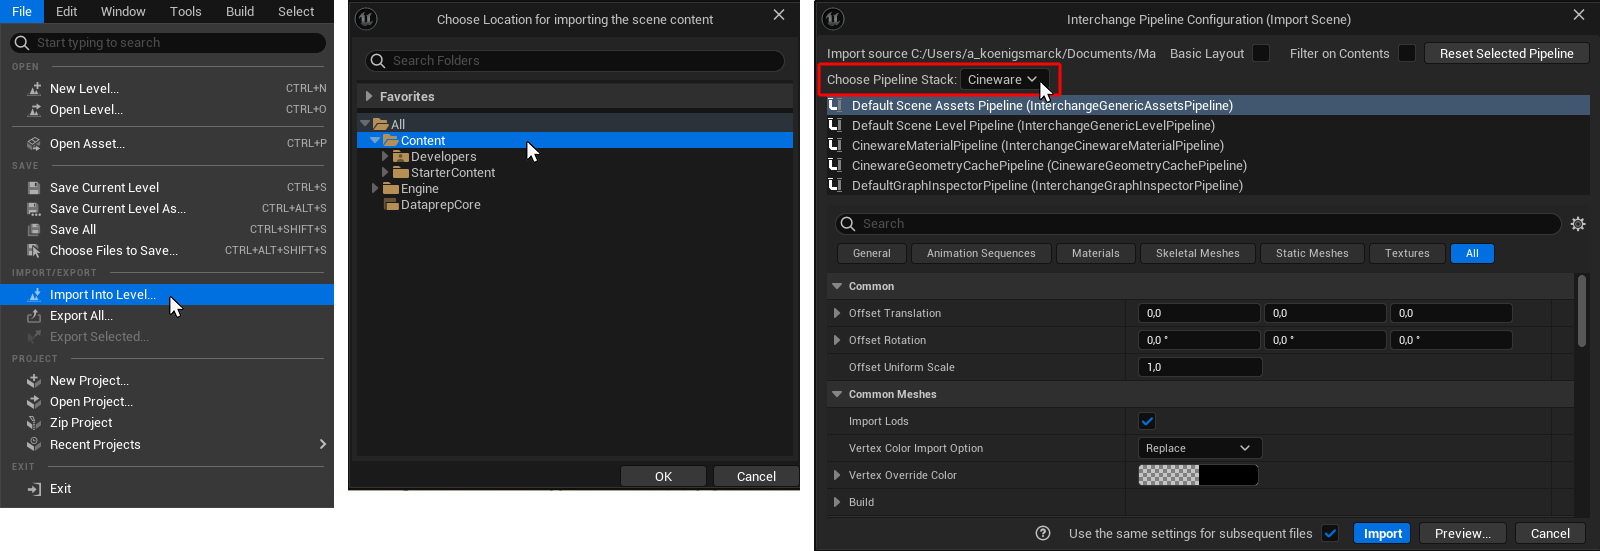
Import via the File menu of the Unreal Editor (see point 1) with subsequent selection of the desired storage location within the Unreal project (see point 2). During the import preparation, a status window appears (see point 3) and then the stack responsible for processing the data can be selected (see point 4). Finally, click on the Import button (see red marking at the bottom right). After clicking the Import button, another dialog opens in which a GeometryCache can optionally be activated for all meshes contained in the file. These Geometry Caches are required, for example, for importing animated point positions. This can then be used to import Pose Morph object deformations, PLA animations or the results of a baked clothing simulation. If the Cinema 4D file contains such objects, activate the options for these in the GeometryCache column. Otherwise, only static meshes or meshes that can be deformed by joints/bones are imported.
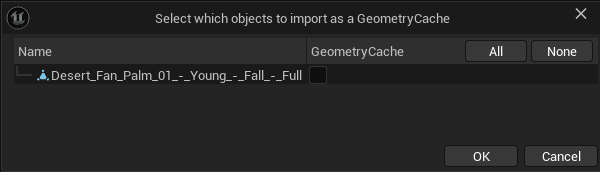
Optional activation possibility for loading Geometry Caches for each object in order to transfer animated point positions of the geometry into the Unreal Editor. Elements that do not allow the use of Geometry Caches are automatically marked with corresponding locked symbols. However, as can also be seen in the lower half of the figure above, there are also objects and structures for which no Geometry Caches can be used at all, such as null or joint objects that do not contain any points themselves. In these cases, a corresponding locked symbol is then displayed in the column for GeometryCache.
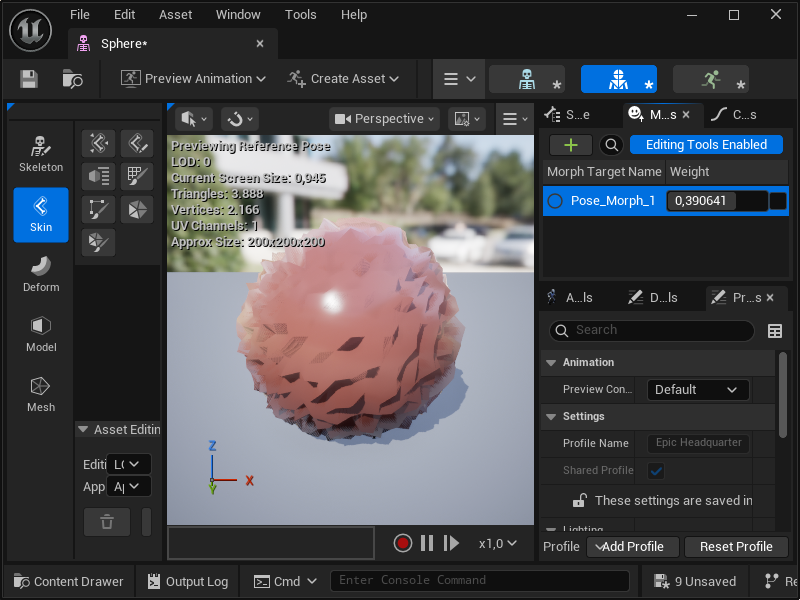
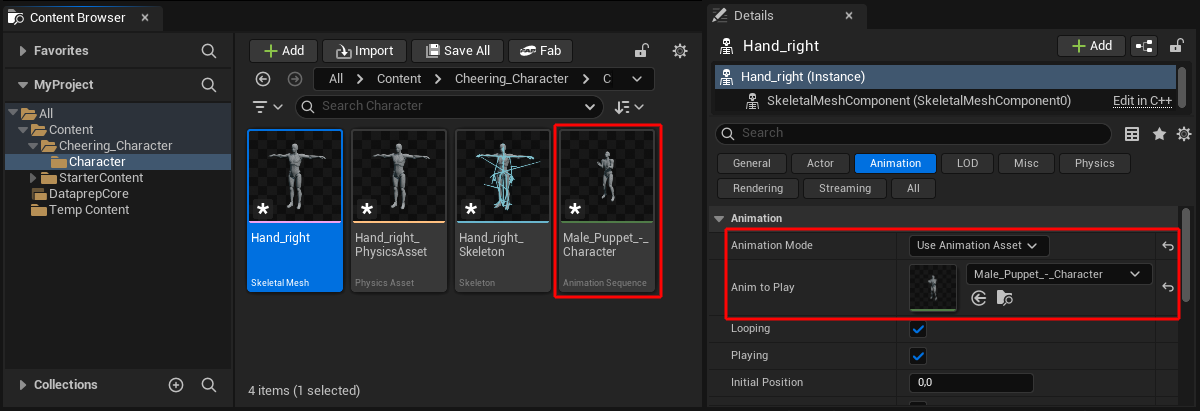
If the imported asset also contains Morph Targets, i.e. different shape states were saved for the asset in Cinema 4D via a Pose Morph Tag, the names of these morph target states appear as independent objects within the listing and can also be activated individually for loading as Geometry Caches (see following figure). The basic state of the object is not offered separately as a Geometry Cache, but is already included in the object as a static state by default.
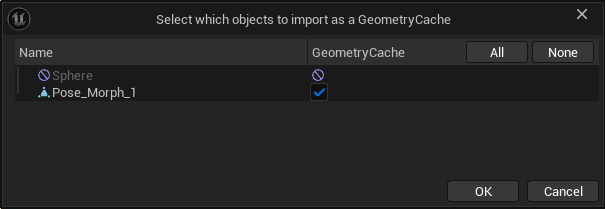
An object named 'Sphere' is imported here, on which a morph target named 'Pose_Morph_1' has been defined in Cinema 4D. When importing objects that have Pose Morph target states in Cinema 4D (with full support for saved point and normal information), this option is already active by default in the CinewareGenericAssetsPipeline:
- Import as Static Mesh: The Pose Morph target states are imported as individual Skeletal Actors.
- Import as Skeletal Meshes: The morph target states are imported and targets with the same name are combined into one.
- When loading animations, existing morph target interpolation curves are deleted.Finally, after clicking on the OK button, a last dialog opens where you can make the final selection as to which elements of the file should be loaded. Only the elements activated in the left-hand column are imported. This makes it possible, for example, to initially load a file that still contains legacy light sources, cameras or materials only via the Datasmith import and then, in a second step, to load only the animated figures of this project with the Interchange workflow. Or you can select only certain meshes or materials from an extensive Cinema 4D scene that you want to use in the Unreal Editor. For complex projects, however, it can also be useful to have the desired elements saved separately in Cinema 4D in order to make it easier to select the assets actually required when importing in the Unreal Editor and, if necessary, to be able to configure the appropriate import options more easily. This section explains how to import Cinema 4D scenes via Datasmith.
As the right-hand column of the following image shows, the properties used for each element selected in the left-hand list are displayed for checking and adjustment. For example, you can directly see which textures are used in materials.
A preview of the components within the file used for the import then appears (see left-hand column in the illustration), within which individual components can also be excluded from the import by clicking away the blue checkmarks or examined with regard to their content by clicking on the name. Click on the Dismiss button to complete the import.
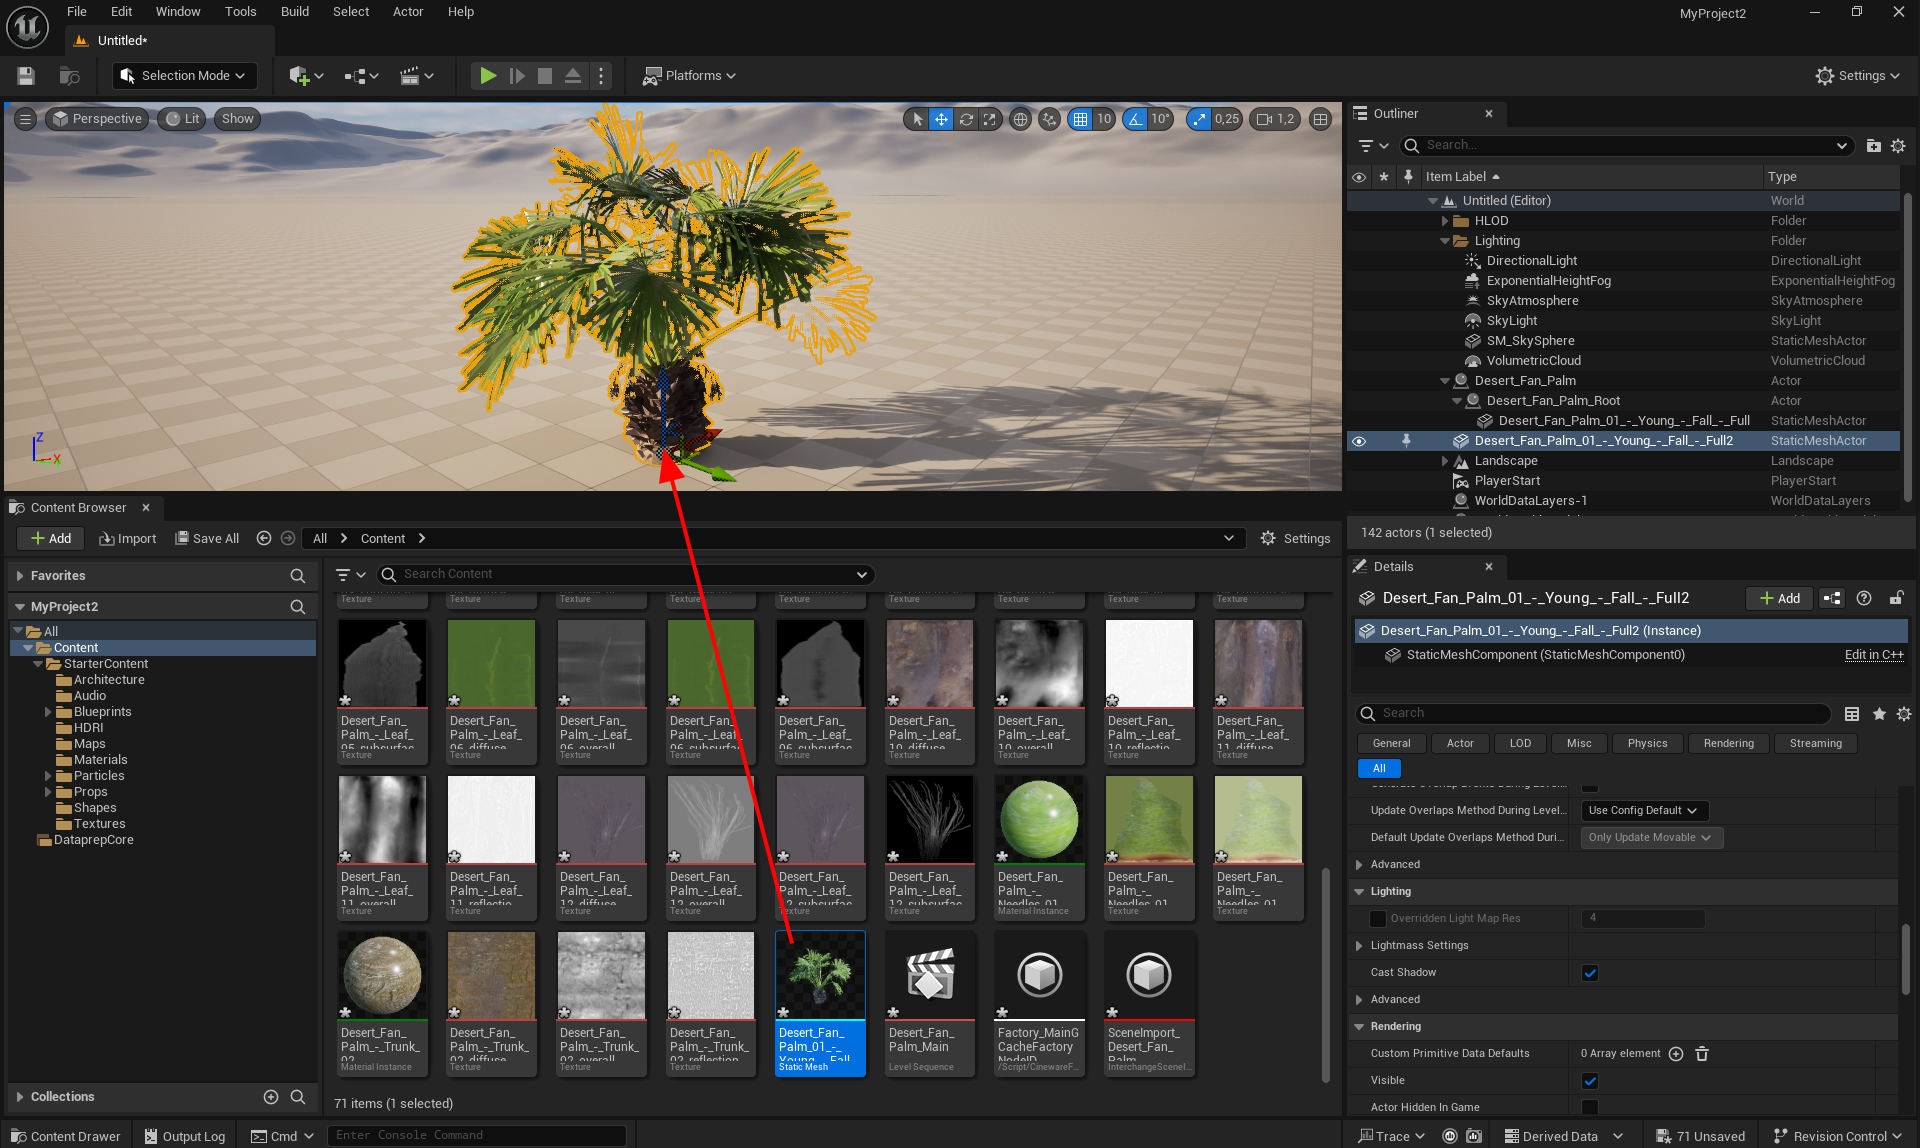
If Pose Morph target states have also been imported, these can also be displayed and checked individually when editing the Skeletal Mesh Actor (select the corresponding Skeletal Mesh Actor in the Unreal Engine outliner and then execute Ctrl + E ) (see also the following figure).
Import of Animations
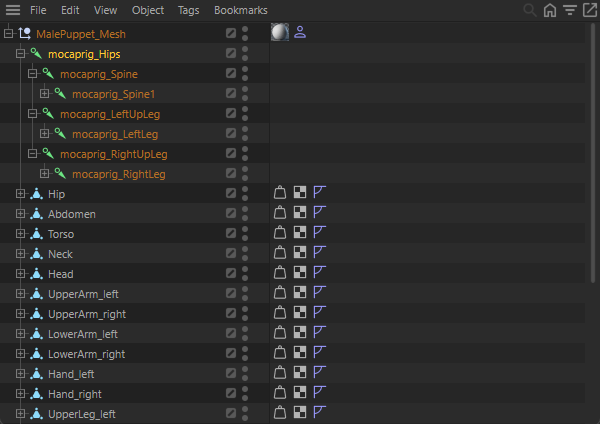
When importing characters animated with joints, please note that their skeletons must always be hierarchically arranged under a root object in Cinema 4D (see also the example in the following illustration). This then also becomes the origin of the corresponding character in the Unreal Engine. It is also permitted for a Cinema 4D scene to contain several figures and a corresponding number of joint skeletons attached to them.
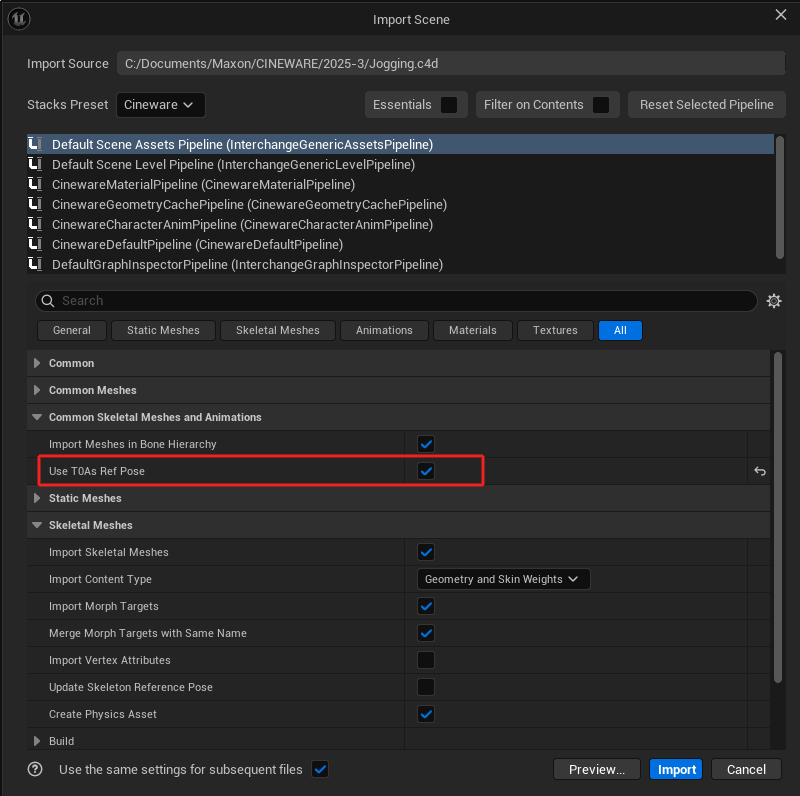
If several geometries were bound to one and the same joint in Cinema 4D and different reference poses were used to bind the geometries to the joints, the option for Use T0 as Ref Pose must be activated during import in the Unreal Editor. This automatically uses the pose at time 0 as the reference pose.
Currently no Pose Morph target states are supported on Skeletal Meshes loaded with active Use T0 as Ref Pose option. Although the morphs are loaded, they do not lead to any deformation in the character's reference pose.
The current Cineware for Unreal version also supports the processing of joint hierarchies that contain additional, static meshes. This is useful for objects that are bound to a figure but should not be subjected to deformation by multiple joints. Think, for example, of glasses, a helmet or a weapon. These objects therefore remain separate within the skeleton hierarchy.
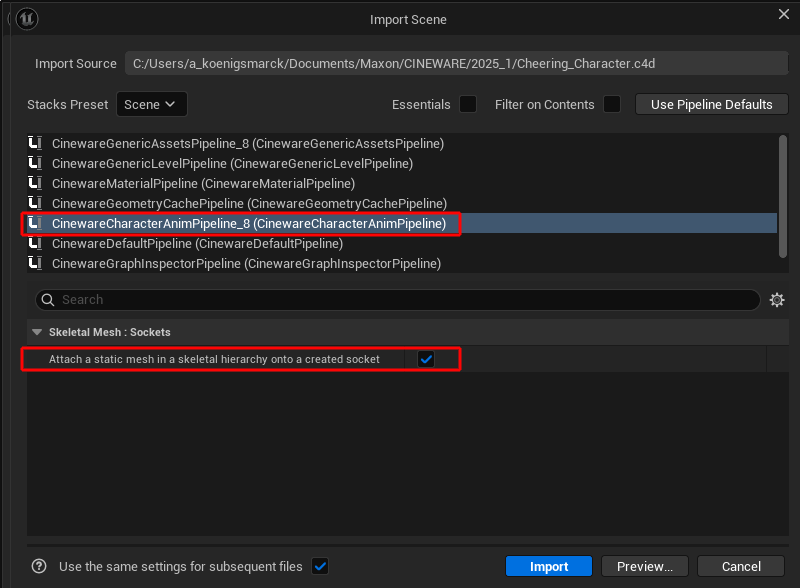
In such cases, activate the option for Attach a static mesh in a skeletal hierarchy onto a created socket during import, which is displayed after selecting the CinewareCharacterAnimPipeline (see following figure). The static meshes within the imported joint hierarchy are then automatically integrated within the rig at the corresponding position.
If this option remains switched off, meshes that are found within a joint hierarchy automatically receive 100% weighting values in relation to their parent joint or bone. These meshes also become a regular part of the deformed character mesh and can therefore no longer be addressed individually.
When importing animated hierarchies, please also note the following information, which applies both when dragging and dropping data onto the Content Browser and when using Import into Level via the File menu of the Unreal Editor:
As already explained here, the deformations of an object defined via a Pose Morph Tag in Cinema 4D can also be adopted. The blends and changes between these saved poses can already be animated in Cinema 4D using simple keyframes. This is then also loaded directly as an animation in the Unreal Engine. Alternatively, these morph targets can also be controlled in the Unreal Engine itself.
If the mesh deformed via Pose Morphs is also part of a rigged character, the Pose Morphs target states become part of the Skeletal Mesh Actor and retain their morph weightings and animations.
Currently no Pose Morph is supported on Skeletal Meshes loaded with the active option Use T0 as Ref Pose. Although the morphs are loaded, they do not lead to any deformation in the character's reference pose.
Note that currently only Pose Morphs for managing point positions and normals are fully supported.
Although the Pose Morph options in Cinema 4D for managing positions, sizes and angles are not supported within a Skeletal Mesh Actor, they are also imported and appear as targets in the Level Sequencer .
The option to process UV coordinates via Pose Morph target states, which is otherwise also offered in Cinema 4D, is generally not supported in the Unreal Engine.
There is also the restriction that only Pose Morph target states with the same number of points as the object to be deformed can be used.
Regardless of which of these two import options you choose (via Drag & Drop on the Content Browser or by loading via the File menu), all loaded elements should appear in the Content Browser at the end of the import and can be placed in your level from there, e.g. by dragging them directly into the viewport. If you have used Import Into Level for importing, the loaded assets already appear automatically in the Viewport/Outliner and can then be moved to the desired position, for example.
Reimport of Assets
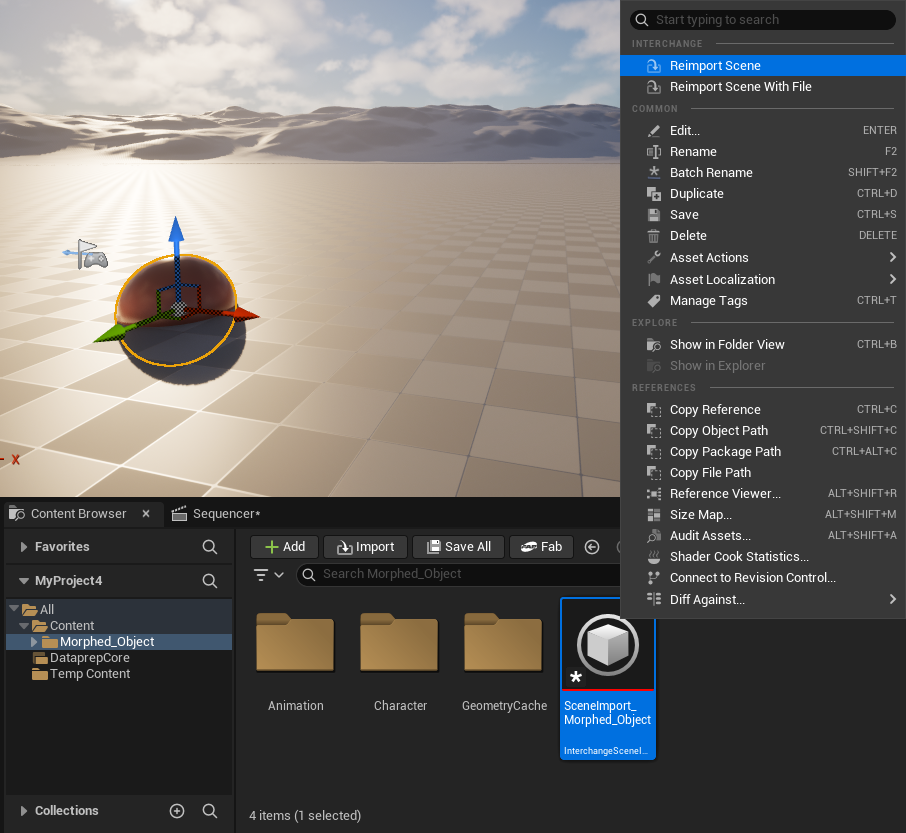
If changes need to be made to the original Cinema 4D scene, assets already imported into the Unreal Engine can also be updated or replaced at a later date. After right-clicking on the asset to be reloaded in the Unreal Engine Content Browser, the command for Reimport Scene can be selected (see figure below).
As a result, the asset goes through the import process already discussed here again. At the end of the process, the Cinema 4D file associated with the asset is reloaded, updating the asset in the Unreal Engine.
If the original file name or file path of the Cinema 4D project has been changed in the meantime, the command for Reimport Scene With File can also be executed in the same context menu, whereby the new file path can also be selected via a file dialog.
Changes for Interchange from Version 2026.0.0
- The properties of Material tags, such as the UV offset, the number of texture tile repetitions or the definition of the polygon side for the material assignment are adopted.
- Support of C4D generators for light sources and cameras (e.g. the Symmetry or Cloner object).
- Fixed a problem with non-geometry entries of a Subdivision Surface object.
- Cineware Pipeline Stacks are already integrated into the Asset or Scene Pipeline Stacks by default.
- Support for Cinema 4D visibility animation tracks
- Meshes that lie within a joint hierarchy can be automatically bound to the joints within the hierarchy without becoming a deformed part of the Skeletal Mesh.
- Assets that have already been imported can be updated using the Reimport Scene command.
- The Dome lights of a Cinema 4D scene are imported into the Unreal Engine as Skylight. HDR textures on the Dome light automatically become textures on the Skylight and are assigned there using longitude/latitude cubic mapping.
- IES light sources in the Cinema 4D scene are interpreted in the Unreal Engine as point light sources with an assigned IES profile.
- Extensive support of Pose Morph target states for point positions and normal directions.
Current Limitations
In addition to the differences between the Datasmith and Interchange import options already documented here, these limitations in functionality are currently known:
- When using older Cinema 4D versions in conjunction with Unreal Engine 5.5 or newer versions, functionality may be limited. The use of C4D 2025.2 is currently recommended as a minimum.
- Joint hierarchies that are not grouped under a common root object in Cinema 4D lead to incorrect recognition in the Unreal Editor. All joint hierarchies of a character rig must be grouped under a single root joint.
- Due to current restrictions, Subdivision Surface smoothing on rigged meshes is not passed on to the Unreal Engine.
- Due to current restrictions, FFD deformations of meshes that are not loaded as Geometry Caches are not implemented in the Unreal Engine.
Import with Datasmith
Overview
The following explanations concern the Datasmith import of Cinema 4D files (.c4d) in the Unreal Engine. Other options are also available, e.g., via a Direct Link connection or the .udatasmith format, which are described on this page.
The Interchange Workflow for importing data described above is also available and offers additional options in some cases, e.g. when importing animated characters or supporting Redshift materials.
Datasmith Import of Cinema 4D Assets into the Unreal Editor
If the plug-in components for Datasmith described here are installed and active in the Unreal Editor, a Datasmith>File Import... function is available via a separate icon in the main menu of the Unreal Editor, which also directly supports the Cinema 4D data format .c4d, among others. Contrary to the way previous versions worked, the scene in Cinema 4D no longer needs to be saved via File>Save project for Cineware.... Normal saving, e.g., via File>Save project as... is sufficient. The Cineware settings under Edit>Project Preferences.../Cineware can also be ignored when working with Unreal. Generators and node materials are automatically converted by Unreal during import, and the desired texture size can also be selected directly in the Unreal Editor during import.
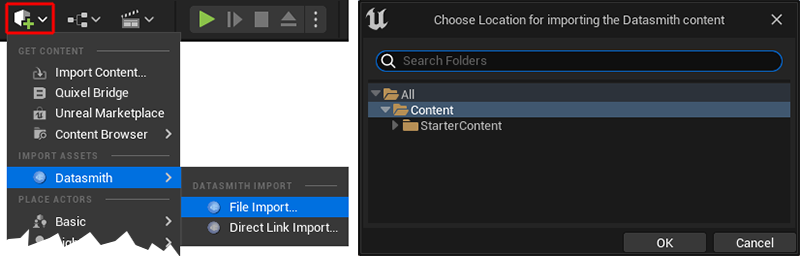
Basic Import Settings
Selecting Datasmith>File Import... will open the standard file dialog, which can be used to load a .c4d file directly. During this import, you will be asked for the desired directory within your Unreal project into which the data should be loaded. By default, this is the Content folder, as can be seen in the right half of the above image. The imported data will then be stored there as native Unreal .uasset files.
The next step will open the actual import settings, which you can use to select the properties of the Cinema 4D file to be imported, among other things. The following options and settings are available there:
| Geometry |
Objects and their geometry will be imported as static meshes. Note that only the front side of the polygons is visible in Unreal by default. To make both polygon sides visible, the option for Material Property Overrides>Two Sided must be activated in Unreal for the material of the geometry. |
| Materials & Textures |
Materials and the textures used in them will be loaded. The resolution used for baking the material properties in bitmap textures can be selected separately in the Node Material Textures group. Please note that not all native Cinema 4D shaders and Nodes can be baked and imported as textures. You should therefore create all parametric material information as textures yourself before saving in Cinema 4D, if possible. Redshift Node Materials are also supported (no XPresso materials), although no displacement settings will currently be adopted. |
| Lights |
The light sources of the Cinema 4D scene will be imported as Light Actors. Please note that not all configuration options are also available in Unreal. For example, Area lights can only be rectangular, disc-shaped, cylindrical or spherical and are then generally imported into Unreal as rectangular Area lights. The use of several Infinite light sources can also be problematic with regard to shading in Unreal. |
| Cameras |
Imports the Camera objects of the Cinema 4D scene as Cine Camera Actors. Redshift cameras are also supported. You can find further information here. |
| Animation |
Animated properties will be imported. This includes, for example, the classic Position, Rotation and Size keyframe sequences, but also the render visibility of objects to animate their visibility. Animations implemented using scripts or XPresso circuits, for example, must be baked as keyframes before being saved in Cinema 4D. Animations in which the number, sequence or position of surface points change can be imported as a Geometry Cache. This also applies to simulations that have been saved as a cache. The principle corresponds to the use of the Allembic storage format, in which animations are saved image by image. You will find a separate option for this in the Geometry Caches group, which can also be used to import PLA keys, for example. |
Redshift Light Sources
By activating the Lights option mentioned above, light sources from Cinema 4D projects can also be transferred to the Unreal Editor. This also applies to Redshift light sources, although only these types are supported:
- RS Point Light (point light source)
- RS Spot Light (spot light source)
- RS Area Light (Area light source): Only rectangular light shapes are supported directly in Unreal (Light Type Rect). Special shapes, such as a Redshift Dome Light or a geometry that is used in conjunction with a Redshift Area Light for illumination, must be converted manually in the Unreal Editor.
- RS Infinite Light (Infinite light source)
Since Lumen and Lux are used in the Unreal Engine as units for determining the light output and these are dependent on the size of a light source or a light cone, light brightnesses and intensities must be converted.
The following applies to Point lights (RS Point Light):
| Redshift unit | Conversion to Unreal |
|---|---|
| Image | Intensity (lm) = Intensity / pi |
| Luminous Power | Intensity (lm) = Intensity |
| Luminance | Intensity (lm) = Intensity / (pi * 1000) |
| Radiant Power | Intensity (lm) = Intensity * LuminousEfficacy |
| Radiance | Intensity (lm) = Intensity * LuminousEfficacy / (pi * 1000) |
The same applies to Spot lights (RS Spot Light) as to Point lights, except that the light intensity is also influenced by the aperture angle of the Spot light:
Intensity (lm) = Intensity * (1 - cos (angle of the light cone) * 0.5)
The following applies to Area lights (RS Area Light):
| Redshift unit | Conversion to Unreal |
|---|---|
| Image | Intensity (lm) = Intensity * Area / 2pi |
| Luminous Power | Intensity (lm) = Intensity * Area |
| Luminance | Intensity (lm) = Intensity / (pi * 1000) |
| Radiant Power | Intensity (lm) = Intensity * LuminousEfficacy * Area |
| Radiance | Intensity (lm) = Intensity * LuminousEfficacy / (pi * 1000) |
The following applies to infinite lights (RS infinite Light):
| Redshift unit | Conversion to Unreal |
|---|---|
| Image | Intensity (lux) = Intensity * 500 |
| Luminous Power | Intensity (lux) = Intensity * 200 |
| Luminance | Intensity (lux) = Intensity / 10 |
| Radiant Power | Intensity (lux) = Intensity * LuminousEfficacy / 17 |
| Radiance | Intensity (lux) = Intensity * LuminousEfficacy / 17 |
Redshift Cameras
Redshift cameras contained in Cinema 4D projects can also be transferred. The following settings will be applied:
- The value for Focal Length (mm) as found in the camera's Object settings.
- The width of the sensor size as set via the X component of the Size (mm) value in the camera's Object settings. The height of the sensor is determined by the Aspect Ratio value from the Output section of the Render Settings in Cinema 4D.
- The Focus Distance from the Optical section of the Redshift camera.
- The Shutter Speed (s) as found in the Optical section of the Redshift camera.
- Exposure (EV) or sensitivity (ISO), depending on the selected Exposure mode in the Optical section of the camera.
- The Aperture (f/#) from the Optical section of the Redshift camera.
- An assigned Target object within an Alignment Expression for automatically aligning the camera to an actor. The corresponding target object will be used as an Actor to Track within the Lookat Tracking Settings in Unreal.
In order to be able to use the tracking of a Focus (assigned object in the Depth of Field settings of the Redshift camera) in Unreal as well, you must manually switch to Focus Method Tracking in the Focus settings of the imported Redshift camera and then manually assign the corresponding object for Actor to Track.
Advanced Import Settings
Static Mesh Options
| Min Lightmap Resolution |
Unreal can use existing or self-calculated UV maps on the objects to bake lighting information (so-called light maps). As a result, the display of static objects under static lighting can be accelerated and implemented with higher quality. This setting defines the smallest possible resolution for one of the resulting UV islands. In general, square UV-Map tiles will always be created. |
| Max Lightmap Resolution |
This is where you can define the maximum resolution for the creation of light maps. Please note that you can also adjust this value individually for each Geometry Actor at a later date. You should therefore use an average value for the import. |
| Generate Lightmap UVs |
Activate this option so that Unreal itself creates UV mappings of the geometry during import, which can be used to bake light maps. If the imported objects already have the appropriate UV processing that is also to be used for baking the light maps, this option can remain disabled. This not only shortens the time required for importing, but also saves memory, which would otherwise be required for the additional UV coordinates. Existing UV coordinates, which are used for assigning materials, for example, will be retained in any case. |
Selective Import Settings
If your Cinema 4D project contains several assets, you can already control which of them are to be transferred to the Unreal Editor by creating a selection in Cinema 4D. If only the objects selected in a Cinema 4D scene and their subordinate hierarchies should be loaded, activate this option for Selection Only. Otherwise, all objects in the Cinema 4D scene will always be loaded as assets. This selection option also allows you to import only some elements of the scene via Datasmith and others via Interchange.
Multipliers
You can generally adjust the lighting intensity of the imported light sources via Light Intensity Scale. Values greater than 1.0 will increase the amount of light emitted by the light sources, values below 1.0 reduce the amount of light emitted by the light sources.
Camera ISO Scale works in a similar way. This can be used to adjust the light sensitivity of the imported cameras for import. With values greater than 1.0, the brightness of the scene recorded by the cameras will be increased accordingly. Values less than 1.0 will reduce the recorded brightness.
Import Settings for Animated Assets
If animations have been created within the Cinema 4D scene, you can selectively load only a single time segment of these animations. To do this, activate the Custom Frame Range option for the import and then enter the frame numbers of the first and last animation frame to be loaded for Start Frame and End Frame. If Custom Frame Range is disabled, the complete animation of the assets will always be loaded.
Import Settings for Texture Sizes
In the Node Material Textures settings group, you will find the square resolution used (Texture Resolution), which can be used for the automatic adjustment of the imported textures. All textures used in the Cinema 4D scene can therefore be scaled up or down to this resolution during import.
This scaling can be influenced via the setting in the Texture Resize menu:
- Don't Enlarge: Only textures that are larger than defined in Texture Resize will be resized accordingly. Textures whose original resolution is smaller than defined in Texture Resize will remain unchanged.
- Always: The resolution of all imported textures will be adjusted in order to achieve the default resolution of Texture Resize. Smaller textures will therefore be enlarged and larger textures will be reduced in size.
- Off: All textures retain their original resolutions, just as they are used in Cinema 4D.
Incidentally, the settings in the Node Material Textures group also apply to non-Node Materials, such as the old standard material from Cinema 4D. However, as Redshift is now the standard renderer for Cinema 4D, you should also use its Node Materials.
Settings for Geometry Caches
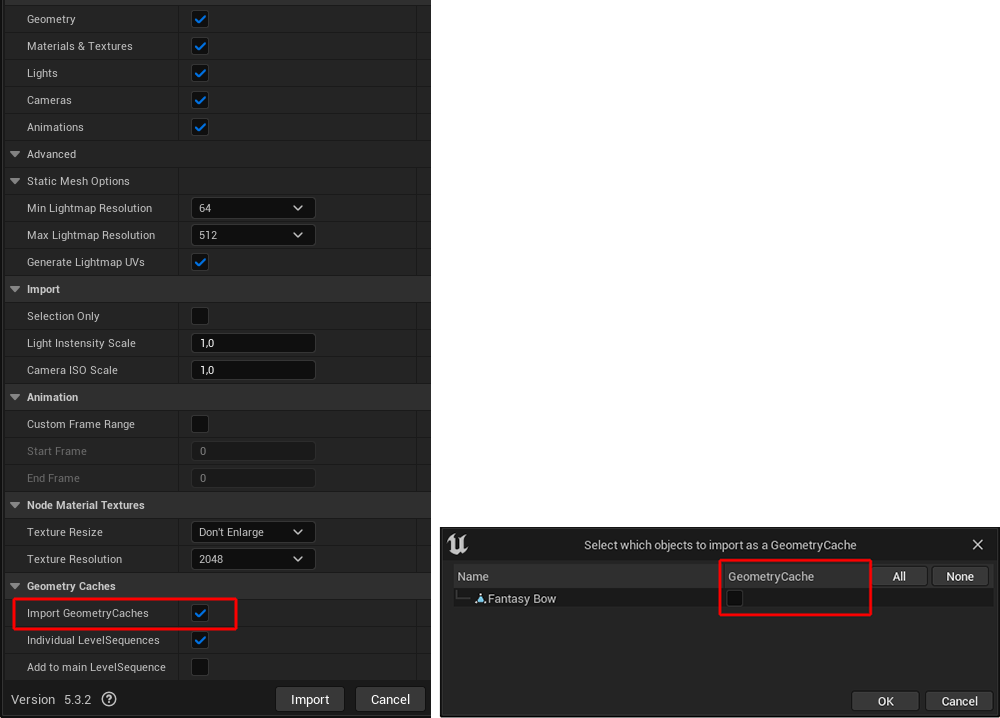
| Import GeometryCaches |
Geometry Caches are required, for example, for importing animated point positions. This can be used to import object deformations or the results of a baked Cloth simulation, for example. Activating this option alone does not lead to the import of this information, but opens an additional dialog when the Import button is clicked, in which the creation of a Geometry Cache can then be activated for all objects present in the imported scene (see right-hand side of the figure above). |
| Individual LevelSequences |
Activates the imported objects for use in the Unreal Sequencer. The Import GeometryCaches option must be active for this. |
| Add to main LevelSequences |
Adds the imported objects to the Main Level Sequence. The Import GeometryCaches option must be active for this. |
Imported Assets in the Unreal Editor
After importing, the objects automatically appear in the Outliner (see following image). In addition, all loaded components (animations, geometry, materials and textures) are available in the Content Browser.