Toon Material
Overview
|

|
|
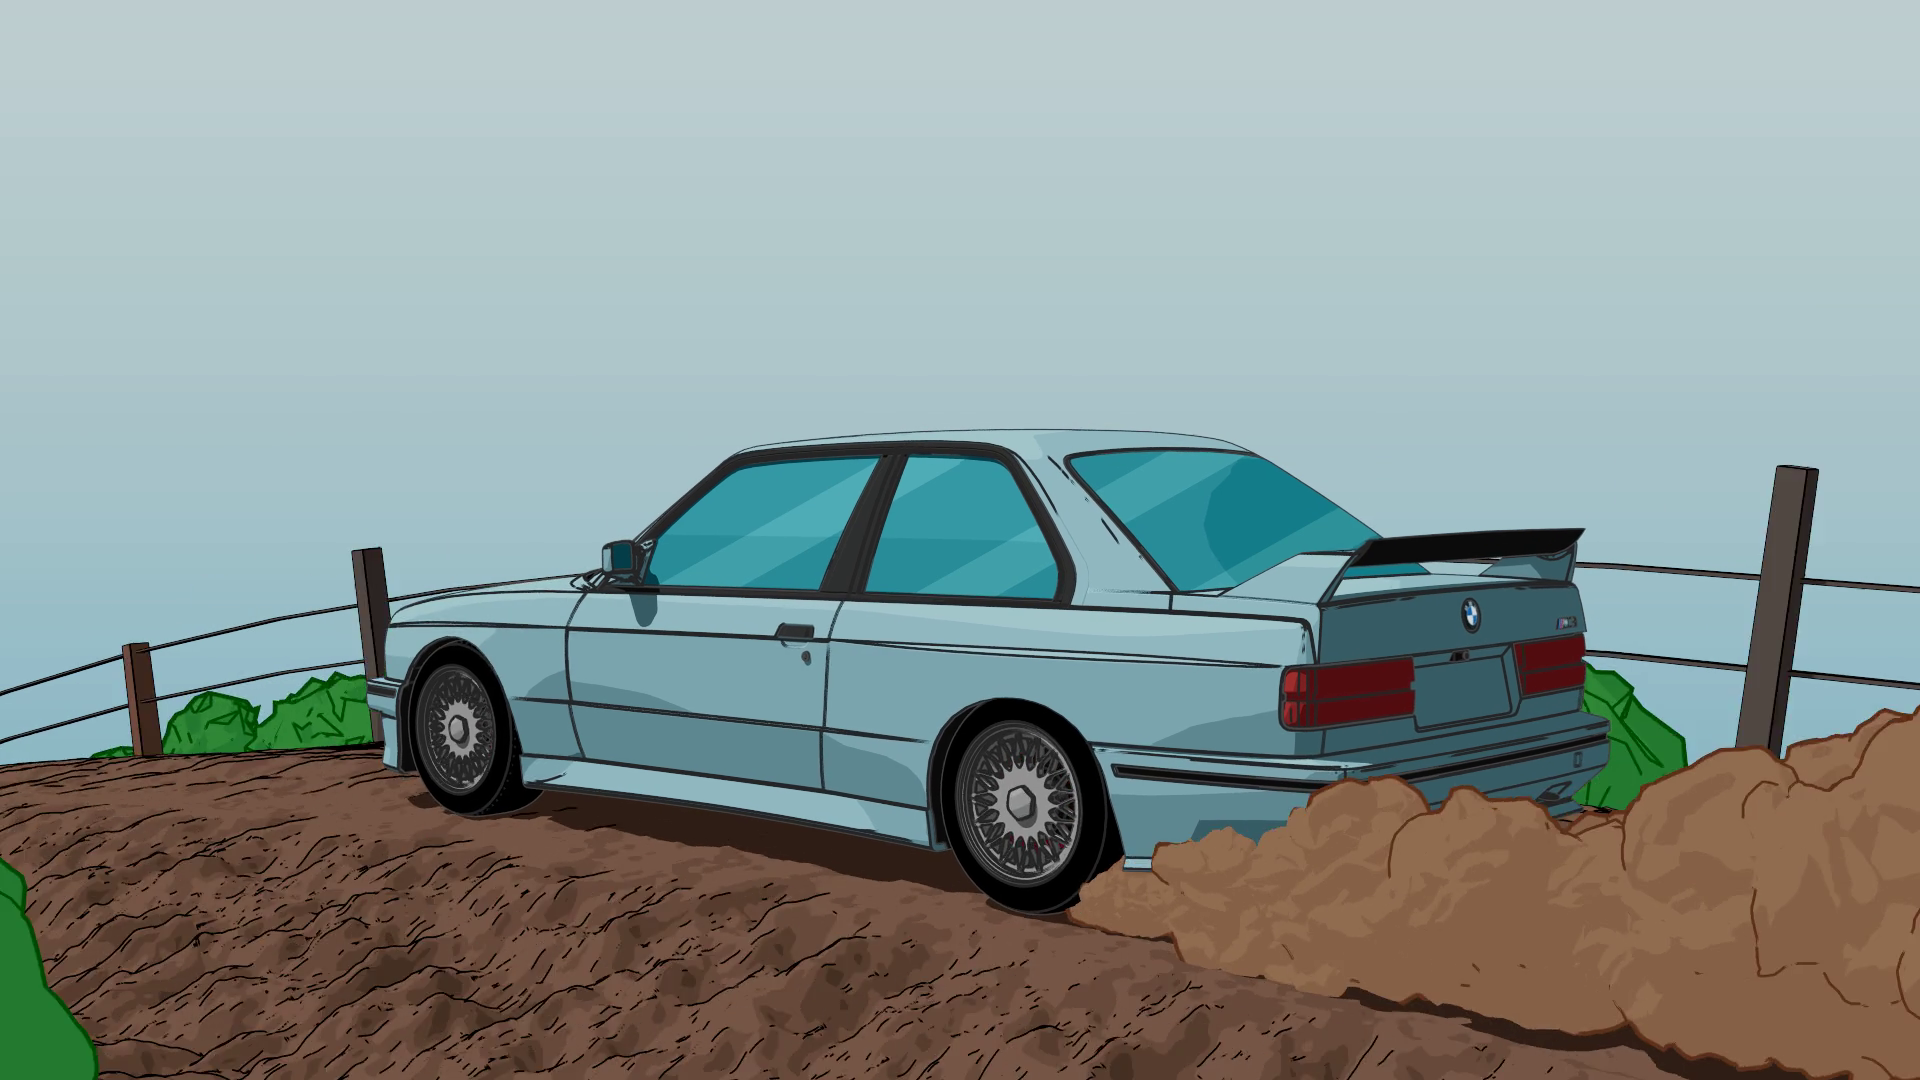
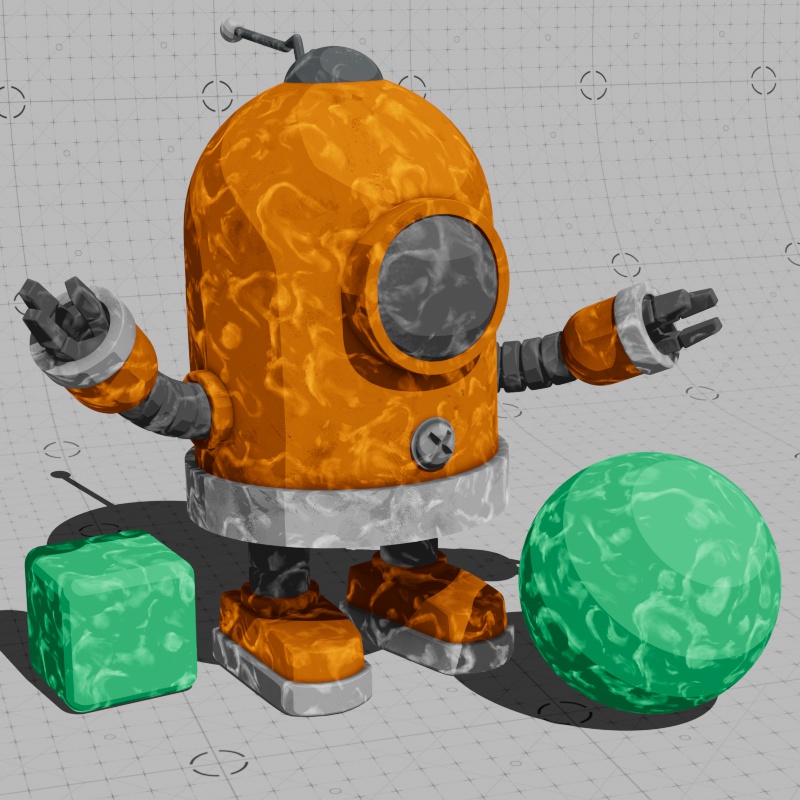
| by Benjamin Mikhaiel, model by Martin Trafas | by Theo Daley | Robot model by Ian Robinson |
The Toon Material is Redshift's non-photorealistic rendering shader. It allows for great flexibility and creative freedom in designing cel shaded and cartoon style looks. It is one of three shaders that make up Redshift's core offering of non-photorealistic tools. The Toon Material is used as the primary shading element to create stylized cel shaded looks, the Contour shader is used to create outlines around your objects, and the Tonemap Pattern texture adds a screen space pattern to your shading to mimic a halftone dot effect and others.
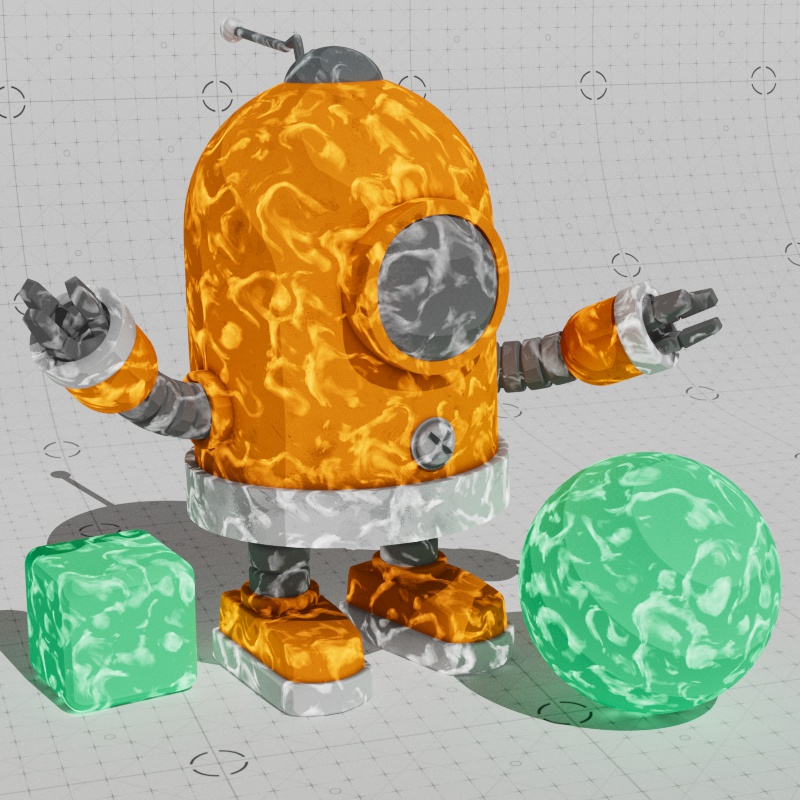
| Toon Shader Non-Photorealistic Rendering |
Standard Material Physically Based Rendering |
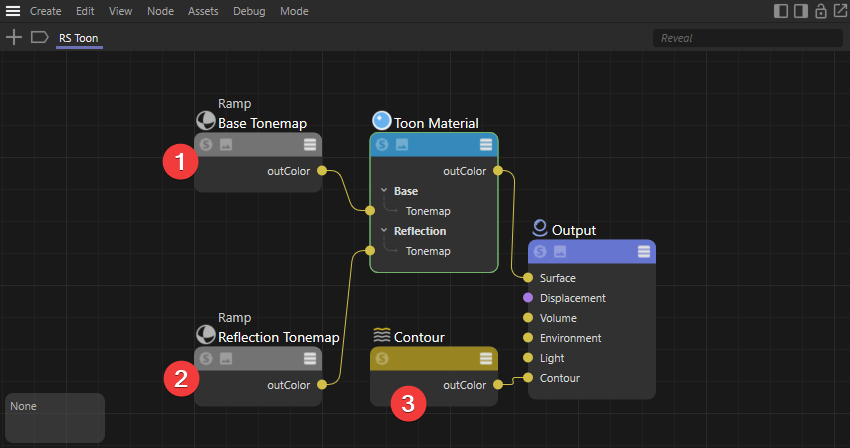
Basic Toon Setup
A basic cel shaded Toon Material can be set up with the following main ingredients:
-
A stepped ramp to drive base tone mapping for a cel shaded look.
-
A ramp to drive reflection tone mapping so specular reflections can be stylized.
-
A Contour shader connected to the "contour" port of a material output node for toon outlines.
Please see the next section, Tone Mapping and Lighting, for toon lighting tips and information on tone mapping and how it works — for even more stylish effects check out the Tonemap Pattern texture!
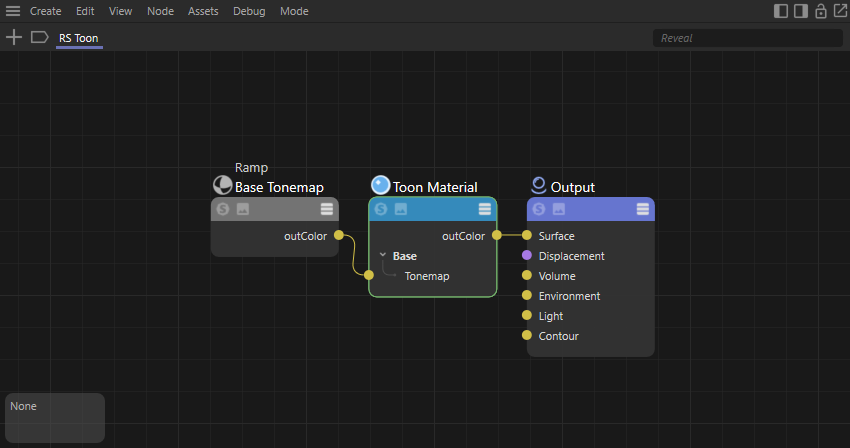
In Cinema 4D, a Toon material preset can quickly be created using the Create menu in the Material Manager:
|
Tone Mapping and Lighting
What is Tone Mapping?
Tone mapping is the most important element in defining the look of a Toon shader. It is the most powerful differentiator between non-photorealistic rendering (NPR) and traditional physically based rendering (PBR) as it allows an artist direct control over lighting and shading. The key to understanding how tone mapping works is to consider the starting point — the lighting in your scene. Tone mapping works by taking the scene lighting and remapping that with a user defined ramp. If you are familiar with remapping a black and white noise with a color ramp then you're already halfway there, as the same basic methodology applies to tone mapping. Let's start with a black and white noise texture, using a horizontal ramp, the left side of the ramp maps to the darkest parts of the texture, the middle area maps to the midtones found in the texture, and the right side maps to the brightest parts of the texture. In the example below, note how the color ramp at the bottom matches up with the black and white ramp and how that applies directly to the colors of the noise texture on the plane floating in the center.
| Color remapping a noise texture |
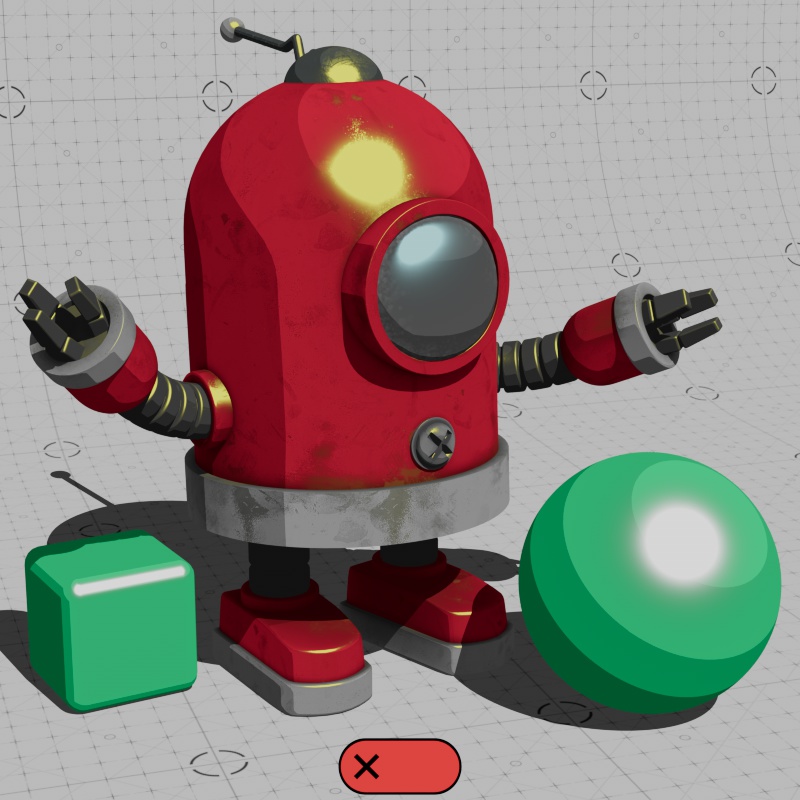
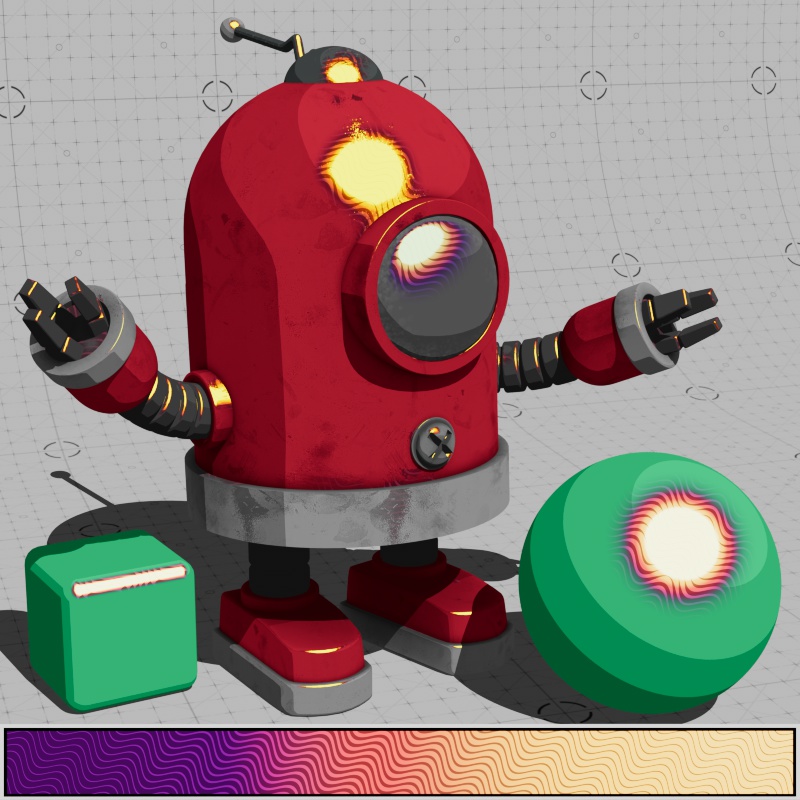
With tone mapping, instead of the color ramp being driven by a 2D texture, it is driven by the actual lights in the scene and all the different aspects that this brings with it like light intensity, light angle, and shadow softness. Using a horizontal ramp, the left side of the ramp maps to the darkest parts of the scene lighting, the middle area maps to the midtones, and the right side maps to the brightest parts of a scene. At the extremes, the leftmost part of the ramp (knot position 0) maps to the shadows while the rightmost part maps to the brightest highlights. In the example below, note how the horizontal color ramp at the bottom matches up with the black and white ramp and how that directly applies to the lighting on the toon shaded objects in the scene.
| Tone mapping a Toon shader with an Area Light |
Light Type
In the previous example, you'll notice that the lighting is very soft and the tone mapping perfectly replicates that softness. The green part of the ramp only appears in the areas where lighting is brightest but nothing quite reaches the dark purples found on the left side of the ramp. This is because a large area light was used which casts a very diffused shadow, to change this, the light type can be changed and then the tone map effect will follow.
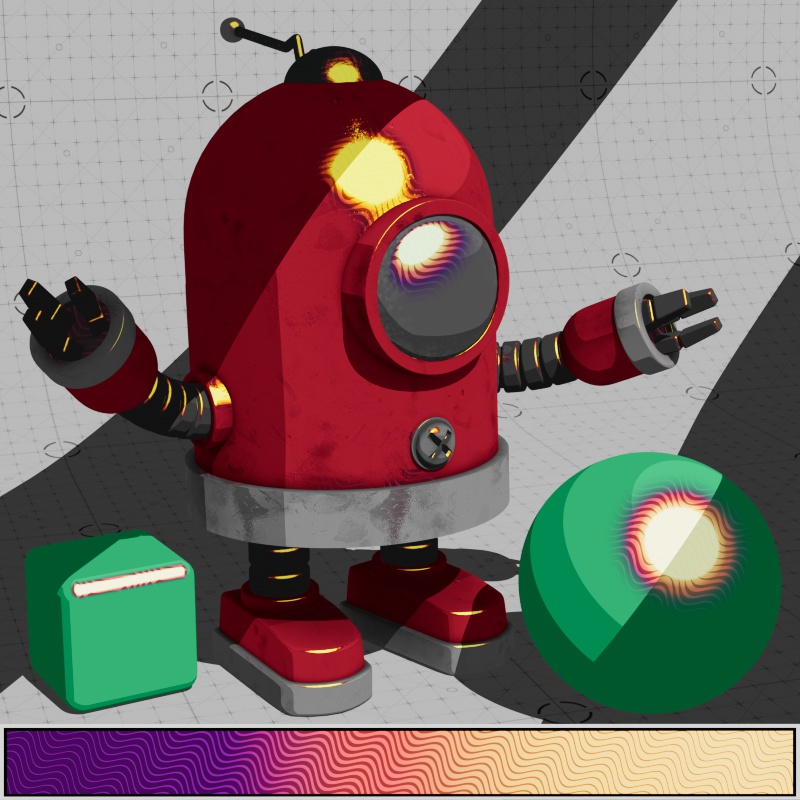
In the example below the area light has been replaced with a infinite/distant light resulting in perfectly sharp shadows. Because of this, the scene lighting now encompasses the full range of the ramp used for tone mapping, we see inky blacks from the black and white ramp and dark purple in the color ramp, as well as every other color in between.
| Tone mapping a Toon Shader with an Infinite Light |
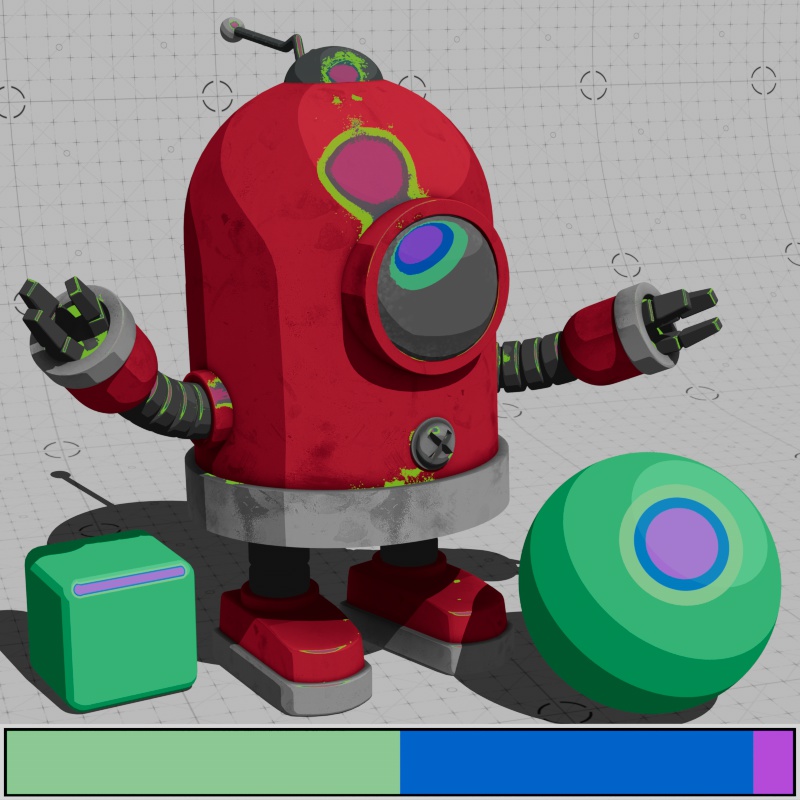
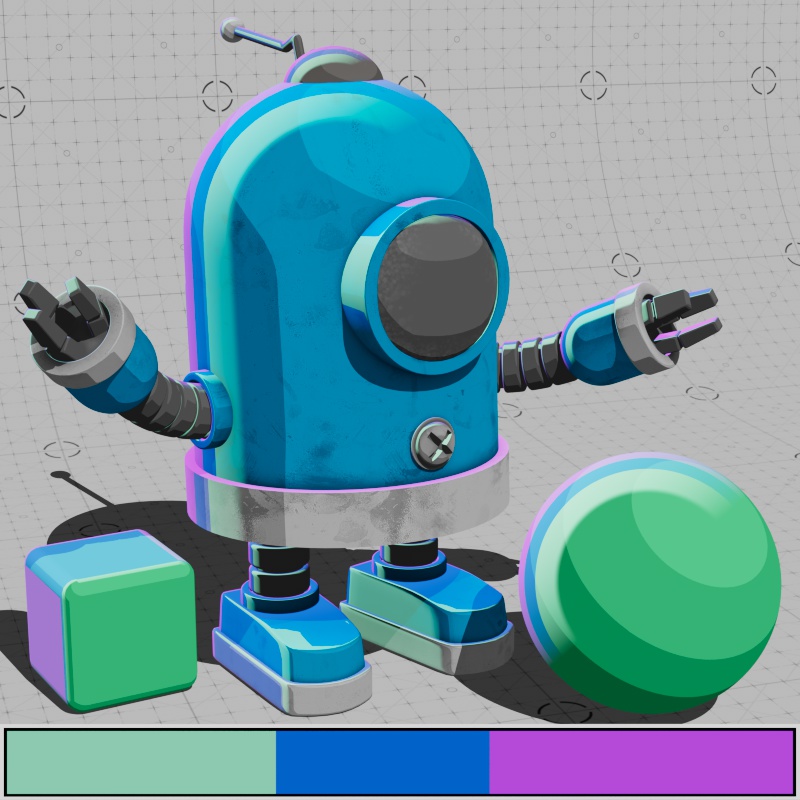
Now the shading is nice and sharp but it doesn't look cel shaded, this can be accomplished easily by changing how the colors in your ramp are interpolated. Using a stepped interpolation between color points transforms the shading into a more stylized appearance. You can use colored ramps for colorized tone mapping or a grayscale ramp that relies on the Base Color to provide the overall color and texture.
| Tonemap: Stepped Color Ramp Base Color: White |
Stepped Grayscale Ramp Color texture map |
In general, it is recommended to primarily use Point Lights, Spot Lights, and Infinite/Distant Lights when using a Toon shader because the output always matches the ramp used as a tonemap. By comparison, when an area light is used, the size of an area light has a direct impact on how the tonemap ramp is applied — even if you use a stepped ramp the tonemap will be blurred depending on how large the area light is. The examples below compare changing the size of an area light vs using an infinite light and adjusting the shadow softness. Both examples use the same tonemap but the results are very different. The infinite light provides more direct control as you can get nice soft shadows and if you actually want soft tone mapping this should be changed directly in the ramp instead.
| Light Type: Infinite Light Changing Shadow Softness |
Area Light Changing Area Light Size |
Light Intensity
Since tone mapping is based on scene lighting there is a direct connection between how your tonemap is applied and how bright the lighting is in your scene. In the left example below, the intensity of a point light is animated to showcase how light intensity affects toon shading. Note how tone mapping behaves differently depending on the shape of each object, when using a stepped ramp, the shading on rounded objects smoothly transitions across the surface where as flat objects can change abruptly as light intensity passes through the different areas of the tonemap ramp.
A light's shadow transparency also has different effects on toon shading and light intensity as seen in the right example below. For more information on how shadow opacity affects toon shading, please see the Tonemap Mode parameter descriptions.
| Changing light intensity | Changing a light's shadow transparency |
If your toon shader doesn't look the way you want, consider changing the lighting in your scene before adjusting the shader or ramp parameters — you may just need to increase or decrease the light intensity. If that doesn't solve your problem, or the rest of the objects in your scene look great but one or two do not, then it may be worth directly tweaking your ramp.
|
|
Connecting a Tonemap
Using a tonemap with a Toon shader is as easy as connecting a ramp node to one of the tonemap inputs.
|
Any ramp connected at any point along the path of a tonemap input is automatically applied according to the scene lighting.
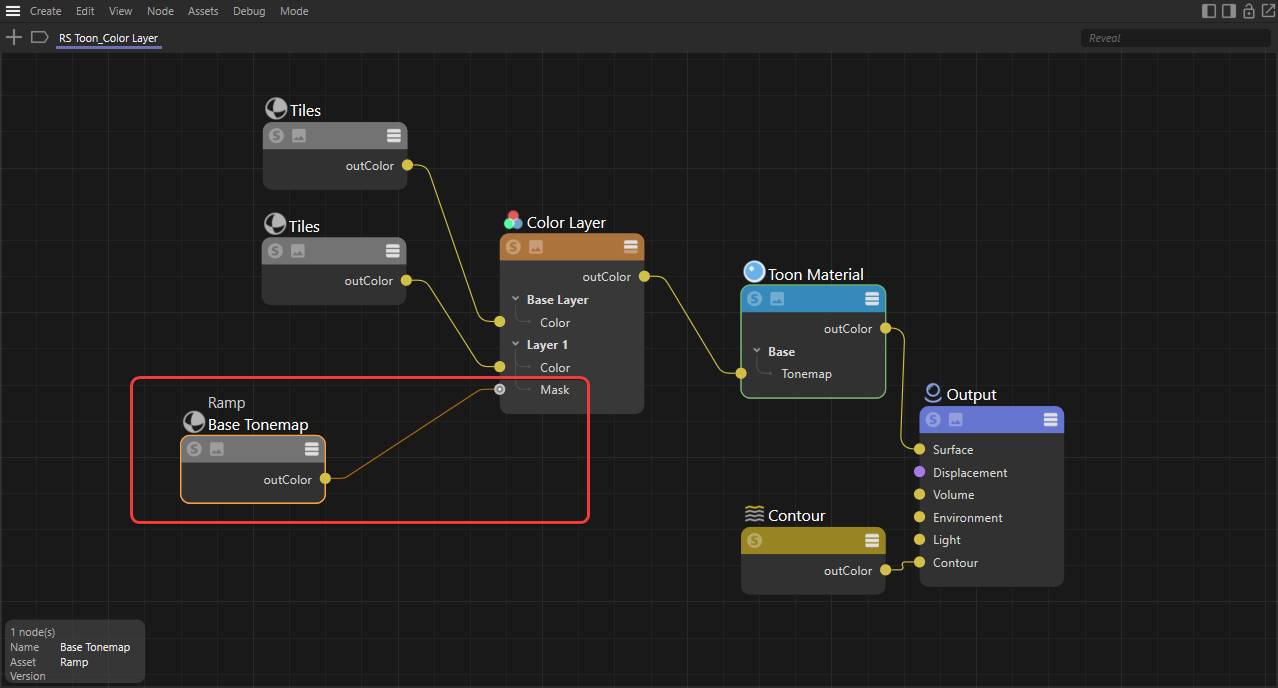
For example, you could use a ramp as a mask to blend between two different textures with a color layer node, but you must remember that the ramp will automatically be applied as a tonemap. Effectively, this allows you to use ramps to apply any sort of effect you can think of based on scene lighting as long as it is part of a node network that goes into a tonemap input. Understanding this is the cornerstone to complex and stylized tone mapping, this is what allows the Tonemap Pattern texture node to scale the size of the pattern based on scene lighting. In the example below, a ramp is being used for the layer mask and the Color Layer node is being used to drive the Base Tonemap input, the ramp is automatically mapped to the scene lighting while the two tile textures are projected as usual.
|
Troubleshooting
If your shader is unexpectedly dark or completely black there are some things you can check. First check the lighting in your scene, make sure the lights are bright enough and try using a point or infinite light if area lights are being used. Try isolating each shading component by increasing or decreasing the base weight, reflection weight, and rim weights individually to help pinpoint the problem. Check your base and tonemap colors — if either are too dark this may stop any shading from appearing. Check your reflection settings, try reducing the Reflection Weight and setting the Energy Conservation Mode to None in the shader's Advanced section. Check the Reflection Tonemap Mode, if it's set to Stylized you must connect a light in the Reflection Light List otherwise you will get a completely black layer cast over your object.
If none of these work, consider building a new toon shader from scratch and work your way back up slowly.
General Properties
Base
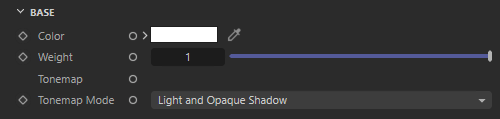
|
Color
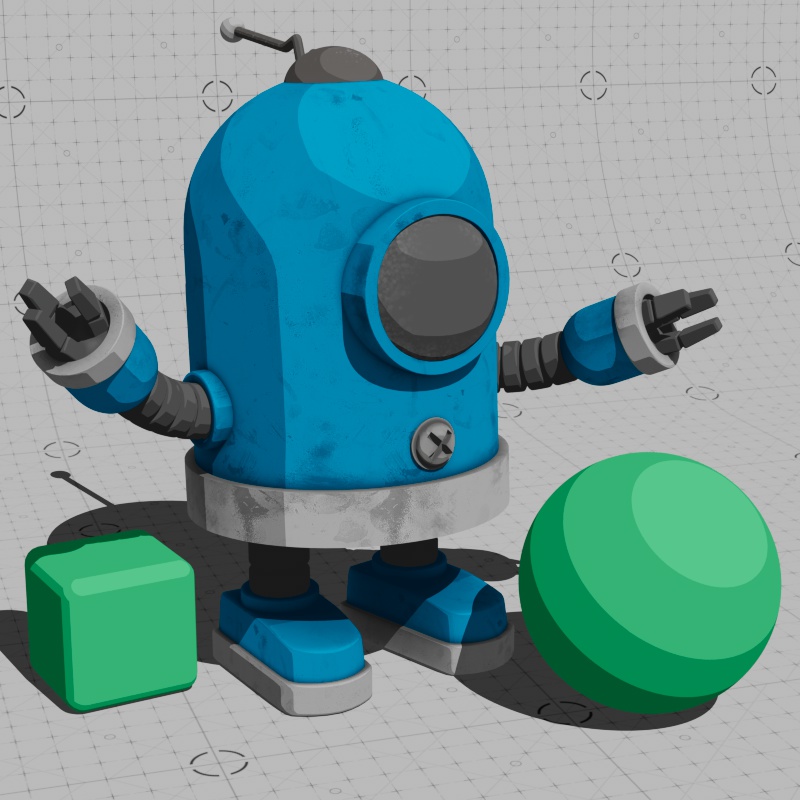
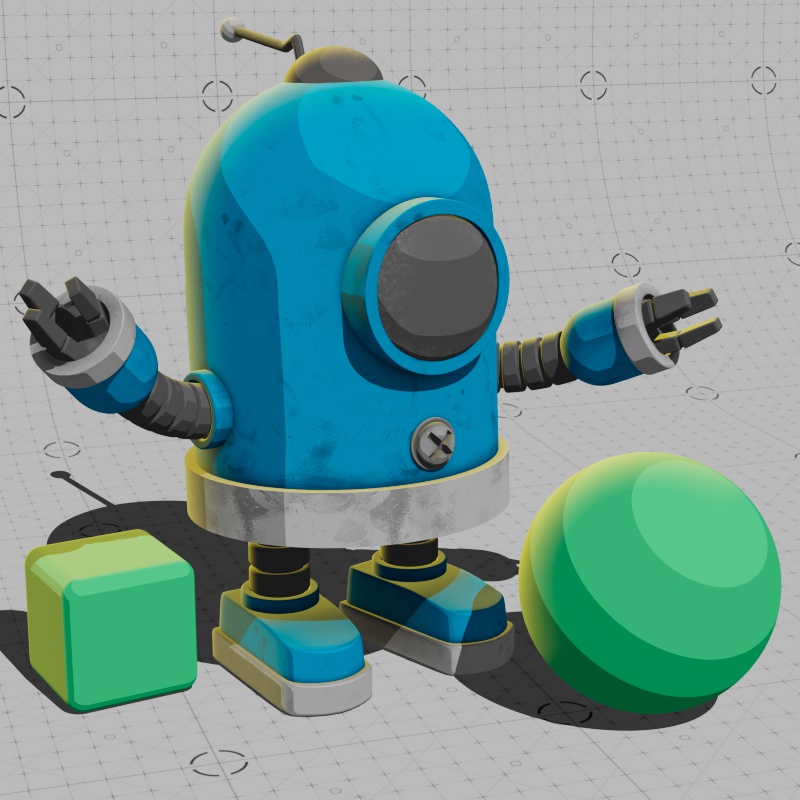
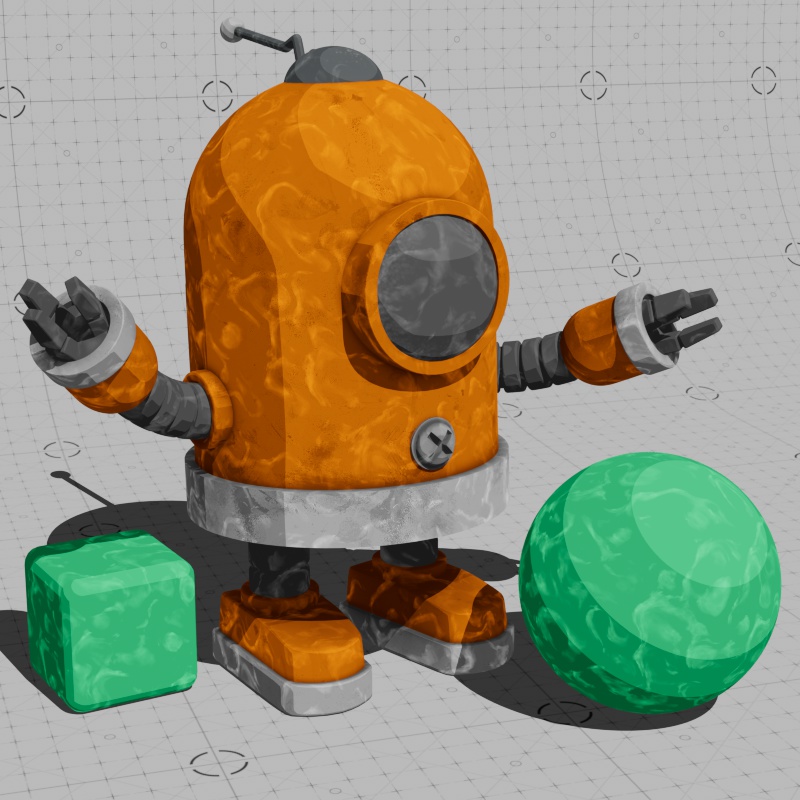
Controls the main color of the Toon shader. This the most common place to connect a primary color texture. The Base Color is multiplied with the Base Tonemap color, setting the Base Color to white allows the full Base Tonemap color to come through while setting it to black results in no color.

|

|

|
| Base Color: Textured | White | Blue |
Weight
Controls the brightness of the base color from 0 to 1.

|

|

|
| Base Weight: 0 | 0.5 | 1 |
Tonemap
Controls the shading with an externally connected ramp or texture node. This is where you give a Toon shader a cel shaded look and is one of the most important inputs to adjust. Using a ramp with stepped interpolation results in a classic cel shaded look where the transition between highlight and shadow is abrupt and sharp. You can use ramps with any type of interpolation, stepped and smooth transitions can even be used in the same ramp, however, mixed interpolation types will not look as sharp as a ramp that only uses stepped interpolation. The Base Tonemap color is multiplied with the Base Color.
Ramp nodes are automatically used as a tonemap when they are connect to a Tonemap input. This includes a single ramp connected directly to a Tonemap input, or multiple ramps as part of a node network — as long as the network eventually ends with a connection into a Tonemap input, every ramp along that chain is automatically mapped to the illuminance in the scene.
Texture nodes require you to enable the "Override UV's for Tone-Mapping" option in the Advanced section of a RS Texture node.
Any node that is not a ramp, but is part of a tonemap input will be applied as usual — allowing you to mix traditional texture projection with tone mapping.
By default, with no connected ramp node, the Base Tonemap results in a linear black to white shaded style as seen in the example on the right below.

|

|
| Tonemap: With cel shaded input Ramp | Tonemap: Without input (Default - Linear Black and White Ramp) |
Tone mapping works by mapping the light intensity on the objects in your scene (the illuminance) to a ramp node with colors and shading defined by you. With a horizontal ramp, the left side of the ramp controls the shadow color, the middle part of the ramp controls the midtone colors, and the right part of the ramp controls the highlight color. Light intensity has a direct impact on how much of your tonemap is used, for example, if you don't see the highlight portion of a ramp on your objects then you either need to make the lighting brighter or change the position of the highlight color in your ramp.
The type of light you use has a major impact on the look of tone mapping. In most situations point lights should be used with a Toon shader, they always reproduce your tone mapping as defined in the connected ramp. If area lights are used, the tonemap may become blurry and smooth. This is based on the size of the area light, large area lights produce smooth tone mapping (even if the tonemap ramp is stepped) while small area lights produce sharper tone mapping. Point lights have the advantage of being able to reproduce sharp tone mapping with the option of casting soft shadows by increasing their Shadow Softness parameter.
You can use a node network as the Tonemap input but only ramp nodes are mapped to the illuminance in your scene. For example, you can use a Color Layer node with two different textures as the layer colors and a ramp node used as a mask between these layers. The textures driving the layer color will be mapped as usual but the ramp node will automatically be mapped according to illuminance — resulting in a layer mask that is driven by scene lighting. This mentality is the key building block for more advanced tone mapping effects — any ramp node is automatically applied to your object based on scene lighting.
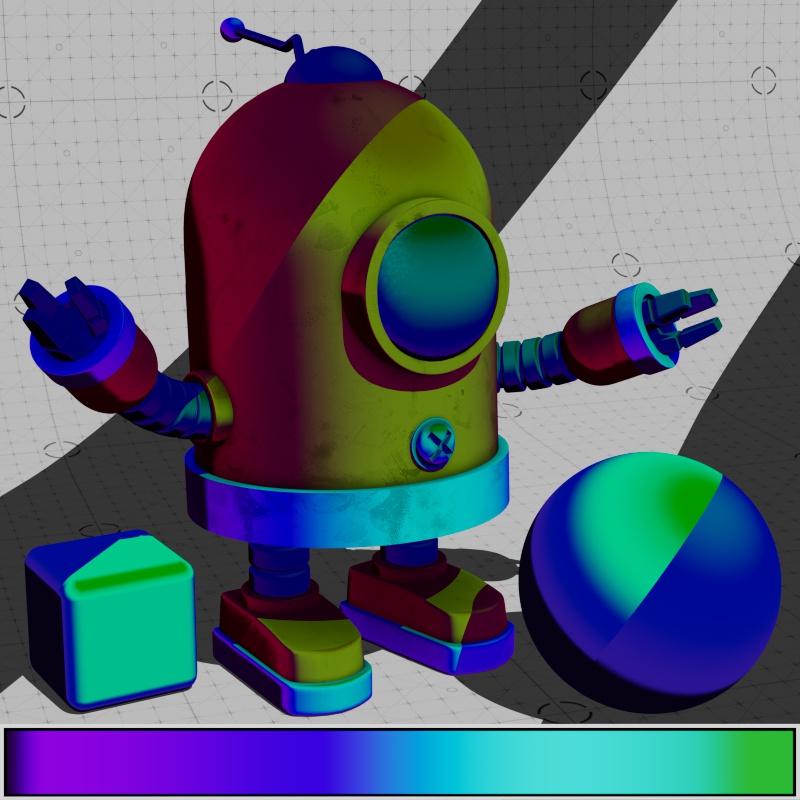
In the examples below the ramp used in each can be seen at the bottom of the image. Take note of how the ramp is mapped to the scene, with the darkest parts of the scene mapping to the left side of the ramp and the brightest parts mapping to the right side of the ramp. Understanding the relationship between scene lighting and a tonemap is important to achieving any kind of stylized look you can come up with.

|

|

|
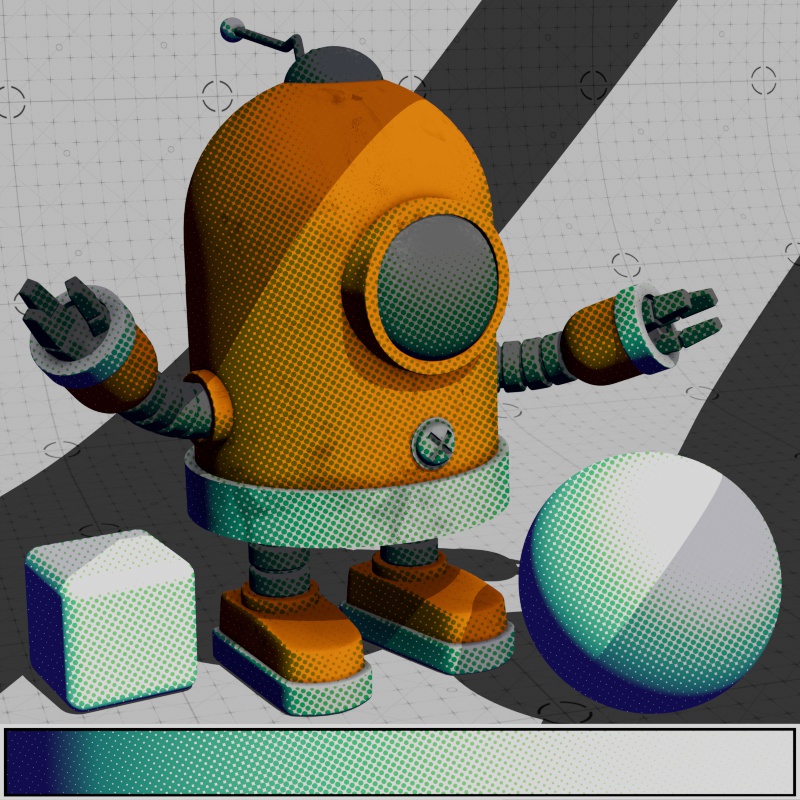
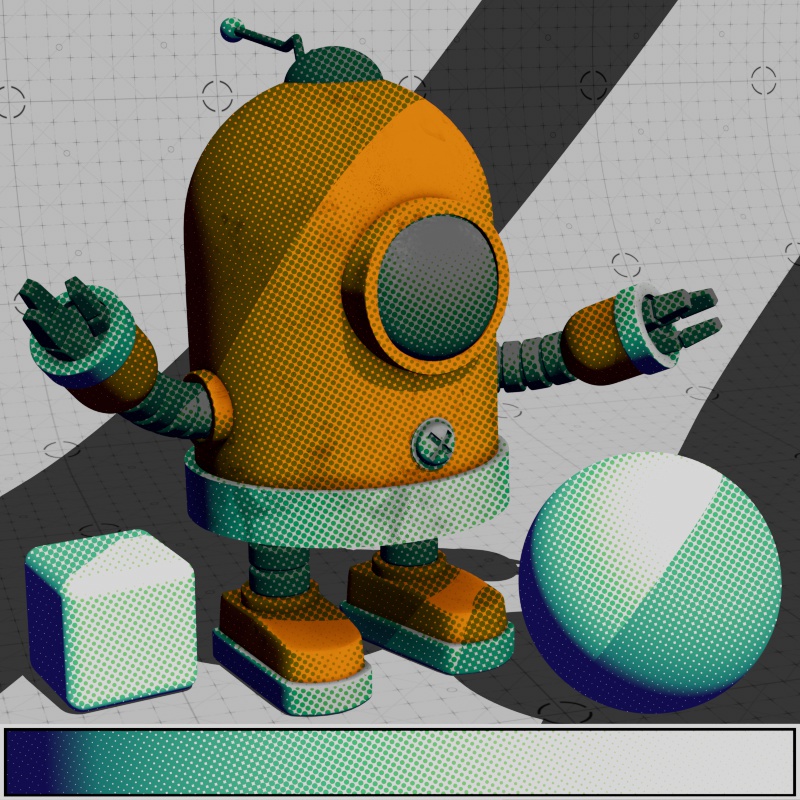
|
| Tonemap: Stepped Ramp | Colorful Ramp with Tonemap Pattern utility | White to Black stepped Ramp | Animated Ramp input |
When bump mapping is used it distorts the tone mapping which allows for stylized shading. In the examples below, note how the shading appears less uniform.

|

|

|
| Tonemap with Bump: Stepped Ramp | Colorful Ramp with Tonemap Pattern utility | White to Black stepped Ramp |
Tonemap Mode
The Base Tonemap Modes controls how Base Tonemap shading behaves in shadow, this includes shadows from other objects and self shadows.
By default, the Light and Opaque Shadow mode does not change how tone mapping is applied when in shadow. In this mode, a shadow is able to dim or even change the color of the tone mapping underneath (if is casting a colorful shadow) but all tone mapping transitions stay in the same place whether they are in or out of shadow. Lower opacity shadows make the underlying region brighter while more opaque shadows make it darker.
By comparison, the Light and Shadow mode actually changes how tone mapping is applied in shadows and adheres strictly to the colors used in the tonemap. In this mode, a shadow is able to shift the tone mapping underneath along the tonemap ramp — how far, and in which direction, this shift travels depends on the opacity of the shadow. Lower opacity shadows shift the tone mapping into the brighter part of a ramp, while more opaque shadows shift the tone mapping further into the shadow part of the ramp.
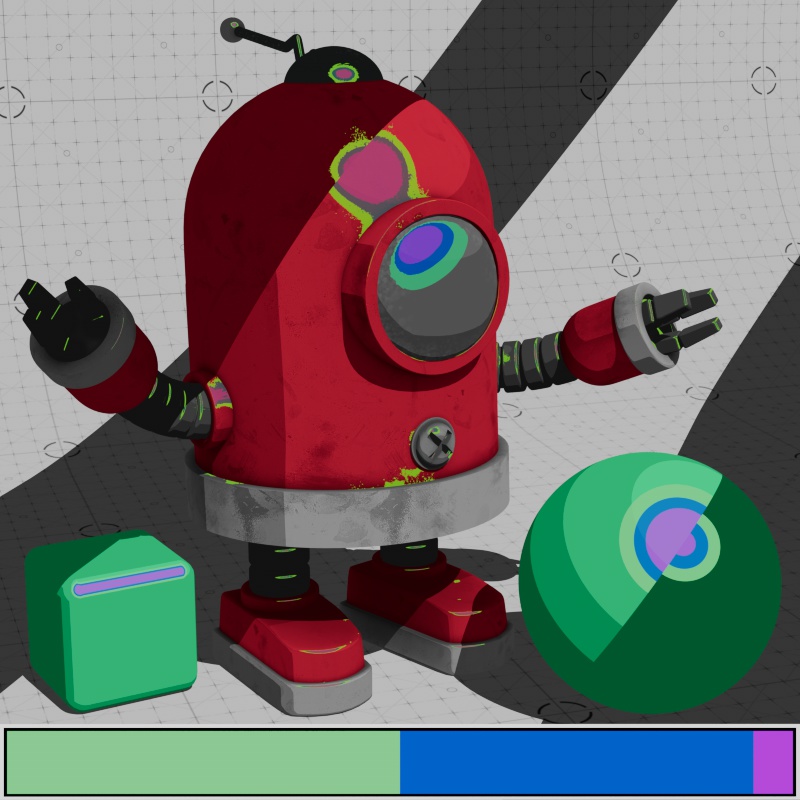
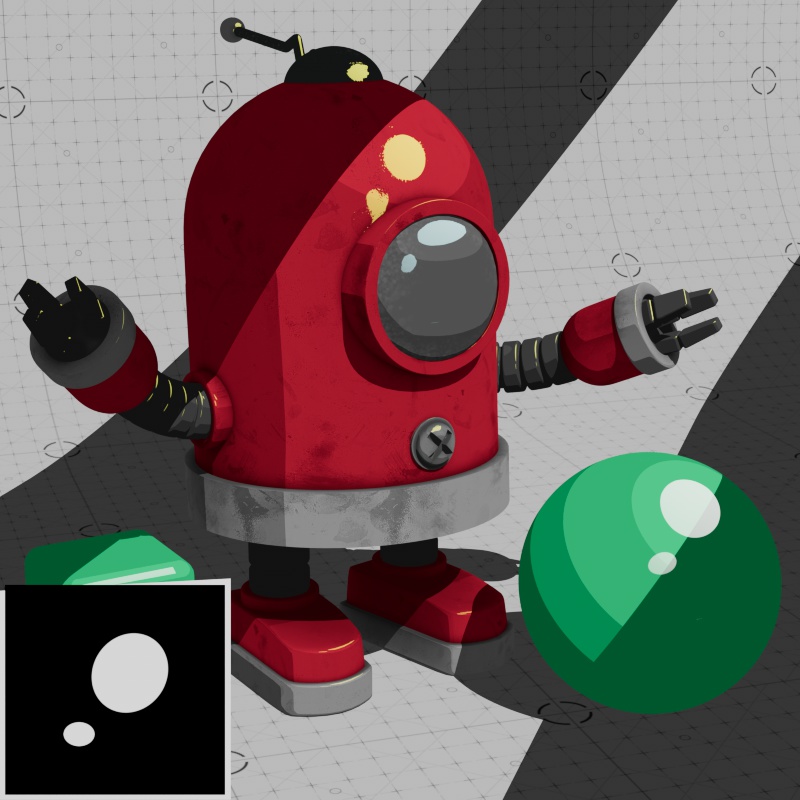
In the examples below, two fully opaque bars cast a shadow on the objects below and the Toon shader's Base Shadow Opacity is adjusted to demonstrate the effect shadow transparency has on each mode, this setting can be found in the Toon shader's Advanced section. When using the Light and Shadow mode, the tonemap ramp can be seen creeping along the surface of the object as shadow opacity decreases from the default value of 0. However, when using the Light and Opaque Shadow mode the tonemap does not move. Keep in mind that shadow transparency can also be adjusted on lights.
| Light and Opaque Shadow (Default) |

|
|
|
| Light and Shadow |
|
|
|
| Tonemap Mode | Tonemap Input: Stepped Ramp Shadow Opacity: -1 to +1 |
Colorful Ramp 0.5 |
Colorful Ramp + Tonemap Pattern 0.5 |
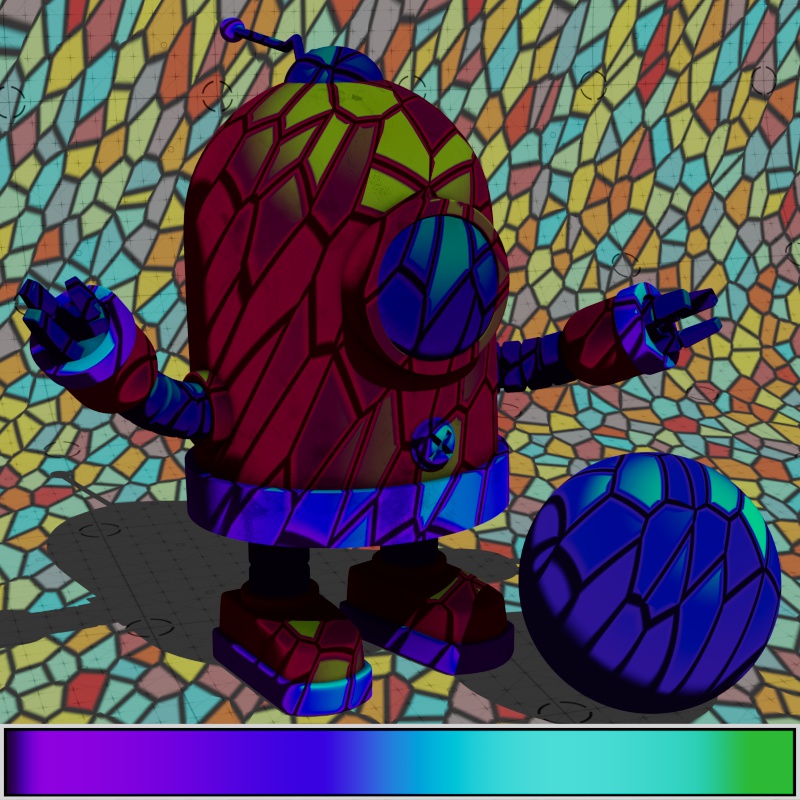
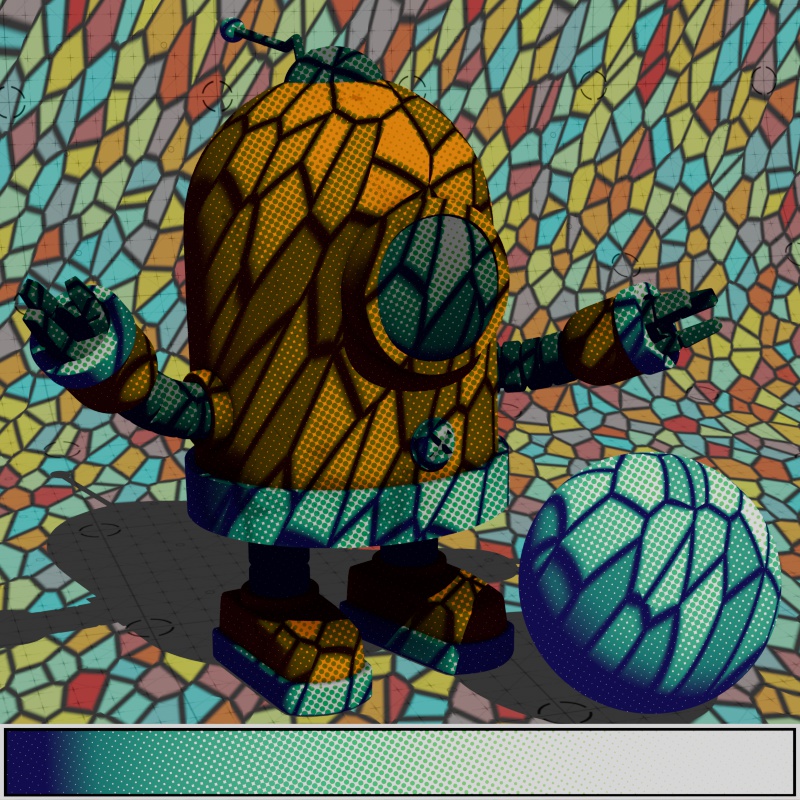
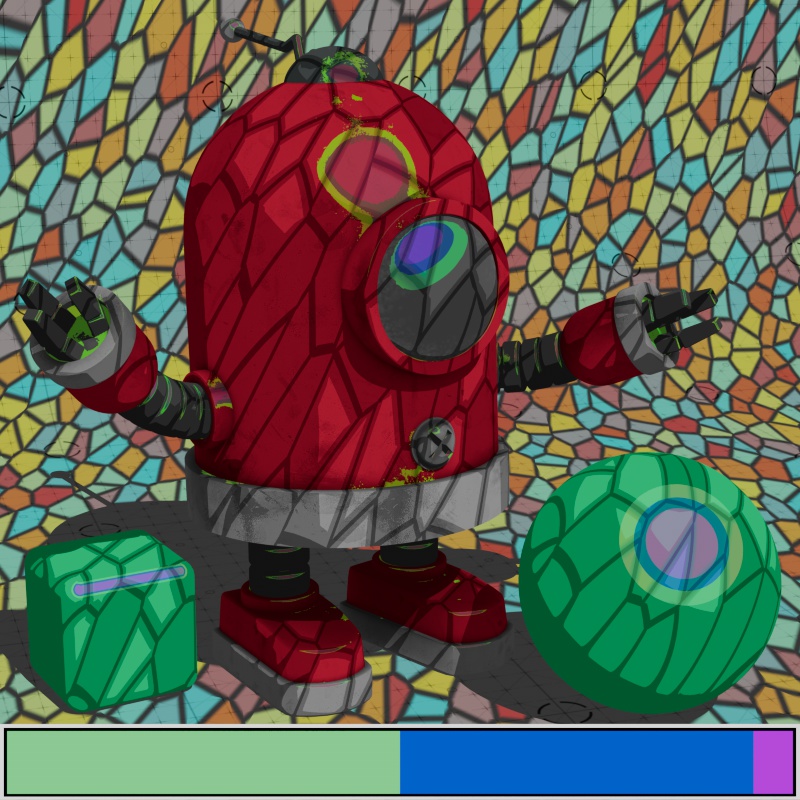
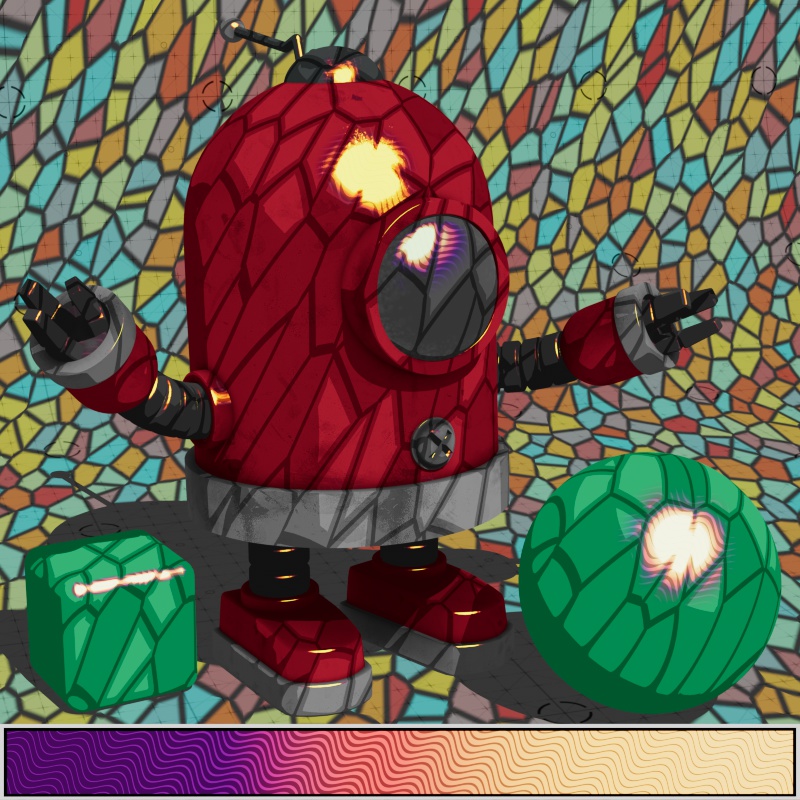
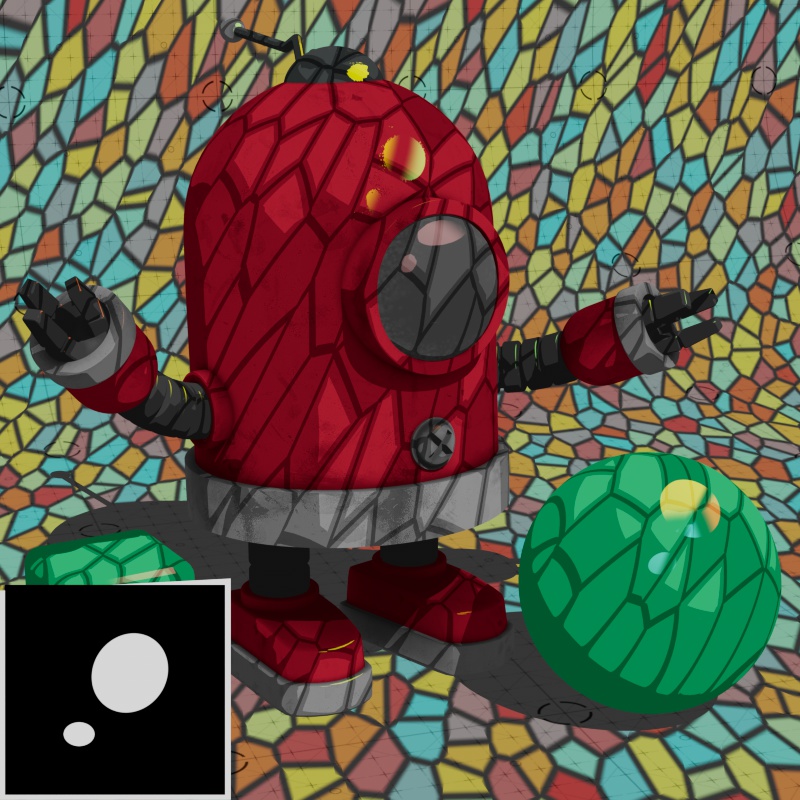
In the next example, a large transmissive plane casts a colorful stained glass window effect on the objects below. When using Light and Opaque Shadow the stained glass effect fades in and out over the surface of the objects when changing the shadow opacity, this includes casting the color of the stained glass effect onto the surface of the objects. However, when using Light and Shadow mode, the different regions of the stained glass effect only adjust how the tonemap ramp is applied — it does not change any of the colors. Take note of how the dark strips between the glass pieces and the darker colored pieces themselves shift the tone mapping into the shadow portion of the ramp faster than the brighter colors. For both modes, when Base Shadow Opacity is at +1, the objects appear entirely in shadow because the transmissive object is casting a completely opaque shadow.
| Light and Opaque Shadow (Default) |

|

|
|
| Light and Shadow |
|
|
|
| Tonemap Mode | Tonemap Input: Stepped Ramp Shadow Opacity: -1 to +1 |
Colorful Ramp 0.5 |
Colorful Ramp + Tonemap Pattern 0.5 |
Reflection
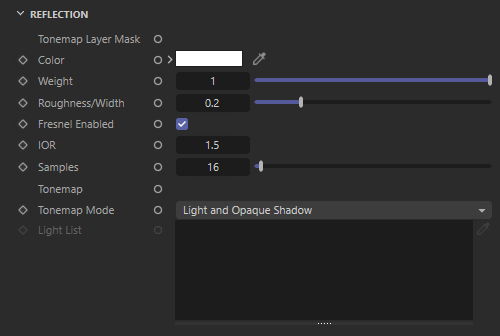
|
Tonemap Layer Mask
Controls where specular reflections (direct reflections from light sources) are able to be seen with an externally connected ramp. A ramp used with the Tonemap Layer Mask is mapped in exactly the same way as the Reflection Tonemap, the darkest part of a specular reflection maps to the left side of a horizontal ramp while the brightest part maps to the right side — light intensity and light angle directly affect where this is applied on your objects and move in unison with the Reflection Tonemap. Bright colors increase the opacity of the specular reflection while dark colors decrease the opacity — the same general functionality as any layer mask where black removes from the layer being masked. By default, with no input ramp, the specular reflection can be visible everywhere.
Since the Tonemap Layer Mask is mapped onto the object based on light angle and intensity it cannot be used to mask out specular reflections in certain parts of an object. Instead, this should be controlled with a texture in the overall Reflection Color below, using black areas to stop the specular reflection from being visible or just dimming them with darker colors.
The Tonemap Layer Mask feature is particularly useful when "Fresnel Enabled" is disabled for reflections. Fresnel reflections are more realistic but they quickly lose their intensity as reflection roughness increases making it difficult to achieve large stylized specular reflections. However, when you disable fresnel the specular reflection completely overwhelms the rest of the shader, blocking out the base color and tonemap. Therefore, the Tonemap Layer Mask can be used to manually control exactly where specular reflections are visible while being able to use high roughness values and having maximum control over the size of the reflections.
All the examples of specular reflection on this page use a Tonemap Layer Mask with fresnel disabled unless noted otherwise.
The Tonemap Layer Mask only affects direct specular reflections, it does not affect indirect reflections of other geometry in the scene. By default the Toon shader has indirect reflections disabled, this can be adjusted in the Advanced section with the Reflection Indirect Scale.
In the examples below you can see how the ramp controls where the specular reflection is visible and how brightness and color affect how intense that reflection is. In most situations you want bright colors in the ramp on the right side so the brightest part of a specular reflection is more intense than the darkest — usually with black on the left side of the ramp so that the specular reflection isn't visible across the entire object. However, since the layer mask is extremely flexible, if you actually want to mask out the brightest part of a highlight that is possible by making the right side of the ramp black as seen in the animated example. In the Smooth Rainbow example, note how the objects are tinted by color everywhere — even in shadow — because there is no black in the ramp so the specular reflections. In the other examples, the left side of the ramp is black so that the darkest parts are not tinted.

|

|

|
|
| Tonemap Layer Mask: Linear Ramp | Animated Ramp | Color Bars | Smooth Rainbow |
Color
Controls the main reflection color of the Toon shader. This the most common place to connect a reflection color map. The Reflection Color is multiplied with the Reflection Tonemap and masked away by a Tonemap Layer Mask if present. Setting Reflection Color to white allows the full Reflection Tonemap to come through while setting it to black results in no color.

|

|

|

|
| Reflection Color: White | Black | Blue | Textured |
Weight
Controls the overall brightness of reflections.

|

|

|
| Reflection Weight: 0 | 0.5 | 1 |
Roughness/Width
Controls the size of specular reflection highlights. Higher roughness values result in larger specular highlights while lower values result in smaller highlights, using a roughness texture map will create a variable size and shape.
This parameter also controls the surface roughness for indirect reflections, however, indirect reflections are disabled by default. To enable indirect reflections increase the Reflection Indirect Scale in the Toon Shader's Advanced section.
| Roughness/Width: 0 - 1 Tonemap Mode: Light & Shadow |
0 - 1 Stylized |
Fresnel Enabled
Controls whether the fresnel effect has an impact on reflection intensity. When enabled, by default, the intensity of reflections varies heavily based on light angle and reflection roughness — this realistically emulates how reflections behave in physically based rendering. However, for more stylized reflections, disabling fresnel might produce a more desirable result that is easier to control.
For example, when fresnel is enabled, high roughness values can cause reflections to quickly lose intensity. With the Toon shader, when a reflection loses intensity the specular highlight also gets smaller, this can be counter-intuitive if you want a wide specular highlight. In the examples below, take note of how the specular highlight stays much smaller, and even disappears, as Reflection Roughness changes with Fresnel enabled.
| Fresnel: Enabled (Default) Reflection Roughness: 0 - 1 |
Disabled 0 - 1 |
IOR
Fresnel must be Enabled to use this parameter.
Short for Index of Refraction, controls how light rays traverse a medium and bend when changing mediums. In a practical sense, changing the IOR adjusts how intense reflections become when Fresnel is enabled. A value of 1 is equivalent to how light behaves in a vacuum, resulting in no bending of the light as a vacuum does not interact with the light rays at all. In the real world, normal materials never have an IOR below 1 because that would be impossible, as it would mean light travels faster in this medium than it does in a vacuum.
| IOR: 1 - 10 |
Samples
Controls how many samples are used for reflections, this mainly effects rough indirect reflections. Higher values reduce reflection noise but take longer to render, while lower values increase the chance for reflection noise but render faster.
Tonemap
Controls the look of specular highlights with an externally connected ramp or texture node. Reflection Tone mapping works by taking the specular intensity of the lighting in your scene and mapping that to a ramp node with colors and shading defined by you. With a horizontal ramp, the left side of the ramp controls the dimmest part of a highlight, the middle part of the ramp controls the midtone colors, and the right part of the ramp controls the brightest part of a highlight. Light intensity has a direct impact on how much of your tonemap is used and how large the specular highlights appear, for example, if your specular highlights are too small then you might make the lighting brighter, change the reflection roughness, or change the position of the highlight color in your ramp.
Ramp nodes are automatically used as a tonemap when they are connect to a Tonemap input. This includes a single ramp connected directly to a Tonemap input, or multiple ramps as part of a node network — as long as the network eventually ends with a connection into a Tonemap input, every ramp along that chain will automatically be mapped to the specular intensity in the scene.
Texture nodes require you to enable the "Override UV's for Tone-Mapping" option in the Advanced section of a RS Texture node. When the "Stylized" Reflection Tonemap Mode is used, the texture used for the stylized highlight must have this option enabled.
The Reflection Tonemap color is multiplied with the Reflection Color and masked away by the Reflection Tonemap Layer Mask. By default, with no connected ramp node , the Reflection Tonemap results in a linear black to white shaded style as seen in the right example below.
|
|
| Tonemap: With input Ramp | Tonemap: Without input (Default - Linear Black and White Ramp) |
The type of light you use has a major impact on how your tone mapping looks. In most situations point lights should be used with a Toon shader because they reliably reproduce your tone mapping as defined in the connected ramp. If area lights are used, the tonemap may become blurry and smooth. This is based on the size of the area light, large area lights will produce smooth tone mapping (even if the tonemap ramp is stepped) while small area lights produce sharp tone mapping. Point lights have the advantage of being able to reproduce sharp tone mapping.
In the examples below, note how the specular intensity of the light in the scene corresponds to the different parts of the ramps that can be seen at the bottom of each image. The dark parts of the specular reflections map to the left side of the ramp and the bright parts map to the right side of the ramp.

|
|
|
|
| Tonemap: Stepped Ramp | Colorful Tonemap Pattern | Colorful Ramp | Animated Ramp |
When bump mapping is used it distorts the tone mapping.

|

|

|
| Tonemap with Bump: Stepped Ramp | Colorful Tonemap Pattern | Colorful Ramp |
Tonemap Mode
The Reflection Tonemap Modes control how specular reflections behave in shadow, this includes self shadows and shadows from other objects.
By default, the Light and Opaque Shadow mode does not change how tone mapping is applied when in shadow. In this mode, a shadow is able to dim or even change the color of the tone mapping underneath (if is casting a colorful shadow) but all tone mapping transitions stay in the same place whether they are in or out of shadow. Lower opacity shadows make the underlying specular highlight brighter while more opaque shadows make it darker.
By comparison, the Light and Shadow mode actually changes how tone mapping is applied in shadows and adheres strictly to the colors used in the tonemap. In this mode, a shadow is able to shift the tone mapping underneath along the tonemap ramp — how far, and in which direction, this shift travels depends on the opacity of the shadow. Lower opacity shadows shift the tone mapping of the specular highlight into the brighter part of a ramp and make it larger. While more opaque shadows shift the tone mapping of the specular highlight further into the shadow part of the ramp and make it smaller.
When using the Stylized mode, specular reflections behave completely differently. Please see the Stylized section below, past the next two sets of example images.
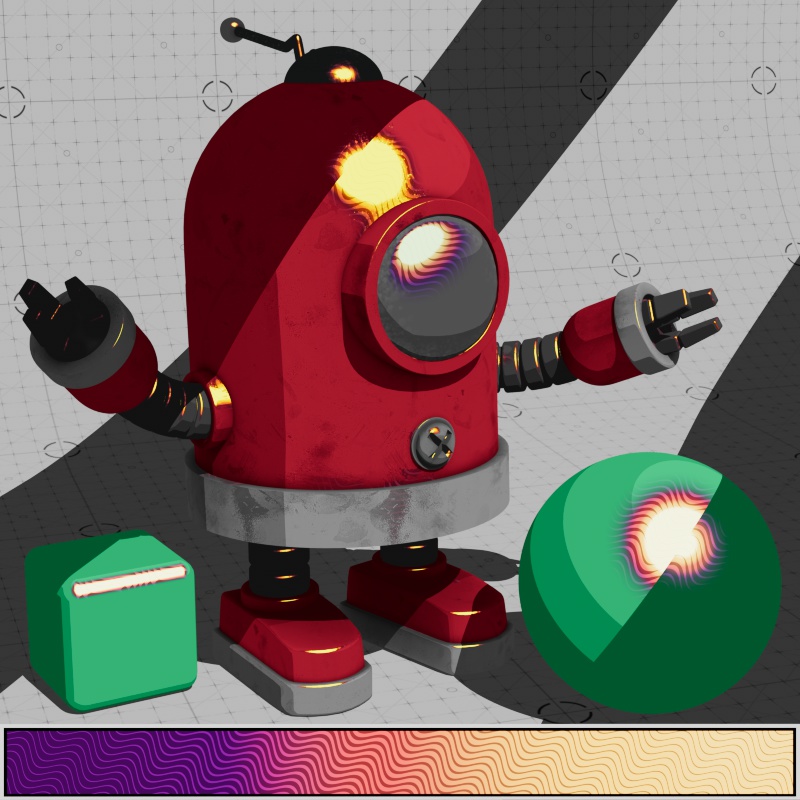
In the examples below, two fully opaque bars cast shadows on the objects below and the Toon shader's Reflection Shadow Opacity is adjusted to demonstrate the effect shadow transparency has on each mode, this setting can be found in the Toon shader's Advanced section. When Light and Shadow mode is used, note how the specular reflection shifts along the tonemap ramp and gets smaller when the shadows get darker and more opaque. However, when using Light and Opaque shadow, the specular highlights stay the same size and only the overall brightness changes.
| Light and Opaque Shadow |

|
|
|
| Light and Shadow |
|
|
|
| Tonemap Mode | Tonemap Input: Stepped Ramp Reflection Shadow Opacity: -1 to +1 |
Colorful Ramp 0.5 |
Colorful Ramp + Tonemap Pattern 0.5 |
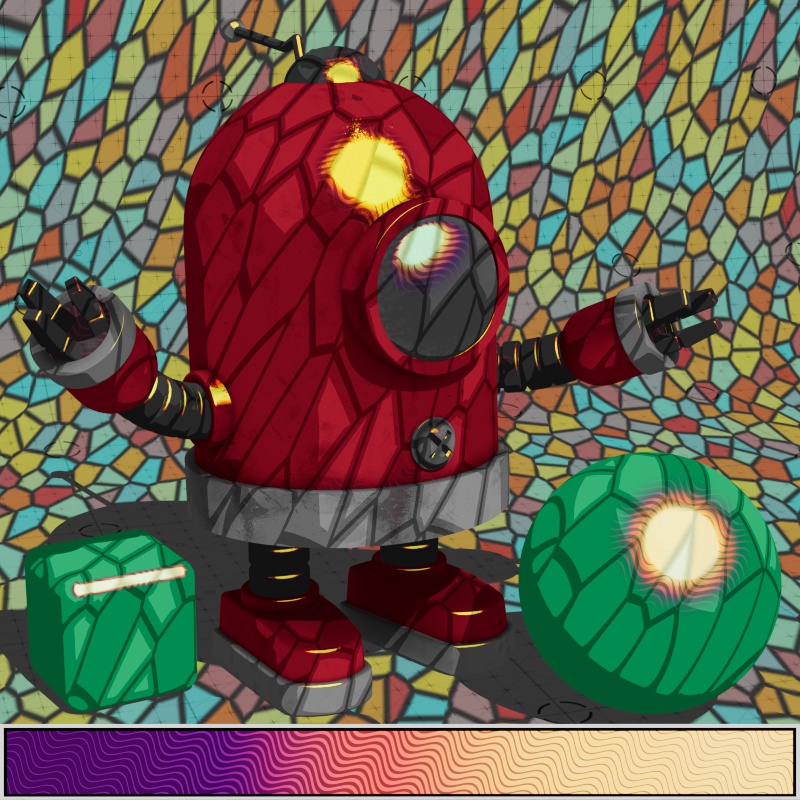
In the next example, a large transmissive plane casts a colorful stained glass window effect on the objects below. When using Light and Opaque Shadow the specular reflections are tinted by the stained glass effect, taking on their color and dimming as the shadows become more opaque. However, when Light and Shadow mode is used, the specular highlights shift and shrink at different rates depending on where the different parts of the stained glass effect land. For both modes, when Reflection Shadow Opacity is at +1, there is no visible specular reflection because the transmissive object is casting a completely opaque shadow.
| Light and Opaque Shadow |
|
|
|
| Light and Shadow |

|
|
|
| Tonemap Mode | Tonemap Input: Stepped Ramp Reflection Shadow Opacity: -1 to +1 |
Colorful Ramp 0.5 |
Colorful Ramp + Tonemap Pattern 0.5 |
When the Stylized mode is used, a texture connected to the Reflection Tonemap input is used to create a stylized specular highlight based on the position and intensity of selected lights.
At least one light must be added to the Light List or Stylized mode will not work.
| Stylized |
|
|
Light List
The Reflection Tonemap Mode must be set to Stylized to use this feature.
Area lights are not supported, only point, spot, and infinite lights are compatible with Stylized reflections.
Here, up to four lights can be added to the Light List to drive the placement and intensity of stylized reflection highlights, any excluded lights are ignored for this effect.
Rim
|
The Rim light effect is used to simulate backlighting from lights in the scene.
Rim lighting has the following requirements:
-
Only lights that are added to the Light List affect rim lighting. If no lights are added, Rim lighting is equivalent to a uniform fresnel effect.
-
Lights in the Light List must have a "Toon Rim" contribution greater than 0.
-
Area lights are not supported, only point, spot, and infinite lights are compatible with rim lighting.
Rim lights cannot cast lighting from the front, even if a light is positioned in front of the object the rim effect will only appear around the silhouette of the object.
Color
Controls the color of the rim lighting effect. Rim lighting does not cast shadows but it is dependent on the position of the lights selected to participate in the effect.
Rim Color is multiplied with the Rim Tonemap color.

|

|

|
| Rim Color: White | Yellow | Blue |
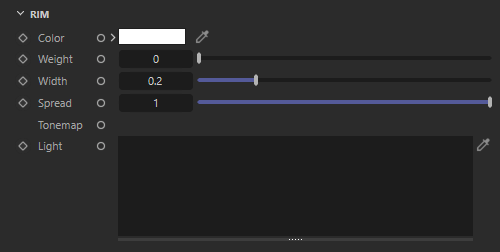
Weight
Controls the overall brightness of the rim lighting.
Light intensity influences the intensity of the rim lighting effect, if you don't see any rim lighting your selected lights might not be bright enough.
|
|

|
| Rim Weight: 0 | 0.5 | 1 |
Width
Controls the thickness of the rim lighting. This is similar to controlling the falloff of a fresnel shader.
| Rim Width: 0 - 1 |
Spread
Controls how focused the rim lighting is, low values shrink the spread of the rim effect around the incoming direction of rim lights. A value of 0 disables the rim lighting.
There are two rim lights in the example below, notice how at low values the rim effect is narrow and localized around the incoming light angle. By comparison, when this value is high the rim effect is spread out along the silhouette of an object and the effect from each light even overlaps .
| Rim Spread: 0 - 1 |
Softness
Controls how the rim light fades out to the terminator edge. Low values result in an abrupt transition while high values fade out gradually.
| Rim Softness: 0 - 1 |
Tonemap
The Rim Tonemap can be used to map a ramp along the width of the rim effect.
Rim Tonemap is not based on scene lighting the way Base Tonemap and Reflection Tonemap work.

|

|
|
| Rim Tonemap: Linear Ramp Rim Color: Yellow |
Stepped Ramp Yellow |
Colorful Ramp White |
Light List
Area lights are not supported, only point, spot, and infinite lights are compatible with Rim lighting.
Lights must have a "Toon Rim" contribution set to a value greater than 0 for the effect to take place.
Here, up to four lights can be added to the Light list to drive the angle of the rim lighting, any excluded lights are ignored for this effect.
If no lights are added, Rim lighting is equivalent to a uniform fresnel effect.
By default, when a light is included in the light list it will continue to impact diffuse, specular, and all other light contribution effects. If you only want rim lighting consider setting all contribution values to 0 except for "Toon Rim."

|

|

|
| Lights: Rim Light | Rim Light and Main Light | Main Light |
Emission

|
Color
Controls the color of emitted light.
For NPR styles, emission can be useful in ways that it isn't with traditional PBR workflows. Since cel shaded looks tend to have a flat look already, emission can be used as another way to add interesting flat looks to your shader.

|

|

|

|
| Emission Color: White | Same Texture as Base | Red | Textured |
Weight
Controls the intensity of the emitted light.

|
|
|
| Emission Weight: 0 | 0.5 | 1 |
By default the Toon shader does not receive global illumination, because Base Indirect Scale is set to 0, so it is important to be careful with emission as it will cast indirect illumination on objects that can receive GI.

|
|
| Global Illumination: Disabled Emission Weight: 3 |
Enabled 3 |
Geometry

|
Opacity
Controls the overall transparency of the material. Brighter colors are more opaque while darker colors are more transparent. White, by default, results in a fully opaque object.

|
|
| Opacity: Black to White | Textured |
Opacity Affects Emission
When enabled, any emissive effects are affected by opacity. For example, if you have a bright orange emissive texture but opacity is set to a low value, you will only get a dim orange result.
When disabled, emissive effects are not affected by opacity. In this mode, it is easier to separately control emission and opacity and bright emissive areas that stack on top of each other will be rendered additively. Disabling Opacity Affects Emission is a great way to render additive particle effects.

|

|
| Opacity Affects Emission: Enabled (Default) | Disabled |
Opacity Affects Reflection
When enabled, reflections are affected by opacity masking just like any other part of the material.
When disabled, reflections are not affected by opacity masking, instead reflections will remain untouched which can create the illusion of a transparent toon material.
In the example below a window is placed in the scene and the pane of glass has a toon shader applied with a completely black opacity. When Opacity Affects Reflection is enabled you can see entirely through the glass but there is no indication of any reflective surface. When it is disabled, you can still see through the glass but the toon reflection comes back and the opacity of the stylized reflection can be controlled with the reflection weight.

|

|

|

|
| Opacity Affects Reflection: Enabled (default) | Disabled | Enabled (default) | Disabled |
Opacity Affects Rim
When enabled, the rim light effect is affected by opacity masking just like any other part of the material.
When disabled, the rim light effect is not affected by opacity masking, instead rim shading will remain untouched which can create the illusion of a transparent toon material.

|

|
| Opacity Affects Rim: Enabled (default) | Disabled |
Bump Map
Connect a bump map node and texture here. Bump mapping affects all aspects of the Toon shading, including breaking up the transitions between cel shading in a tonemap ramp. Low bump intensities can go a very long way with toon shading.
Bump Mapping does not affect the edges of a cast shadow or the edge of a core shadow on object shading.

|

|
| Bump Map: With Input | Without Input (Default) |
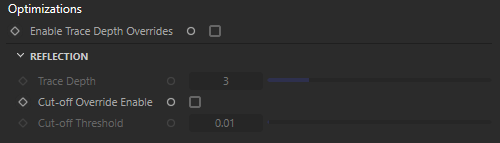
Optimizations
|
Enable Trace Depth Overrides
This enables the per-material Trace Depth parameters below. When disabled, global trace depths from the render settings are used.
Reflection
Trace Depth
This parameter controls the trace depth for reflection rays shot from this material. If the reflection rays of a material are not very defined (meaning they are blurry because of high roughness or have a low reflection weight), then multiple bounces can be a waste of rendering time. This parameter allows the user to reduce the trace depth and speed up rendering on a per-material basis.
Cut-off Override Enable
This parameter allows you to override the global cut-off setting for reflections.
Cut-off Threshold
When the reflections of a material are very dark (because of low "Weight" or "Color" values) they contribute very little to the final image. This parameter defines what is considered "very dark" at which point no more reflection rays will be shot — which will speed up rendering. Scenes containing very strong lights might need this parameter set to very low values such as 0.0001 in order to avoid early termination which can produce a grain-like effect.
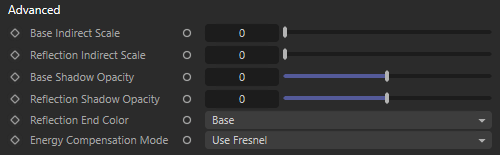
Advanced
|
Base Indirect Scale
Controls the weight of indirect illumination base rays, i.e. the effect of global illumination on the base shading of the Toon shader. By default, the Toon shader has indirect illumination disabled with a Base Indirect Scale of 0. This is frequently desirable so that toon shading remains flat, however, the Base Indirect Scale can be increased to enable the effects of global illumination.

|

|

|
| Base Indirect Scale: 0 | 0.5 | 1 |
Reflection Indirect Scale
Controls the weight of indirect reflection rays, i.e. reflections of other surfaces (including self reflections) — this does not include specular reflections, i.e. reflections of light objects. By default, the Toon shader has indirect reflection disabled with a Reflection Indirect Scale of 0. This is frequently desirable so that toon shading remains flat and looks less like a traditional PBR style, however, the Reflection Indirect Scale can be increased to enable this here.

|

|

|
| Reflection Indirect Scale: 0 | 0.5 | 1 |
Base Shadow Opacity
Offsets the transparency level of shadows that are cast on a tone mapped object. Note, the overall tone mapping behavior when in shadow is controlled by the Base Tonemapping Mode.
By default, using a value of 0, the shadow opacity is determined by each light's Shadow Transparency.
Values below 0 reduce the shadow opacity with -1 resulting in no cast shadows.
Values above 0 increase the shadow opacity with +1 forcing all shadows to their darkest tone mapped value.
In the examples below, two fully opaque bars cast a shadow on the objects below and the Toon shader's Base Shadow Opacity is adjusted to demonstrate the effect shadow transparency has on each Tonemap Mode. On the right side is what each Tonemap mode looks like at the default value — in a scenario with opaque shadows, note that both Tonemap modes look identical and only look different when the shadows become transparent. For more detailed information on the behavior of each mode, please see the Base Tonemap Mode section of the Toon shader.
| Light and Opaque Shadow |

|
|
| Light and Shadow |

|
|
| Tonemap Mode | Base Shadow Opacity: -1 -to +1 |
Base Shadow Opacity: 0 (Default) |
In the next example, a large transmissive plane casts a colorful stained glass window effect on the objects below. On the right side is what each Tonemap mode looks like at the default value — in a scenario with shadows cast from a transmissive object, note that the two modes look different from each other. The Light and Opaque Shadow mode takes on the color of the stained glass while the Light and Shadow mode does not.
| Light and Opaque Shadow |

|
|
| Light and Shadow |

|
|
| Tonemap Mode | Base Shadow Opacity: -1 -to +1 |
Base Shadow Opacity: 0 (Default) |
Reflection Shadow Opacity
Does not work with Stylized Tonemap Mode.
Controls the transparency level of shadows cast on the Specular Reflection layer of the Toon shader, including self shadows.
In the examples below, two fully opaque bars cast a shadow on the objects below and the Toon shader's Reflection Shadow Opacity is adjusted to demonstrate the effect shadow transparency has on each Tonemap Mode. On the right side is what each Tonemap mode looks like at the default value — in a scenario with opaque shadows, note that both Tonemap modes look identical and only look different when the shadows become transparent. For more detailed information on the behavior of each mode, please see the Base Tonemap Mode section of the Toon shader.
| Light and Opaque Shadow |

|
|
| Light and Shadow |

|
|
| Tonemap Mode | Reflection Shadow Opacity: -1 -to +1 |
Reflection Shadow Opacity: 0 (Default) |
In the next example, a large transmissive plane casts a colorful stained glass window effect on the objects below. On the right side is what each Tonemap mode looks like at the default value — in a scenario with shadows cast from a transmissive object, note that the two modes look different from each other. The Light and Opaque Shadow mode takes on the color of the stained glass while the Light and Shadow mode does not.
| Light and Opaque Shadow |

|
|
| Light and Shadow |

|
|
| Tonemap Mode | Reflection Shadow Opacity: -1 -to +1 |
Reflection Shadow Opacity: 0 (Default) |
Reflection End Color
This setting controls what is reflected when the Reflection Trace Depth is exceeded.
- Base: The final reflection color is taken from the base color of the toon shader.
- Environment: The final reflection is taken from an available environment shader (like a dome light) or will be black if there is no environment.
When trace depths are low or an object's shape creates many self reflections and this parameter can have an enormous difference on the final look. Increasing the reflection trace depths will fix this issue, resulting in more realistic dark reflections, but this comes at the expense of render times. Sometimes setting Reflection End Color to "Base" is enough to produce a very similar darkened result to increasing the trace depths but avoids increased render times.
Energy Compensation Mode
Controls how the reflection layer observes energy compensation from the following options:
- Use Fresnel: Layering is weighted by the albedo weight multiplied by fresnel. This matches other uber shaders like the Standard Material.
- No Fresnel: Reflection layer weight is based on the Reflection Weight. This can result in the reflection layer completely overpowering the rest of the shader at the default Reflection Weight of 1.
- None: No energy compensation is used, the base and reflection layers are added together.
Consider using the Reflection Tonemap Layer Mask feature for greater control over where and how the reflection layer is blended with the rest of the shader.

|

|

|
| Energy Compensation Mode: None | Use Fresnel | No Fresnel |
Semi-Transparency Rays Include Self
Controls if a an object is visible in itself through areas of semi-transparency. A semi-transparency area is anywhere a grey value appears in an opacity map. Opacity maps without semi-transparency, purely black and white maps, are unaffected by this option.
In the example below a tile shader is used for the opacity map with the grout and bevel width animated in order to demonstrate the effect. When the tile shader, pictured below on the right, has smooth transitions between white and black semi-transparency is involved and the effect can be seen. If disabled, instead of revealing the backside of the object through the semi-transparent sections it is completely skipped showing only the white background behind them.
However, when this parameter is enabled — or when the tile shader is only black and white with harsh edges — the opacity behaves as normal.
| Semi-Transparency Include Self: Enabled (default) |
Disabled | Tile Opacity Map for Reference |