The Preferences
This dialog offers various categories and basic settings for how Maxon Redshift for Archviz should behave. You will not usually need to change anything here, but you do of course have the option of customizing some controls, units, or help functions, for example.
Quick Navigation
Interface Preferences
In this settings group, you can customize the font sizes in the interface and display additional information such as keyboard shortcuts or tooltips.
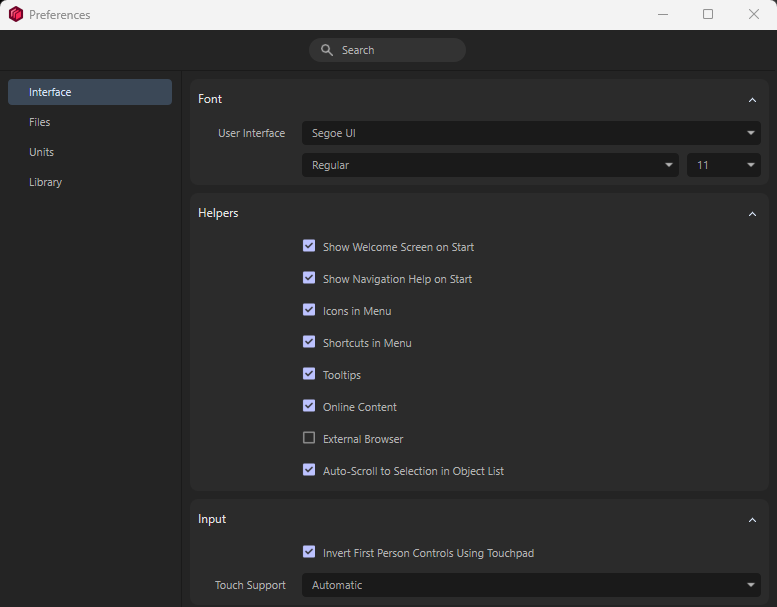
Font
If, for example, you want to improve the readability of the interface, you can select the desired font, font style, and font size here.
Helpers
This group mainly contains visual aids, e.g., for displaying assigned keyboard shortcuts in the menus or bubble help texts when hovering over icons with the mouse.
-
Show Welcome Screen on Start: This activates a welcome window when Maxon Redshift starts up, showing some typical workflows and tasks for processing scenes. This window can be easily closed at any time to start working. Disable this window here if you no longer want to see it when starting Redshift.
-
Show Navigation Help on Start: To help you get used to the navigation keyboard shortcuts when you first start using Maxon Redshift, a help box can be displayed automatically. Once you no longer need this reminder, you can turn off this option. In any case, the help box can also be called up manually at any time via the Redshift menu (Display Navigation Help).

-
Icons in Menu: Disable this option if you prefer a minimalist menu without additional icon displays.
-
Shortcuts in Menu: The keyboard shortcuts displayed next to the entries in the menu make it easier to learn the most common commands. If you don't need them and would prefer the menu to look tidier, you can also disable this option. Note: The keyboard shortcuts displayed in the tooltips when you move the mouse pointer over an icon are not affected by this option.
-
Tooltips: This activates additional descriptive texts and also displays the assigned keyboard shortcuts for functions when you move the mouse pointer over an icon.
-
Online Content: This option is not currently evaluated. This option refers to the Maxon Redshift help documentation and whether it should be accessed online via help.maxon.net or whether a downloaded version of the documentation should be opened instead. This feature is currently not supported. If necessary, access the Redshift help documentation via your web browser at https://help.maxon.net/r3d/.
-
External Browser: This option is not currently evaluated. It is only relevant for direct access to the help documentation via Maxon Redshift menu commands and defines whether your system browser or the browser window integrated in Maxon Redshift should open the help.
-
Auto-Scroll to Selection in Object List: This feature is quite useful because it makes it easier to find selected objects in the Object List. For example, if you have created a selection by clicking on an object with the Selection Tool, the Object List will automatically scroll to the corresponding position.
Input
This setting is designed to support state-of-the-art input devices such as touchpads, trackpads, mice with multi-wheel/touch/ball, touchscreens, etc. These can be used to control the navigation in Redshift with specific gestures (e.g., move, zoom, rotate). This setting may possibly only be available for Windows since MacOS works very dependably and must not be disabled.
Redshift evaluates a mouse scroll wheel differently in the Viewport than, for example, in the Objects List. In the Objects List you use the wheel to scroll and in the Viewport you use it to zoom - this is the behavior you're accustomed to.
Touch devices on the other hand use swipe movements to scroll and 2-finger movements (spread or pinch fingertips) to zoom. This is exactly how it should work when Automatic is enabled.
If this does not work on Windows - for example, if the mouse scroll wheel moves the view instead of zooming - you can enable one of the following options:
Scroll Wheel: The mouse scroll wheel will zoom in the view (however, a touch swiping motion can also be interpreted as a zoom)
Touch Devices: The touch devices will work as expected with their respective gestures (however, the mouse scroll wheel will then also move the view instead of zooming - but here the Ctrl/Cmd key can be pressed simultaneously to zoom).
If you are used to working with inverted directions when using the touchpad, activate the option Invert First Person Controls Using Touchpad if necessary.
File Preferences
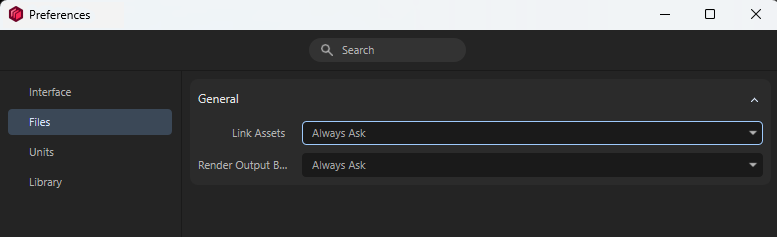
These settings mainly deal with how images and videos are loaded or saved. For example, images and HDRIs can be loaded to display an environment, or images and videos can be saved as the results of the rendering.
-
Link Assets: Whenever external data, such as an image file, is loaded, this default setting is taken into account:
-
Copy to Project: Each file that is loaded is automatically saved in the current project directory. This ensures that the project can be archived more easily later on and that necessary data cannot be lost so easily. The disadvantage is that, for example, the loaded image is duplicated. The original file remains in place and an additional copy is created in the project directory.
-
Absolute Path: The referenced file remains in its original location and only its absolute file path is saved. The advantage of this is that no additional copy of the file is created. However, a disadvantage may be that if this file is deleted, renamed, or moved to another directory, it can no longer be found and may cause an error in your project.
-
Always Ask: This is the default setting. Each time you load an image file, for example, a dialog box appears in which you can choose between using an absolute path or copying the file to the project directory.
-
Render Output Behavior: This setting only affects the rendering and saving of images and videos:
-
Always Ask: If, when starting the rendering process, it is determined that files with the same name already exist in the specified storage path, a dialog box appears allowing you to specify how to proceed. This is the default setting.
-
Overwrite existing files: If images or videos with identical names already exist in the specified directory, they will simply be replaced by the newer renderings without warning.
-
Never overwrite (render without saving): Images that already exist with the same name are not saved again and are retained even when rendered again.
-
Skip existing files (render only missing files): If files with the same name already exist, they will not be rendered or saved again.
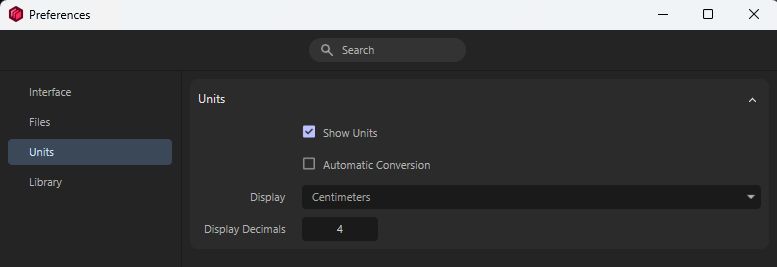
Units Preferences
Units are used in various places in Maxon Redshift, but primarily to specify the precise positions of objects, for example. The units are based on real-world dimensions and can even be converted automatically when simple mathematical calculations are used within input fields.
-
Show Units: Units at position coordinates and angles can be shown or hidden as desired.

-
Automatic Conversion: When this option is enabled, each display field can decide on the appropriate unit for values in order to limit the use of decimal places. For example, the value 0.0001 cm can then become 1 µm, as shown in the following figure. When this option is disabled, all value fields must always use the specified unit type (see Display setting). This can lead to visual rounding when displaying very small values. Values may then be displayed differently than their actual amount, as the specified maximum number of Display Decimals is no longer sufficient.

-
Display: Select your preferred unit to use within Maxon Redshift here. Existing values are automatically converted accordingly. You can change this unit at any time without altering the scene.
-
Display Decimals: Here you can specify the maximum number of decimals displayed in the value input fields. If you find that you regularly have to enter or read values with many decimals, changing the Display unit may help. If you regularly use very large and very small values at the same time, the Automatic Conversion option can also help, as it allows the unit used to be adjusted automatically when, for example, very small values need to be displayed.
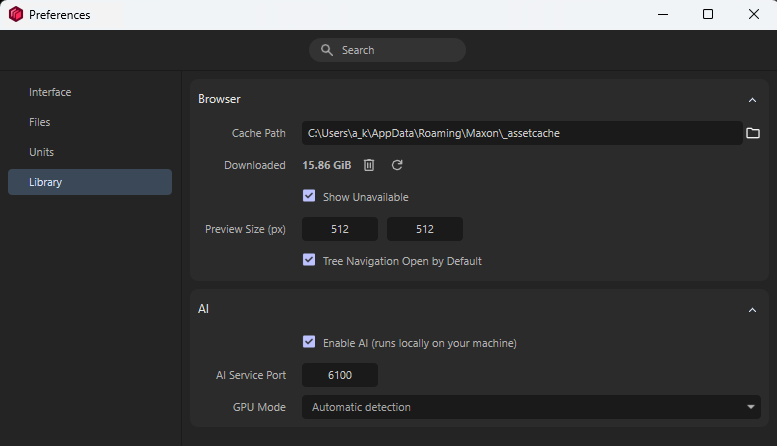
Library Preferences
This section focuses solely on the Library Browser. That library offers a wide range of ready-made assets that can be downloaded directly and used in your projects. AI-supported search queries can also be used to find suitable assets even more accurately. You can find out everything you need to know on the Library Browser page.
Browser
-
The Cache Path specifies the directory where all assets loaded from the cloud via the Library Browser are automatically stored. The storage value displayed in Downloaded gives you an overview of how much space is occupied by the downloaded assets at any given time. If you want to free up this storage space again, e.g. after completing a project, simply click on the Trash Can icon. Since all assets can be downloaded to your computer again at any time via the cloud, this is a good option for freeing up storage space that is no longer needed.
Click on the Refresh button to update the Downloaded storage space display - in case you have deleted or downloaded Assets in the meantime. -
There are Assets that may not correspond to your purchased license. These are normally hidden, but by activating Show Unavailable they can still be displayed in the Library Browser.
-
With Preview Size (px) you can define the size with which the previews of the assets in the Library Browser are saved internally. This is the maximum size that can be displayed in the preview if it is enlarged accordingly. Please note that the physical size of the internal database will quickly swell considerably if you define values that are too large here.
-
When the Tree Navigation is activated, an overview of other asset directories is displayed alongside the preview images and names of the assets. This makes it easier to navigate and switch between different asset groups. However, you can also switch between the tree view display and the rich display of assets directly in the Library Browser, as explained here.
AI
A search function is also available within the Library Browser. If AI gets activated for this search, assets can be found even more easily using search terms. You will find examples of this in the section on the Library Browser. AI processing takes place entirely locally on your hardware.
-
Enable AI: If you want to use the AI search in the Library Browser, this option must be activated. If it is deactivated, the background process mentioned below will NOT run. The AI search then cannot work in the Library Browser. The AI search runs in a background process called MXAI ImageSense Service. This background process is started or ended with this option. If Enable AI is activated, it is started when Maxon Redshift is started and ended when it is closed. The process requires memory, both PC memory and GPU memory, and can therefore be switched off here.
AI Search can also include the appearance of assets in the search. This allows you to search for and find red textures, for example, even though "red" is not included as a term or keyword in the description or name of the asset. -
AI Service Port: The AI search service just mentioned communicates with Redshift under this port. You do not normally need to change anything here unless you are running other applications with this port.
-
GPU Mode: The AI search normally decides for itself whether to use the graphics card or CPU (Automatic detection option). Whenever possible, it will prefer the graphics card, as this is approximately 10 times faster than the CPU. If there are problems with this setting, you can activate the graphics card (Force On) or the CPU (Force Off) for the AI computation here.